Cloud Agent Installation Steps
The following are the installation steps to install Qualys Cloud Agent on the AWS Bottlerocket container host.
- Download the Qualys Cloud Agent installer (tar.xz) for the AWS Bottlerocket container host from Qualys Cloud Platform. To learn more about downloading Cloud Agent, refer to Download Cloud Agent Installer.
- Extract the downloaded Qualys Cloud Agent file on your jump host, using the following command:
tar -xvf <qualys-cloud-agent-installer>
For example,
tar -xvf QualysCloudAgent.tar.xz - Load the extracted Cloud Agent image to the jump host using the following command.
docker load -i <qualys-cloud-agent-image>
For example,
docker load -i QualysCloudAgent.tar - Log in to the ECR repository using the following command.
aws ecr get-login-password --region <region> docker login --username AWS --password-stdin <ECR repository url>
For example,
aws ecr get-login-password --region us-east-1 | docker login --username AWS --password-stdin 123456789012.dkr.ecr.us-east-1.amazonaws.com - Tag the extracted Qualys Cloud Agent image to the ECR repository using the following command.
docker tag <Image Name/ID>: <Tag Name> <ECR repository url>/<repo name>: <Tag Name>
For example,
docker tag qualys/linux-cloud-agent:1.2.123-4 123456789012.dkr.ecr.us-east-1.amazonaws.com/<local repo>:1.2.123-4 - Push the Cloud Agent image to ECR repository using the following command.
docker push <ECR repository url> <repo name>: <Tag Name>
For example,
docker push 123456789012.dkr.ecr.us-east-1.amazonaws.com/<local repo>:1.2.123-4 - Open the
.ymlfile in the jump host and update it with the following parameters:Parameters Description activation-id
activation-id for the Qualys Cloud Agent for AWS Bottlerocket container host, auto-generated based on your subscription.
customer-id
The customer-id of your Qualys subscription is auto-generated based on your subscription.
server-uri
https://qagpublic.qg1.apps.qualys.com/CloudAgentThis server-uri is associated with the activation key for your Cloud Agent installer.
provider-name
The value for this parameter can be AWS, AZURE, GCP, IBM, ALIBABA, ORACLE, NONE or AUTO. If you provide ‘NONE’ value, the host does not check for the provider. If you provide ‘AUTO’ value, the host auto checks the provider.
log-level
Configuration to set the logging level for Qualys Cloud Agent for Linux AWS Bottlerocket. The default value for this parameter is 3. You can set the log level value up to 5.
image
The path for your Qualys Cloud Agent image on the ECR repository.
Proxy (Optional)
IPv4 address or FQDN of the proxy server.
CPU (Optional)
CPU usage limit in percentage for Cloud Agent. A valid range is 0-100 and the default value is 0.2.
Sample
.ymlConfiguration
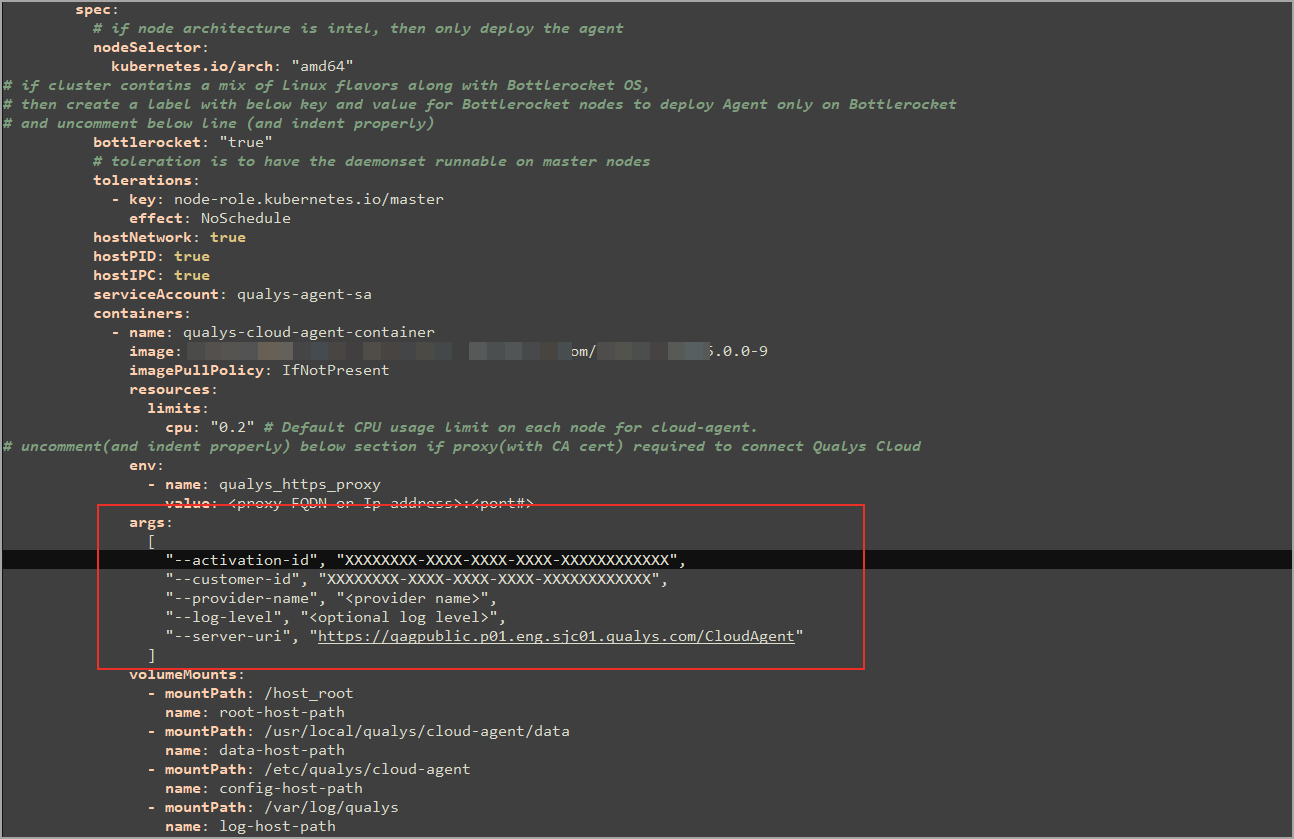
The field indentation/alignment in the .yml file is very important. Ensure that you follow the formatting provided in the template.
-
Deploy the updated
.ymlfile using the following command to install the Qualys Cloud Agent on the AWS Bottlerocket container host.kubectl apply -f qualys-cloud-agent-deploy.yml -
Verify the container running under the qualys namespace using the following command:
kubectl get all -n qualys-agent -o wideThe Cloud Agent running status is displayed on the screen.

When the Cloud Agent instance is started, it activates the Qualys Cloud Agent, which provisions itself and starts functioning as expected.
Post-Installation Steps
Once installed, the Cloud Agent connects to the Qualys Cloud Platform and provisions itself. You can see your first asset discovery results within a few minutes after installation. The first assessment scan in the Qualys Cloud Platform takes some time; after that, scans are completed as soon as new host metadata is uploaded to the Qualys Cloud Platform.