On Demand Scan
With this functionality, you can launch the immediate scan on the agent host if the agent host is not performing any scan on the same application. The On Demand Scan runs independently of the scheduled scans that you configure in the Configuration Profile and resets the scan interval on the agent after a successful scan.
Prerequisite for On Demand Scan
Your Cloud Agent must be activated for the application for which you want to launch the On Demand Scan. When activated, the Agent downloads manifests for that application from the Qualys Cloud Platform. If the manifest for the application is not available, then Cloud Agent does not launch the scan.
Use the cloudagentctl.sh script to run the On Demand Scan. This script file is available at /usr/local/qualys/cloud-agent/bin/.
The following are the steps to launch the On Demand Scan:
- Get the list of instances running on the AWS Bottlerocket container host:
kubectl get all -n qualys-agent -o wide - Log in to the AWS Bottlerocket container host and run the following command:
kubectl exec -it qualys-cloud-agent-<instance id> -n qualys-agent -- /bin/bash - Run the following command to start the On Demand scan:
/usr/local/qualys/cloud-agent/bin/cloudagentctl.sh action=demand type=inv cputhrottle={0-1000}
Where the action and type are mandatory parameters.
- action is demand, meaning an On Demand Scan.
- type is the application for which you want to run the scan (Before you launch the scan, ensure that Cloud Agent is activated for the respective application).
- cputhrottle is the amount of CPU used for Cloud Agent execution. The higher the CPU throttle value less CPU is used at the expense of higher execution time. The range for CPU throttle is 0-1000. The default value is set at 0, which means no throttling.
For example, to initiate an On Demand Scan for the Vulnerability Management application (VM) with no throttling:
/usr/local/qualys/cloud-agent/bin/cloudagentctl.sh action=demand type=vm cputhrottle=0
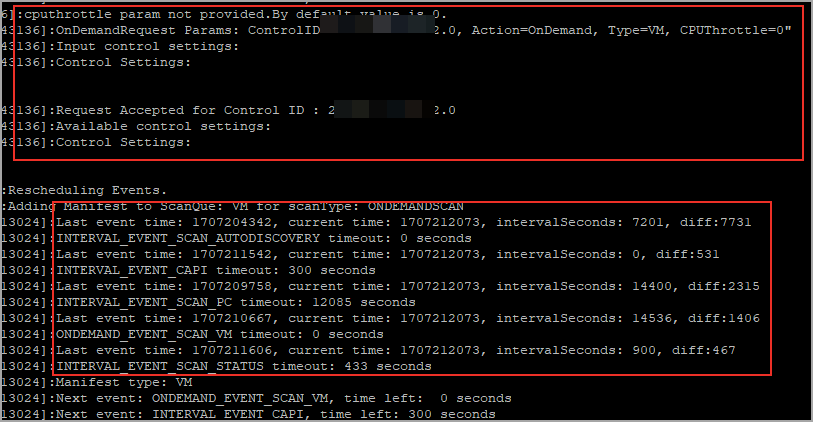
The script calls the agent to run asynchronously in the background and returns to the shell prompt. The script prints a ControlId that you can track in the log file. The ControlId is the timestamp of the script initiation. For example, On-Demand-Request ControlId: 20240228164415.0.
The scan logs for the On Demand Scans and Interval Scans are stored at the same location. /var/log/qualys/qualys-cloud-agent.log
You can find the On-Demand Scan information in the following log file.
If the agent is currently performing an interval scan for the same application, the On Demand Scan waits for the currently running scan to finish. The script prints a log line with the following status.
2024-02-28 15:11:36.474 [qualys-cloud-agent][9710]:[Information]:[123456789123456]:Interval Event of same type is in progress with state INTERVAL_EVENT_SCAN
2024-02-28 15:11:36.474 [qualys-cloud-agent][9710]:[Information]:[123456789123456]:OnDemand request for Control ID: 20240427151136.0 will be delayed.
If the script shows an error message that a manifest file is not present, check whether the Cloud Agent is activated for that particular application. If the agent is activated but you still get manifest-related errors, the Cloud Agent may not have downloaded the manifest for that application. You can manually force a manifest download by deactivating and then reactivating the agent for that application from the Cloud Agent user interface. If that does not resolve the issue, contact Qualys Support.
Once an On Demand Scan is completed, the results are logged in the log file located at: /var/log/qualys/qualys-cloud-agent.log.