Cloud Agent Installation Steps
The following are the installation steps for Qualys Cloud Agent for Red Hat Enterprise Linux CoreOS in Red Hat OpenShift (.tar.xz).
Prerequisites for Cloud Agent Installation
Your host assets must meet the following prerequisites for a successful Cloud Agent installation:
- OpenShift Cluster with versions 4.x
- Cluster configured with Registry for Master and Worker Nodes
Method 1: For Registry Support
- Download the Qualys Cloud Agent for Red Hat Enterprise Linux CoreOS in the Red Hat OpenShift Container image (.tar file) from the Qualys Cloud Platform.
- After downloading the file, untar the Qualys Cloud agent package using this command:
sudo tar -xvf QualysCloudAgent.tar.xz - Perform the following steps to load the images in different environments:
a-1. To load the images in the Docker Runtime environment: Push the Qualys Cloud Agent image to a repository common to all nodes in the Kubernetes cluster using following commands:
sudo docker load -i QualysCloudAgent.tar

	sudo docker tag <IMAGE NAME/ID> <URL to push image to the repository>

	sudo docker push <URL to push image to the repository>
For example:
sudo docker load -i QualysCloudAgent.tar

	sudo docker tag c3fa63a818df mycloudregistry.com/linux-cloud-agent:3.5.0.20

	sudo docker push mycloudregistry.com/linux-cloud-agent:3.5.0.20
Do not use these examples as is. Replace the registry/image path with your own.
a-2. To load the images in the Container Runtime environment: Push the Qualys Cloud Agent image to a repository common to all nodes in the Kubernetes cluster using these commands:
ctr -n=k8s.io images import QualysCloudAgent.tar

	ctr images tag <IMAGE NAME/ID> <URL to push image to the repository>

	ctr images push <URL to push image to the repository>
For example:
ctr -n=k8s.io images import QualysCloudAgent.tar

	ctr images tag c3fa63a818df mycloudregistry.com/linux-cloud-agent:3.5.0.20

	ctr images push mycloudregistry.com/linux-cloud-agent:3.5.0.20
Do not use these examples as is. Replace the registry/image path with your own.
a-3 To load the images in OpenShift CRI-O Runtime environment: Push the Qualys Cloud Agent image to a repository common to all nodes in the OpenShift cluster using these commands:
podman load -i QualysCloudAgent.tar

	podman tag <IMAGE NAME/ID> <URL to push image to the repository>

	podman push <URL to push image to the repository>
For example:
podman load -i QualysCloudAgent.tar

	podman tag c3fa63a818df mycloudregistry.com/linux-cloud-agent:3.5.0.20

	podman push mycloudregistry.com/linux-cloud-agent:3.5.0.20
Do not use these examples as is. Replace the registry/image path with your own.
b. Modify parameters in thelxa-openshift-crio-ds.ymlfile for your registry path <registry path>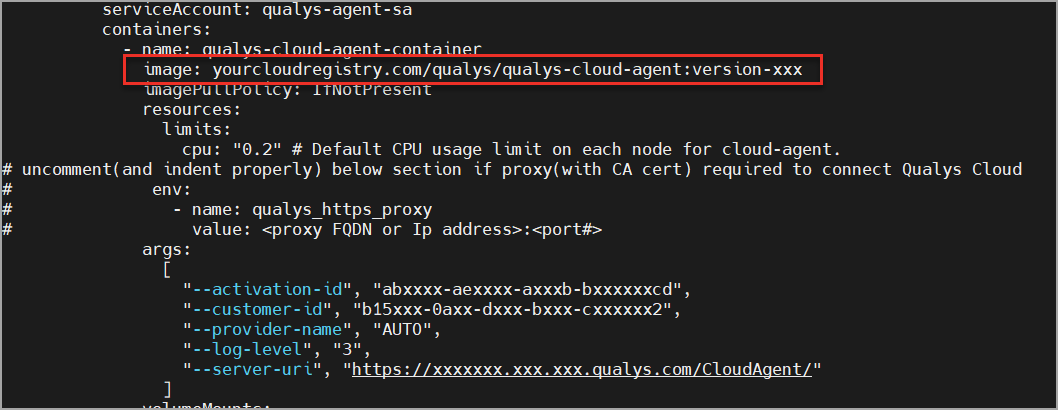
The field alignment in the
.ymlfile is very important. Ensure that you follow the formatting provided in the template. - Configure the following parameters in YML:
Parameter Description image (Optional) path of the image (localhost path or shared repository path). By default, it is a local directory. cpu (Optional) CPU usage limit in percentage for Cloud Agent. A valid range is 0-100 and the default value is 0.2 proxy IPv4 address or FQDN of the proxy server activation-id Activation Id for the Qualys Cloud Agent for Red Hat Enterprise Linux CoreOS in Red Hat OpenShift, auto-generated based on your subscription. customer-id Qualys subscription’s customerId, auto-generated based on your subscription. provider-name The value for this parameter can be AWS, AZURE, GCP, IBM, ALIBABA, ORACLE, NONE or AUTO. If you provide ‘NONE’ value, it does check for provider name. If you provide ‘AUTO’ value, it will auto check the provider. log-level Configuration to set the logging level for Qualys Cloud Agent for Red Hat Enterprise Linux CoreOS in Red Hat OpenShift. Valid values are to 5 and the default is 3.
Sample YML Configurations:
If CPU set to more than 0.5 or 0.7 using YML file, agent won’t be installed on all nodes in the cluster.
- Once you modify the
lxa-openshift-crio-ds.ymlfile, run the following command on OpenShift master to create a DaemonSet:
# oc apply -f lxa-openshift-crio-ds.yml - Verify the container running under qualys namespace using the following command:
$oc get pods -n qualys-agent

	NAME READY STATUS RESTARTS AGE

	qualys-cloud-agent-4lcnb 1/1 Running 0 42m

	qualys-cloud-agent-4nxjr 0/1 Running 0 42m

	qualys-cloud-agent-bdhh9 1/1 Running 0 42m

	qualys-cloud-agent-grcm7 0/1 Running 0 42m

	qualys-cloud-agent-hw959 0/1 Running0 42m

	qualys-cloud-agent-krxjc 0/1 Running 0 42m
Method 2
- Download the Qualys Cloud Agent for Red Hat Enterprise Linux CoreOS in the Red Hat OpenShift Container image tar file from the Qualys Cloud Platform.
- Upload the downloaded Qualys Cloud Agent for Red Hat Enterprise Linux CoreOS in the Red Hat OpenShift Container image tar in one of the locations below, where we can access the OpenShift cluster via OpenShift nodes login.
a. Into a private repository
b. into the master or worker nodes, that is, the nodes, where you want the Cloud Agent to run.
Untar package file (for example, package_name in the commands) file and load on the master or worker node using the following commands:
# tar -xJf <package_name.tar.xz>

	# sudo podman load -i <package_name.tar>
The command above is applicable only when the option b is followed.
- Verify that the following files are present:
- lxa-openshift-crio-ds.yml

	- version-info

	- image-id

	- qualys-cloud-agent-md5

	- qualys-cloud-agent-sha

- qualys-cloud-agent.tar - Configure the following parameters in YML:
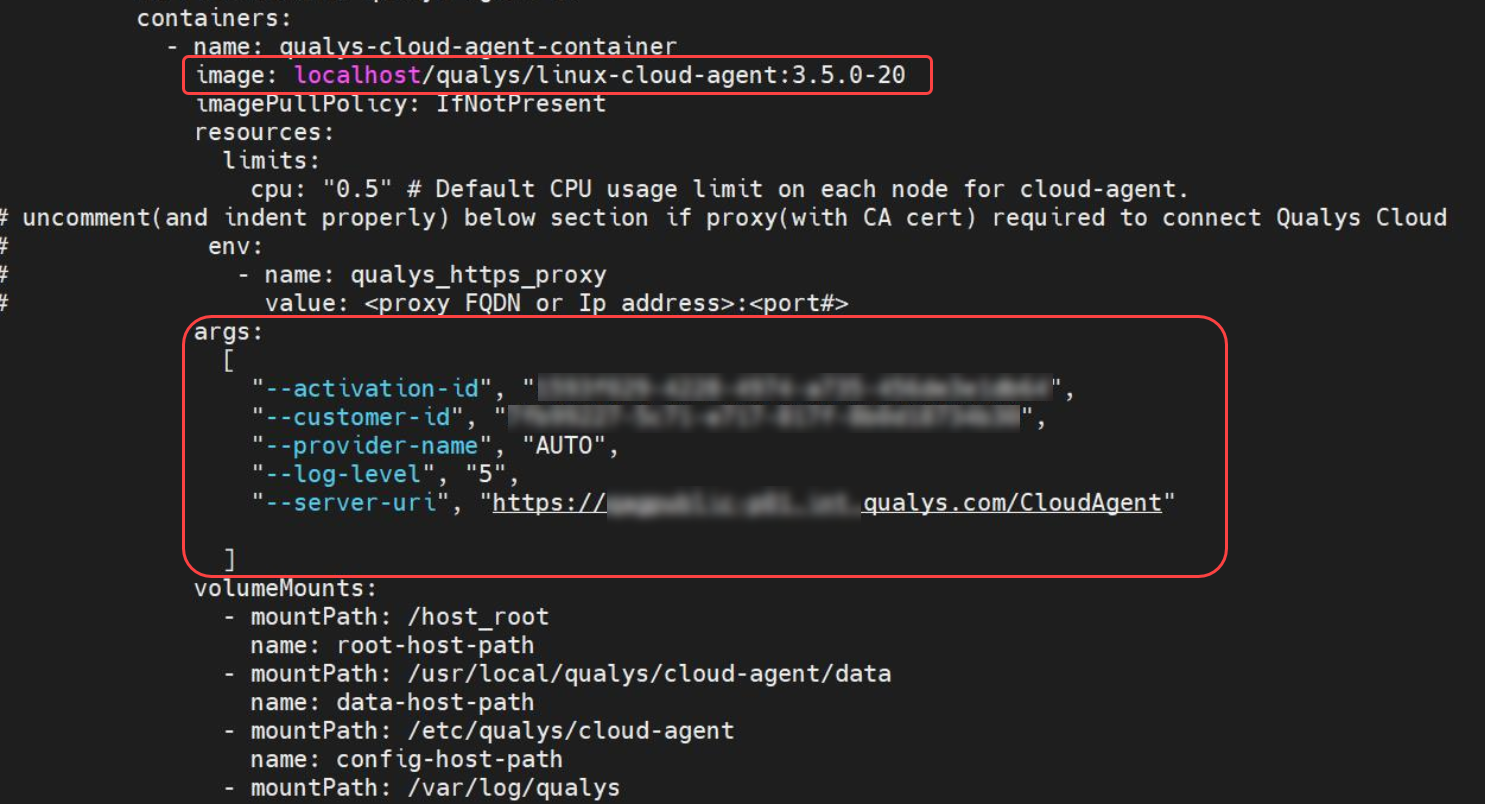
Parameter Description image (Optional) path of the image (localhost path or shared repository path). By default, it is a local directory. cpu (Optional) CPU usage limit in percentage for Cloud Agent. A valid range is 0-100 and the default value is 0.2 proxy IPv4 address or FQDN of the proxy server activation-id Activation Id for the Qualys Cloud Agent for Red Hat Enterprise Linux CoreOS in Red Hat OpenShift, auto-generated based on your subscription. customer-id Qualys subscription’s customerId, auto-generated based on your subscription. provider-name The value for this parameter can be AWS, AZURE, GCP, IBM, ALIBABA, ORACLE, NONE or AUTO. If you provide ‘NONE’ value, it does check for provider name. If you provide ‘AUTO’ value, it will auto check the provider. log-level Configuration to set the logging level for Qualys Cloud Agent for Red Hat Enterprise Linux CoreOS in Red Hat OpenShift. Valid values are to 5 and the default is 3.
Sample YML Configurations:
If the CPU is set to more than 0.5 or 0.7 using the YML file, the agent won’t be installed on all nodes in the cluster.
- Once you have modified the
lxa-openshift-crio-ds.ymlfile, run the following command on OpenShift master to create a DaemonSet:
# oc apply -f lxa-openshift-crio-ds.yml - Verify the container running under the qualys namespace using the following command:
$oc get pods -n qualys-agent

	NAME READY STATUS RESTARTS AGE

	qualys-cloud-agent-4lcnb 1/1 Running 0 42m

	qualys-cloud-agent-4nxjr 0/1 Running 0 42m

	qualys-cloud-agent-bdhh9 1/1 Running 0 42m

	qualys-cloud-agent-grcm7 0/1 Running 0 42m

	qualys-cloud-agent-hw959 0/1 Running0 42m

qualys-cloud-agent-krxjc 0/1 Running 0 42m - When the instance is started, it will activate the Qualys Cloud Agent, which will provision itself and continue functioning as expected.