Create GCP Organization Connector
GCP Organizations is an account management service allowing you to consolidate multiple GCP accounts into an organization you create and centrally manage. As an administrator of an organization, you can create accounts in your organization and invite existing accounts to join the organization. Qualys lets you set up an Organization connector and attach it to project connectors in minutes.
Prerequisites
- Navigate to the Google Cloud Platform (GCP) console.
- Select the organization.
- Select a project or create a new project. Ensure that you select the correct project.
- In the left sidebar, navigate to APIs and Services > Library.
- In the API library, click the following APIs and enable them. If you need help finding the API, use the search field.
- Compute Engine API
- Cloud Resource Manager API
- Kubernetes Engine API
- Cloud SQL Admin API
- BigQuery API
- Cloud Functions API
- Cloud DNS API
- Cloud Key Management Service (KMS) API
- Cloud Logging API
- Stackdriver Monitoring API
- Login to the GCP console and select an Organization.
- Select a project or create a new project. Ensure you have selected the correct project.
- From the left sidebar, navigate to IAM & admin > Service accounts and click CREATE SERVICE ACCOUNT.
- Provide a service account id, name (optional), and description (optional) for the service account, and click CREATE.
- Next, navigate to IAM & Services > IAM and click ADD.
- Enter your service account in New Principal.
- Add the following roles in the Role field and click SAVE.
- Resource Manager -> Organization Viewer
- Resource Manager -> Folder Viewer
- IAM -> Security Reviewer
- Select the newly created service account.
- Click Actions > Manage Keys > Add Key > Create a new Key. Select JSON as the key type and click Create (A message saying "Private key saved to your computer" is displayed, and the JSON file is downloaded to your computer).
Upload the configuration (JSON) file to complete GCP connector creation in Qualys Cloud Platform.
If you want to use the same service account for setting up connectors for additional projects, you can assign service account as a member in IAM at the organization level or at the project level.
Let us view the steps for the same.
Assign Service Account in IAM at project levelAssign Service Account in IAM at project level
(1) Login to Google Cloud Platform (GCP) console.
(2) From the left navigation bar, select IAM & admin.
(3) Select the project from the drop-down menu in the top-left corner.
(4) In the IAM menu bar, click +ADD.
(5) In the New Members box, type the name of the service account and click the suggested value.
(6) In the Select a role drop-down box, select the appropriate role. Choose Viewer role and Security Reviewer role to assign at least reader permissions to the service account.
(7) Click Save.
(8) To add additional projects, repeat steps 3 through 7.
Assign Service Account in IAM at organization levelAssign Service Account in IAM at organization level
(1) Login to Google Cloud Platform (GCP) console.
(2) In the left navigation bar, select IAM & admin.
(3) Select your organization from the drop-down menu in the top-left corner.
(4) In the IAM menu bar, click +ADD.
(5) In the New Members box, type the name of the service account and click the suggested value.
(6) In the Select a role drop-down box, select the appropriate role. Choose Viewer role and Security Reviewer role to assign at least reader permissions to the service account.
(7) Click Save.
Create GCP Organization Connector
Go to the Connectors tab, click Google Cloud Platform Connectors, click Organization and then click Create Connector and our wizard can walk you through the steps.
Step 1: Basic DetailsBasic Details
Enter a name and description (optional) for your connector.
Select applications that are applicable for the connector. GCP connector can only be created in TotalCloud application.
Select Enable Remediation to enable remediation on the connector. You need to configure additional permissions before you enable remediation for GCP connectors.
Ensure that you have write access to the Google Cloud Platform project for which you enable remediation. Refer to Configuring Remediation for GCP .
Step 2: Organization DetailsOrganization Details
Polling Frequency
Select a frequency at which the connector should poll the cloud provider and fetch data. The designated interval for the Org connector determines when it scans for new or deleted accounts. Choose any period under 24 hours as the interval to run the scan.
By default, the connector polling frequency is configured for every 4 hours. As a result, the connector connects with the cloud provider every 4 hours to fetch the data.
Authentication Details
- Project ID: Enter your project ID.
You can provide a distinct project ID for a GCP connector. You can use same service account for multiple projects. As a result, you can create multiple GCP connectors with same service account but distinct project IDs.
For detailed steps on using the same service account for multiple projects, see Assigning Service Account for Multiple Projects.
- Configuration File: Create a service account and download the configuration file from the GCP console and then upload it to Qualys Cloud Platform.
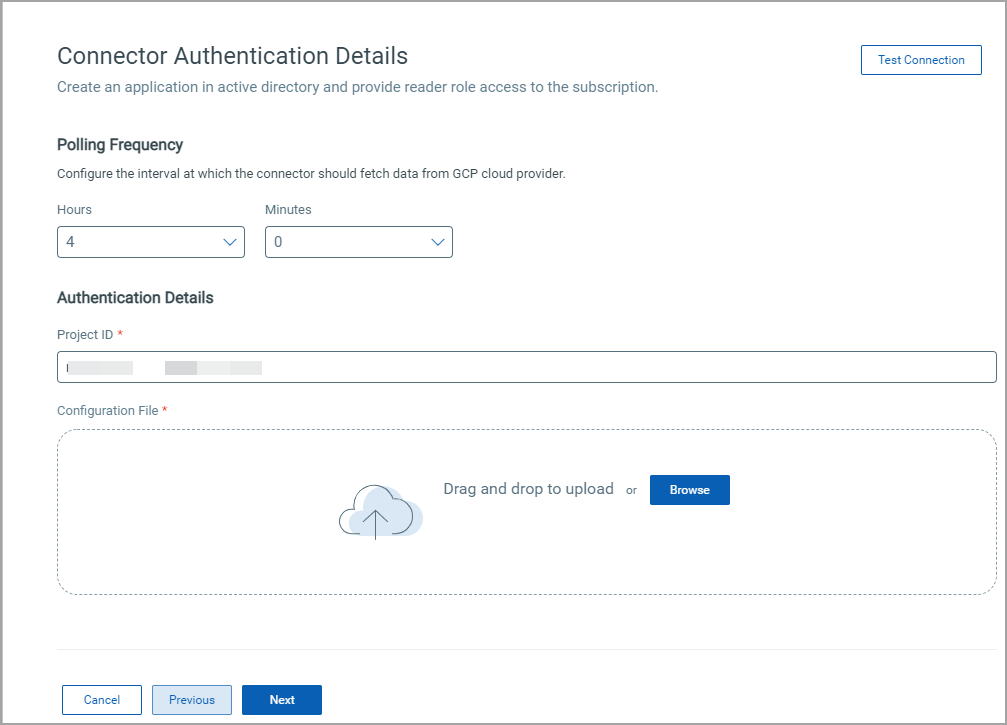
Ensure that you have uploaded the configuration file with correct project details for the connector to successfully fetch resource details.
Test Connection
Click Test Connection to verify if the connector can successfully authenticate using the provided service account credentials in GCP cloud environment. If the test connection is successful, proceed with the connector creation process. If the test connection fails, you may need to check and update the authentication details (configuration file) you uploaded for the connection to work.
Step 3: Project DetailsProject Details
Polling Frequency
Select a frequency at which the org connector should poll the cloud provider and fetch data. The designated interval for the project connector determine when the connectors will be run. Choose any period under 24 hours as the interval to run the scan.
By default, the connector polling frequency is configured for every 4 hours. As a result, the connector connects with the cloud provider every 4 hours to fetch the data.
Connector Name Pattern
Enter the prefix that is added to the project account connector. This prefix shows which organization the member account connector is connected to.
Step 4: Connector DetailsConnector Details
Configure the organization connector. Here, you can select the Folders where project connectors are created for the accounts present under it. Select all GCP Folders, select specific Folders or exclude Folders.
All- Project connectors will be created for all the accounts under all the Folders.
Select OUs- Project connectors will be created for all the accounts under the selected Folders.
Exclude OUs- Project connectors will not be created for the accounts present under the excluded Folders.
The connector details for GCP Organization connectors also allows you to:
1) Automatically create connectors for new projects by selecting the 'Automatically create connectors for new projects' checkbox.
2) Automatically disable connectors for the projects you delete by selecting 'Disable connectors for deleted projects' checkbox. 
The connector will automatically scan for these changes during the polling frequency interval.
Step 5: Assign TagsAssign Tags
Assign tags to the connector that you are creating. You can also create a new tag. For details on creating new tags, see Configure Tags in Qualys CyberSecurity Asset Management documentation.
Step 6: ConfirmationConfirmation
Review the connector settings you configured and then click Create Connector.
That’s it! The connector establishes a connection with GCP to discover resources from each region.
Any changes made to the GCP account will only reflect on the connectors after manually running it or waiting for the auto-run to sync the changes.
The Google Cloud Platform page displays the list of GCP connectors. The Status column indicates the status of the connector created: Completed successfully, Completed with errors, Queued, Synchronizing, and Disabled.
Related Topics
Edit GCP Organization connector
Disable GCP Organization connector