Armis Centrix Connector
Armis Centrix is a cyber exposure management platform that delivers real-time visibility, risk assessment, and proactive protection of an organization's entire digital attack surface. Powered by an AI-driven Asset Intelligence Engine, it continuously discovers, monitors, and secures every asset across complex environments, spanning IT, OT, IoT, and IoMT devices.
Through automated risk scoring, vulnerability detection, and dynamic network segmentation, Armis Centrix helps organizations minimize cyber risk, enforce security policies, and remediate threats before they impact business operations. This connector enables ingestion of compute assets and their associated security findings into the Qualys Enterprise TruRisk Platform, which uses that data for further correlation and processing.
Connector Details
The following table summarizes the capabilities supported by the Armis Centrix Connector.
|
Vendor |
Armis |
|
Product |
Armis Centrix |
|
Connector Category |
Assets & Assets + findings |
|
Asset Types Supported |
Host-Machine |
|
Finding Support |
Yes |
|
Supported Version & Type |
1.0.0 |
|
Integration Method |
API Integration (REST) |
|
Direction |
Unidirectional (Armis Centrix to Qualys) |
|
Incremental Sync (Delta) |
Supported (Asset-only connector) |
Configure the Connector
Prerequisites
Account permissions, Secret Key generation, and data access.
Create a Profile and Connection
Name the connector profile and authenticate with the Armis platform.
Set the Scope and Schedule
Choose the data to ingest and how often the connector runs.
Before You Begin - Authentication
Set Up the Armis User Account and Permissions
Before you generate the API Secret Key, make sure the Armis user account you plan to use for the connector has the required permissions.
The user account must have:
- Read permissions for the required data types, such as Device and Vulnerability.
- Generate API Secret Key permission.
You can use an existing account or create a custom role to provide these permissions.
Source devices must have a non-empty macAddress for asset ingestion.
Option 1: Use an existing user account
Use an existing Armis user account that already has:
- Read permissions for the required data types, such as Device and Vulnerability.
- Generate API Secret Key permission.
If the account has all the required permissions, you can proceed to generate the API Secret Key.
Option 2: Create a custom role
If no existing account has the required permissions, create a custom role in Armis and assign it to the user account that you plan to use for the connector.
Assign the following permissions to the custom role:
- Read access to Device, Vulnerability, and any other data types required for your connector configuration.
- Generate API Secret Key permission.
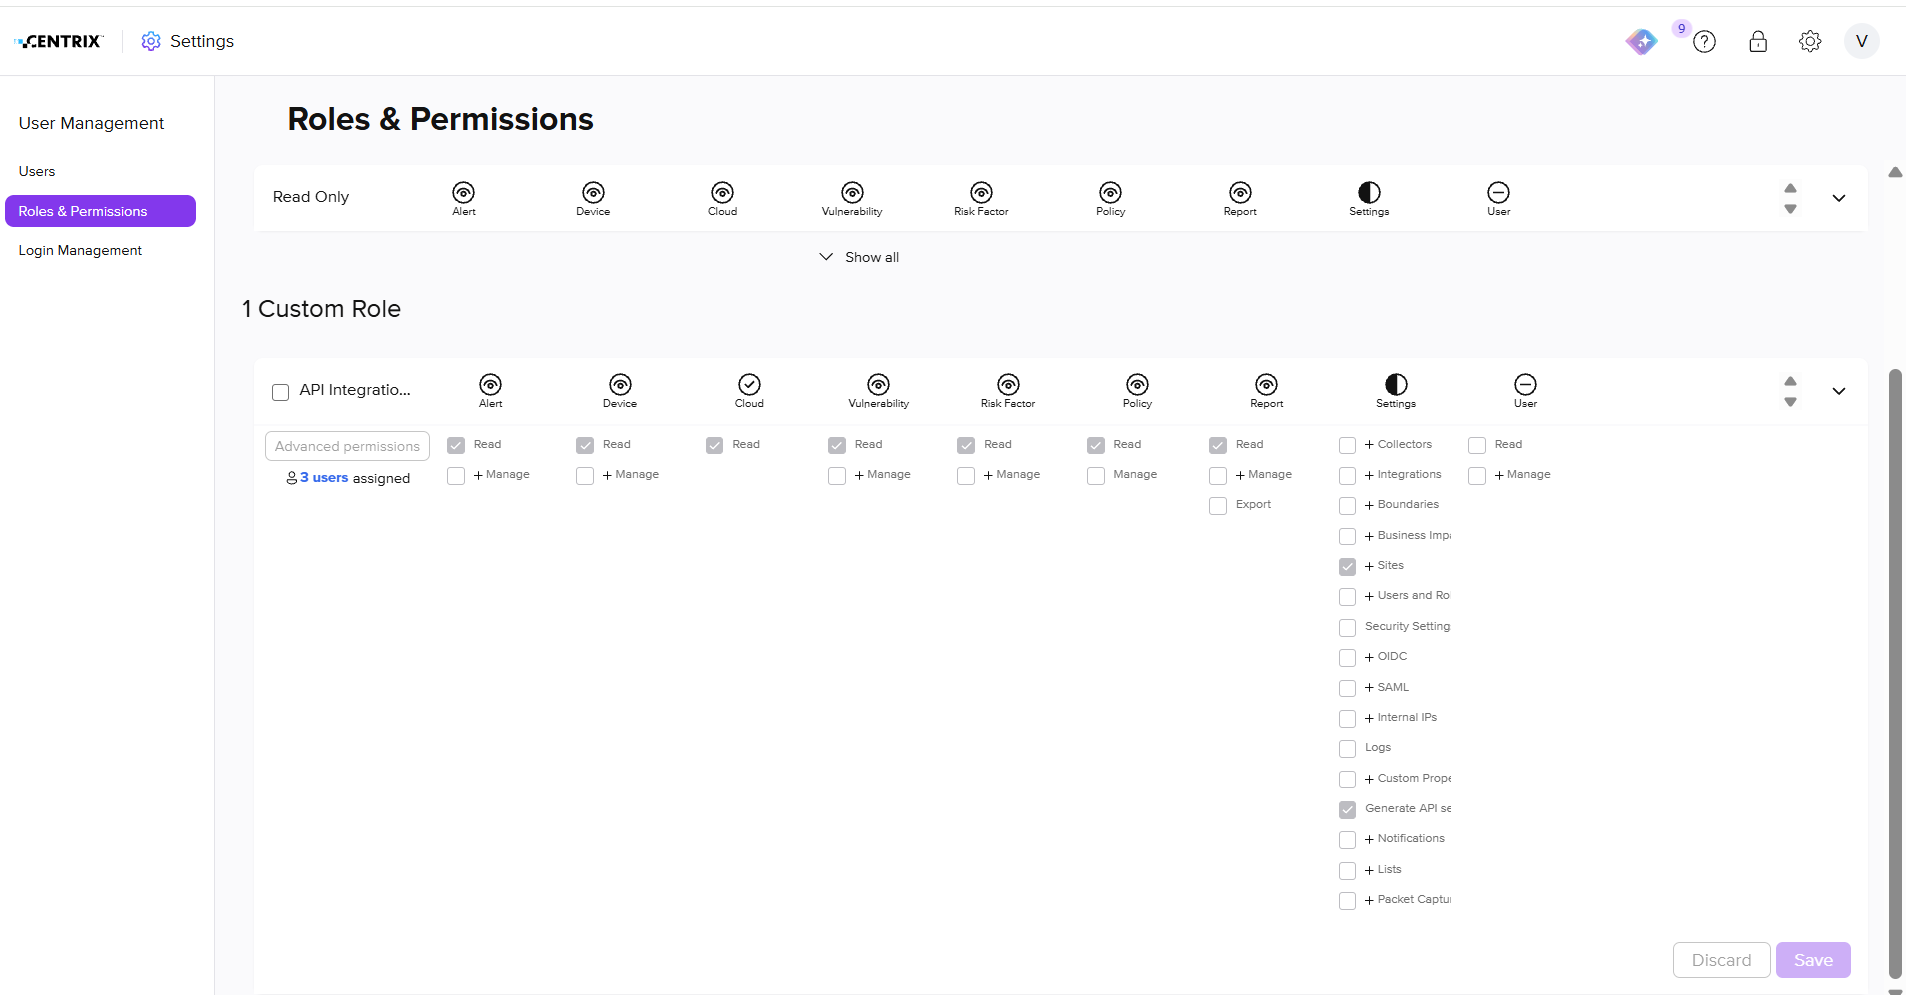
Assign the role to the user account, verify that the account has all required permissions, and then generate the API Secret Key.
Generate a Secret Key in Armis
- Log in to your Armis Centrix instance.
- Navigate to the Settings icon.
- Go to Medical Device Security Settings > API Management.
- Click Create Secret Key.
- Copy the generated Secret Key for use during connector configuration.
Scope and Data Access
The connector retrieves data using the following Armis REST API endpoints:
| API Function | Endpoint |
|---|---|
| Retrieve Devices | https://ic.armis.com/api/v1/device/_search |
| Retrieve Vulnerabilities | https://ic.armis.com/api/v1/cve/_search |
Key Rotation
Rotate the Secret Key periodically to accordance with your organization's credential rotation policy.
Create a Profile & Connection
Create the connector profile and provide authentication details for the Armis platform.
Connector Details
| Field | Description |
|---|---|
| Name | Name of the connector profile. |
| Description | Optional description for the connector profile. |
Authentication Details
| Field | Type | Description |
|---|---|---|
| Base URL | String | Base URL of the Armis platform. Example: https://lab-qualys.armis.com |
| Secret Key | Encrypted String | Secret Key generated from the Armis API Management settings. |
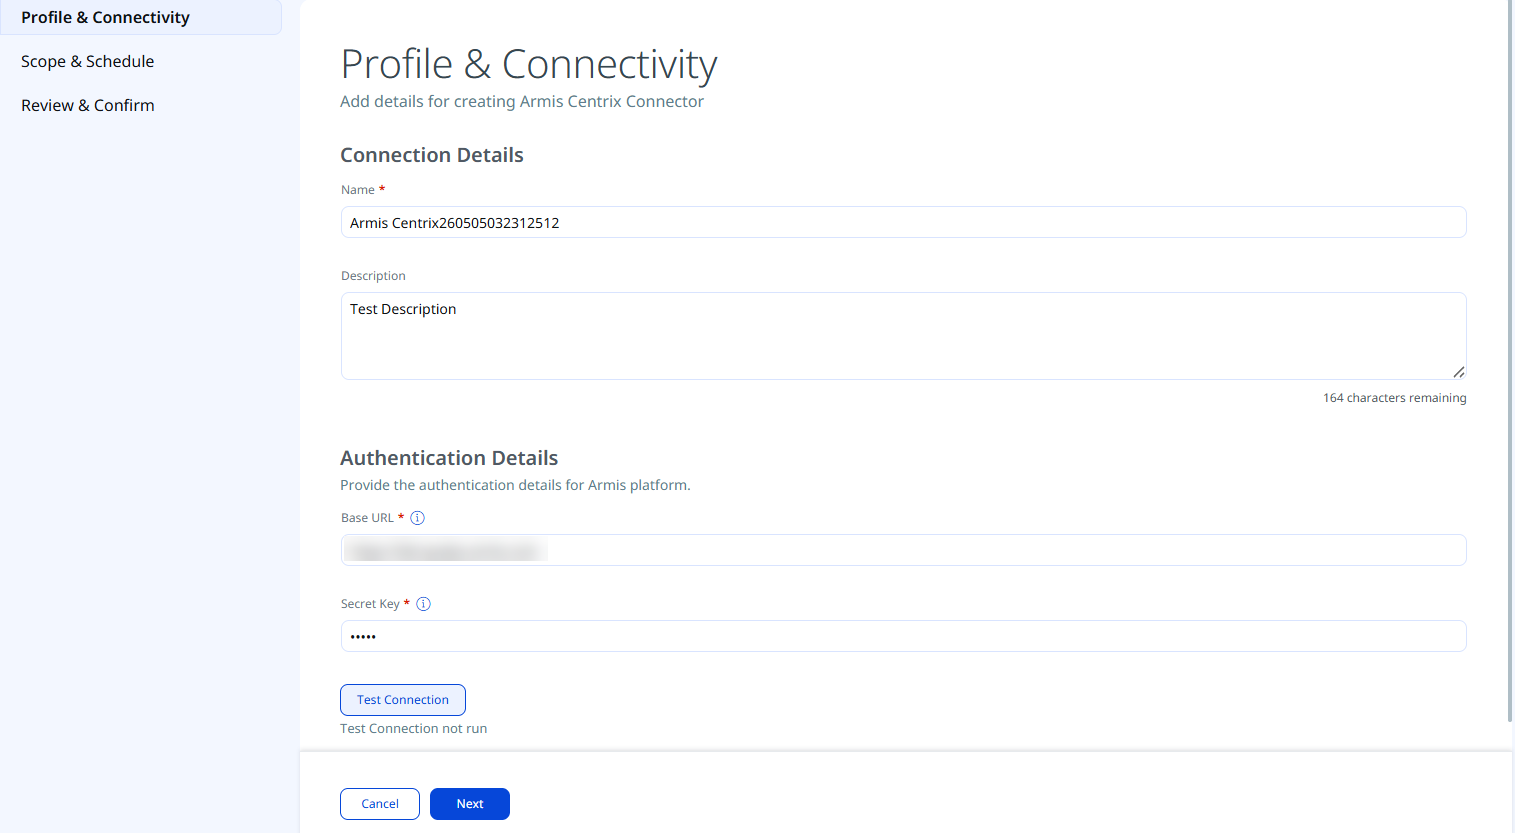
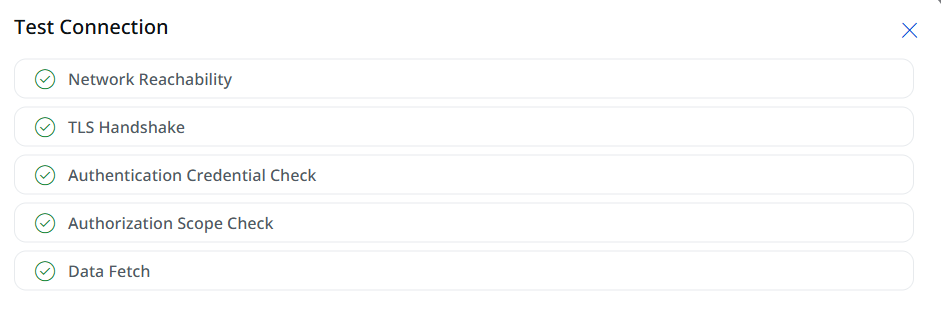
After entering the authentication details, click Test Connection to validate connectivity.
- Network Reachability — Verifies that the connector endpoint is reachable over HTTPS (port 443).
- TLS Handshake — Confirms that a secure TLS connection can be established with the remote endpoint.
- Authentication Credential Check — Validates the configured credentials against the source system's authentication endpoint.
- Authorization Scope Check — Confirms that the provided credentials have the required permissions to access the configured data scope.
- Data Fetch — Verifies that data can be successfully retrieved from the source system using the configured connection.
Set the Scope & Schedule
This step defines what data is ingested and when the connector runs. Select the type of data to import and configure the synchronization schedule.
- Data to Sync - Select one of the following options:
- Assets & Findings - Imports both asset inventory and CVE findings.
- Assets - Imports only asset inventory records.
The Info icon identifies the default selections for Asset Types and Findings used in data mapping. To change these selections, go to Advanced Settings > Filters, and then configure Findings as needed. The Asset Types are default selected.
- Limit sync to top 1,000 assets and findings - You can select this checkbox to limit the fetch 1000 assets using risk-based filter criteria. The assets, along with their associated findings, are discovered and shared with ETM. The connector applies risk-based filters during asset fetch to ensure the ingested subset represents the most relevant assets in your environment rather than a random or arbitrary sample.
- Advanced Settings (optional) - Turn on the Advanced Settings toggle to select the asset classes and finding types that you want to ingest into ETM.
- Schedule - Under the Schedule section, select an execution frequency from the Occurs dropdown (for example, Daily). The system will display the calculated start date, end date, and timezone for the scheduled run. The schedule configuration supports recurring synchronization, such as
Daily.
Configure the schedule frequency using the Occurs field. The connector supports recurring scheduled imports.
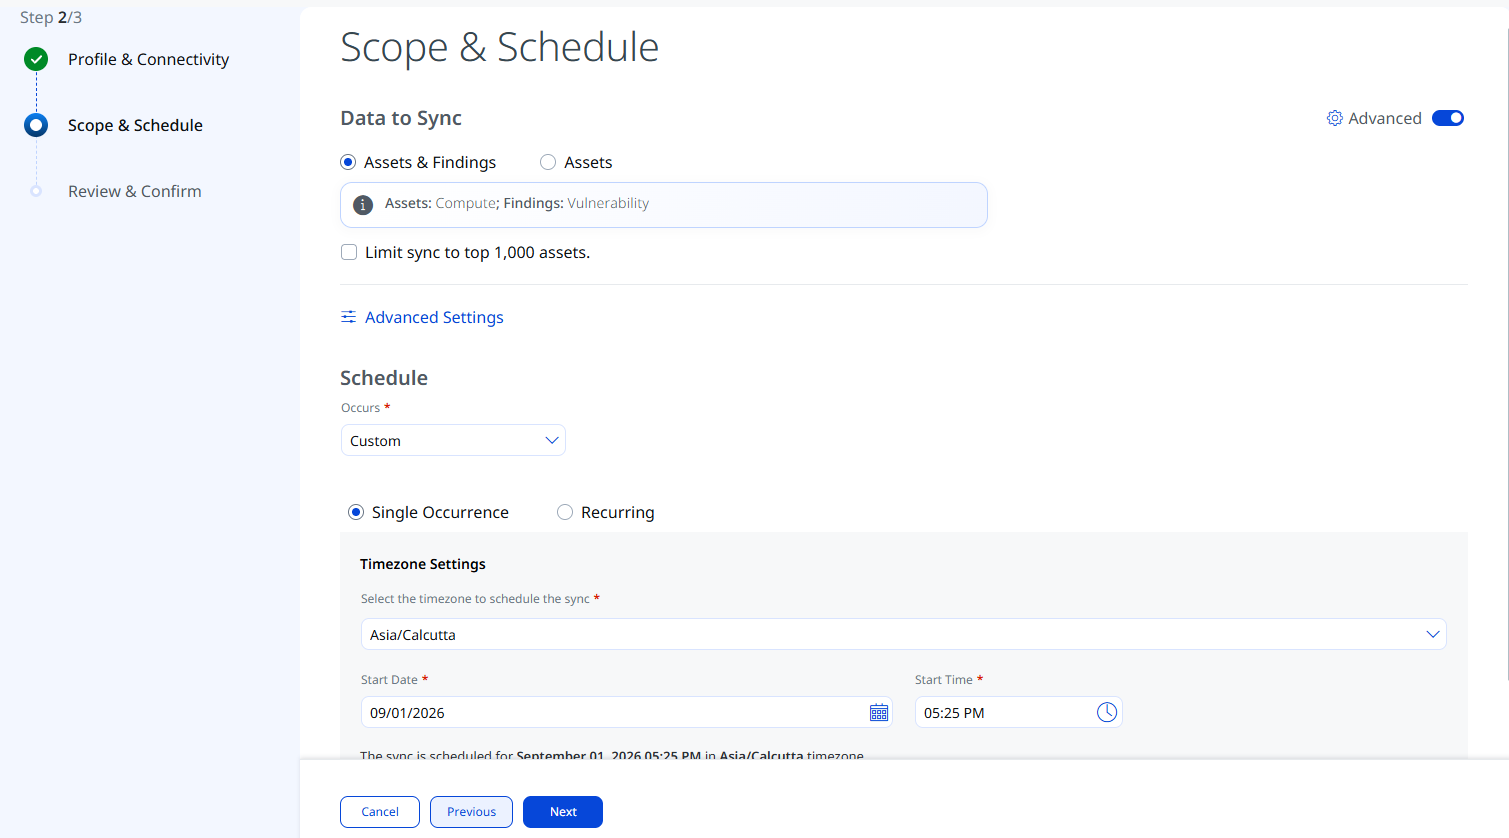
The schedule duration is configured for a 5-year period based on the selected timezone.
Advanced Settings
The Advanced Settings page allows you to configure optional Filters and Transform Maps.
Filters
The connector supports filter-based scoping using free-text input fields.
| Filter | Options | Description |
|---|---|---|
| Asset Types | Compute | This is the default selection. |
| Findings | Vulnerability | Optionally filter findings by type. |
| Site Name | - | The identifier of the site in which the device resides. Example: Pune-ICS-Lab |
| Boundary Name | - | The identifier of the boundary. Example: Corporate |
| Business Impact | - | The identifier of the business impact. |
| Baseline Start from | Date | This connector supports bulk and delta runs. A bulk run always ingests the full dataset. You can schedule the runs to occur weekly, fortnightly, every three weeks, or monthly by using the Baseline Schedule setting when creating or updating the connection.
Select the date from which you want to start the baseline. |
| Timeframe | Last Day, Last Hour, Last 7 Days, Last 14 Days, Last 30 Days | Timeframe for the devices to track. Only the devices within the provided timeframe will be fetched. |
| Create assets that don't exist in Qualys | - | If enabled, the connector ingests all those assets that are not created /exist in Qualys. |
Review and Confirm
Review all configured settings before creating the connection and then click Create.
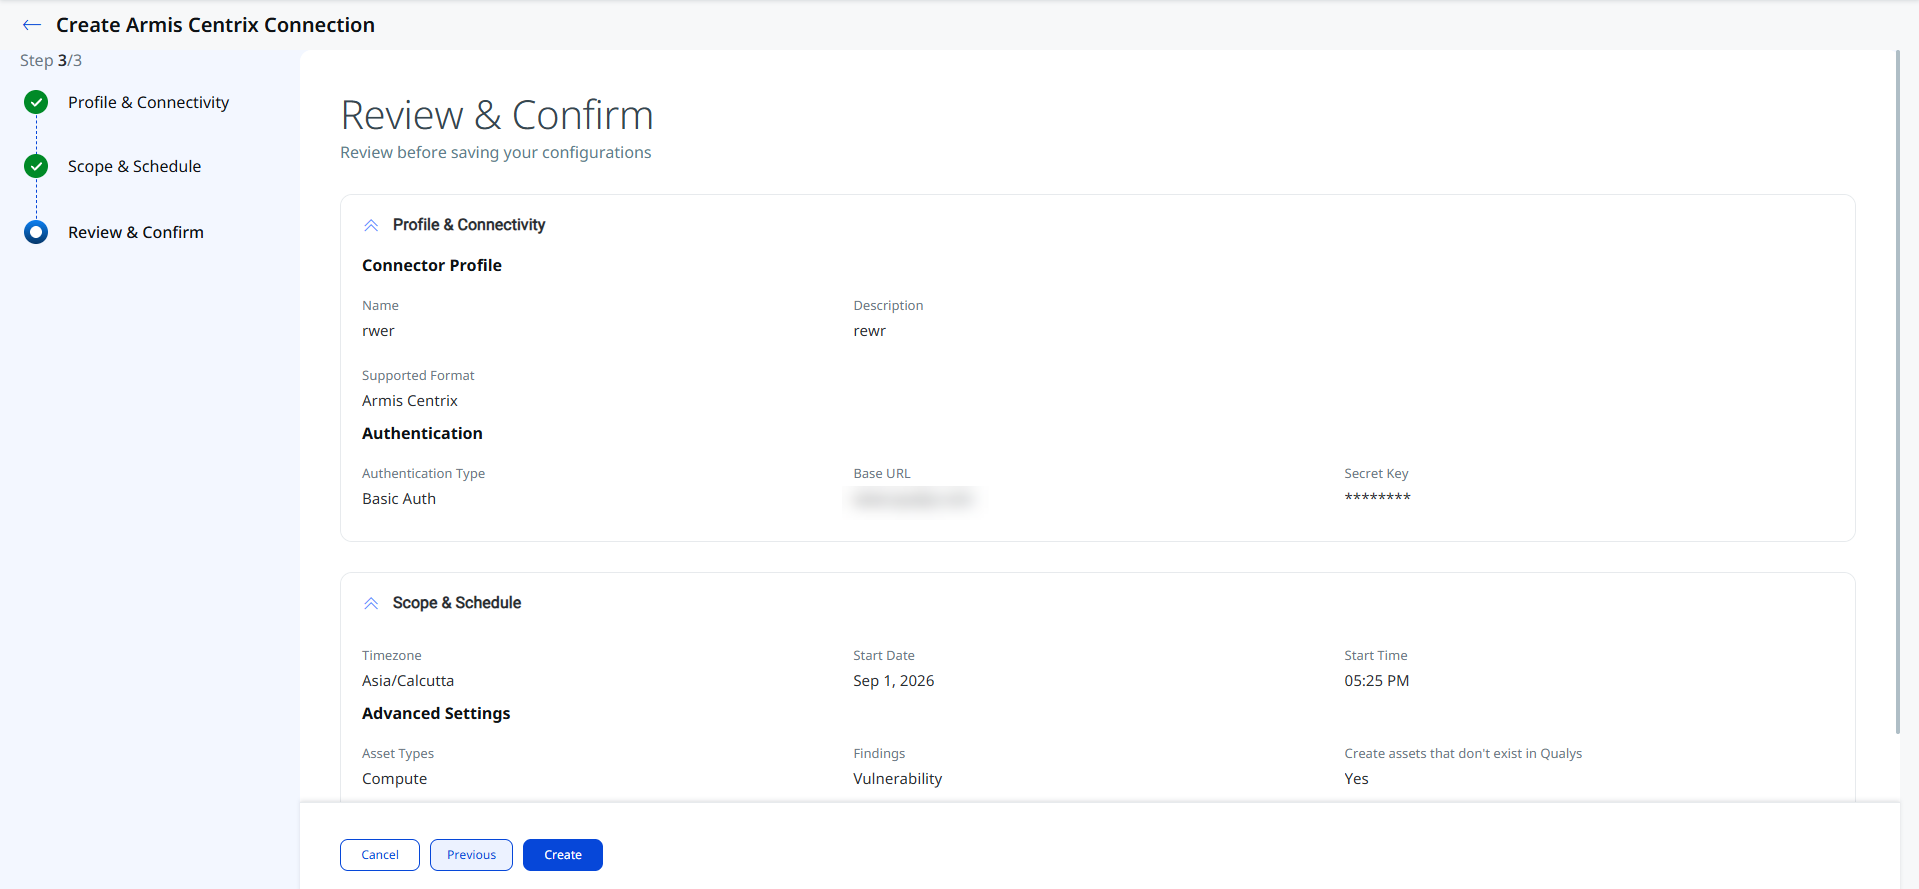
The new connection is displayed in the Connections list with a Registered state and an Active status.
Only assets with a MAC address are staged and ingested.
How the Connection Works
The Armis Centrix Connector retrieves device inventory data and associated vulnerability findings from the Armis platform and imports them into Qualys ETM.
The connector supports importing:
- Assets (Host Asset Records)
- Vulnerability Findings (CVEs)
The connector can be configured to import assets only or assets with associated findings.
Connector States
During execution, the connector transitions through the following states:
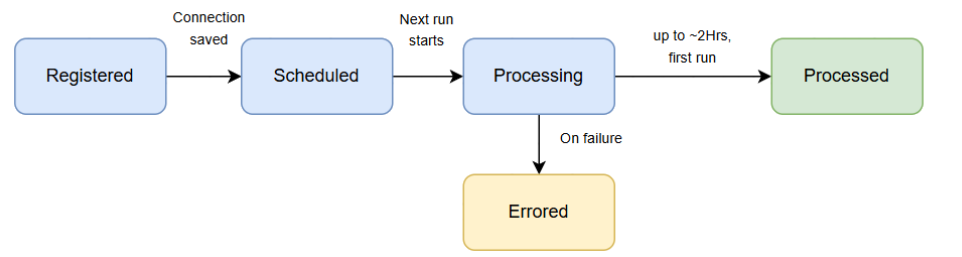
- Registered – The connector is successfully created.
- Scheduled – The connector is queued for execution.
- Processing – Asset and findings data is actively being retrieved and processed.
- Processed – The connector completed the import process successfully.
Initial imports may take up to 2 hours to complete, depending on data volume. The connector may display the Processed state while findings correlation and indexing continue in the background.
Viewing Assets and Findings in ETM
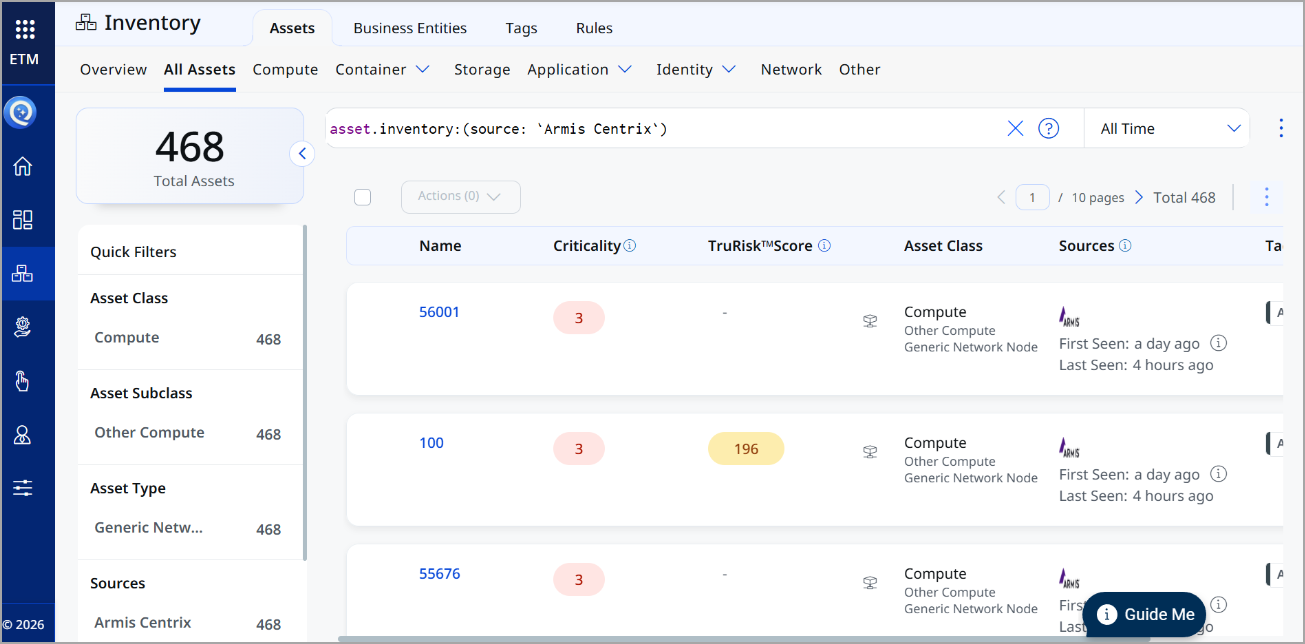
After successful synchronization, imported data can be viewed in ETM.
Assets: Navigate to Enterprise TruRisk Management > Inventory > Assets > All Assets.
Use the tag or asset filter: inventory:(source:"Armis")
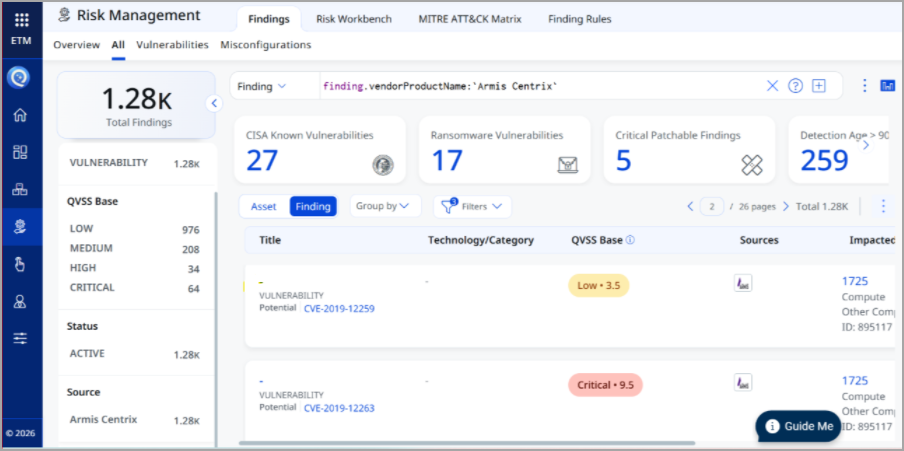
Findings (Vulnerabilities): Navigate to Enterprise TruRisk Management > Risk Management > Findings > Vulnerability.
Use the vendor filter: findings.vendorProductname:"Armis Centrix"
Troubleshooting
| Issue | Resolution |
|---|---|
| Connector remains in Processing state | The full import process may take up to 2 hours to complete. Allow sufficient processing time before troubleshooting the connector. |
Additional Information
API Reference
| API Function | Endpoint |
|---|---|
| Retrieve Devices | https://ic.armis.com/api/v1/device/_search |
| Retrieve Vulnerabilities | https://ic.armis.com/api/v1/cve/_search |
Transformation Maps
The connector uses default transformation maps to normalize imported data into the Qualys ETM schema.
Asset Transformation MapAsset Transformation Map
| Source Field | Target Field |
|---|---|
id |
asset.assetHeader.externalAssetId |
id |
asset.assetHeader.vendorAssetId |
type |
asset.assetHeader.assetTypeName |
operatingSystem |
asset.assetDetail.operatingSystem.name |
operatingSystemVersion |
asset.assetDetail.operatingSystem.version |
ipAddresses[] |
asset.assetDetail.network[].ipv4Addresses[ |
macAddress |
asset.assetDetail.network[].macAddress (Mandatory) |
firstSeen |
sourceCreatedDate |
lastSeen |
sourceLastUpdatedDate |
firstSeen |
asset.assetDetail.openPorts[].firstFound |
displayTitle |
asset.assetDetail.hostname |
displayTitle |
asset.assetDetail.hostIdentity.hostname |
displayTitle |
asset.assetDetail.name |
model |
asset.assetDetail.hardware.model |
manufacturer |
asset.assetDetail.hardware.manufacturer |
accessSwitch |
asset.assetDetail.typedAttributes.& |
boundaries |
asset.assetDetail.typedAttributes.& |
businessImpact |
asset.assetDetail.typedAttributes.& |
category |
asset.assetDetail.typedAttributes.& |
dataSources |
asset.assetDetail.untypedAttributes.& |
ipv6 |
asset.assetDetail.untypedAttributes.& |
purdueLevel |
asset.assetDetail.typedAttributes.& |
riskLevel |
asset.assetDetail.typedAttributes.& |
Sensor |
asset.assetDetail.untypedAttributes.& |
site |
asset.assetDetail.untypedAttributes.& |
tags |
asset.assetDetail.untypedAttributes.& |
tier |
asset.assetDetail.typedAttributes.& |
userIds |
asset.assetDetail.untypedAttributes.& |
visibility |
asset.assetDetail.typedAttributes.& |
Vulnerability Transformation MapVulnerability Transformation Map
| Source Field | Target Field |
|---|---|
vulnerabilities.data.sample[].description |
findingGroup.findings[].description |
vulnerabilities.data.sample[].status |
findingGroup.findings[].findingStatus |
vulnerabilities.data.sample[].cveUid |
findingGroup.findings[].name |
vulnerabilities.data.sample[]. |
findingGroup.findings[].typeDetected |
vulnerabilities.data.sample[].id |
findingGroup.findings[].externalFindingId |
vulnerabilities.data.sample[]. |
findingGroup.findings[].detectionResult |
vulnerabilities.data.sample[]. |
findingGroup.findings[].findingType.v |
vulnerabilities.data.sample[].severity |
findingGroup.findings[].severity |
vulnerabilities.data.sample[].cveUid |
findingGroup.findings[].findingType. |
vulnerabilities.data.sample[]. |
findingGroup.findings[].firstFoundOn |
vulnerabilities.data.sample[]. |
findingGroup.findings[].lastFoundOn |
Frequently Asked Questions
What permissions does the Armis user account need?
The account must have Read permissions for the required data types, such as Device and Vulnerability, and the Generate API Secret Key permission. You can use an existing Armis user account that already has these permissions, or create a custom role and assign it to the account you plan to use. See Set Up the Armis User Account and Permissions.
Where do I generate the Secret Key in Armis?
Log in to your Armis Centrix instance, go to the Settings icon, then Medical Device Security Settings > API Management, and click Create Secret Key. Copy the generated Secret Key for use during connector configuration. See Generate a Secret Key in Armis.
Can I import assets without vulnerability findings?
Yes. In the Set the Scope & Schedule step, set Data to Sync to Assets, which imports only asset inventory records, instead of Assets & Findings, which imports both asset inventory and CVE findings.
How do I change the default Asset Types and Findings selections?
The Info icon identifies the default selections for Asset Types and Findings used in data mapping. To change these selections, go to Advanced Settings > Filters, and then configure Findings as needed. The Asset Types are default selected. See Advanced Settings.
Why is my connector still in the Processing state?
Initial imports may take up to 2 hours to complete, depending on data volume. The connector may display the Processed state while findings correlation and indexing continue in the background. Allow sufficient processing time before troubleshooting the connector; see Troubleshooting.
Does this connector write data back to Armis Centrix?
No. The data flow is unidirectional, from Armis Centrix to Qualys. The connector retrieves device inventory data and associated vulnerability findings from the Armis platform and imports them into Qualys ETM.
How often should I rotate the Secret Key?
Rotate the Secret Key periodically according to your organization's credential rotation policy. See Key Rotation.
Where do I see Armis data in ETM?
Assets — navigate to Enterprise TruRisk Management > Inventory > Assets > All Assets and use the tag or asset filter inventory:(source:"Armis")
Findings (Vulnerabilities) — navigate to Enterprise TruRisk Management > Risk Management > Findings > Vulnerability and use the vendor filter findings.vendorProductname:"Armis Centrix"