AWS Inspector
The Amazon Inspector API Connector bridges AWS Inspector and Qualys ETM to consolidate vulnerability findings from your cloud infrastructure into a centralized risk management platform.
By automatically pulling EC2 instance vulnerabilities, deduplicating data through normalized formats, and enriching findings with additional context, security teams gain unified visibility into their AWS security posture rather than managing assessments across separate tools.
The connector calculates risk scores using TruRisk and enables faster remediation by combining cloud vulnerabilities with on-premises findings in one system. This integration transforms AWS vulnerability discovery from an isolated assessment into an actionable component of enterprise-wide threat and risk management.
Connector Details
Here is a comprehensive overview of what the AWS Inspector Connector supports.
| Vendor | Amazon |
| Product Name | AWS Inspector |
| Category | Vulnerability Management |
| Findings Support | Yes |
| Supported Assets | EC2 Instance, ECR container images and Lamda functions |
Prerequisites
These are the required configurations to successfully create an Amazon Inspector connection for Qualys ETM.
User Roles and Permissions
You need the following API Access information to configure the connection:
-
Default region: The AWS region for the Amazon Inspector connector. You must select the region for your AWS Inspector connection to run, if not specified, the connector uses the AWS default region. Refer to the AWS documentation.
-
Assume role: The Amazon Resource Name (ARN) for the role that the connector assumes when accessing AWS services, which must have permissions to log in to the API server and return data.
-
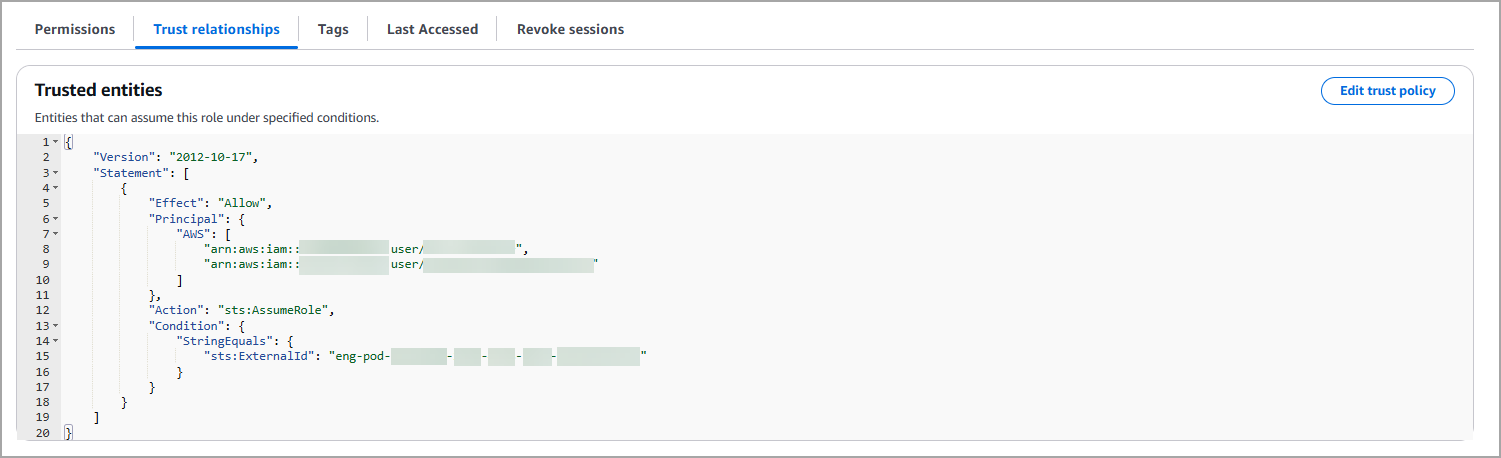
External Id: You must add Qualys provided AWS User into the Trust relationships for the AWS Role to be used to run the AWS Inspector Qualys Connector as shown below. Also need to configure External Id for additional security purpose.
Qualys Provided AWS User account: arn:aws:iam::178650962893:user/aws-connector
Base Account Id: 178650962893
How to obtain the prerequisites in AWS?
Create a role and assign permissions
-
Log in to your organization's AWS Management Console as an administrator.
-
Navigate to the Identity and Access Management (IAM) dashboard > Roles and then click Create role.
-
Select AWS account for the Trusted entity type and click Next.
-
Search for and select the AmazonInspector2ReadOnlyAccess permission from the list of permissions and click Next.
-
Assign a name and description, and then click Create role.
-
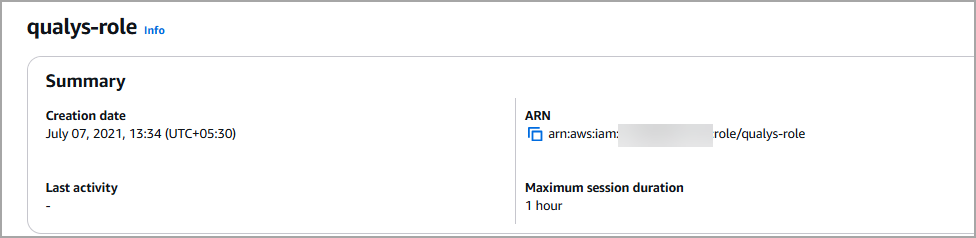
Go back to the Roles page, click the newly created role and copy the value in the ARN field as shown below.
If you do not have the permissions to create roles, contact your AWS administrator. For additional information, see AWS documentation.
Types of data to retrieve
The Amazon Inspector connector can retrieve the following types of data from the AWS SDK:
Data retrieved from Amazon Inspector
|
Connector Object |
Maps to Data Model |
|---|---|
| AWS EC2 Instance | Vulnerability/HostAsset |
Create a New API Connector
- Provide the Connector's Name and Description.
- Select the type of findings you want to import or export - currently, we support Vulnerability.
- Select the Asset Type - currently we support Host Asset.
The following screenshot displays the Basic Details fields.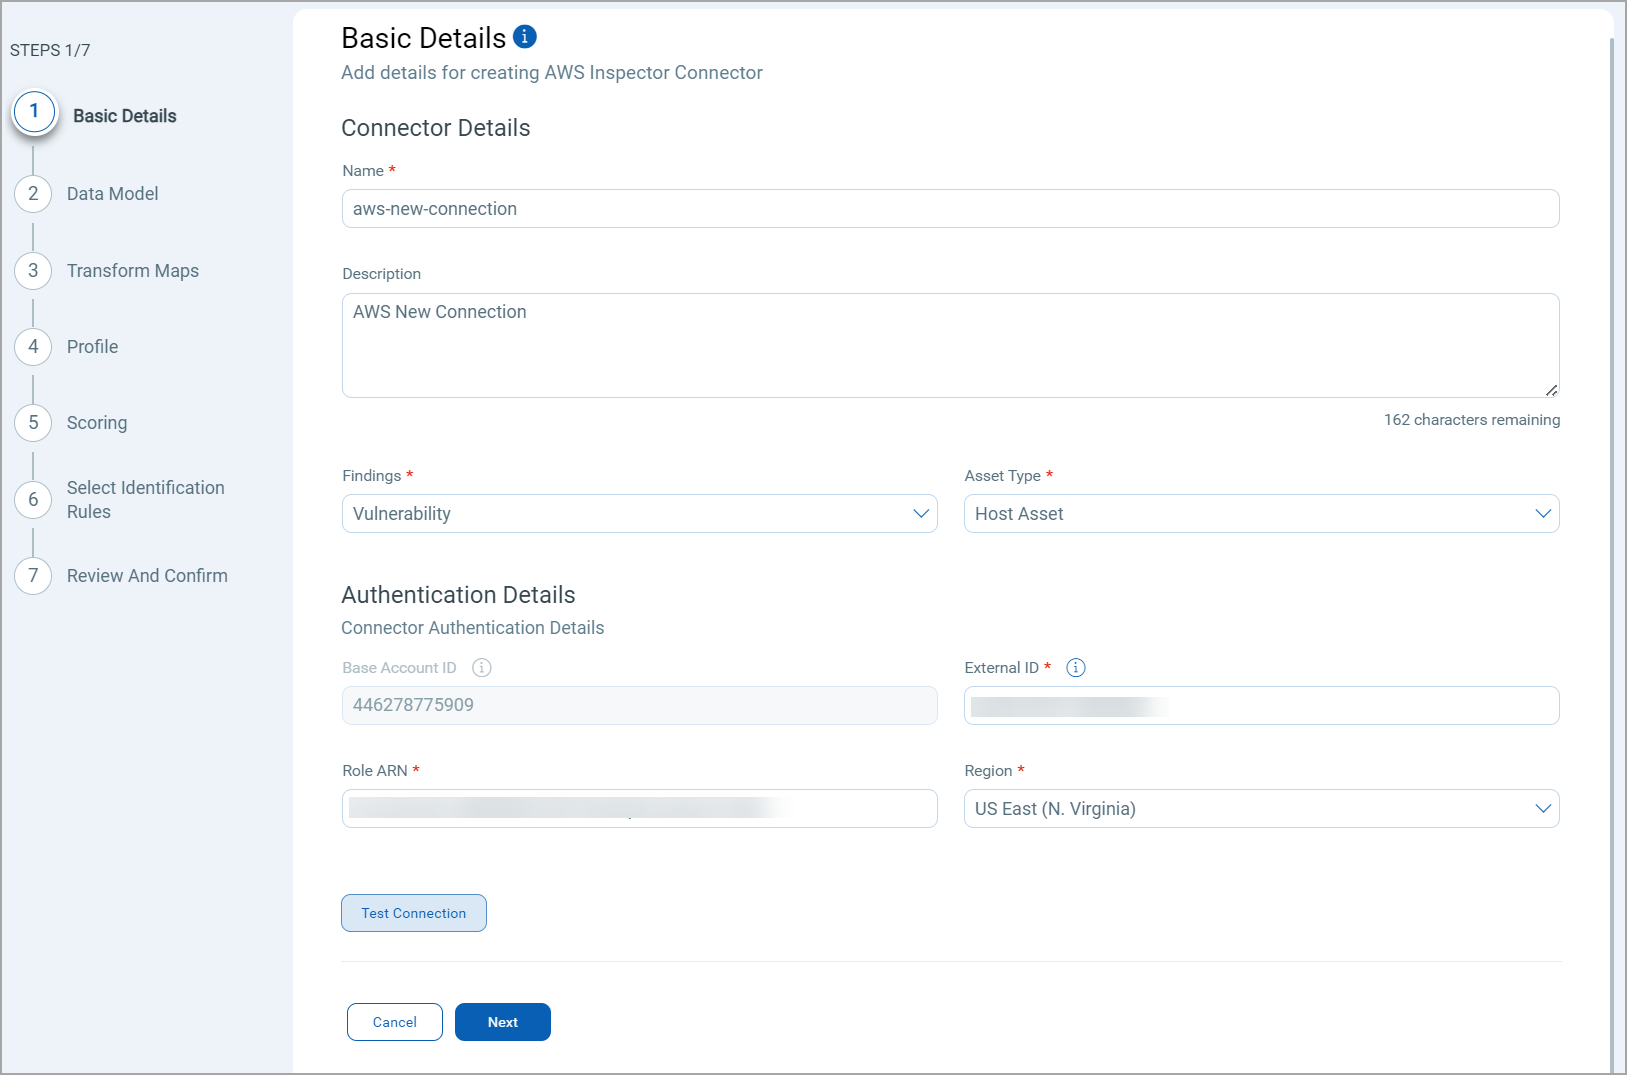
-
Next, provide the API authentication details of the AWS Inspector environment. You need to provide the following.
- Base Account ID: Enter your AWS account ID.
- External ID: This is automatically generated for cross-account authentication.
- Role ARN: Provide the ARN of the IAM role that grants necessary permissions.
- Region: Select the AWS region where Inspector is running (e.g., "US East (N. Virginia)").
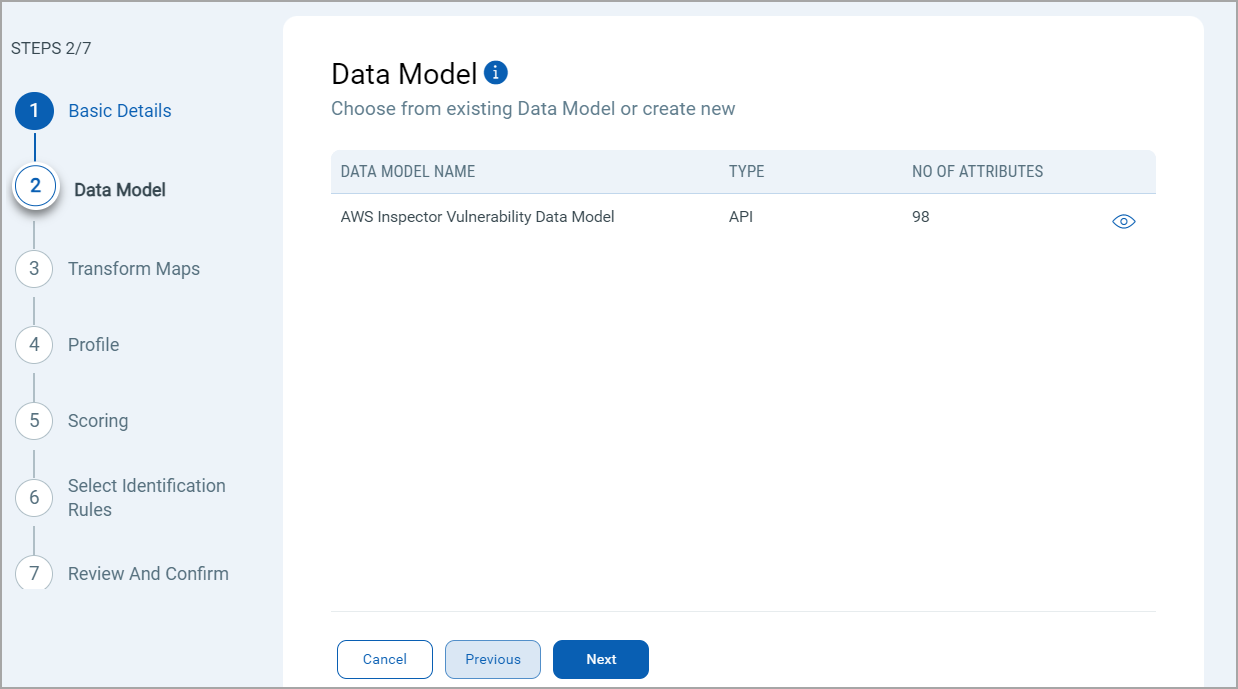
The AWS Inspector API Connector offers an out-of-box data model mapping for you to map with Qualys ETM schema. You can view the schema to understand the attributes in the data model.
Map the fields from AWS Inspector to the corresponding fields in your target system. Transform Maps ensure the data is transformed correctly during the import or export process.
The AWS Inspector Connector offers an out-of-box transform map for you to proceed without further configuration. View the map to understand the data transformation or clone the map to edit its configurations.
![]()
Click Create New for a new Transform Map.
Perform the following steps to configure a Transform Model:
- Transform Map Name: Enter a unique name for the Transform Map. This name helps identify the specific transformation configuration within this connector.
- Source Data Model: Select the data model that serves as the input for the transformation. This is the model from which data will be extracted.
- Target Data Model: Choose the data model that receives the transformed data. This model defines how the data will be structured after the transformation.
Refer the following Transform Map screenshot:
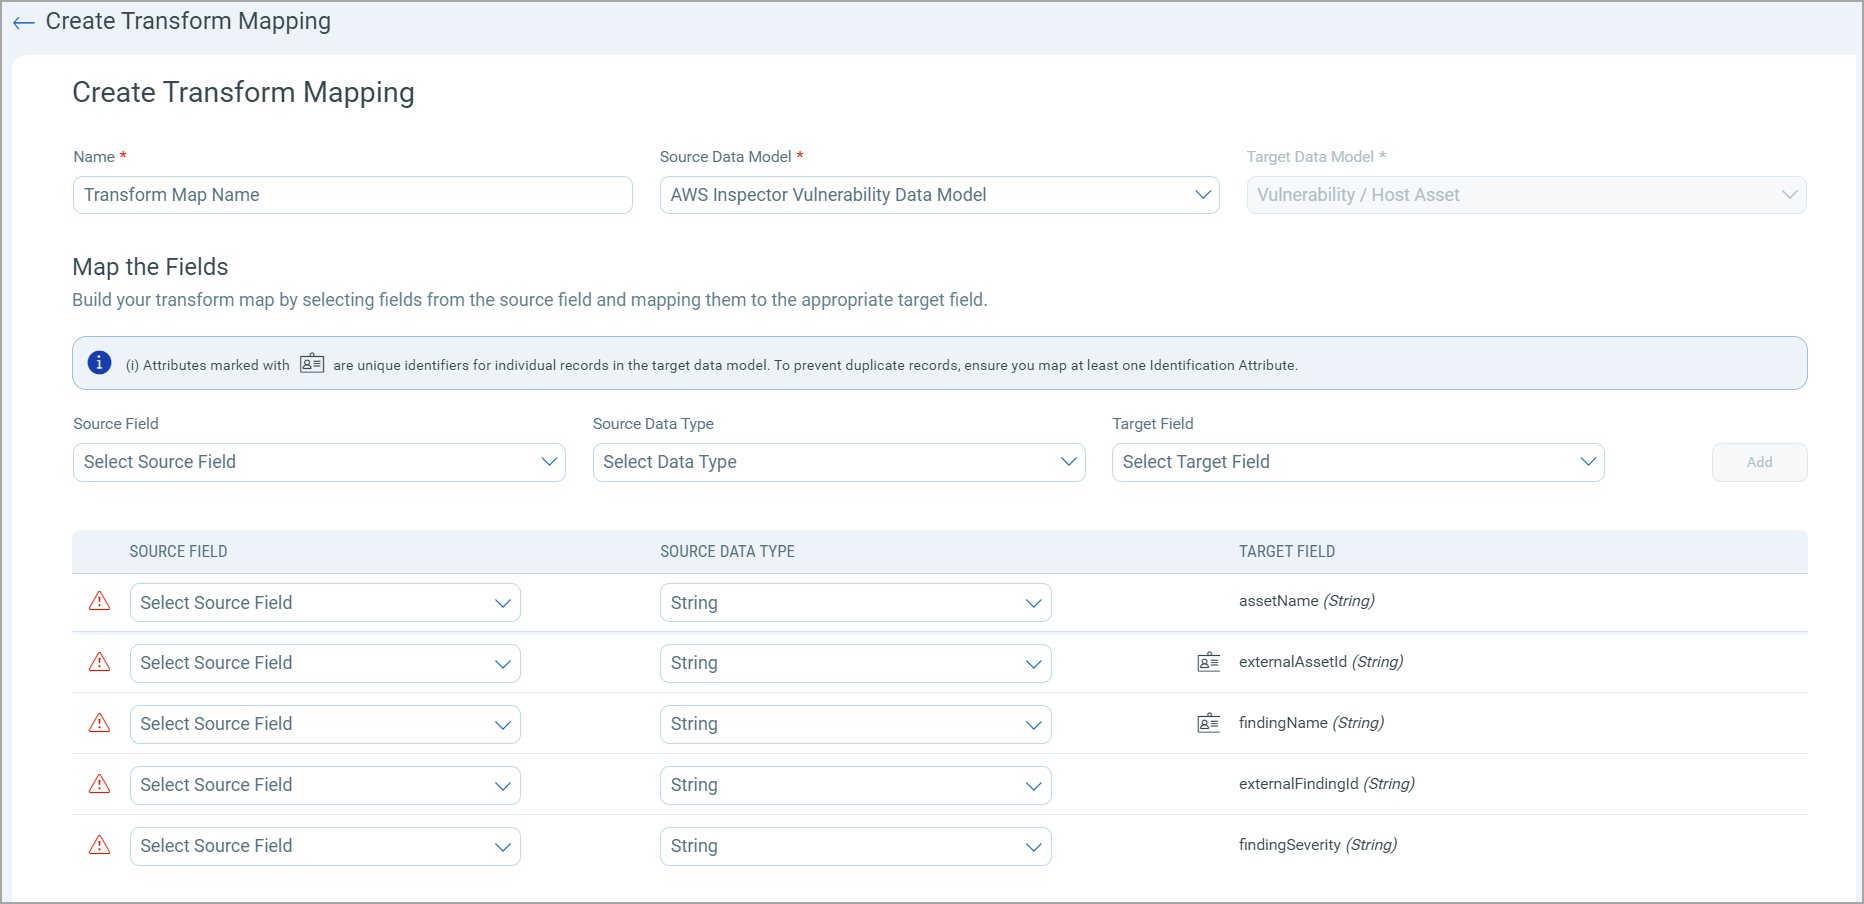
Fields Mapping
The Fields Mapping section maps fields from the Source Data Model to the Target Data Model.
- Source Field: Specify the field in the Source Data Model containing the transformed data.
- Data Type: Indicate the data type of the Source Field (e.g., string, integer, date).
- Target Field: Designate the corresponding field where the transformed data will be placed in the Target Data Model.
Click Add to create and display the mapping for the Source Field, Data Type, and Target Field below the section. This visual helps ensure that all necessary fields are mapped correctly and allows easy verification and adjustments.
Create a profile for your connector. A profile decides the connector status, execution schedule and transform map to choose. The connector follows the configurations of this profile for all future executions.
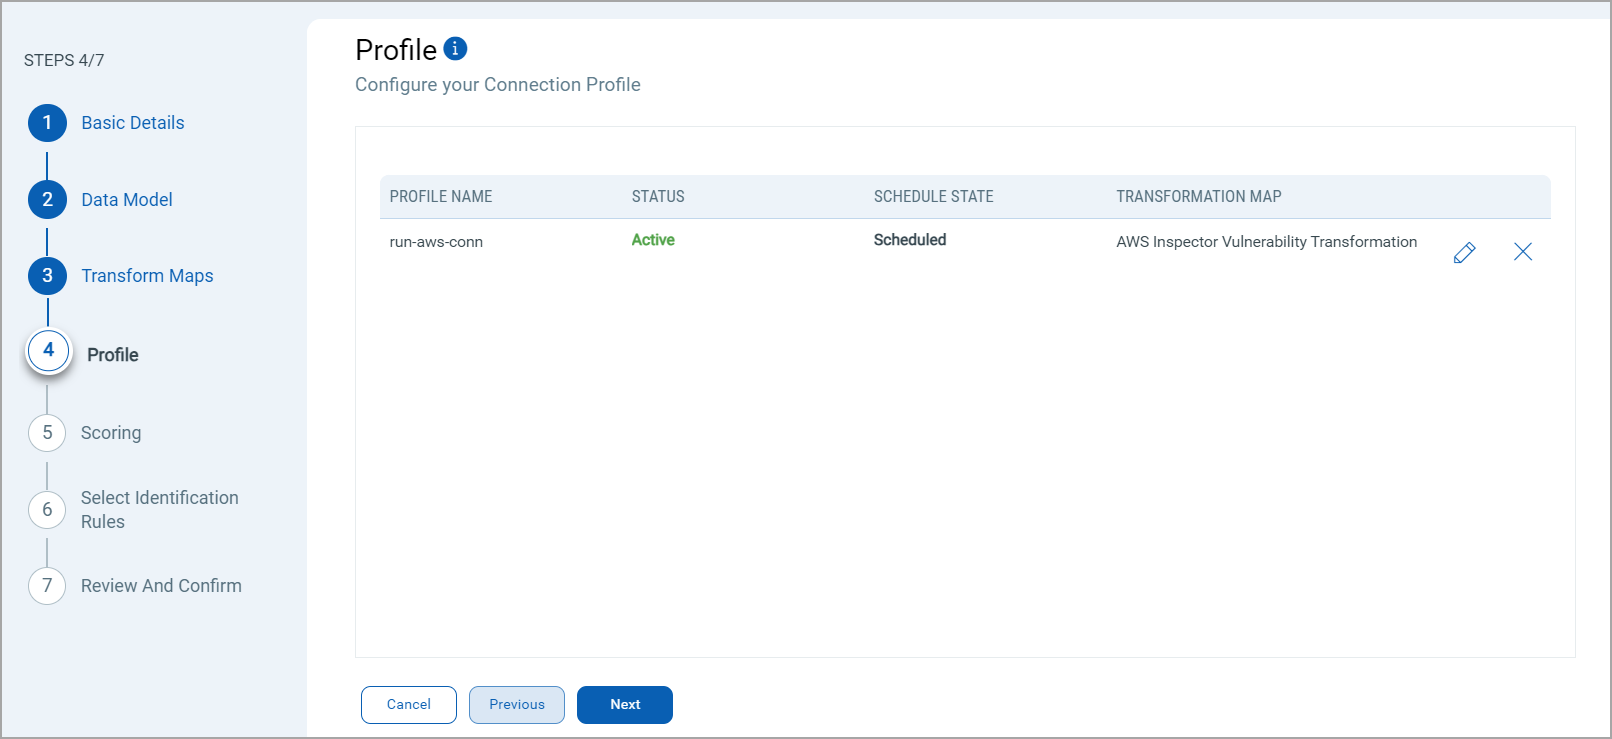
Click the "+" to create a new profile.
In the Add Profile screen, provide the necessary inputs for your new profile.
Provide a Name and Description.
Select the required Transform Map for the data mapping.
The Detection of DataTypes determine which findings to select for the profile. The Asset Types determine the required resource whose findings should be ingested by Qualys ETM.
The Filter field let's you add snippets of code to further determine what data should be parsed.
The Status field determines whether the connector should be in Active or Inactive state after creation.
Lastly, the Schedule section lets you either create a Single Occurrence schedule or a Recurring schedule. Provide the exact date and time for the Single Occurence execution and provide the Start and End date/time for the Recurring schedule.
The Scoring screen lets you map non-CVE vulnerability scores from your vendors to Qualys Detection Score (QDS) system.
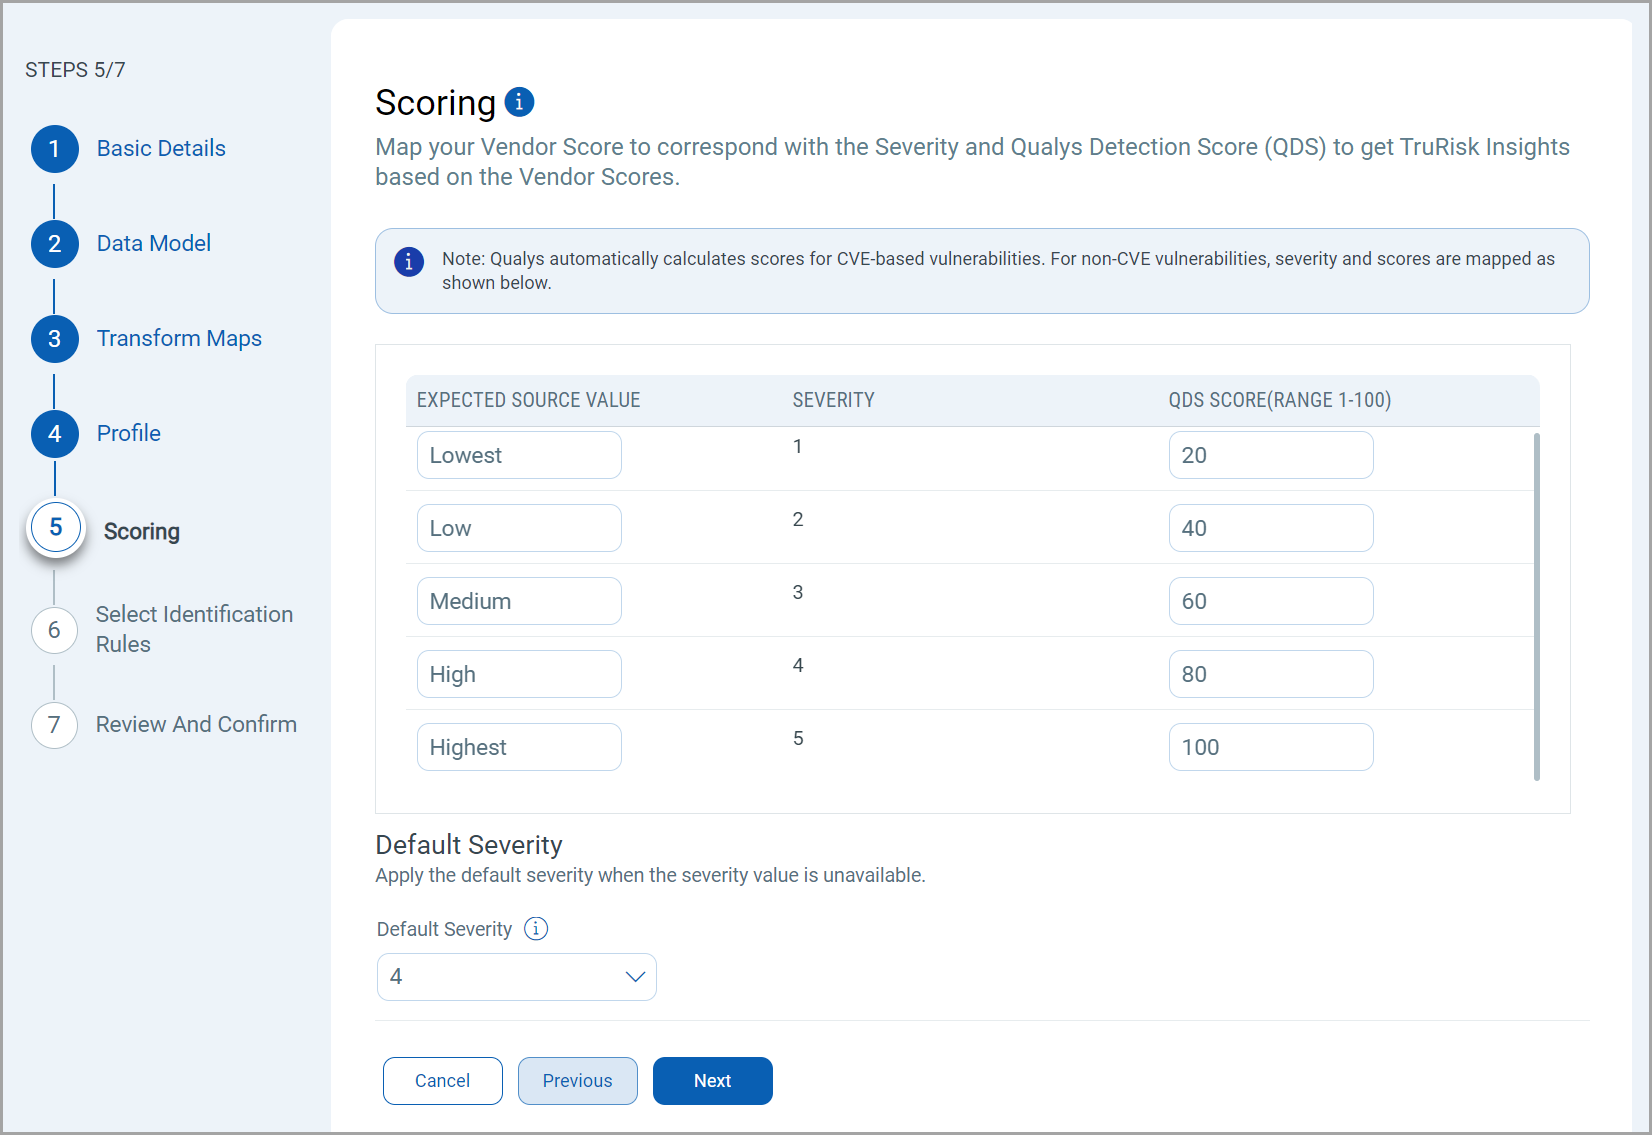
You have two columns with 5 input fields in each of them. These fields correspond to a specific severity starting from the least severe (1), to the most severe (5).
Fill out all 5 rows to create a comprehensive score mapping. This allows for translation between various vendor scoring systems and Qualys' Detection Score.
The specifics of the mapping is explained below.
Expected Source Values - Enter the vendor's original score or rating for non-CVE vulnerabilities.
This can be alphanumeric values. (e.g., "High", "Critical", "A", "3", etc.).
Severity - This column is pre-populated with severity levels from 1-5. These represent the severity levels in Qualys. The Source Value must be mapped such that it utilizes these 5 severity levels.
QDS - Enter the corresponding Qualys Detection Score. Use values from 0-100, where higher numbers indicate higher severity.
Default Severity
Below the scoring map, find the 'Default Severity' dropdown menu.
Select a default severity level from 1-5, this is applied when a vendor's score for a non-CVE vulnerability doesn't match any 'Expected Source Value' in your mapping table.
Select Identification RulesSelect Identification Rules
The Identification Rules are a set of out-of-the-box precedence rules set by Qualys CSAM. The connector discovers findings based on the order set by the selected Identification Rules.
You can proceed to the next step without making any changes to this screen.
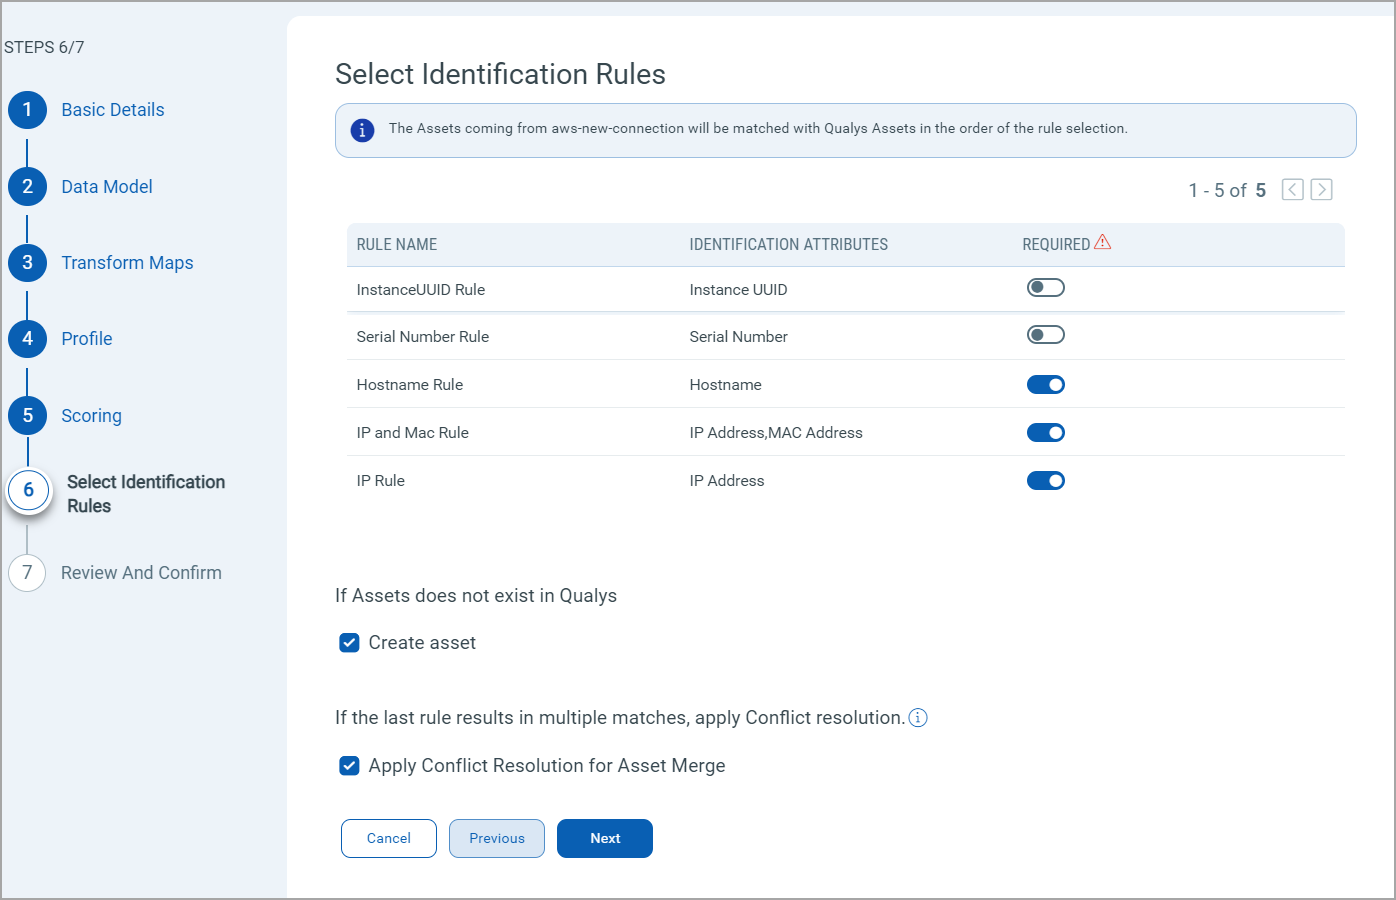
If you don't want to choose a specific rule, turn off the toggle next to it. But, ensure that at least one rule is selected.
To learn more about the different rules and options present in this screen, refer to the CSAM Online Help.
How Does a Connection Work?
The Amazon Inspector connector functions through configured profiles that determine what data gets synchronized and when.
A Connection usually involves creating a profile that defines which vulnerabilities to import based on detection data types and asset types. The connector then automatically executes according to the schedule (or on-demand), pulling vulnerability data from Amazon Inspector into Qualys ETM where it can be viewed alongside other security findings.
With the Amazon Inspector API Connector successfully configured, you are almost ready to view all the assets and findings from Amazon Inspector.
In the Connector screen, you can find your newly configured connector listed and marked in the Processed state.
Connector States
A successfully configured connector goes through 4 states.
- Registered - The connector is successfully created and registered to fetch data from the vendor.
- Scheduled - The connector is scheduled to execute a connection with the vendor.
- Processing - A connection is executed and the connector is fetching the asset and findings data.
- Processed - The connector has successfully fetched the assets, it may still be under process of fetching the findings. Wait for some more time for the connector to fetch the findings completely.
The Processed state indicates that the Connector is successfully configured but it is under the process of importing all your assets and findings. This process (specifically for findings) may take some time.
This entire process may take up to 2 hours for completion. Once it is done, you can find the imported data in Enterprise TruRisk Management (ETM).
View Assets and Findings in ETM
Navigate to Enterprise TruRisk Management to get started with analyzing your Connector's vulnerability findings.
You can view the assets imported from the Amazon Inspector connection by navigating to Inventory tab of ETM.
Go to Assets > Host to find all of your imported assets.
Use the token, inventory: (source: `AWS Inspector`) to view all the imported Amazon Inspector assets.
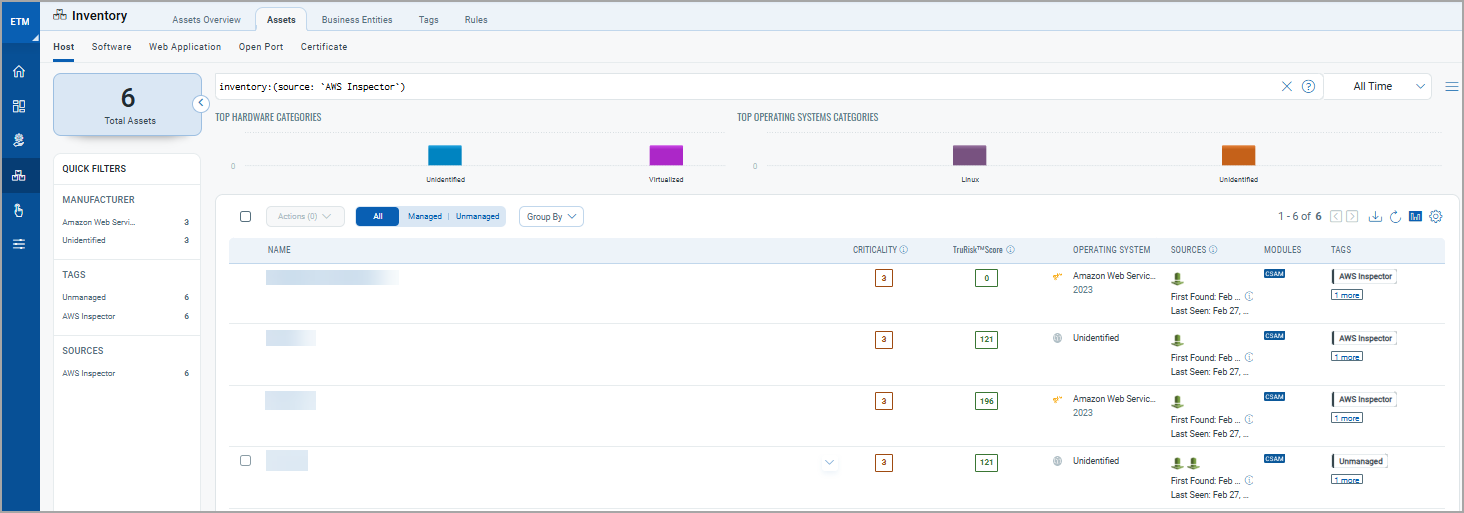
Here, you can learn about the criticality of your assets and their Risk Scores. Click any of the asset to find more details about them.
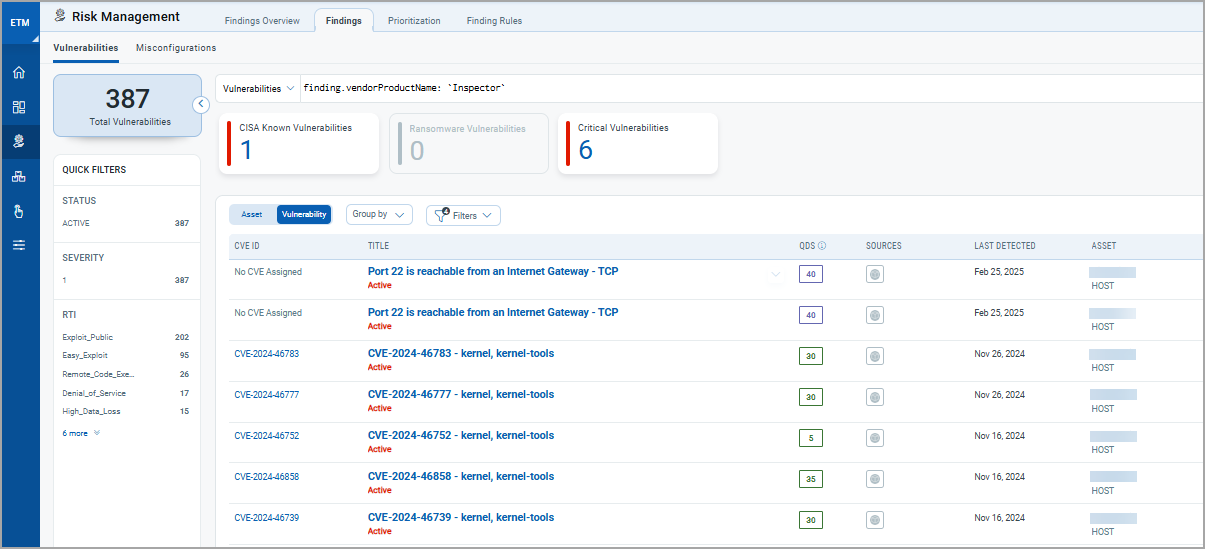
Next, you can navigate to the Risk Management tab to view your vulnerability findings.
Go to Findings > Vulnerability to view all the discovered vulnerabilities.
Use the token, finding.vendorProductName: `Inspector` to view all the discovered Amazon Inspector vulnerabilities.
To know more about how the Amazon Inspector API Connector leverages the findings, refer to the Qualys ETM Documentation.
Additional Resources
Additional Information related to Amazon Inspector Connector.
Data Model Map
This section explains the attribute mappings of the values from Amazon Inspector and Qualys ETM.
AWS Inspector Vulnerability Transformation Map
| Source Attribute Key | Target Attribute Label |
|---|---|
| resources.details.awsEc2Instance.keyName | assetName |
| resources.id | externalAssetId (Required) |
| title | findingName (Required) |
| findingArn | externalFindingId (Required) |
| severity | findingSeverity (Required) |
| description | findingDescription |
| exploitAvailable | isExploitAvailable |
| firstObservedAt | findingFirstFoundOn |
| fixAvailable | isPatchAvailable |
| inspectorScore | detectionScore |
| lastObservedAt | findingLastFoundOn |
| packageVulnerabilityDetails.cvss[].baseScore | cvssV2Base |
| packageVulnerabilityDetails.cvss[].scoringVector | vector |
| packageVulnerabilityDetails.referenceUrls[] | references |
| packageVulnerabilityDetails.vulnerabilityId | cveId |
| resources.details.awsEc2Instance.ipV4Addresses[] | ipAddress |
| resources.details.awsEc2Instance.platform | operatingSystemName |
| FUNCTION_PICKER | findingStatus |
| FUNCTION_PICKER | cloudProvider |
| resources.details.awsEc2Instance.iamInstanceProfileArn | cloudInstanceId |