BitSight Connector
The Bitsight API Connector bridges Bitsight's continuous security monitoring platform with Qualys ETM, automatically transferring asset inventory and vulnerability findings through scheduled data pulls. Security teams gain consolidated visibility into their external security posture by ingesting findings related to patching cadence, SSL configurations, web applications, and other risk categories alongside internal Qualys data.
The connector solves asset duplication and data fragmentation challenges by deduplicating redundant entries, normalizing data formats, enriching findings with context, and calculating risk scores. This integration enables faster, data-driven remediation decisions by correlating external threat intelligence with internal vulnerability assessments in a single platform.
Connector Details
The following table provides an overview of the BitSight Connector capabilities and supported functionality.
| Vendor | BitSight |
| Product Name | BitSight |
| Category | EASM |
| Works With | ETM, CSAM |
| Connector Type | ROC Connector |
| Supported Assets | Host Assets & Web Applications |
| Findings Support | Supported |
| Version | 1.0 |
| Supported Version & Type | SaaS (Latest) |
| Integration Type | API Integration (REST) |
| Authentication Type | OAuth API Token |
| Direction | Unidirectional (BitSight → Qualys) |
| Incremental Sync (Delta) | Supported |
| Import of Installed Software | Not Supported |
| Import of Source Tags | Not Supported |
| Filters / Filter Query | Not Currently Supported |
Configure the Connector
Before You Begin - AuthenticationBefore You Begin - Authentication
Complete the following prerequisites before configuring the BitSight Connector.
Generate an API Token in BitSight
- Log in to BitSight as an administrator.
- Navigate to Settings > Account > User API Token.
- Click Generate New Token.
- Copy and securely store the generated API token.
Important: The API token is the sole authentication credential used by the connector. Protect the token and rotate it periodically according to your organization's security policy.
Enable IP Visibility
Before scheduling the connector, configure IP Visibility in BitSight to unmask IP addresses and prevent duplicate asset creation in ETM.
- Log in to your BitSight instance.
- Navigate to Settings > IP Visibility.
- Accept the Terms and Conditions.
- Enable IP visibility for your entire portfolio or for selected companies.
If IP visibility is not enabled before the initial connector execution, imported assets may contain masked IP addresses such as xxx.xxx.xxx.xxx, which can increase the likelihood of duplicate asset creation.
Permissions Required
The BitSight user account used for connector authentication must have at minimum Reader permissions.
Scope and Data Access
The connector accesses all companies and assets visible to the authenticated BitSight account. Imported data includes asset information, applications, vulnerabilities, SSL findings, application security findings, and misconfigurations.
The connector supports the following data synchronization types:
- Assets & Vulnerabilities
- Applications & Vulnerabilities
- Assets
- Assets & Misconfigurations
Key Rotation
To rotate the API token:
- Navigate to Settings > Account > User API Token in BitSight.
- Generate a new API token.
- Update the connector configuration in Qualys using the new token.
Create a Profile & ConnectionCreate a Profile & Connection
Provide connector profile information and authentication details.
Connector Details
| Field | Type | Description |
|---|---|---|
Name |
String | Enter a unique connector profile name. Example: BitSight260505043336536. |
Description |
String | Optional description for the connector profile. Example: Test Description. |
Authentication Details
| Field | Type | Description |
|---|---|---|
User Token |
Encrypted String | Enter the BitSight API token generated from your BitSight account. |
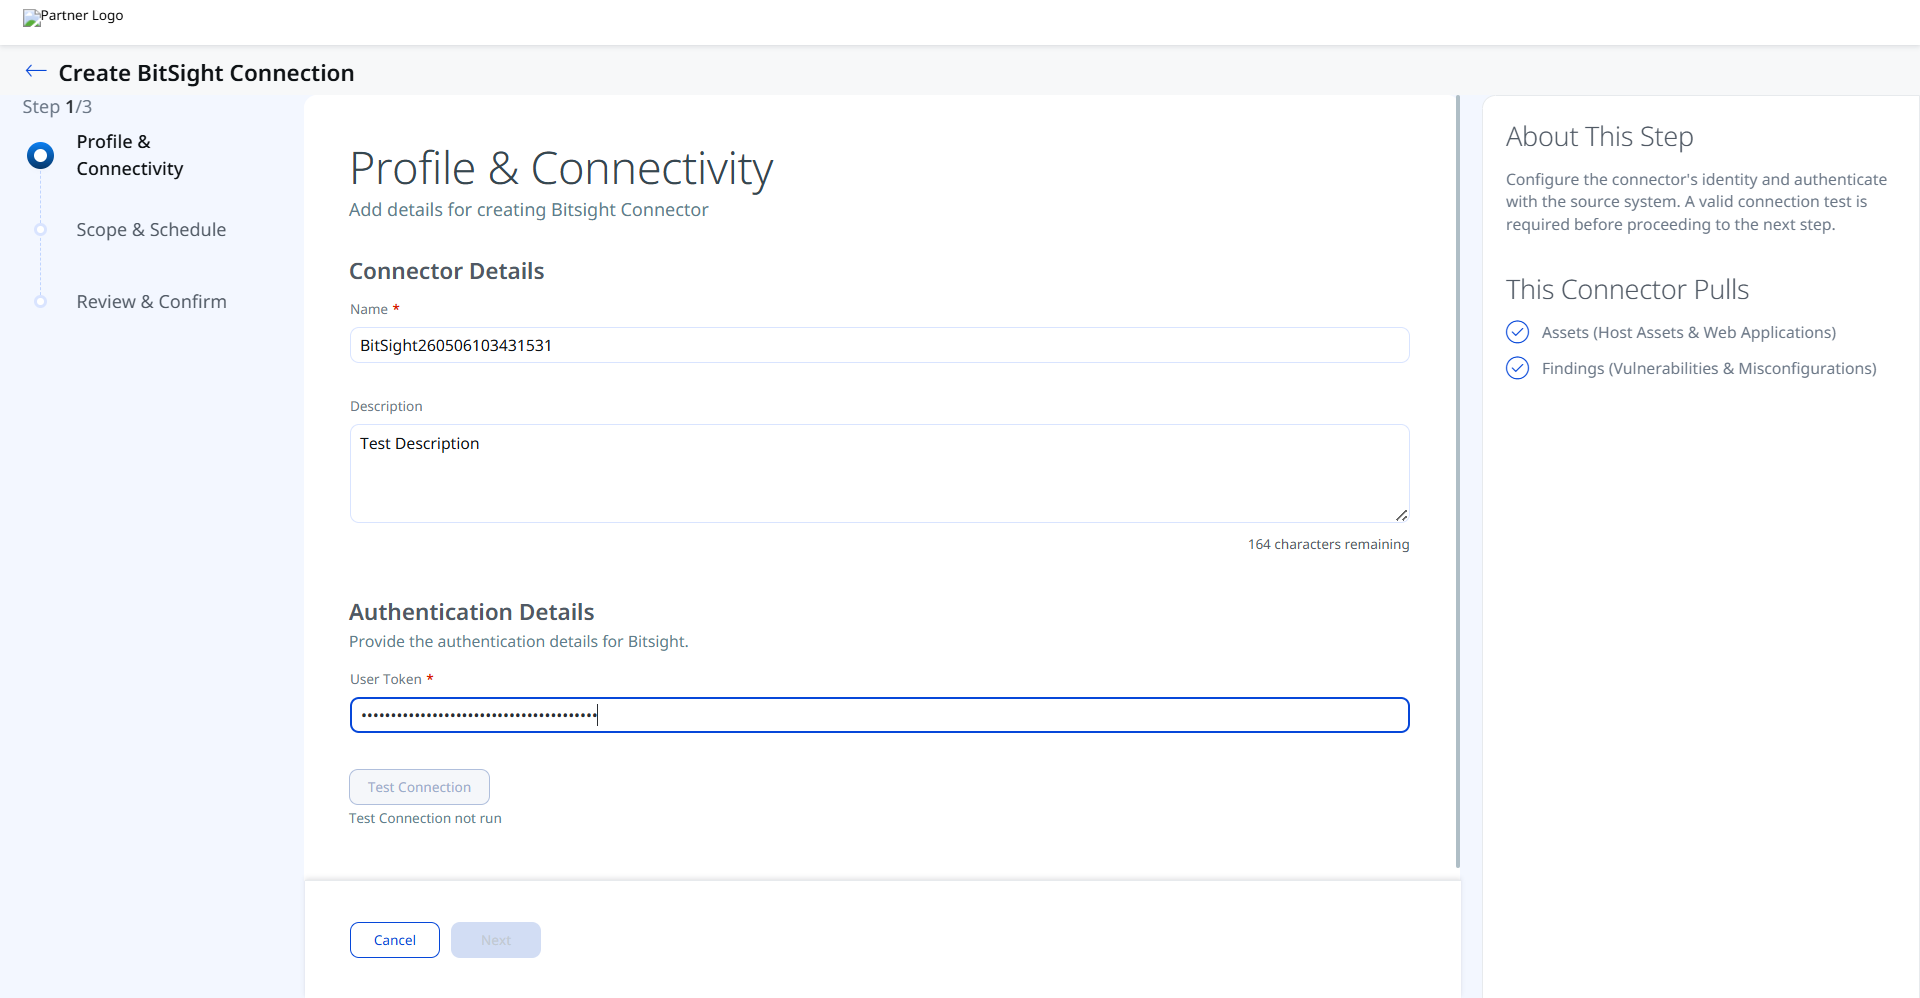
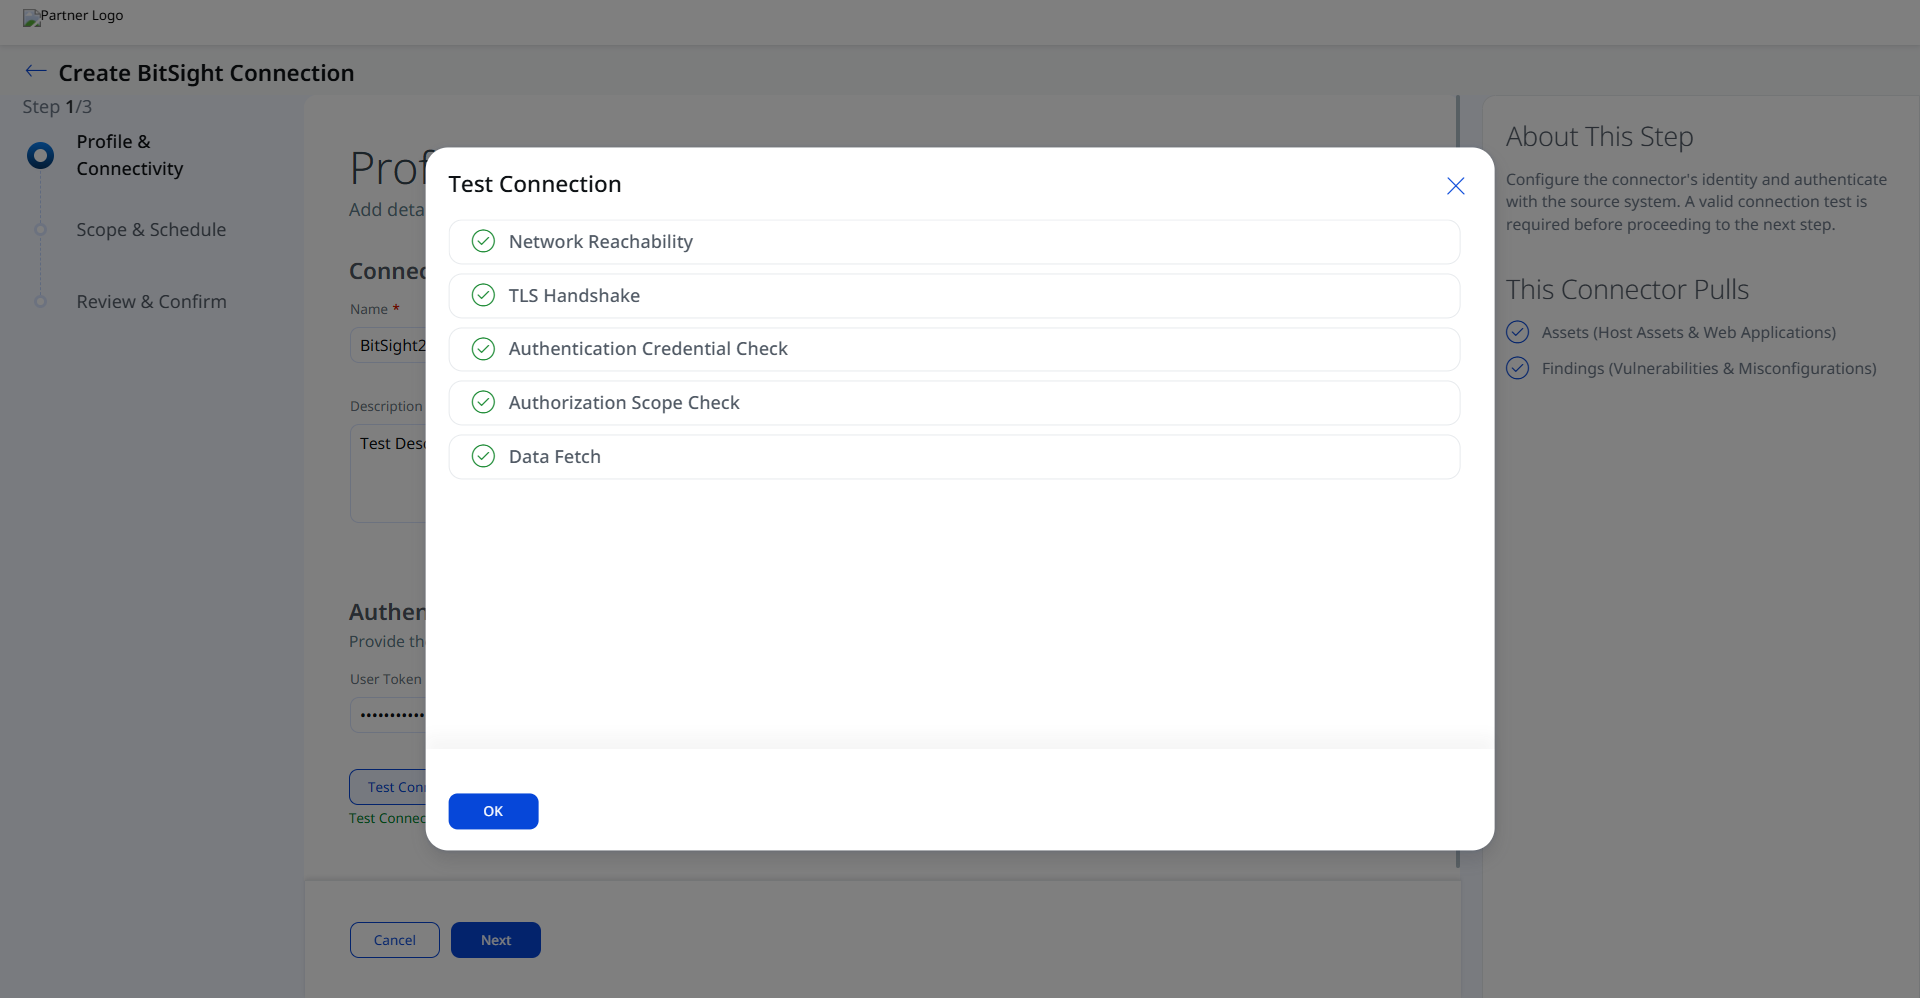
After entering the authentication details, click Test Connection to validate connectivity.
- Network Reachability
- TLS Handshake
- Authentication Credential Check
- Authorization Scope Check
- Data Fetch
Set the Scope & ScheduleSet the Scope & Schedule
Select the data types to synchronize and configure the execution schedule.
The connector supports the following synchronization options:
- Assets & Vulnerabilities
- Applications & Vulnerabilities
- Assets
- Assets & Misconfigurations
The connector schedule supports recurring execution frequencies such as Daily.
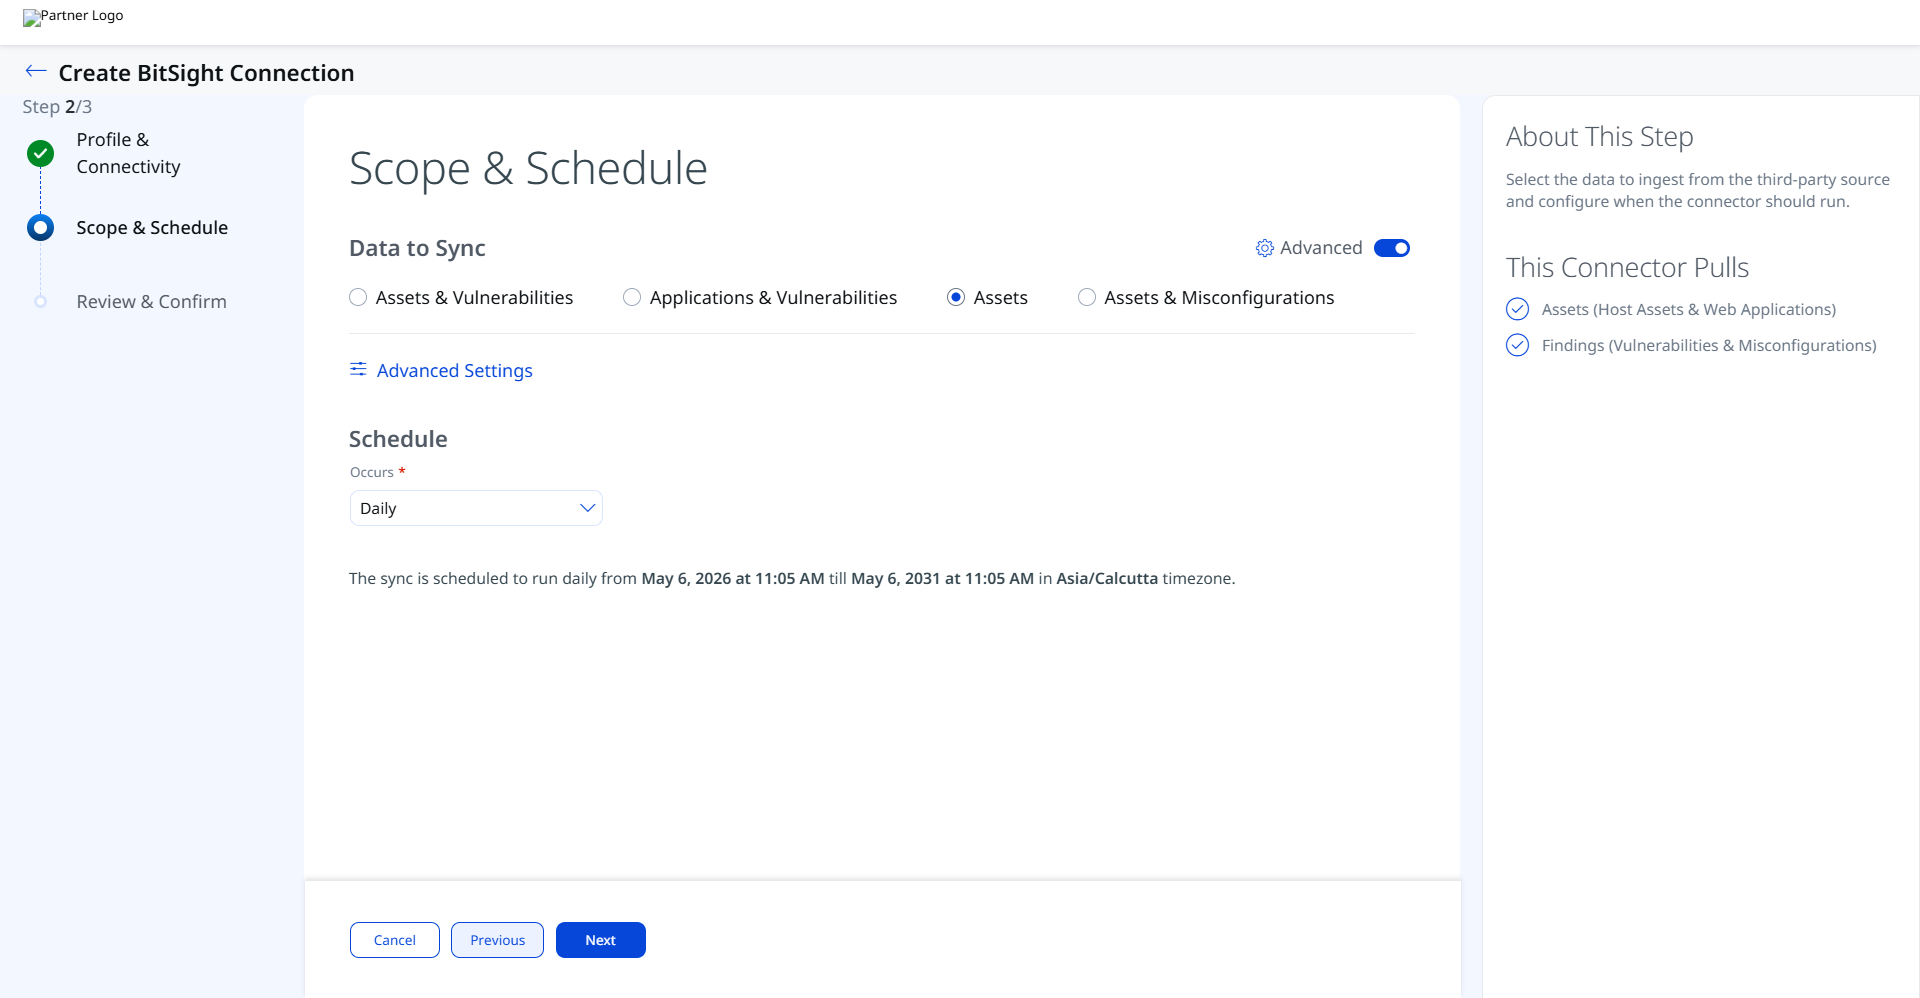
The connector schedule can run for up to five years from the configured start date and uses the configured timezone. Example timezone: Asia/Calcutta.
Advanced Settings
Filters Tab
The Filters tab is available in the Advanced Settings dialog.
The filter configuration is currently present but does not support filter query customization.
Save any Advanced Settings configuration changes before proceeding to the next setup step.
Transform Map Tab
The connector includes the following active out-of-box transform map:
Assets MapAssets Map
Bitsight Web Application Findings MapBitsight Web Application Findings Map
Bitsight Misconfigurations MapBitsight Misconfigurations Map
Bitsight Vulnerability MapBitsight Vulnerability Map
| assets.asset | externalAssetId |
| details.infection.family | finding[].name |
| details.vulnerabilities[].name | finding[].name |
| rolledup_observation_id | finding[].externalFindingId |
| severityCategory | finding[].severity |
| assets.asset | hostName |
| details.vulnerabilities[].cvss.base | finding[].findingType.vulnerability.cvss.cvss3Base |
| first_seen | finding[].firstFoundOn |
| last_seen | finding[].lastFoundOn |
| risk_category | finding[].category |
| rolledup_observation_id | finding[].findingType.vulnerability.vendorId |
| last_remediation_status_label | finding[].findingStatus |
| assets.ip_addresses[] | networkInterfaces[].ipAddress |
| details.vulnerabilities[].remediation_tip | finding[].remediation.remediationStrategy |
| details.remediation_tip | finding[].remediation.remediationStrategy |
| vulnerabilityName) | finding[].findingType.vulnerability.cveId |
| details.vulnerabilities[].description | finding[].description |
| details.infection.description | finding[].description |
| details.detection_method | finding[].detectionMethod |
| details.dest_port | finding[].port |
| risk_vector_label | finding[].subCategory |
| open_ports_description | finding[].detectionResult |
| details.diligence_annotations.certchain-summary | finding[].detectionResult |
| assets.origin_subsidiary.name | temp_q_customAttributes.origin_subsidiary |
| assets.asset | externalAssetId |
| details.searchable_details | finding[].name |
| details.infection.family | finding[].name |
| details.searchable_details | finding[].findingType.misconfiguration.policy.title |
| rolledup_observation_id | finding[].externalFindingId |
| severityCategory | finding[].severity |
| assets.asset | hostName |
| first_seen | finding[].firstFoundOn |
| last_seen | finding[].lastFoundOn |
| risk_category | finding[].category |
| assets.ip_addresses[] | networkInterfaces[].ipAddress |
| details.remediation_tip | finding[].remediation.remediationStrategy |
| details.vulnerabilities[].description | finding[].description |
| details.infection.description | finding[].description |
| security_outcome | finding[].findingStatus |
| details.detection_method | finding[].detectionMethod |
| details.dest_port | finding[].port |
| risk_vector_label | finding[].subCategory |
| assets.origin_subsidiary.name | temp_q_customAttributes.origin_subsidiary |
| details.final_location | webApp.webAppUrl |
| assets.asset | webApp.webAppName |
| rolledup_observation_id | finding[].externalFindingId |
| details.assessment_name | finding[].name |
| severityCategory | finding[].severity |
| first_seen | finding[].firstFoundOn |
| last_seen | finding[].lastFoundOn |
| details.help_text | finding[].description |
| result_finding_grade | finding[].findingStatus |
| risk_vector_label | finding[].subCategory |
| risk_category | finding[].category |
| rolledup_observation_id | finding[].findingType.vulnerability.vendorId |
| details.remediation_tip | finding[].remediation.remediationStrategy |
| assets.origin_subsidiary.name | temp_q_customAttributes.origin_subsidiary |
| asset | externalAssetId |
| asset | hostName |
| ip_addresses[] | networkInterfaces[].ipAddress |
| asset_type | type |
| origin_subsidiary.name | temp_q_customAttributes.origin_subsidiary |
Risk Severity Mapping Tab
The Risk Severity Mapping tab maps BitSight severity values to Qualys Detection Scores (QDS).
| Expected Source Value | Severity | QDS Score (Range 1-100) |
|---|---|---|
1 |
1 | 20 |
2 |
2 | 40 |
3 |
3 | 60 |
4 |
4 | 80 |
5 |
5 | 100 |
The configuration also supports a Default Severity value for unmatched findings.
CVE-based findings are automatically scored by Qualys and are not affected by this severity mapping configuration.
How the Connection Works
The BitSight connector imports external security ratings, asset data, vulnerability findings, and misconfiguration findings from the BitSight platform into Qualys ETM. The connector retrieves security posture information for your organization and portfolio companies, enabling correlation of external risk intelligence with internal vulnerability management workflows.
The connector retrieves Assets, Applications, Vulnerabilities, and Misconfiguration findings from BitSight. Imported data includes security ratings, IP-level asset information, SSL findings, application security observations, patching cadence findings, and related external exposure data.
Connector States
The connector progresses through the following operational states:
- Registered – The connector is successfully created and registered.
- Scheduled – The connector is scheduled for execution.
- Processing – The connector is actively importing assets and findings.
- Processed – The connector successfully completed synchronization.
The initial synchronization and findings processing can take up to two hours depending on data volume.
After the connector reaches the Processed state, findings import may still continue in the background. Allow additional processing time for all findings to appear in ETM.
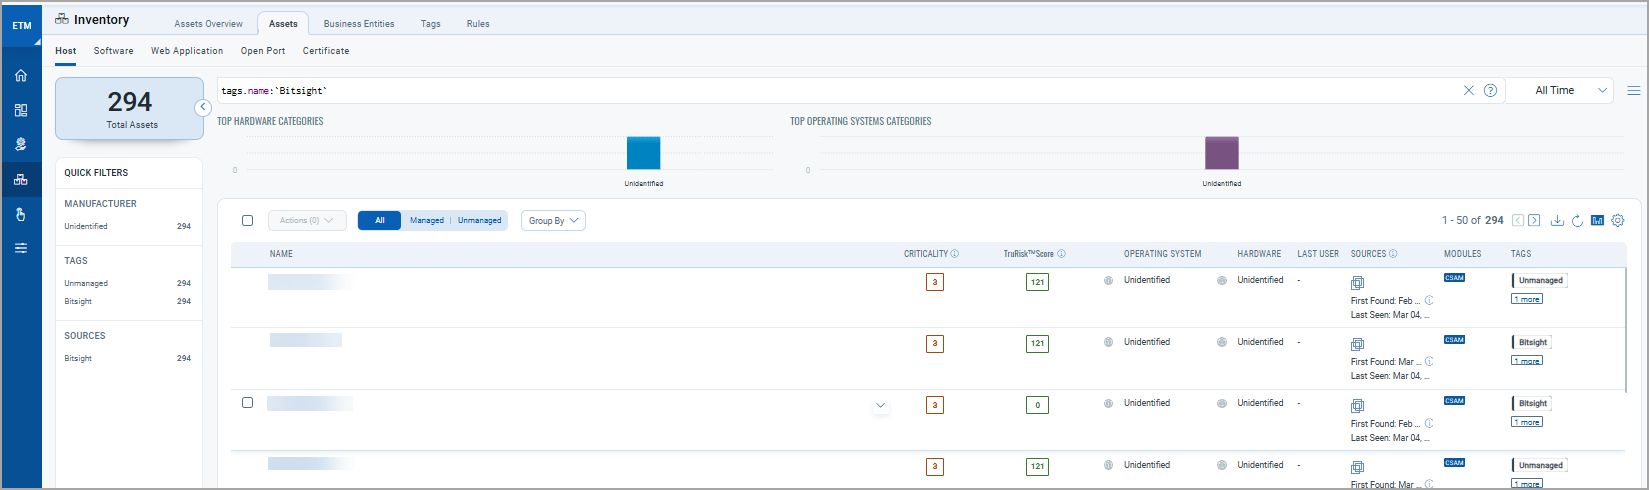
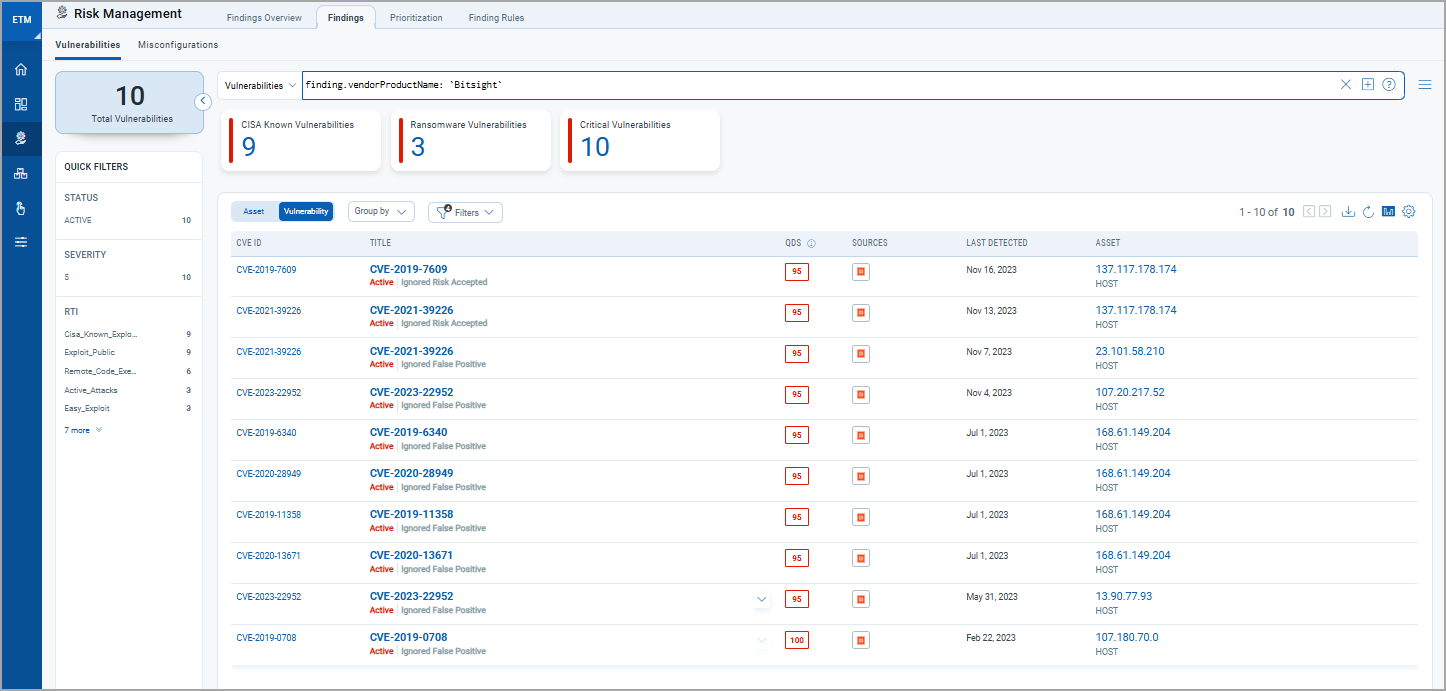
Viewing Assets and Findings in ETM
You can view imported assets and findings in Enterprise TruRisk Management (ETM).
To view imported BitSight assets, use the following QQL filter:
inventory:(source:"bitsight")
To view imported BitSight findings, use the following QQL filter:
findings.vendorProductname:"BitSight"
Troubleshooting
| Issue | Resolution |
|---|---|
| Duplicate assets appearing in inventory | Enable IP Visibility in BitSight under Settings > IP Visibility before running the connector to ensure unmasked IP addresses are imported. |
| Connector stuck in Processing state | The connector may require up to two hours to complete synchronization depending on the data volume. Review connector logs for API errors or rate limiting issues if processing exceeds this duration. |
| Assets or findings not appearing after processing | After the connector reaches the Processed state, findings synchronization may still be running. Allow additional time for all data to appear in ETM. |
Additional Information
API Reference
| Name | Filters | Endpoint |
|---|---|---|
| Authentication API | N/A | https://api.bitsighttech.com/ |
| Fetch Portfolio | N/A | https://api.bitsighttech.com/ratings/v2/portfolio/ |
| Fetch Companies | N/A | https://api.bitsighttech.com/ratings/v1/companies/ |
| Fetch Assets | Assets |
https://api.bitsighttech.com/ratings/v1/companies/${companyGUID}/assets |
| Fetch Vulnerabilities | patching_cadence, ssl_certificates, ssl_configurations |
https://api.bitsighttech.com/ratings/v1/companies/${companyGUID}/findings |
| Fetch Web Applications | web_appsec, application_security |
https://api.bitsighttech.com/ratings/v1/companies/${companyGUID}/findings |