BugCrowd Connector
The BugCrowd Connector bridges crowdsourced vulnerability research with enterprise risk management by automatically ingesting security findings from BugCrowd's researcher community into Qualys ETM. It eliminates manual data transfer and normalizes disparate vulnerability submissions through deduplication, format standardization, and enrichment with contextual risk scores.
Security teams gain unified visibility into web application vulnerabilities discovered by external researchers alongside internal findings, enabling comprehensive risk prioritization. The integration supports scheduled automation and flexible scoring mappings, allowing organizations to operationalize crowdsourced security intelligence within their existing risk management workflows.
Connector Details
The following table summarizes what the BugCrowd Connector supports.
|
Vendor |
Bugcrowd |
|
Product Name |
Bugcrowd |
|
Category |
Risk Source |
|
Findings Support |
Yes |
|
Supported Assets |
Web Applications |
|
Version |
1.0.0 |
|
Integration Type |
API Integration (REST) |
|
Direction |
Unidirectional |
|
Delta Support |
Not Supported |
| Import of Installed Software | Not Supported |
| Import of Source Tags | Not Supported |
| Filters/Filter Query | Yes |
Configure the Connector
The BugCrowd Connector setup wizard consists of three steps: Profile & Connectivity, Scope & Schedule, and Review & Confirm. A valid connection test is required before proceeding from Step 1 to Step 2.
Before You Begin - AuthenticationBefore You Begin - Authentication
Complete the following prerequisites before configuring the connector in Qualys ETM.
- Ensure you have administrator access to your BugCrowd portal.
- Generate API credentials in BugCrowd. Click the Profile icon, select API Credentials, enter an app name, and create credentials. Copy and securely store the API keys immediately, as they cannot be viewed again.
- Confirm network connectivity: Qualys cloud must be able to reach
api.bugcrowd.comover HTTPS (port 443).
Generating API Credentials in BugCrowd
Follow these steps to generate the API credentials you will need during connector setup.
- Log in to your BugCrowd portal with administrator access.
- Click the Profile icon and select API Credentials.
- Enter an application name and click Create.
- Copy and securely store the API keys immediately, as they cannot be viewed again after this screen.
Important: BugCrowd API credentials are displayed only once at the time of creation. If you navigate away without copying them, you must generate new credentials. Store them in a secrets manager or password vault immediately.
During connector setup in Qualys ETM, enter the BugCrowd API authentication details (username and password) on the Profile & Connectivity screen. Select Vulnerability as the data model and Application as the data model type.
Permissions Required
The BugCrowd account used for this connector must have administrator-level access to generate API credentials and access engagement and submission data.
Scope and Data Access
The connector queries the following BugCrowd API endpoints to retrieve web application assets and vulnerability findings:
https://api.bugcrowd.com/engagements– retrieves web application assets from active bug bounty engagements.https://api.bugcrowd.com/submissions– retrieves vulnerability findings (submissions) associated with those engagements.
Non-CVE vulnerability scores are mapped to Qualys Detection Scores (QDS) on a 0–100 scale across five severity levels.
Key Rotation
When rotating API credentials, generate new credentials in the BugCrowd portal under Profile > API Credentials. After generating the new credentials, update them in Qualys ETM using the Edit Connector option. The previous credential set will no longer be valid after regeneration.
Create a Profile & ConnectionCreate a Profile & Connection
Configure the connector's identity and authenticate with the BugCrowd source system.
Connector Details
|
Field |
Type |
Description |
|
Name |
String |
A unique display name for this connector instance. Example: |
|
Description |
String |
Optional free-text description (up to 180 characters). |
Authentication Details
|
Field |
Type |
Description |
|
API URL |
String |
The BugCrowd API base URL. Default value: |
|
API Authentication Username |
String |
The API credential username (app name) generated in the BugCrowd portal under Profile > API Credentials. Example: |
|
API Authentication Password |
Encrypted String |
The API credential password (secret) generated alongside the username. This value is masked after entry and cannot be retrieved. |
Important: The API Authentication Password is stored encrypted and is never displayed in plaintext after initial entry. If you lose this value, generate new API credentials in BugCrowd and update the connector via Edit Connector.

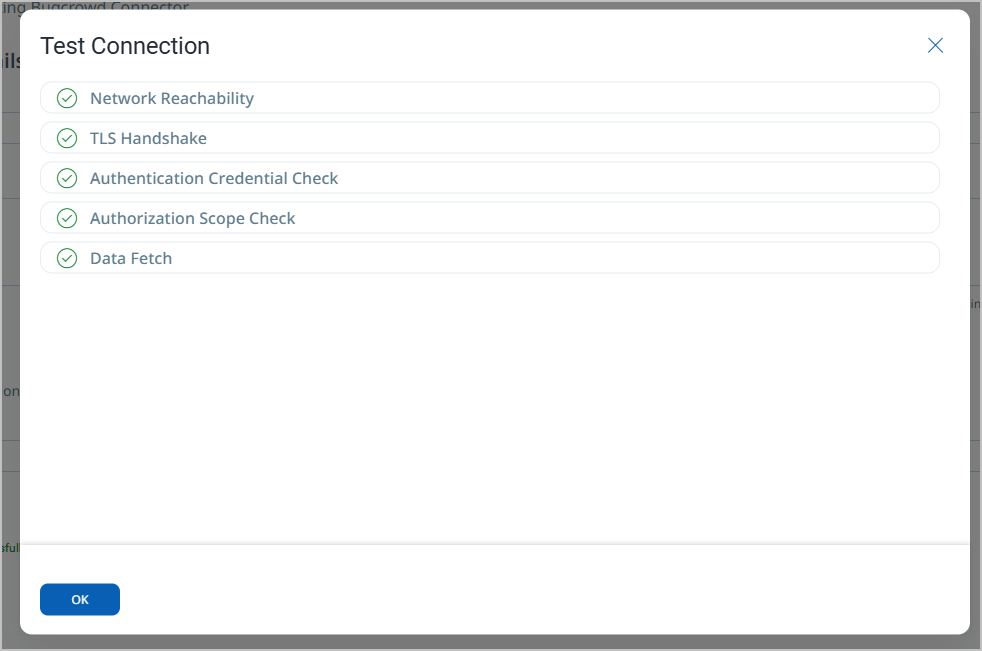
After entering all authentication details, click Test Connection. The following checks are performed:
- Network Reachability
- TLS Handshake
- Authentication Credential Check
- Authorization Scope Check
- Data Fetch
All five checks must pass before you can proceed to Step 2. If the connection test fails, verify that api.bugcrowd.com is reachable over HTTPS (port 443) and that the API credentials have not been revoked.
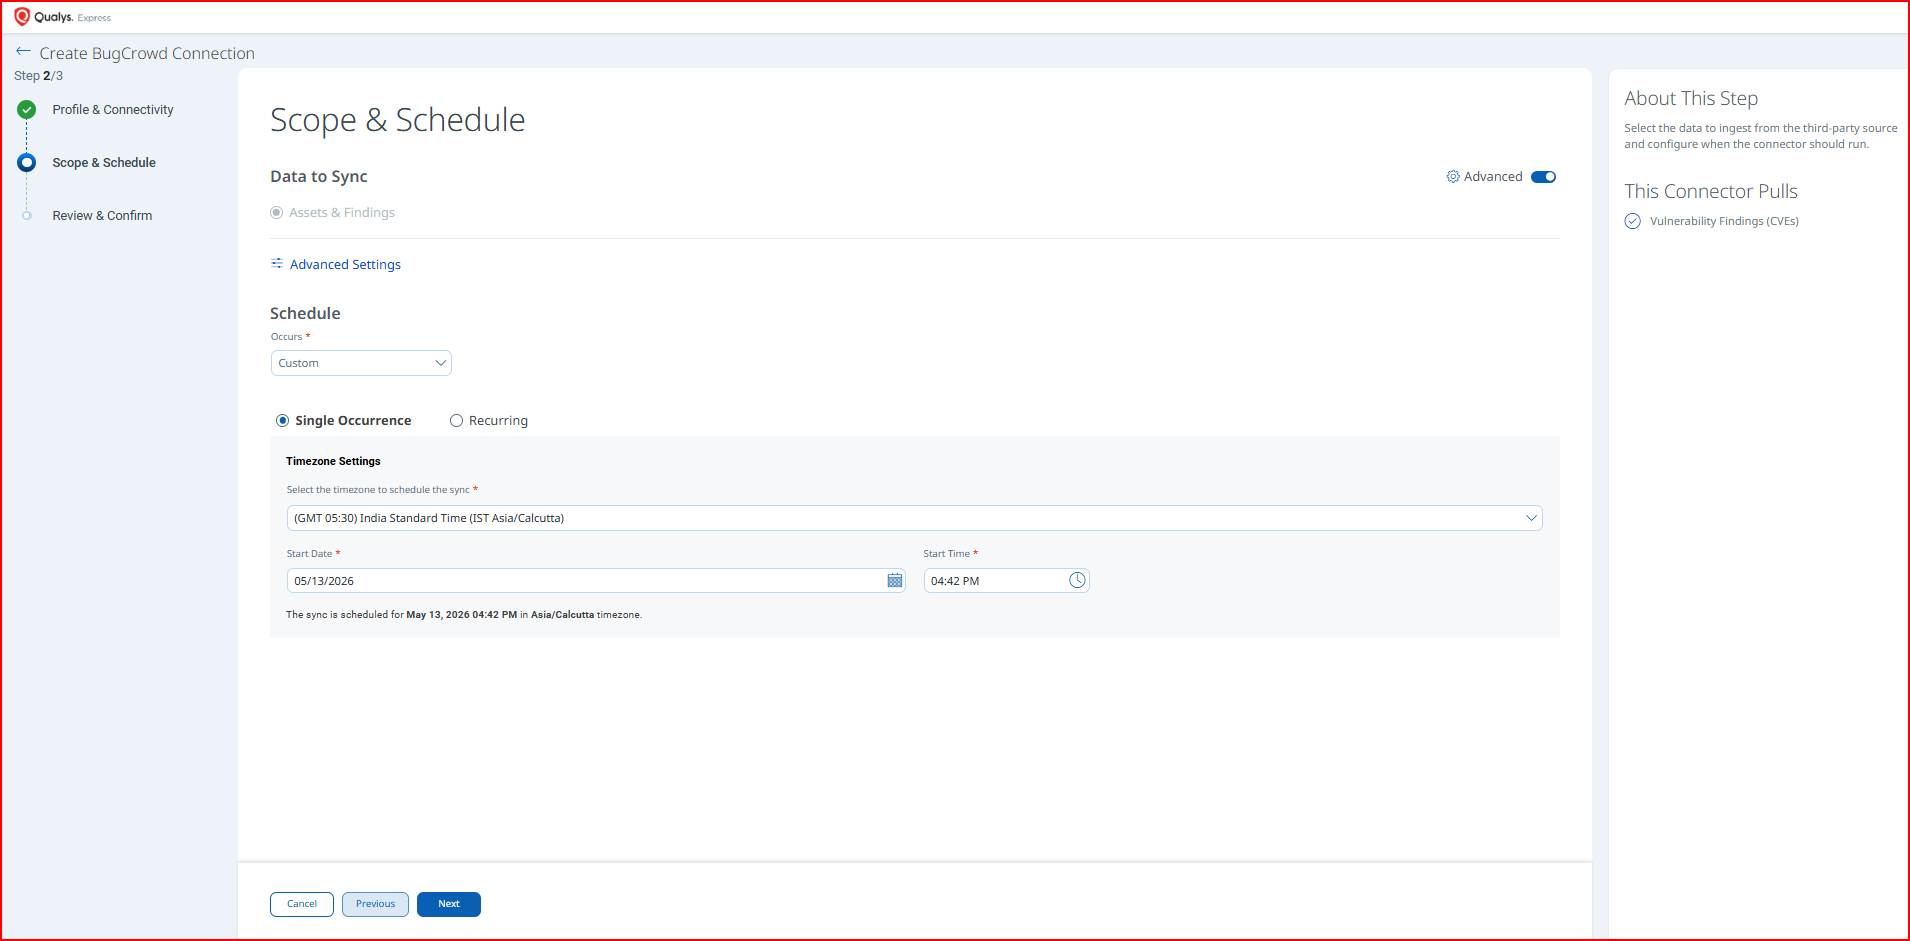
Set the Scope & ScheduleSet the Scope & Schedule
Select the data to ingest from BugCrowd and configure when the connector should run.
Data to Sync: Assets & Findings (fixed; this connector always ingests both web application assets and vulnerability findings).
Schedule: Use the Occurs dropdown to select a recurrence. Available options include Daily and Custom.
- Daily – the connector runs once every 24 hours starting from the configured date and time.
- Custom – choose between Single Occurrence (runs once at the specified date and time) and Recurring (repeating on a defined interval).
For Custom schedules, configure the following fields:
|
Field |
Description |
|
Select the timezone to schedule the sync |
Timezone for the scheduled run. Example: |
|
Start Date |
The calendar date on which the connector run will begin. Format: |
|
Start Time |
The time of day for the connector run. |
Note: Schedule times are interpreted in the timezone selected above. The confirmation message below the schedule fields displays the resolved date, time, and timezone before you proceed.
Click Advanced Settings to configure optional filters, review the transform map, and view risk severity mapping before proceeding.
Review the complete connector configuration before saving. Click Create to save the connector. Click Previous to return to an earlier step and make changes.
Advanced Settings
Advanced Settings are accessible from the Scope & Schedule step by clicking the Advanced Settings link. This panel contains three tabs: Filters, Transform Map, and Risk Severity Mapping.
Note: Click Save in the Advanced Settings panel before closing it to preserve any changes made to filters or mappings.
Filters Tab
The Filters tab lets you scope which data the connector retrieves from BugCrowd during each sync run.
Detection of DataType – a chip selector field. Select one or more data types to include in the sync. The chip App Issues is available and selected by default.
Filter – a free-text JSON filter field. Enter a JSON object to apply server-side filtering on the BugCrowd submissions endpoint. The filter expression is passed directly to the BugCrowd API.
Example filter expression visible in the UI:
{"state":"unresolved,resolved,triaged"}– returns only submissions in the specified states.
Use the state key to filter submissions by their current lifecycle state. Supported state values include unresolved, resolved, and triaged. Combine multiple values as a comma-separated string within the JSON value.
Transform Map Tab
The Transform Map tab displays the active out-of-box transformation configuration used to map BugCrowd submission fields to the Qualys ETM schema. No additional configuration is required to use the default map.
The active transform map for this connector is the BugCrowd Submissions map. View the map to understand the field-level transformation, or clone it to create a customized version.
Risk Severity Mapping Tab
The Risk Severity Mapping tab defines how BugCrowd submission severity levels are translated to Qualys Detection Scores (QDS) on a 0–100 scale. Non-CVE vulnerability scores are mapped across five severity levels.
Note: CVE-based findings are scored automatically by Qualys using CVSS data and are not affected by the Risk Severity Mapping configuration.
How the Connection Works
The BugCrowd Connector retrieves web application assets and associated vulnerability findings from crowdsourced security engagements on the BugCrowd platform and imports them into Qualys ETM for unified risk analysis and prioritization.
Each run retrieves web application assets and associated vulnerability findings from BugCrowd submissions. Findings include vulnerability severity, status, descriptions, and related security details from crowdsourced bug bounty engagements. Delta synchronization is not supported; each run performs a full pull.
A BugCrowd connection creates a profile that defines which vulnerability data to import based on detection data types. The connector then executes automatically according to the configured schedule (or on demand), pulling vulnerability data from BugCrowd into Qualys ETM where it can be viewed alongside other security findings.
Connector States
A successfully configured connector transitions through the following states:
- Registered – The connector has been successfully created and is registered to fetch data from BugCrowd.
- Scheduled – The connector is scheduled and waiting to execute its first connection.
- Processing – A connection is executing and the connector is actively fetching asset and findings data from BugCrowd.
- Processed – The connector has successfully fetched assets. Findings may still be processing in the background; allow additional time for all findings to appear.
Note: The first connector run may take up to 2 hours to complete. The Processed state indicates the connector is configured correctly, but the full import of findings – particularly for large engagement datasets – may continue after the state changes. Once processing is complete, imported data is available in Enterprise TruRisk Management (ETM).
Viewing Assets and Findings in ETM
Navigate to Enterprise TruRisk Management (ETM) to analyze vulnerability findings imported by this connector.
To view assets imported from BugCrowd, go to the Inventory tab and use the following filter token:
inventory:(source:"Bugcrowd")
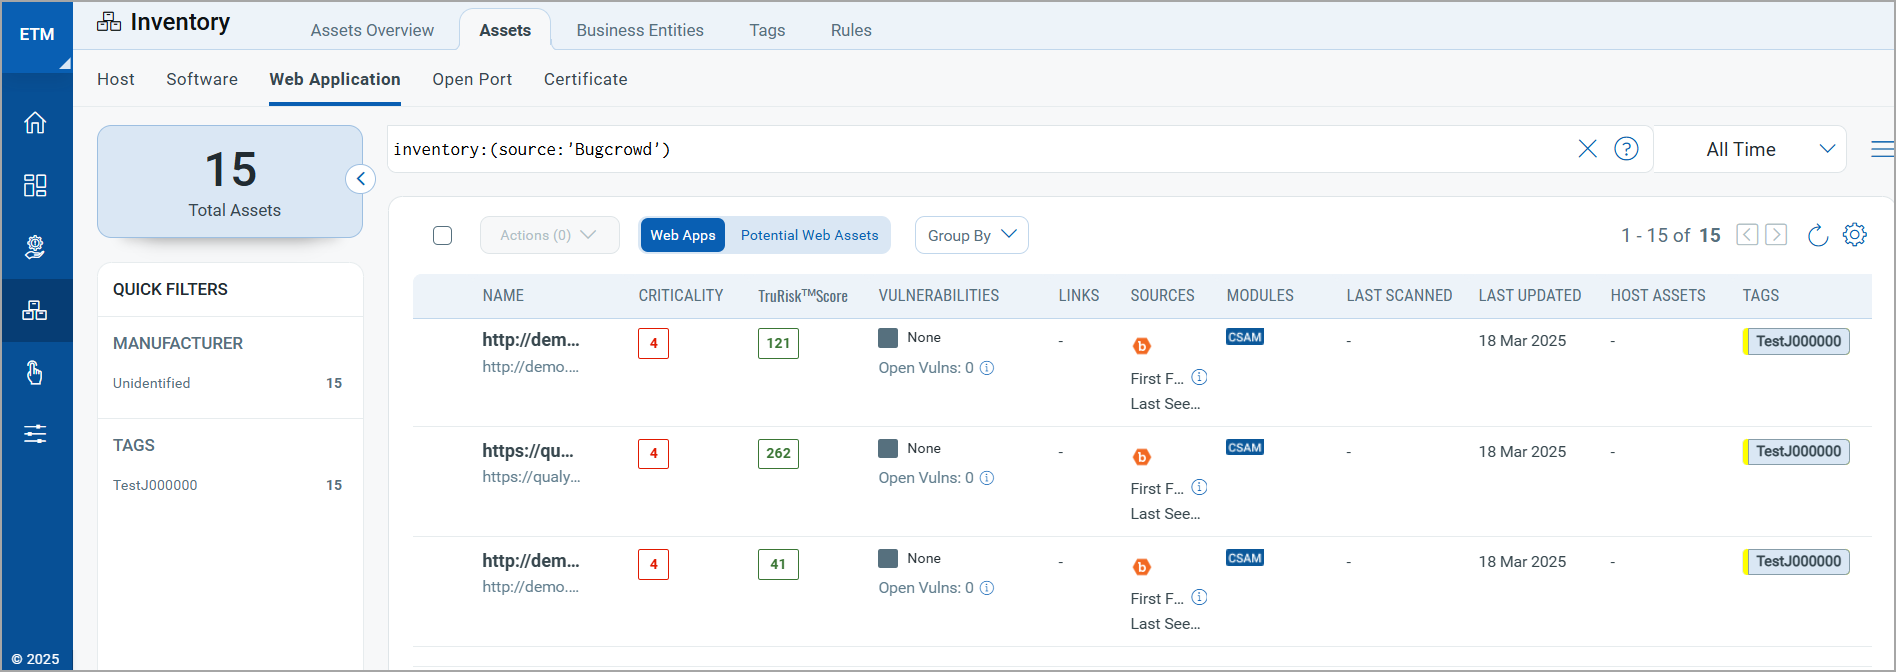
Here you can review asset criticality and Risk Scores. Click any asset to view detailed information.
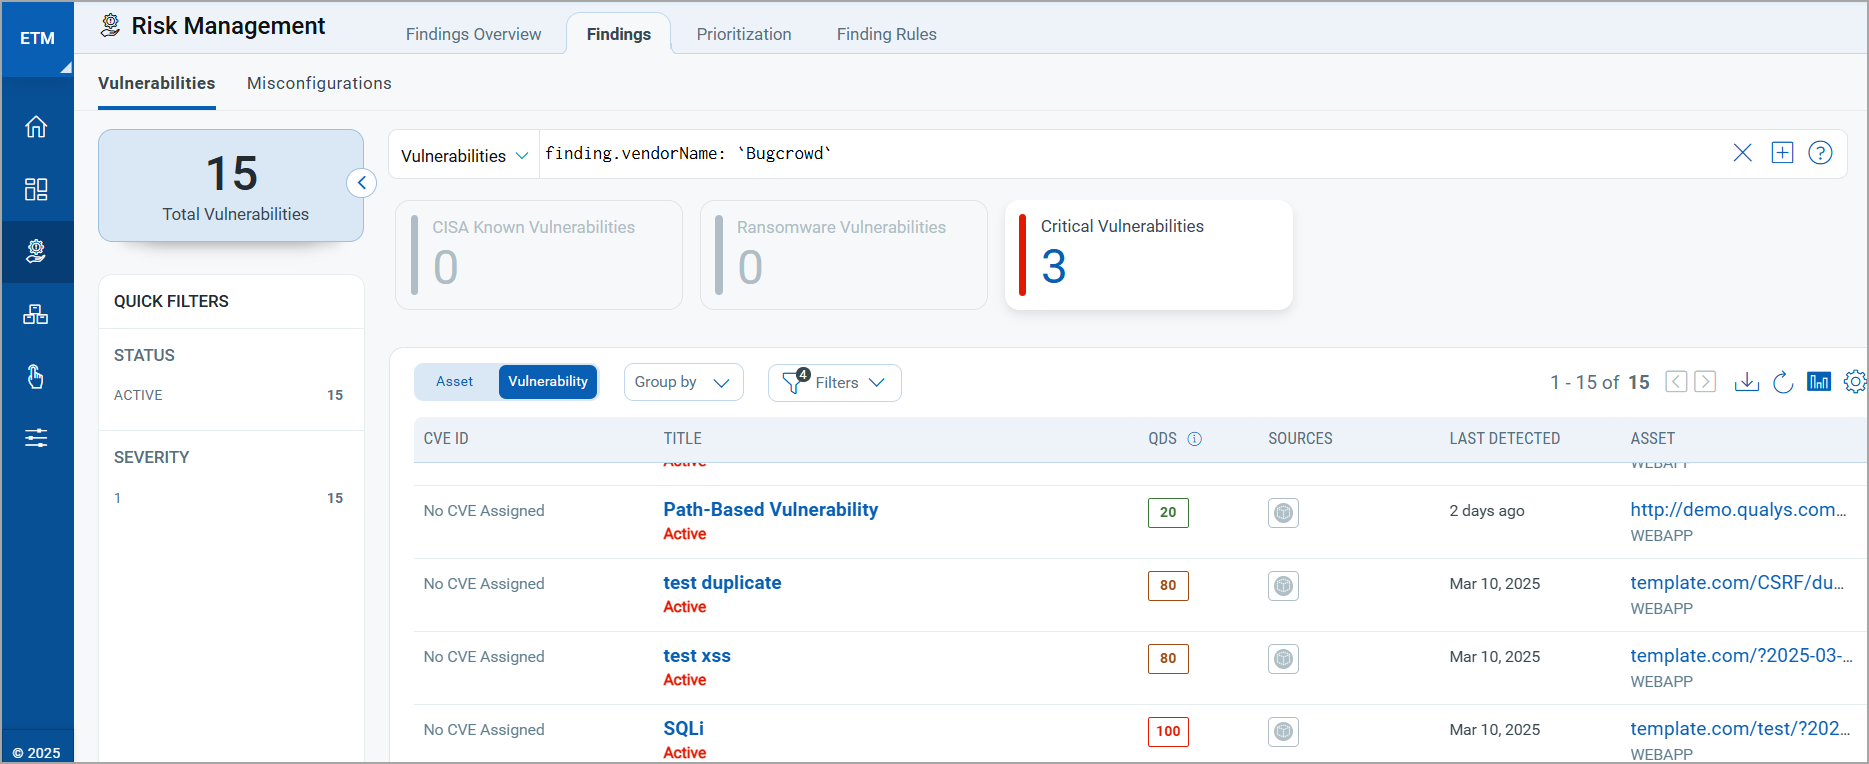
To view vulnerability findings, navigate to Findings > Vulnerability in the Risk Management tab and use the following filter token:
findings.vendorProductname:"Bugcrowd"
Troubleshooting
| Issue | Resolution |
| Authentication failure on connector run | Verify the API credentials entered in Qualys ETM match the current credentials in BugCrowd. If credentials were regenerated in BugCrowd, the previous set may no longer be valid. Update them using the Edit Connector option. |
| No findings imported after first run | The connector transitions through Registered, Scheduled, Processing, and Processed states. The entire process may take up to 2 hours to complete. Verify the BugCrowd account has active engagements with submissions. |
| Connection test fails | Verify Qualys cloud can reach api.bugcrowd.com over HTTPS (port 443). Confirm the API credentials have not been revoked in the BugCrowd portal. |
Additional Information
API Reference
The BugCrowd Connector uses the following BugCrowd REST API endpoints:
|
Endpoint |
Purpose |
|
|
Retrieves web application assets from active bug bounty engagements. |
|
|
Retrieves vulnerability findings (submissions) associated with those engagements. |
Transformation Maps
The BugCrowd Connector ships with an out-of-box transformation map that maps BugCrowd submission fields to the Qualys ETM finding schema. No additional configuration is required to use the default map. Clone the map to create a customized version.
BugCrowd Submissions – Finding MapBugCrowd Submissions – Finding Map
|
Source Attribute (BugCrowd) |
Target Attribute (Qualys ETM) |
|
|
|
|
|
|
|
|
|
|
|
|
|
|
|
|
|
|
|
|
|
|
|
|
|
|
|
|
Enum values:
|
Mapped values:
|