CrowdStrike Endpoint Security Connector
The CrowdStrike Endpoint Security Connector retrieves host asset records and associated vulnerability findings from CrowdStrike Spotlight via its REST API and imports them into Qualys ETM for unified risk analysis and prioritization. Qualys ETM processes the incoming data by de-duplicating redundant entries, normalizing data formats, enriching findings with additional context, and calculating risk scores using TruRisk. The connector supports delta (incremental) synchronization for ongoing scheduled runs.
By automatically syncing host assets and their associated vulnerabilities into a centralized platform, security teams gain unified visibility into their security posture without manual data aggregation. This integration eliminates data silos between endpoint protection and vulnerability management, allowing practitioners to correlate findings and prioritize remediation efforts more effectively.
Connector Details
The following table provides a comprehensive overview of what the CrowdStrike Endpoint Security Connector supports.
| Vendor | CrowdStrike |
| Product Name | CrowdStrike Endpoint Security |
| Category | EDR |
| Works With | ETM, CSAM |
| Connector Type | ROC Connector |
| Supported Assets | Host Asset Records |
| Findings Support | Yes |
| Version | 1.0.0 |
| Supported Version & Type | SaaS (Latest) |
| Integration Type | API Integration (REST) |
| Authentication Type | OAuth2 (Client Credentials) |
| Direction | Unidirectional (CrowdStrike → Qualys) |
| Incremental Sync (Delta) | Supported |
| Import of Installed Software | Not Supported |
| Import of Source Tags | Supported |
| Filters / Filter Query | Not Supported |
Configure the Connector
The connector setup wizard guides you through three steps: Profile & Connectivity, Scope & Schedule, and Review & Confirm. A successful connection test is required to proceed to the next step.
Before You Begin - AuthenticationBefore You Begin - Authentication
Before configuring the connector in Qualys ETM, ensure you have the following ready:
- Ensure you have admin-level access to your CrowdStrike Falcon platform to create API clients.
- Create an API client in the CrowdStrike portal. Navigate to Support > API Clients and Keys and click Add new API Client. Assign the required scopes (see Permissions Required below). Copy and save the Client ID and Client Secret immediately, as the secret cannot be viewed again.
- Confirm network connectivity: Qualys cloud must be able to reach your CrowdStrike API endpoint over HTTPS (port 443).
- Identify your CrowdStrike Auth URL based on your cloud region (for example,
https://api.us-2.crowdstrike.comorhttps://api.eu-1.crowdstrike.com).
Creating an API Client in CrowdStrike Falcon
Follow these steps to create the API client that the connector will use to authenticate.
- Log in to your CrowdStrike Falcon platform with admin credentials.
- Navigate to Support > API Clients and Keys.
- Click Add new API Client. Provide a name and description, and assign the required scopes (see Permissions Required).
- Click Add. The platform displays the Client ID and Client Secret. Copy and save both values immediately, as the secret cannot be retrieved after this screen is closed.
Important: The Client Secret is shown only once. If you close the creation screen without saving the secret, you must regenerate it under Support > API Clients and Keys.
Identifying Your Auth URL
Your Auth URL depends on your CrowdStrike cloud region. Common values include:
https://api.us-2.crowdstrike.comfor US-2https://api.eu-1.crowdstrike.comfor EU-1
You can find your region in the CrowdStrike Falcon console URL or by checking with your CrowdStrike account representative.
Entering Credentials in Qualys ETM
During connector setup in Qualys ETM, select CrowdStrike Spotlight as the supported format and enter the Auth URL, Client ID, and Client Secret in the authentication fields on the Profile & Connectivity screen. The connector uses these credentials to authenticate against the CrowdStrike OAuth2 token endpoint and access the Spotlight and Discover APIs.
Permissions Required
The CrowdStrike API client must have Read permissions for the following scopes. Search and assign these scopes when creating the API client in the CrowdStrike Endpoint console:
| Scope | Permission |
|---|---|
|
Detections |
Read |
|
Hosts |
Read |
| Vulnerabilities | Read |
Scope and Data Access
The connector queries the CrowdStrike Spotlight vulnerabilities endpoint and the Discover hosts endpoint to retrieve vulnerability and asset data. Optional filters can be configured in the connector profile, including Product Type (to filter by asset categories) and Data Provider (to select between Falcon Network Scan and Active Directory sources).
Note: Multi-customer accounts with parent/child Customer IDs must use the appropriate user account, as child CIDs can only access their own host groups and vulnerabilities. Import of installed software and source tags is not supported.
Key Rotation
If the Client Secret is lost or compromised, regenerate it in the CrowdStrike Falcon console under Support > API Clients and Keys. After generating a new secret, update the credential in Qualys ETM via the Edit Connector option. OAuth2 access tokens have a standard 30-minute lifespan and are automatically refreshed by the connector.
Create a Profile & ConnectionCreate a Profile & Connection
This step configures the connector's identity and authenticates with CrowdStrike.
Connector Details
| Field | Type | Description |
|---|---|---|
| Name | String | A unique display name for this connector connection. Example: CrowdStrike Endpoint Security260505023738538 |
| Description | String | Optional free-text description of this connection (up to 164 characters). |
Authentication Details
Enter the OAuth2 credentials generated from the CrowdStrike Falcon console.
| Field | Type | Description |
|---|---|---|
| Url | String | The CrowdStrike OAuth2 Auth URL for your cloud region. Example: https://api.us-2.crowdstrike.com |
| Client ID | String | The Client ID generated when you created the API client in the CrowdStrike Falcon console. |
| Client Secret | Encrypted String | The Client Secret generated when you created the API client. This value is masked after entry. Stored securely by Qualys ETM. |
Important: The Client Secret is shown only once in the CrowdStrike Falcon console. Copy and save it before closing the API client creation screen. If lost, you must regenerate the secret and update this field.

After entering all authentication fields, click Test Connection. Qualys ETM performs the following checks:
- Network Reachability — Verifies that the connector endpoint is reachable over HTTPS (port 443).
- TLS Handshake — Confirms that a secure TLS connection can be established with the remote endpoint.
- Authentication Credential Check — Validates the configured credentials against the source system's authentication endpoint.
- Authorization Scope Check — Confirms that the provided credentials have the required permissions to access the configured data scope.
- Data Fetch — Verifies that data can be successfully retrieved from the source system using the configured connection.
All five checks must pass before you can proceed to Step 2. If any check fails, refer to the Troubleshooting section for resolution steps.

Set the Scope & ScheduleSet the Scope & Schedule
Select the data to ingest from CrowdStrike and configure when the connector should run.
Data to Sync – Choose one of the following options:
- Assets & Findings (default) – Syncs both host asset records and vulnerability findings (CVEs) from CrowdStrike Spotlight.
- Assets – Syncs host asset records only, without vulnerability findings.
Schedule – Set the Occurs field to define how frequently the connector runs. The default is Daily.
Note: The schedule runs in your configured timezone. The sync is active for a 5-year duration from the start date and time you confirm in this step. For example: daily from May 5, 2026 at 03:08 PM till May 5, 2031 at 03:08 PM in the Asia/Calcutta timezone.
Click Advanced Settings to optionally configure filters, transformation maps, and risk severity mapping (see Advanced Settings).
Sampling Mode - Limit Sync to Top 1,000 Assets and Findings
Sampling Mode can restrict data ingestion to a targeted subset of up to 1,000 assets and their associated findings. You can quickly validate integration and review meaningful security data without a full environment sync.
You can select the Limit sync to top 1,000 assets and findings checkbox to limit the fetch 1000 assets using risk-based filter criteria. The assets, along with their associated findings, are discovered and shared with ETM. The connector applies risk-based filters during asset fetch to ensure the ingested subset represents the most relevant assets in your environment rather than a random or arbitrary sample.
Assets are fetched based on the last-seen timestamp, configured in the connector's advanced settings in the UI. The fetch is scoped to specific endpoint categories such as servers, workstations, and domain controllers, ensuring coverage across your most critical managed device types.
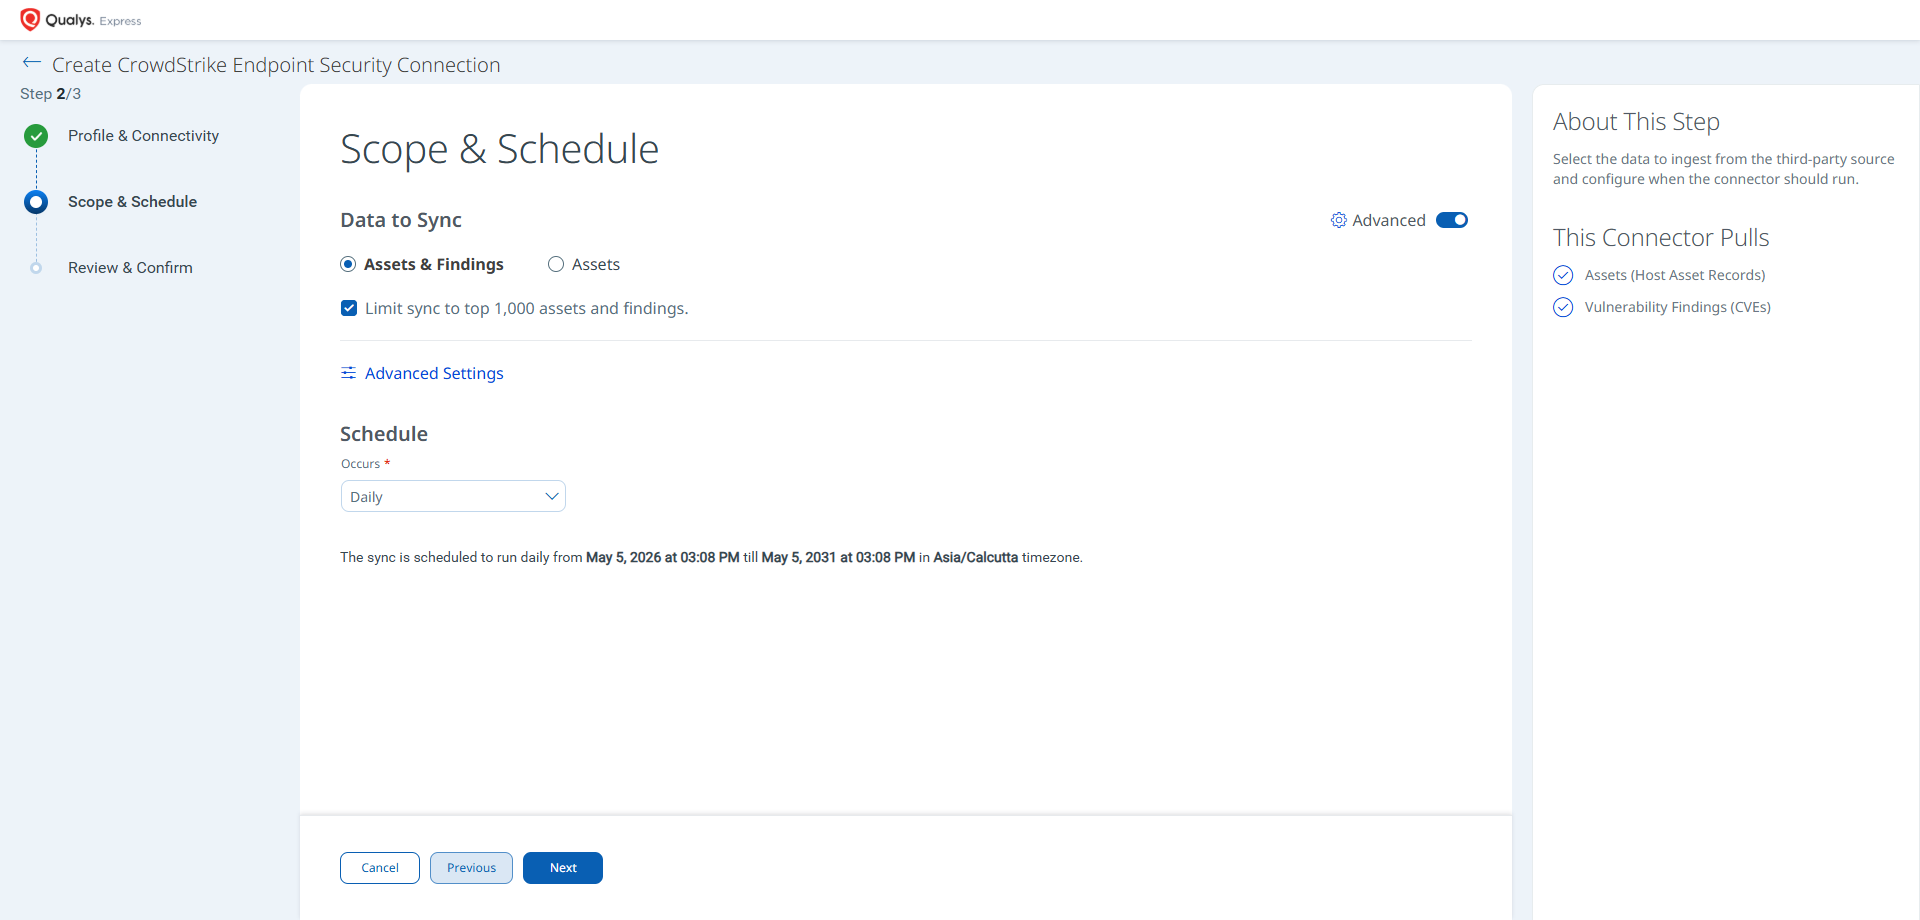
Review all settings before creating the connector. If all settings are correct, click Create. The connector connection is created and immediately transitions to the Registered state.
Advanced Settings
Advanced Settings are optional and can be accessed by clicking Advanced Settings on the Scope & Schedule screen. The panel contains three tabs: Filters, Transform Map, and Risk Severity Mapping.
Note: Click Save within the Advanced Settings panel before closing it to retain any changes you make.
Filters Tab
The Filters tab displays a Fetch From date field that allows you to set the earliest date from which data should be retrieved. The default value is 01/01/1970, which retrieves all available historical data.
Note: This connector does not currently support OData filter queries or chip-based asset type filtering. The Fetch From date is the only available filter control.
Transform Map Tab
The Transform Map tab lists the active transformation maps applied to data ingested by this connector. The following map is active for the CrowdStrike Endpoint Security Connector:
- Crowdstrike Spotlight Vulnerability Map
Transformation maps define how source fields from CrowdStrike are translated into Qualys ETM target fields. For field-level mapping details, see Transformation Maps under Additional Information.
Risk Severity Mapping Tab
The Risk Severity Mapping tab defines how CrowdStrike severity values are translated into Qualys severity levels and QDS scores for findings that are not scored automatically by the Qualys Cloud Threat Database.
Note: Qualys automatically updates scores for CVE-based vulnerabilities available in the Qualys Cloud Threat Database. The severity mapping below applies only to findings that are not CVE-based or are not present in the Qualys Cloud Threat Database.
| Expected Source Value | Severity | QDS Score (Range 1–100) |
|---|---|---|
| 1 | 1 | 20 |
| 2 | 2 | 40 |
| 3 | 3 | 60 |
| 4 | 4 | 80 |
| 5 | 5 | 100 |
Default Severity: 2. This value is applied when the severity value from CrowdStrike is unavailable for a given finding.
How the Connection Works
The CrowdStrike Endpoint Security Connector pulls two categories of data from CrowdStrike Spotlight into Qualys ETM:
- Assets (Host Asset Records) – Each run retrieves host asset records from CrowdStrike including hostname, operating system version, serial number, BIOS manufacturer, IP addresses, and MAC addresses.
- Vulnerability Findings (CVEs) – When vulnerability ingestion is enabled, associated CVE data is imported including CVE ID, severity, CVSS base score, finding status, detection method, and confidence level from CrowdStrike Spotlight
Connector States
After creating a connection, the connector transitions through the following states:
- Registered – The connection has been created and is waiting to be picked up for its first scheduled run.
- Scheduled – The connector is scheduled to execute a connection with CrowdStrike.
- Processing – A connection is executing and the connector is actively fetching asset and findings data from CrowdStrike Spotlight.
- Processed – The connector has successfully fetched assets. Findings may still be processing. Wait for the connector to complete findings import before expecting all data to appear in ETM.
- Errored – The connector encountered an error during the last run. Check the connection logs and refer to the Troubleshooting section.
Note: The entire first-run process – including asset and findings import – may take up to 2 hours for completion. The Processed state indicates that assets have been imported successfully, but findings import (specifically for large datasets) may still be in progress. Allow additional time before assuming findings are missing.
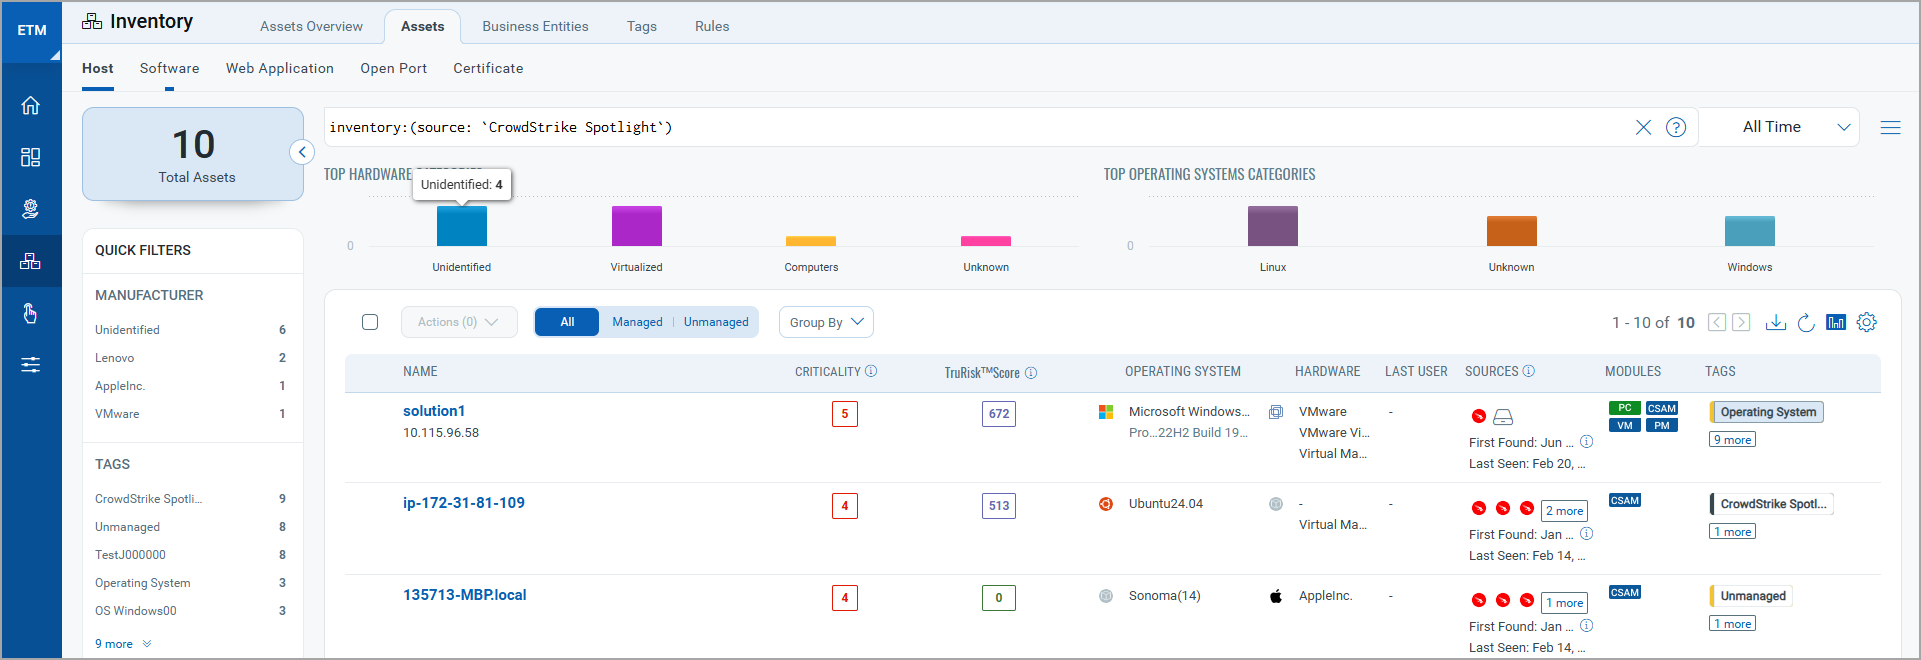
Viewing Assets and Findings in ETM
Once the connector reaches the Processed state, you can view the imported data in Qualys Enterprise TruRisk Management (ETM).
To view imported assets:
- Navigate to Enterprise TruRisk Management.
- Go to Assets > Host.
- Use the filter token:
inventory:(source:"CrowdStrike Spotlight")
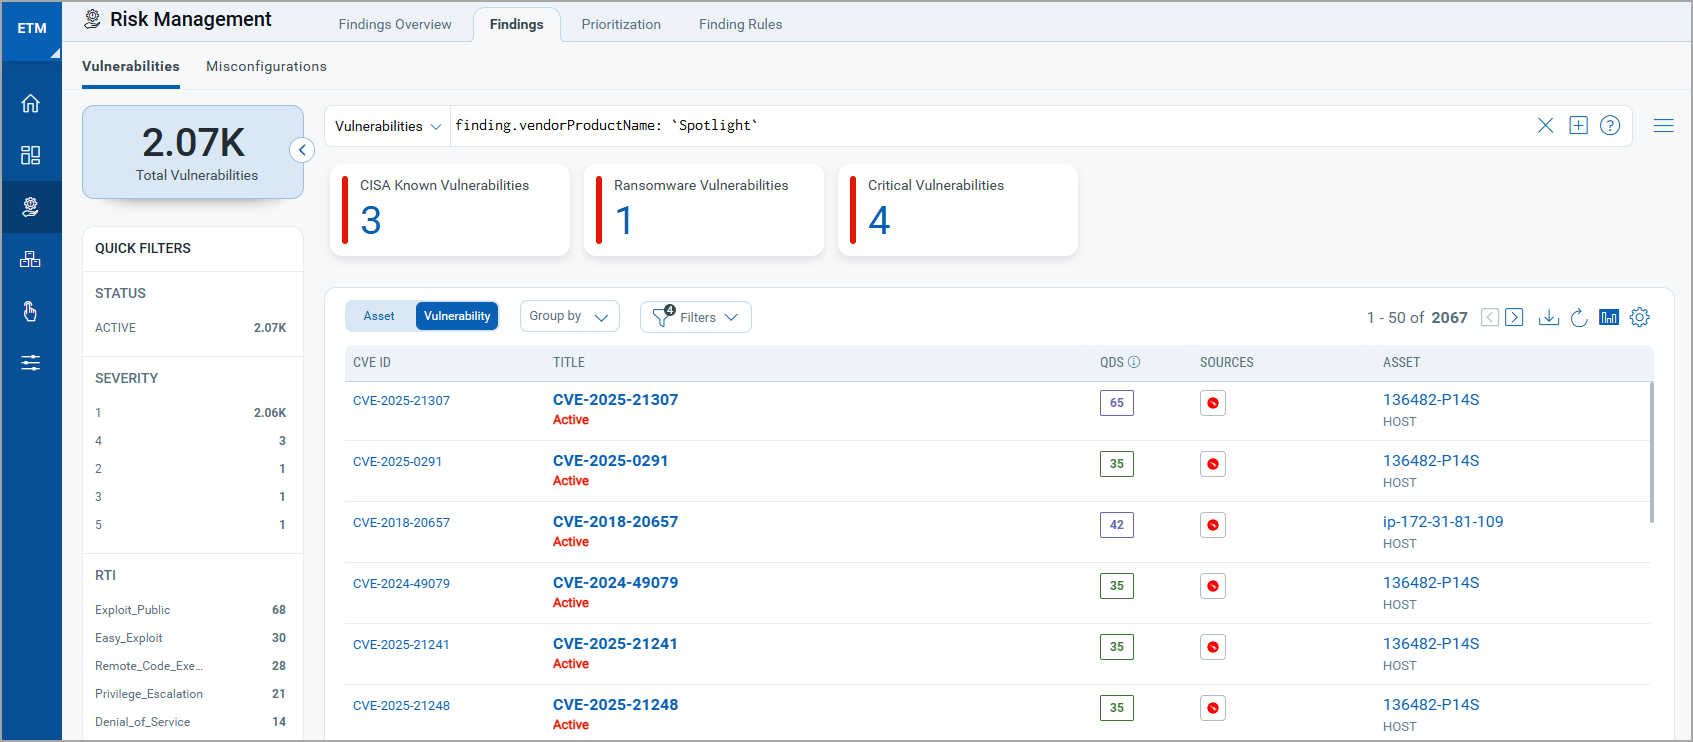
To view vulnerability findings:
- Navigate to Risk Management.
- Go to Findings > Vulnerability.
- Use the filter token:
findings.vendorProductname:"CrowdStrike Endpoint Security"
Troubleshooting
| Issue | Resolution |
|---|---|
| Authentication failure on connector run | Verify the Auth URL, Client ID, and Client Secret values entered in Qualys ETM are correct. Confirm the Auth URL matches your CrowdStrike cloud region (for example, https://api.us-2.crowdstrike.com). If the Client Secret was regenerated in CrowdStrike, ensure the new value has been updated in the Qualys ETM connector configuration via Edit Connector. |
| Connection test fails | Verify the Auth URL is complete and includes the protocol (for example, https://api.us-2.crowdstrike.com). Confirm Qualys cloud can reach the CrowdStrike API endpoint over HTTPS (port 443). Check that the API client has not been disabled or deleted in the CrowdStrike Falcon console. |
| No assets imported after first run | The connector transitions through Registered, Scheduled, Processing, and Processed states. The entire process may take up to 2 hours for completion on the first run. Verify the API client has Read permissions for Hosts and Host Groups. Confirm the connector has reached the Processed state in Qualys ETM. |
| Vulnerability data not appearing | Confirm the API client has Read permissions for Vulnerabilities in CrowdStrike. Verify the connector was configured with Assets & Findings selected as the Data to Sync option and CrowdStrike Spotlight as the supported format. Check the connector state to ensure it has completed processing; assets may appear before findings import finishes. |
Additional Information
API Reference
The following APIs are executed during each CrowdStrike Endpoint Security connector run.
| Name | Filters | Endpoint |
|---|---|---|
| Auth API | N/A | https://api.<region>.crowdstrike.com/oauth2/token |
| Fetch Vulnerabilities API | Finding Type: Vulnerabilities | https://api.<region>.crowdstrike.com/spotlight/combined/vulnerabilities/ |
| Fetch Assets/Resources API | Asset Type: Hosts | https://api.<region>.crowdstrike.com/discover/entities/hosts/v1?ids=<aid> |
| Fetch Host Resource IDs API (Asset flow) | Resource Fetch (Asset) | https://api.<region>.crowdstrike.com/discover/queries/hosts/v1 |
| Fetch Device Resource IDs API | Resource Fetch (Asset) | https://api.<region>.crowdstrike.com/devices/queries/devices/v1 |
| Fetch Device Details API | Asset Type: Hosts | https://api.<region>.crowdstrike.com/devices/entities/devices/v2?ids=<ids> |
Transformation Maps
The following transformation map defines how CrowdStrike Spotlight source fields are mapped to Qualys ETM target fields.
Crowdstrike Spotlight Vulnerability MapCrowdstrike Spotlight Vulnerability Map
| Source Attribute Key | Target Attribute Label |
|---|---|
network_interfaces[].local_ip |
externalAssetId (Required) |
Vulnerability Id |
findingName (Required) |
id |
externalFindingId (Required) |
CVE Severity |
findingSeverity (Required) |
Remediation Entities action |
recommendation |
Status |
findingStatus |
Updated Timestamp |
findingLastFoundOn |
os_version |
operatingSystemName |
Data Provider |
detectionMethod |
CVE Id |
cveId |
CVE Description |
findingDescription |
CVE Base Score |
cvssV2Base |
confidence
Available values: confirmed
|
findingSubType
Available values: Confirmed |
system_serial_number |
biosInfoSerialNumber |
bios_manufacturer |
biosInfoManufacturer |
hostname |
assetName |
network_interfaces[].mac_address |
macAddress |
network_interfaces[].local_ip |
ipAddress |