Microsoft Defender for Endpoint V2 Connector
The Microsoft Defender for Endpoint (MDE) V2 Connector retrieves host asset records and associated vulnerability findings from Microsoft Defender for Endpoint via its REST API and imports them into Qualys ETM for unified risk analysis and prioritization. Qualys ETM processes the incoming data by de-duplicating redundant entries, normalizing data formats, enriching findings with additional context, and calculating risk scores using TruRisk.
The connector supports delta (incremental) synchronization for ongoing scheduled runs, enabling security teams to maintain a consolidated view of endpoint vulnerabilities across their infrastructure without managing separate, disconnected security systems.
Connector Details
The following table provides a comprehensive overview of what the Microsoft Defender for Endpoint V2 connector supports.
| Vendor | Microsoft |
| Product Name | Microsoft Defender |
| Category | Endpoint Security |
| Findings Support | Supported |
| Supported Assets | Host Assets (Compute) |
| Version | 1.0.0 |
| Integration Type | API Integration (REST) |
| Direction | Unidirectional |
| Delta Support | Supported |
| Supported Version & Type | SaaS (Latest) |
| Import of Installed Software | Not Supported |
| Import of Source Tags | Not Supported |
| Filters/Filter Query | Yes |
Configure the Connector
The configuration wizard consists of three steps. A valid connection test is required before you can proceed.
Before You Begin - AuthenticationBefore You Begin - Authentication
Have the following ready before starting the connector configuration in Qualys ETM:
- Ensure you have access to the Azure portal with permissions to register applications in Microsoft Entra ID (Azure Active Directory).
- Register an application in Microsoft Entra ID and assign the required API permissions for WindowsDefenderATP (see Auth Setup below).
- Create a Client Secret for the registered application and copy its value immediately — it cannot be retrieved after leaving the page.
Register an Application in Microsoft Entra ID
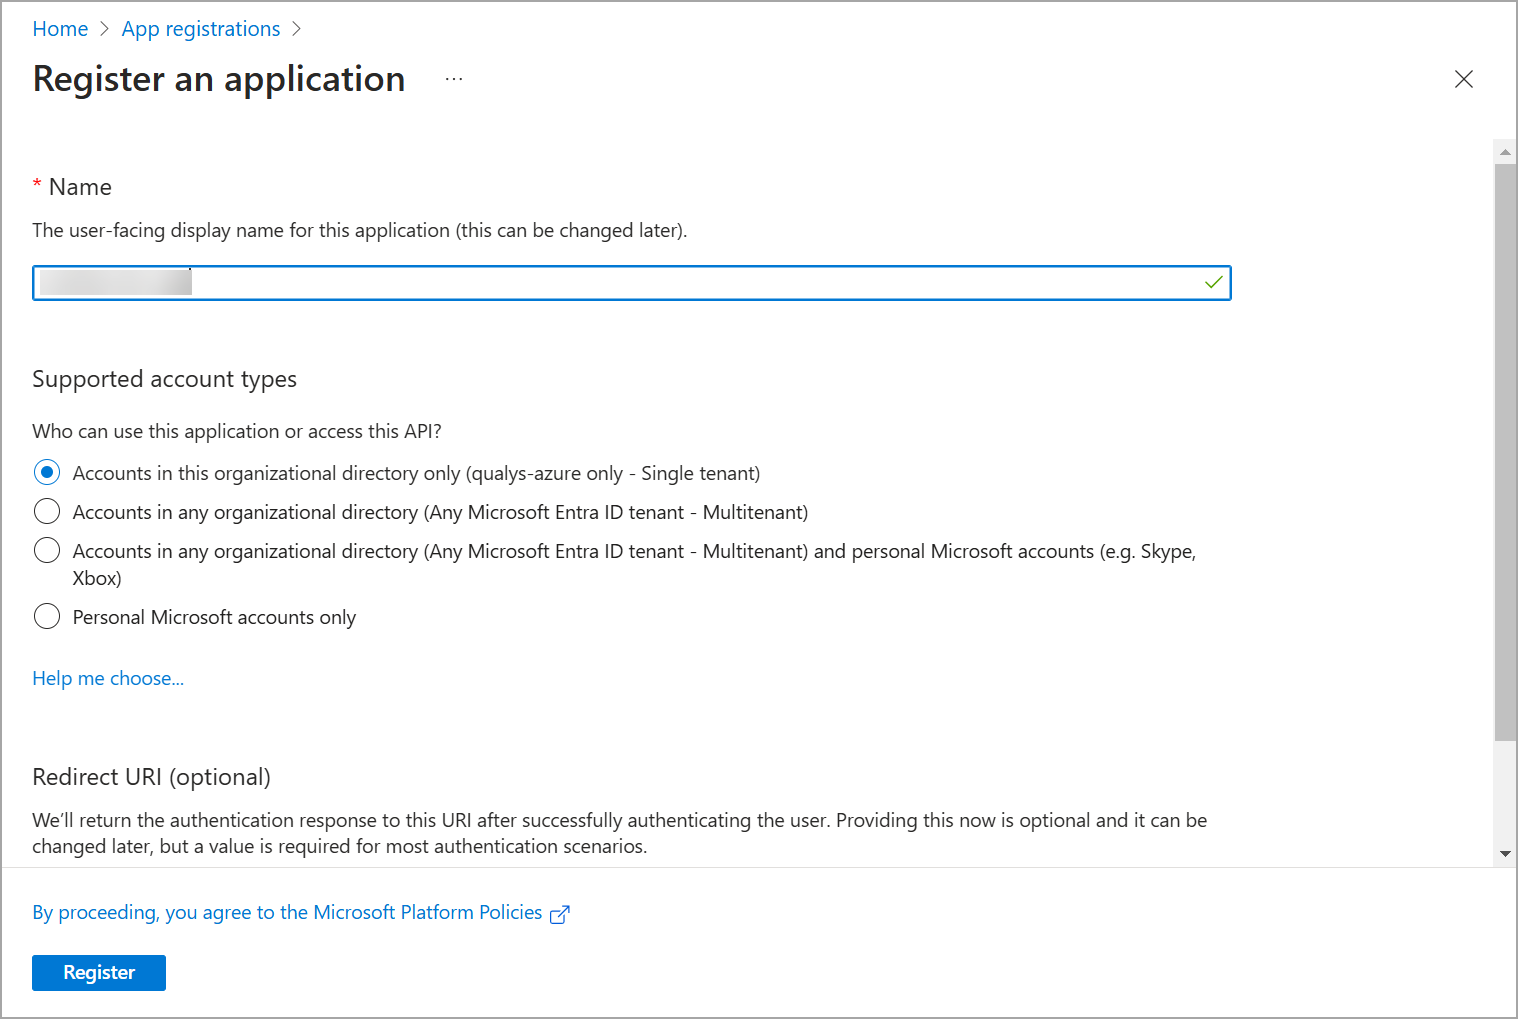
- Sign in to the Azure portal and navigate to Microsoft Entra ID > App registrations > New registration.
- Enter a name for the application, select the appropriate supported account types for your organization, and click Register.
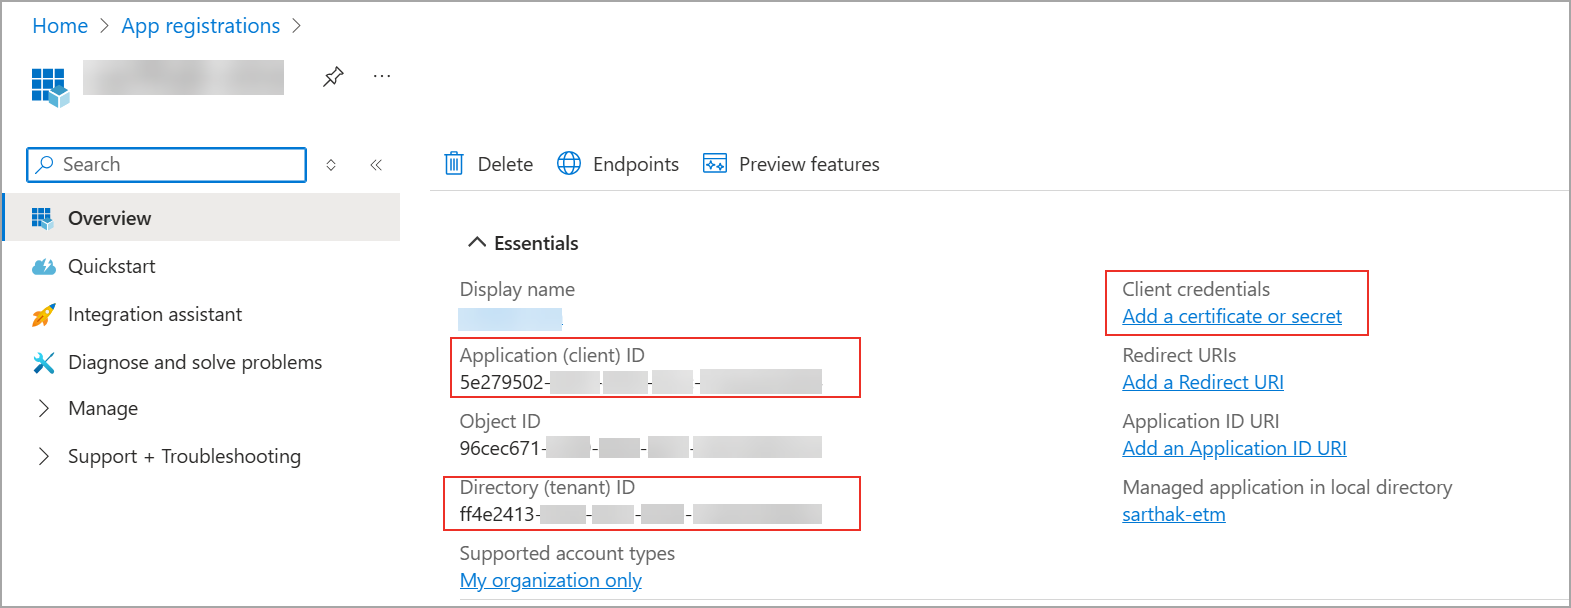
- On the application overview page, note the Application (client) ID and Directory (tenant) ID. Store these securely for use during connector configuration.
Create a Client Secret
- From the registered application page, navigate to Certificates & secrets > New client secret.
- Enter a description, select an expiration period, and click Add. Microsoft recommends an expiration value of less than 12 months.

- Copy the secret Value immediately. It will not be viewable after you leave the page.
Important: Client Secret values are shown only once at creation. If you navigate away before copying it, you must delete and recreate the secret. Store the value securely before proceeding.
Assign API Permissions
The registered Azure application must have the following Application-level API permissions granted for WindowsDefenderATP. An Azure administrator must grant admin consent for these permissions before the connector can authenticate.
To assign: navigate to API permissions > Add a permission > APIs my organization uses, select WindowsDefenderATP, click Application permissions, and grant the following:
| Entity | Permission | Purpose |
|---|---|---|
| Vulnerability and Machines |
Vulnerability.Read.All Vulnerability.Read |
|
|
Machine.Read.All Machine.Read |
Learn more | |
| Machines |
Machine.Read.All Machine.Read |
After adding permissions, click Grant admin consent. Admin consent is required — permissions without it result in 403 Forbidden errors during the connection test.
Scope and Data Access
The connector queries the following MDE REST API endpoints:
https://login.microsoftonline.com/— OAuth 2.0 token endpoint.https://api.security.microsoft.com/api/machines— Retrieves endpoint asset records.https://api.security.microsoft.com/api/machines/SoftwareVulnerabilitiesByMachine— Retrieves vulnerability findings per machine.https://api.security.microsoft.com/api/machines/${mId}— Retrieves individual machine details.https://api.securitycenter.microsoft.com/api/vulnerabilities/machinesVulnerabilities— Retrieves machine-level vulnerability data.
OData v4 query filters are supported on: computerDnsName, osPlatform, deviceValue, exposureLevel, healthStatus, riskScore, onboardingStatus, lastSeen, rbacGroupId, plus $top (max 10,000) and $skip.
Sample filter expressions: deviceValue eq 'Normal' | RbacGroupId eq 0 or RbacGroupId eq 7458
Key Rotation
When the Client Secret expires or is rotated in Azure, update the credentials in Qualys ETM via the Edit Connector option before the old secret expires. Expired secrets cause 401 Unauthorized errors on the next connector run.
Create a Profile & ConnectionCreate a Profile & Connection
This step establishes the connector's identity and authenticates it with Microsoft Defender for Endpoint via Microsoft Entra ID.
- Log in to Qualys ETM.
- Navigate to Connectors > Integration.
- Locate the Microsoft Defender for Endpoint V2 Connector on the Connector Marketplace and click Add. This is a one-time task.
Note: If the connector is already added, navigate to My Connectors, search for it, and click Manage Connections.
- From the connector tile, click Manage Connections.
- Click Create Connection. The Setup Guide opens with the Before You Begin checklist and four reference tabs: Overview, Auth Setup, Permissions, and Troubleshooting. Review these before continuing.
- Click Proceed to Setup.
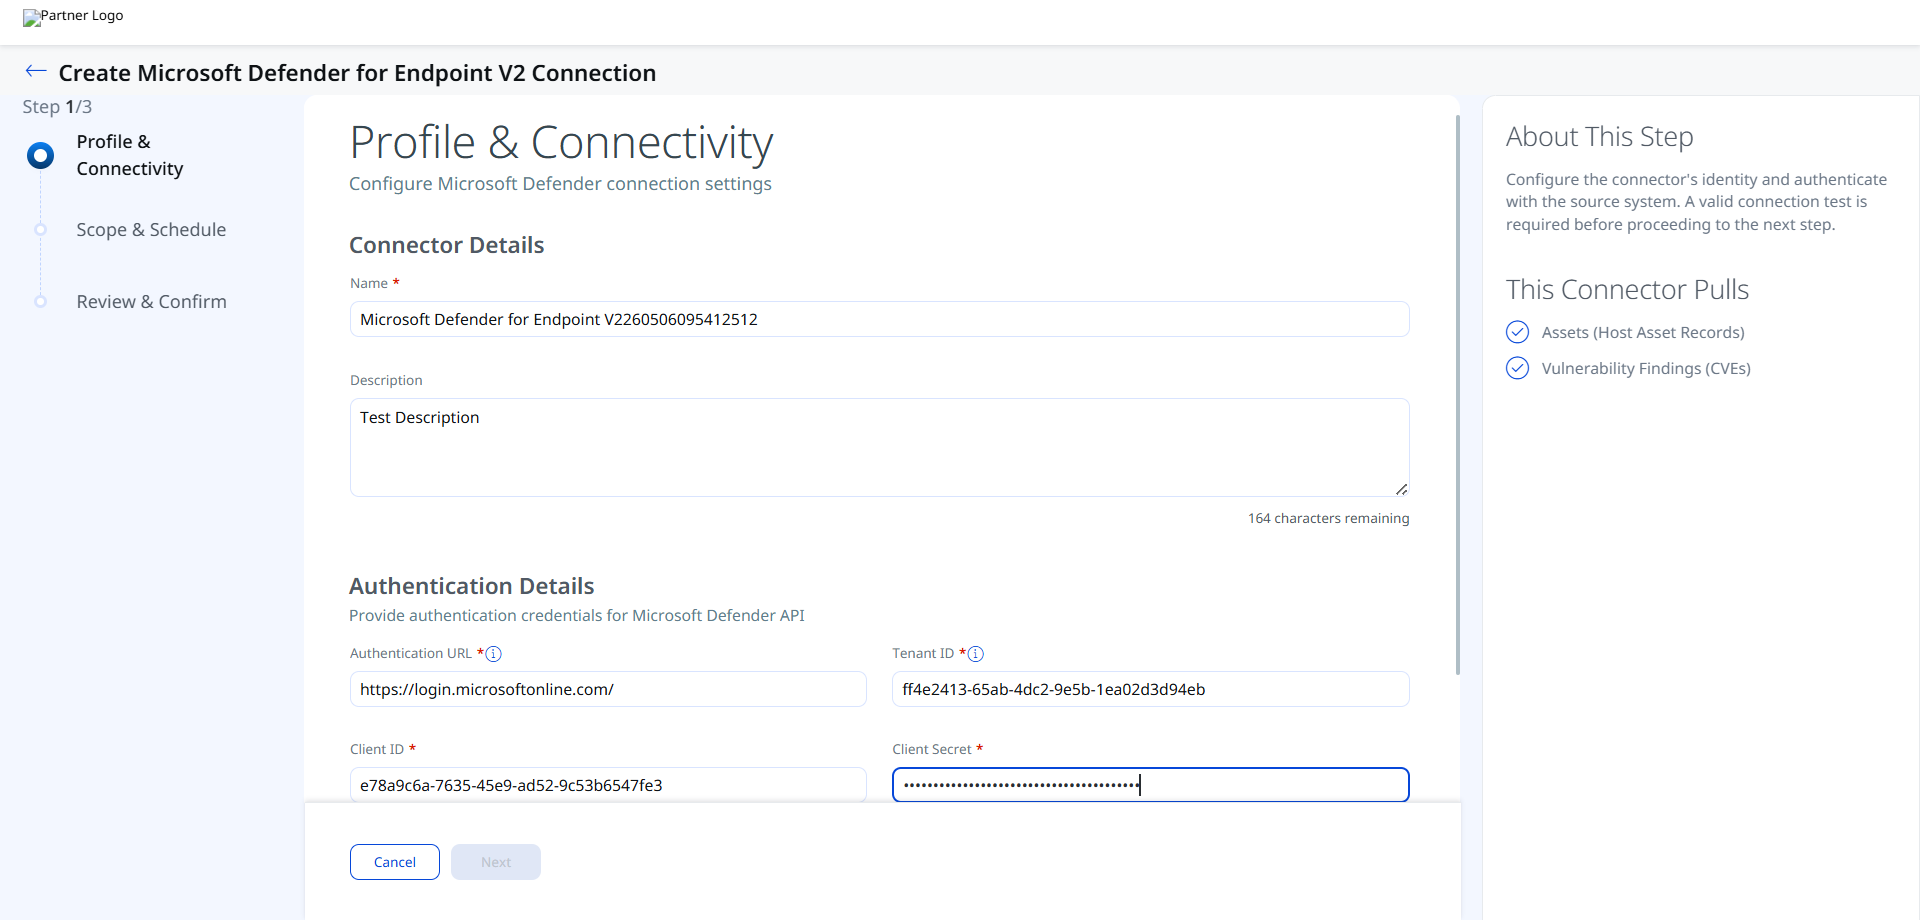
- On the Profile & Connectivity page, complete the following fields:
Connector Details
Field Description Name (required) A unique display name for this connector connection. Description An optional description of the connection's purpose. Authentication Details
Provide the following OAuth 2.0 credentials to authenticate the connector with your Microsoft Entra ID application.
Field Type Description Authentication URL (required) String The Microsoft OAuth 2.0 token endpoint. Use: https://login.microsoftonline.com/(include the trailing slash).Tenant ID (required) String The Directory (tenant) ID from your registered Azure application overview page. Client ID (required) String The Application (client) ID from your registered Azure application overview page. Client Secret (required) Encrypted String The Client Secret Value created under Certificates & secrets. Copy this immediately upon creation — it is not shown again.
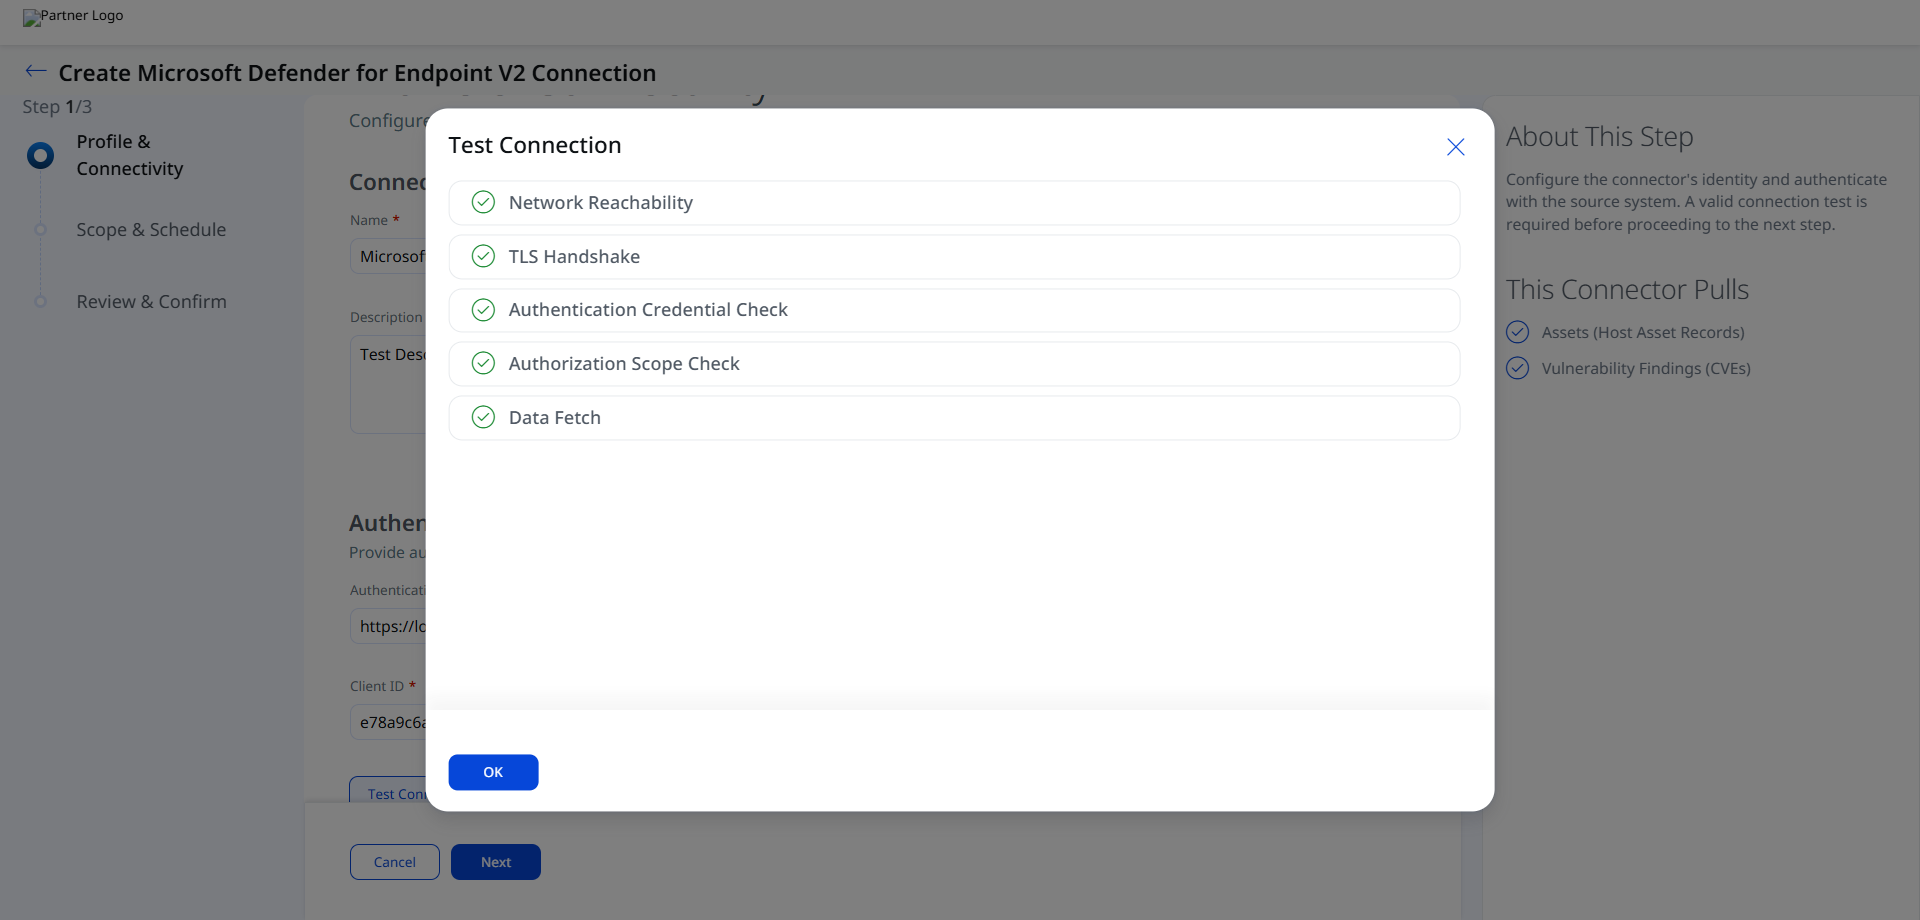
- Click Test Connection. A modal appears showing the status of five sequential checks:
- Network Reachability — Verifies that the connector endpoint is reachable over HTTPS (port 443).
- TLS Handshake — Confirms that a secure TLS connection can be established with the remote endpoint.
- Authentication Credential Check — Validates the configured credentials against the source system's authentication endpoint.
- Authorization Scope Check — Confirms that the provided credentials have the required permissions to access the configured data scope.
- Data Fetch — Verifies that data can be successfully retrieved from the source system using the configured connection.
All five checks must pass before you can proceed. See the Troubleshooting section for resolution steps if any check fails.
- Click OK to dismiss the test result modal, then click Next.
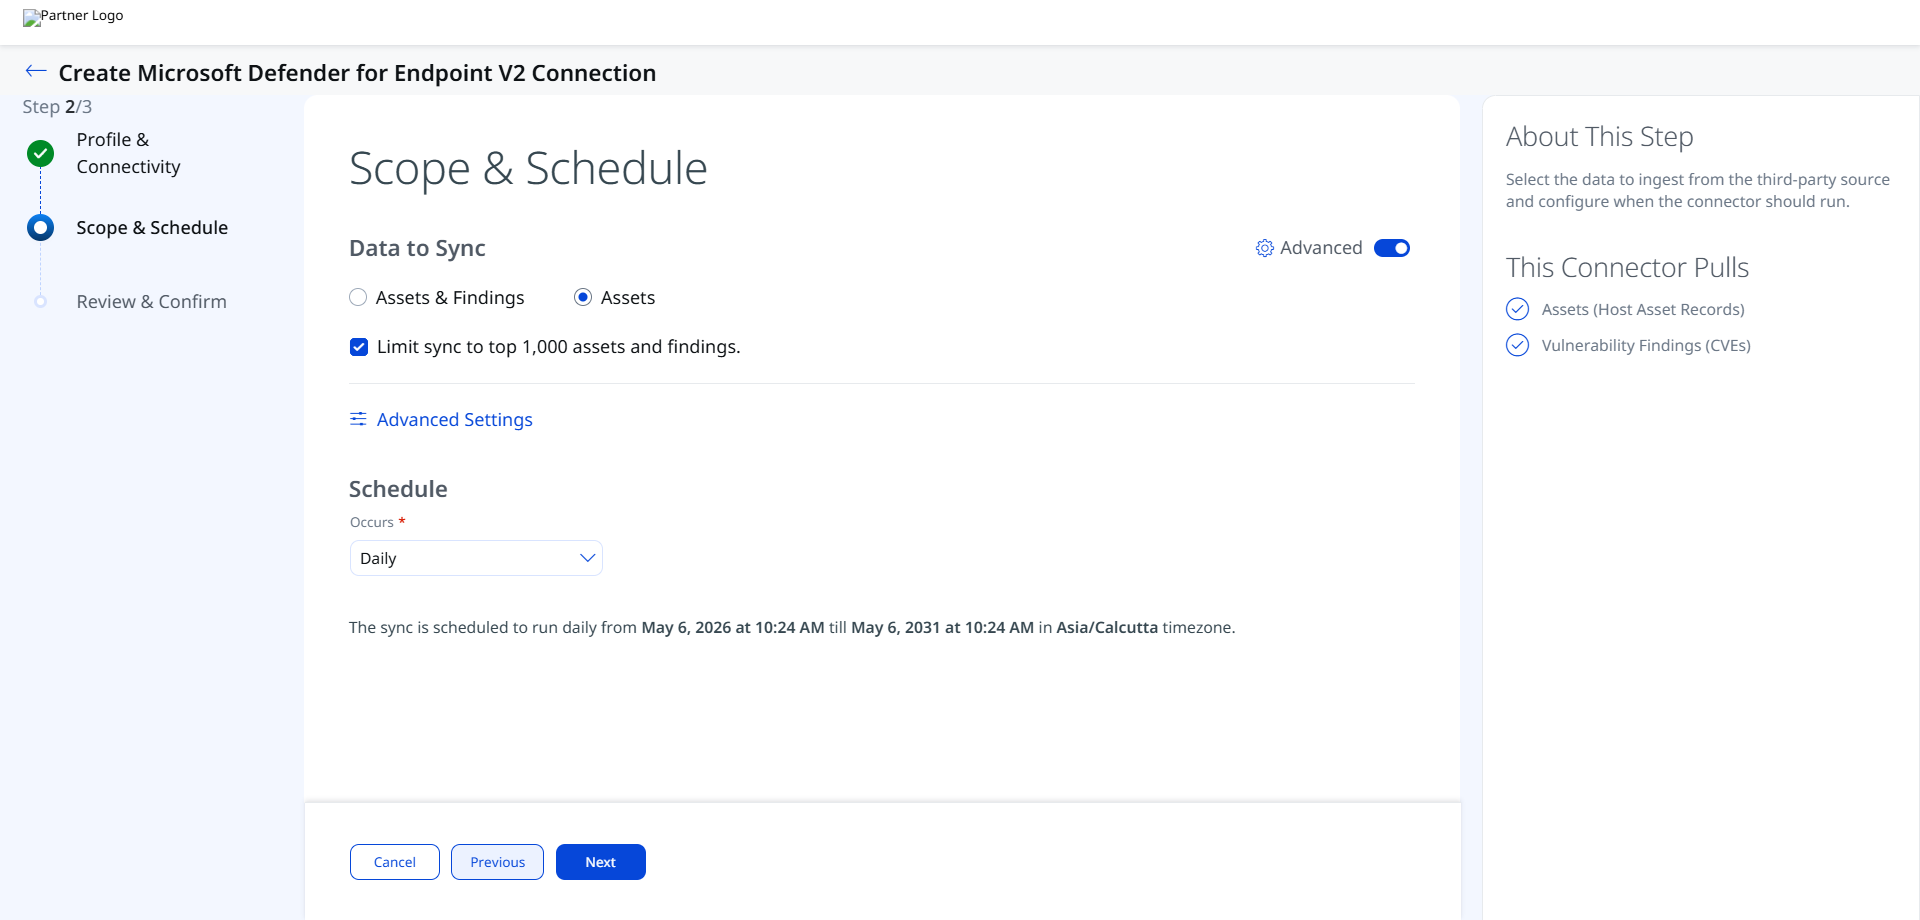
Set the Scope & ScheduleSet the Scope & Schedule
This step defines what data is ingested and when the connector runs.
- Data to Sync — Select one of the following:
- Assets & Findings — Ingests both host asset records and associated CVE-based vulnerability findings.
- Assets — Ingests host asset records only, without vulnerability findings.
- Advanced Settings (optional) — Click Advanced Settings to configure filters, review the active transform map, and customize risk severity mappings. See Advanced Settings below.
- Schedule — Select an execution frequency from the Occurs dropdown (for example, Daily). The system displays the calculated start date, end date, and timezone.
Note: The timezone is determined by your Qualys account settings. The connector runs from the configured start date for a default period of 5 years.
- Click Next.
Sampling Mode - Limit Sync to Top 1,000 Assets and Findings
Sampling Mode can restrict data ingestion to a targeted subset of up to 1,000 assets and their associated findings. You can quickly validate integration and review meaningful security data without a full environment sync.
You can select the Limit sync to top 1,000 assets and findings checkbox to limit the fetch 1000 assets using risk-based filter criteria. The assets, along with their associated findings, are discovered and shared with ETM. The connector applies risk-based filters during asset fetch to ensure the ingested subset represents the most relevant assets in your environment rather than a random or arbitrary sample.
Assets with active findings are fetched and ingested along with their associated vulnerabilities, ensuring only endpoints with confirmed security issues are included in the dataset.
Review your changes and click Create.
Advanced Settings
Enabling the Advanced toggle on the Scope & Schedule page or clicking the Advanced Settings link opens a panel with three tabs: Filters, Transform Map, and Risk Severity Mapping.
Filters Tab
The Filters tab provides a free-text Filter field for OData v4 query expressions to scope which endpoint assets or vulnerability findings are imported. Leave the field empty to import all available data.
Supported OData filter fields: computerDnsName, id, version, deviceValue, aadDeviceId, machineTags, lastSeen, exposureLevel, onboardingStatus, lastIpAddress, healthStatus, osPlatform, riskScore, rbacGroupId. Also supports $top (max 10,000) and $skip.
Note: Click Save after making changes in the Advanced Settings panel. Closing without saving discards any modifications.
Transform Map Tab
The Transform Map tab displays the active transformation maps applied during connector execution. The MDE V2 connector ships with two predefined active maps:
- MDE V2 Vulnerability Transformation Map — Maps MDE vulnerability finding fields to ETM finding target fields.
- MDE V2 Asset Transformation Map — Maps MDE machine fields to ETM asset target fields.
These maps are predefined by Qualys and applied automatically.
Vulnerability Transformation Mapping
MDE V2 Vulnerability Transformation MapMDE V2 Vulnerability Transformation Map
Asset Transformation Mapping
MDE V2 Asset Transformation MapMDE V2 Asset Transformation Map
Risk Severity Mapping Tab
The Risk Severity Mapping tab controls how MDE severity values translate into Qualys Detection Score (QDS) values for non-CVE findings. For CVE-based vulnerabilities in the Qualys Cloud Threat Database, QDS scores are automatically updated by Qualys and are not affected by this mapping.
Configure five rows mapping the vendor's expected source values to Qualys severity levels (1–5) and corresponding QDS scores (0–100). A Default Severity dropdown is also available — this value is applied when the severity field is unavailable in the source data.
How the Connection Works
On each scheduled or on-demand run, the MDE V2 connector queries the Microsoft Defender for Endpoint REST API to retrieve the following data and import it into ETM:
- Assets (Host Asset Records) — Endpoint inventory including hostname, OS, IP addresses, MAC addresses, cloud metadata, and machine tags.
- Vulnerability Findings (CVEs) — Software vulnerability data detected by Defender, including CVE identifiers, severity levels, first/last seen timestamps, and remediation references.
Note: The connector uses a bulk API approach that fetches only vulnerable asset data. Assets with no associated vulnerabilities are not ingested through the vulnerability findings pipeline. They can still be retrieved using the Assets-only sync option.
Connector States
After creation, a connector connection moves through the following states:
- Registered — The connection is created and registered; data fetching has not yet begun.
- Scheduled — The connection is queued for its next scheduled execution.
- Processing — Assets and findings are actively being fetched from MDE.
- Processed — Assets have been imported; findings may continue processing in the background.
- Errored — The connection encountered an error during execution. Check the Logs tab on the connector tile for details.
Note: The full ingestion process may take up to 2 hours, particularly on the first run or after large delta changes. The Processed state indicates assets are imported; findings ingestion may still be in progress.
Viewing Assets and Findings in ETM
After ingestion, Microsoft Defender for Endpoint assets and vulnerability findings are available in ETM.
- Assets: Navigate to Enterprise TruRisk Management > Inventory > Assets > Host.
Use the filter:inventory:(source:"MS Defender")to view MDE-imported assets.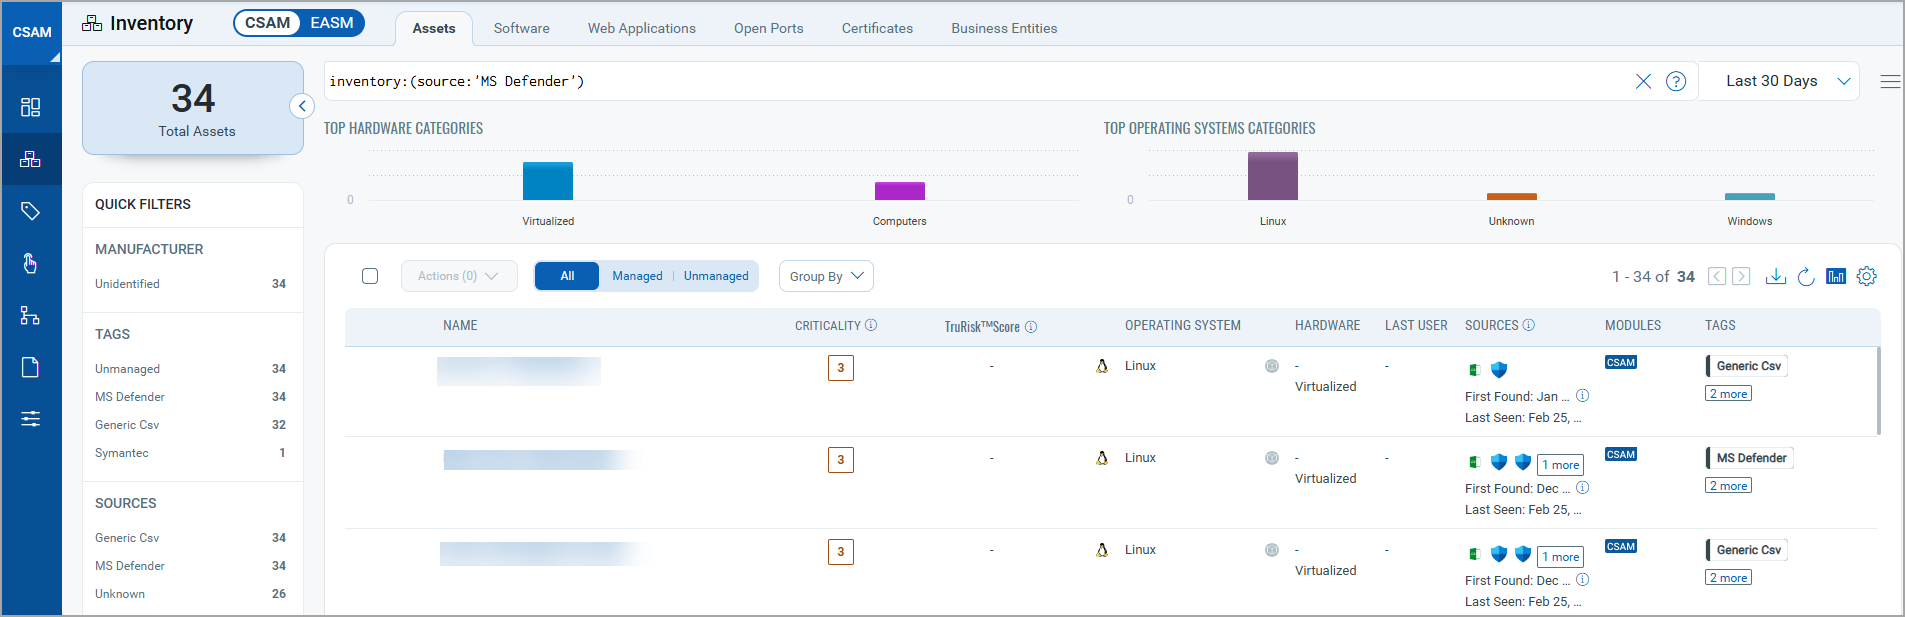
- Findings (Vulnerabilities): Navigate to Enterprise TruRisk Management > Risk Management > Findings > Vulnerability.
Use the vendor filter:finding.vendorProductName:"Defender".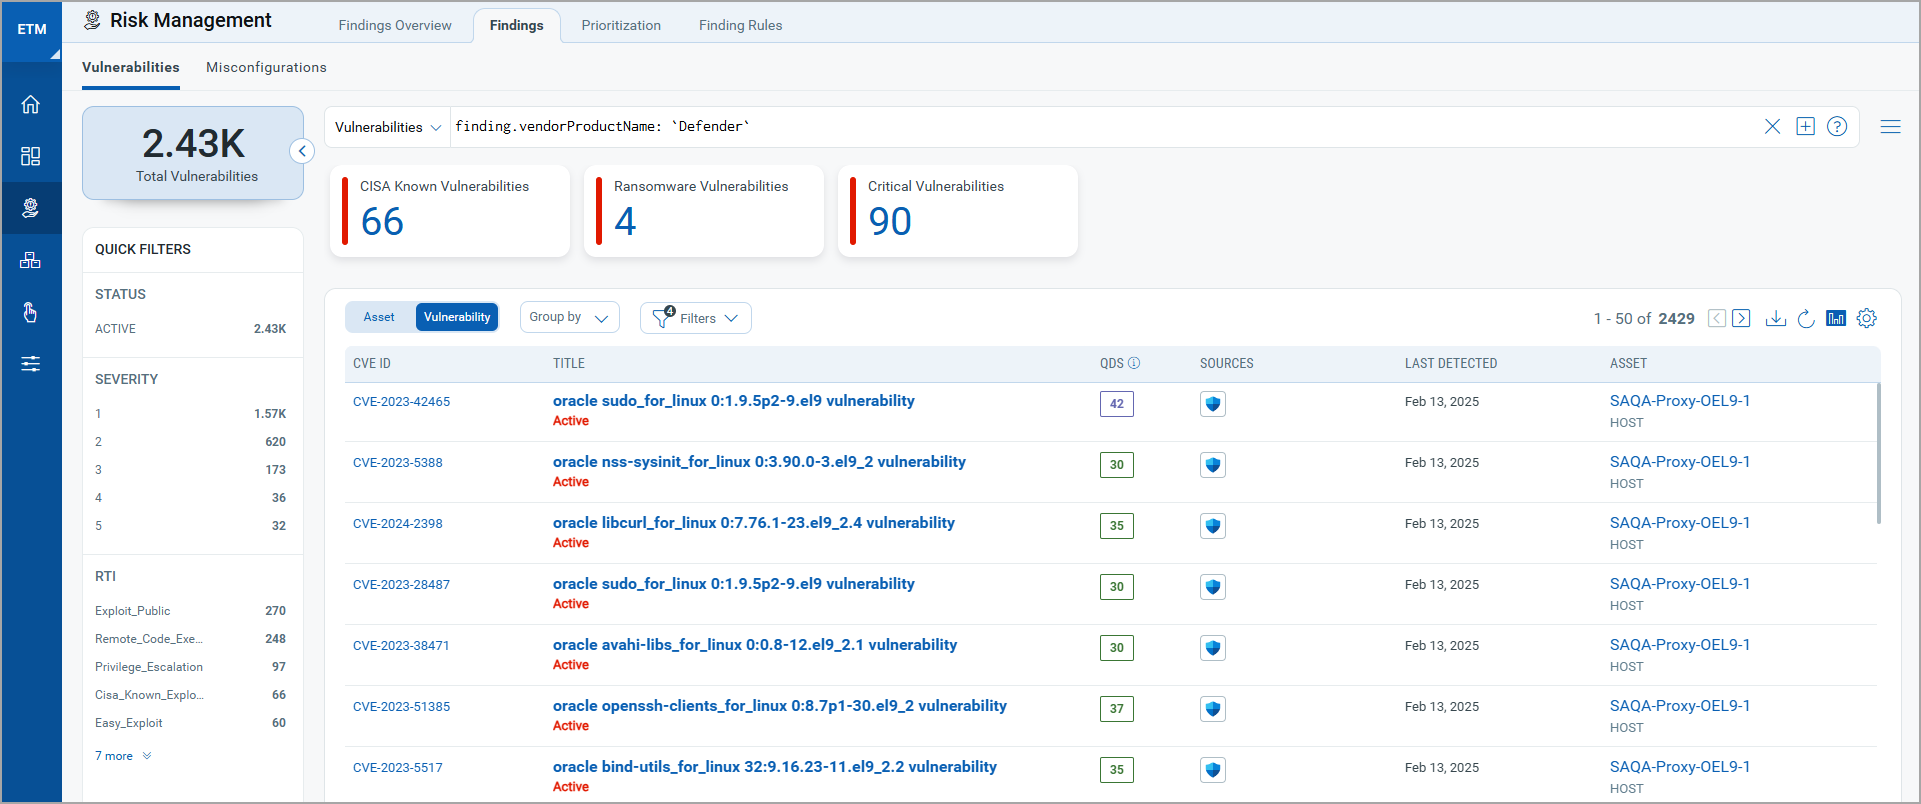
Click any asset or finding row to open a detailed view with criticality, risk scores, and associated finding details.
Troubleshooting
| Issue | Resolution |
|---|---|
| 401 Unauthorized | The Client Secret may be expired or incorrect. Verify the Tenant ID, Client ID, and Client Secret entered in Qualys ETM. Check the secret expiration date in the Azure portal and regenerate if needed. Ensure admin consent has been granted for all required API permissions. |
| 403 Forbidden | The application has authenticated but lacks the required permissions. Verify that Machine.Read.All and Vulnerability.Read.All are assigned under WindowsDefenderATP and that admin consent has been granted. Some APIs require tokens issued for the resource https://api.securitycenter.microsoft.com. |
| Connection test fails | Verify the Authentication URL is https://login.microsoftonline.com/ (with trailing slash). Confirm the Tenant ID and Client ID match the values on the Azure application overview page. Ensure the registered application has not been deleted or disabled in Entra ID. |
| No assets imported after first run | The connector transitions through Registered, Scheduled, Processing, and Processed states. Full data population on the first run may take up to 2 hours. Verify that at least one machine is onboarded in MDE and that the service account has the required API permissions with admin consent granted. |
| Connection in Errored state | Navigate to the Logs tab on the connector tile for detailed error information. Common causes include expired Client Secrets, revoked admin consent, or MDE API rate limiting. Resolve the underlying issue and re-run the connector. |
Additional Information
API Reference
| Name | Endpoint | Filters |
|---|---|---|
| Auth API | https://login.microsoftonline.com/ |
N/A |
| Fetch Assets | https://api.security.microsoft.com/api/machines |
OData v4; Asset Type: Host Asset |
| Fetch Vulnerabilities by Machine | https://api.security.microsoft.com/api/machines/SoftwareVulnerabilitiesByMachine |
Finding Type: machines / Vulnerabilities |
| Fetch Machine Details | https://api.security.microsoft.com/api/machines/${mId} |
Asset Type: machines |
| Fetch Machine Vulnerabilities | https://api.securitycenter.microsoft.com/api/vulnerabilities/machinesVulnerabilities |
Asset Type: Host Ass |