Microsoft Entra ID (Devices) Connector
The Microsoft Entra ID integration with Qualys enables ingestion of device inventory from Entra ID into CSAM/ETM and helps improve asset completeness and visibility for Entra-managed endpoints across cloud and hybrid environments.
Connector Details
|
Vendor |
Microsoft |
|
Product |
Microsoft Entra ID |
|
Connector Category |
Assets (Devices) |
|
Asset Types Supported |
Devices |
|
Finding Types Supported |
Not Supported |
|
Supported Version & Type |
SaaS (v1.0.0) |
|
Integration Method |
API Integration (REST) |
|
Direction |
Unidirectional (Microsoft Entra ID to Qualys) |
|
Incremental Sync (Delta) |
Supported |
|
Import of Installed Software |
Not Supported |
|
Import of Source Tags |
Not Supported |
|
Filters/Filter Query |
Not Supported |
Configure the Connector
The connector is configured in three steps: Authenticate, Create a Profile & Connection, and Set the Scope & Schedule.
Before You Begin - AuthenticationBefore You Begin - Authentication
Ensure the following prerequisites are met before configuring the connector:
- Register an application in Microsoft Entra ID (Azure Active Directory) with the required API permissions for reading device data.
- Have your Azure Tenant ID, Application (Client) ID, and Client Secret ready.
- Confirm that the Unified Asset Inventory is activated on your Qualys account. Contact your Technical Account Manager or Qualys Support if it is not enabled.
- Confirm network connectivity: Qualys cloud must be able to reach the Microsoft Graph API endpoint (
https://graph.microsoft.com) over HTTPS (port 443).
Registering an Application in Microsoft Entra ID
- Log in to the Azure portal at
https://portal.azure.com. - Navigate to Microsoft Entra ID (Azure Active Directory), then App registrations, and click New registration.
- Provide a name for the application and select the appropriate supported account type.
- After registration, copy the Application (client) ID and Directory (tenant) ID from the application overview page.
Creating a Client Secret
- In the registered application, navigate to Certificates & secrets and click New client secret.
- Add a description and select an expiry duration. Click Add.
- Copy the secret value immediately.
Important: The Client Secret value is displayed only once and will not be retrievable after you leave this page. Copy it immediately and store it securely. This value is entered as the Client Secret in the Qualys connector configuration.
Granting API Permissions
- In the registered application, navigate to API permissions and click Add a permission.
- Select Microsoft Graph, then Application permissions, and add
Device.Read.All. - Click Grant admin consent to authorize the permission.
Important: Admin consent is required for application-level permissions. Without it, the connector will receive a 403 Forbidden error when attempting to read device records.
Entering Credentials in Qualys
- Log in to Qualys CSAM and navigate to the Connectors section.
- Locate the Microsoft Entra ID (Devices) connector and click Manage.
- Enter the Tenant ID, Client ID, and Client Secret obtained from the Azure app registration.
Permissions Required
The Azure app registration must have the following Microsoft Graph application permission with admin consent granted:
| Permission | Device.Read.All |
| Permission Type | Application |
| Admin Consent Required | Yes |
Scope and Data Access
The connector retrieves device records from your Entra ID tenant. The scope of devices returned depends on what is registered and managed in your Entra ID directory, including Azure AD joined devices, Azure AD registered devices, and hybrid Azure AD joined devices. The Device.Read.All permission allows the connector to read all device records in the Entra ID directory.
Key Rotation
When the Client Secret expires or is rotated in Azure, generate a new secret under Certificates & secrets in the app registration. Update the credential in Qualys by editing the connector configuration and entering the new Client Secret value. Microsoft recommends setting an expiry on client secrets and rotating them before expiration to avoid service interruption.
Create a Profile & ConnectionCreate a Profile & Connection
Configure the connector's identity and authenticate with the source system. A valid connection test is required before proceeding to the next step.
Connector Details
| Name | A unique display name for this connection. Example: Microsoft Entra ID (Devices)260505060829529 |
| Description | An optional description for this connection (up to 164 characters). |
| Include hosts having the selected tags | Optional. Add Qualys asset tags to restrict which hosts are included. Any host that has all the selected tags associated with it will be included. |
Authentication Details
| Field | Type | Description |
|---|---|---|
| Tenant ID | String | The Directory (tenant) ID from your Azure app registration. Example: ff4e2413-xxxx-xxxx-xxxx-1ea02d3d94eb |
| Client ID | String | The Application (client) ID from your Azure app registration. Example: e78a9c6a-xxxx-xxxx-xxxx-9c53b6547fe3 |
| Client Secret | Encrypted String | The client secret value generated in Azure under Certificates & secrets. This field is masked after entry. |
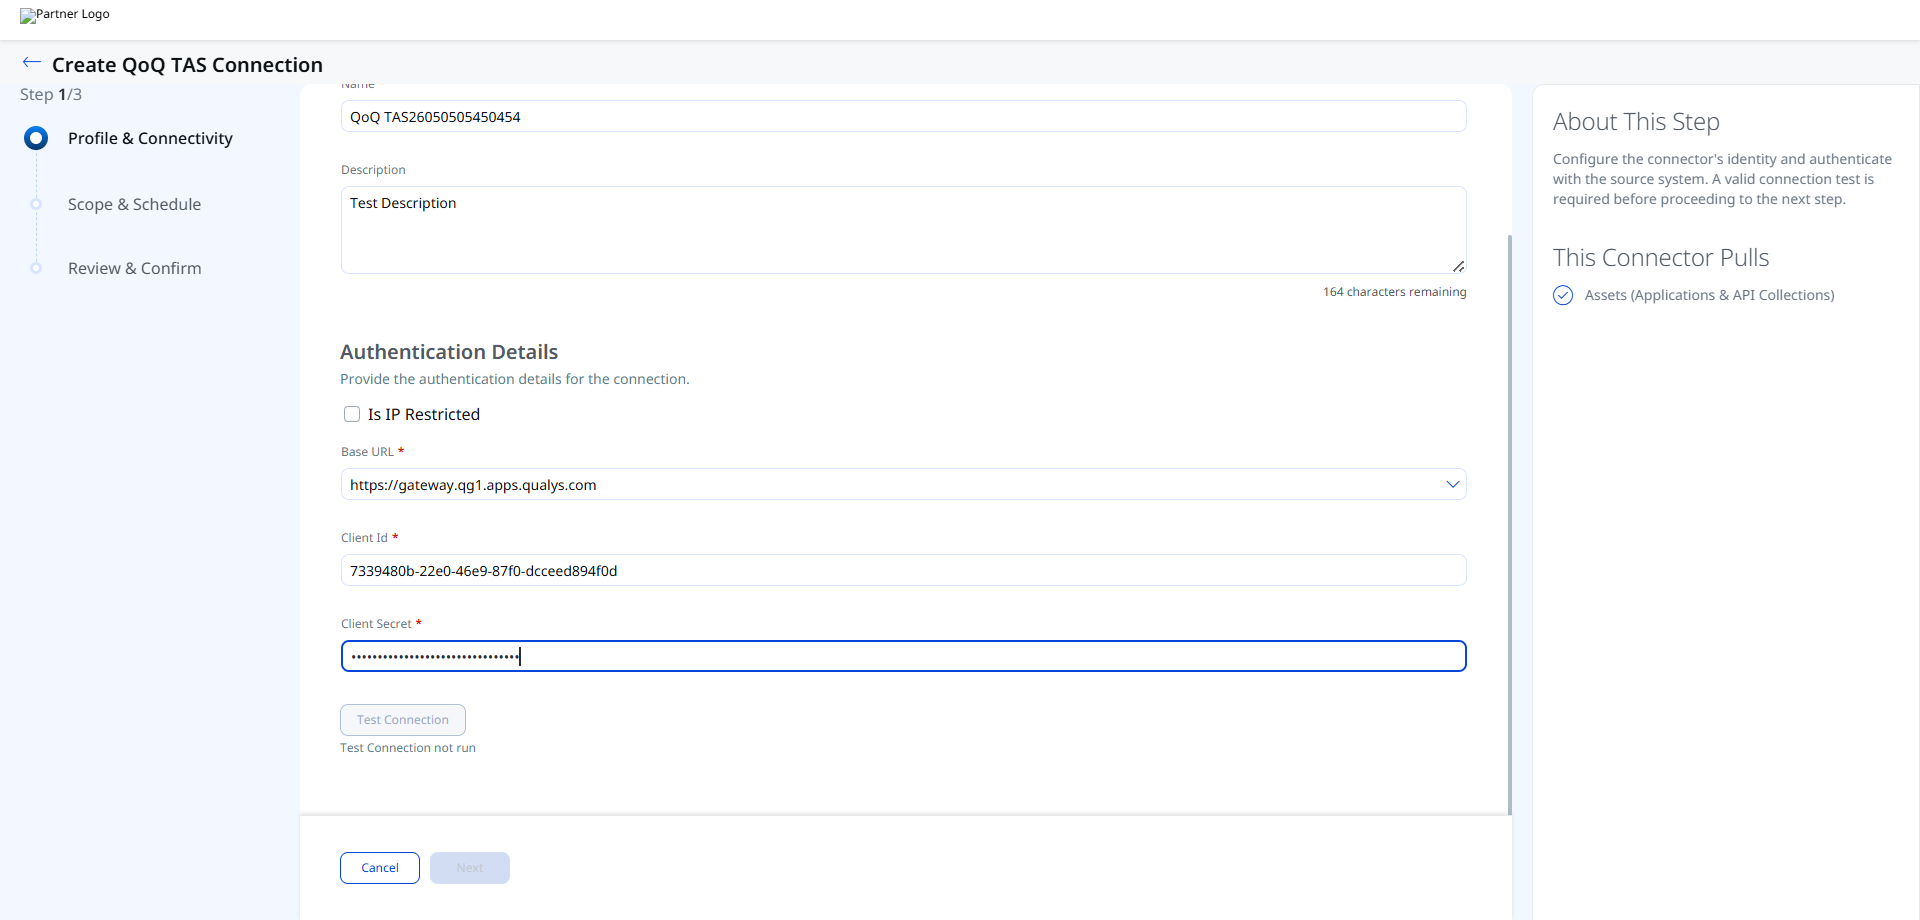
After entering all authentication details, click Test Connection to validate the credentials before proceeding.
The Test Connection dialog runs the following checks in sequence:
- Network Reachability — Verifies the API endpoint is reachable.
- TLS Handshake — Confirms a secure connection can be established.
- Authentication Credential Check — Validates the Client ID, Client Secret, and Token URL.
- Authorization Scope Check — Confirms the service account has the required permissions.
- Data Fetch — Verifies that data can be retrieved from the Microsoft Entra ID API.

Note: All five checks must pass before you can proceed to the next step. If any check fails, refer to the Troubleshooting section for resolution steps.
Set the Scope & ScheduleSet the Scope & Schedule
Select the data to ingest from Microsoft Entra ID and configure when the connector should run.
Data to Sync: Assets (Host Assets) is the only available option for this connector. Device records including device identity, operating system, compliance state, and management metadata are imported as host assets.
Click Advanced Settings to optionally configure filters, transformation map review, and risk severity mapping before saving.
Schedule: Use the Occurs dropdown to set the sync frequency. The available option shown is Daily. The schedule runs daily from the configured start date and time for a 5-year duration in the selected timezone.
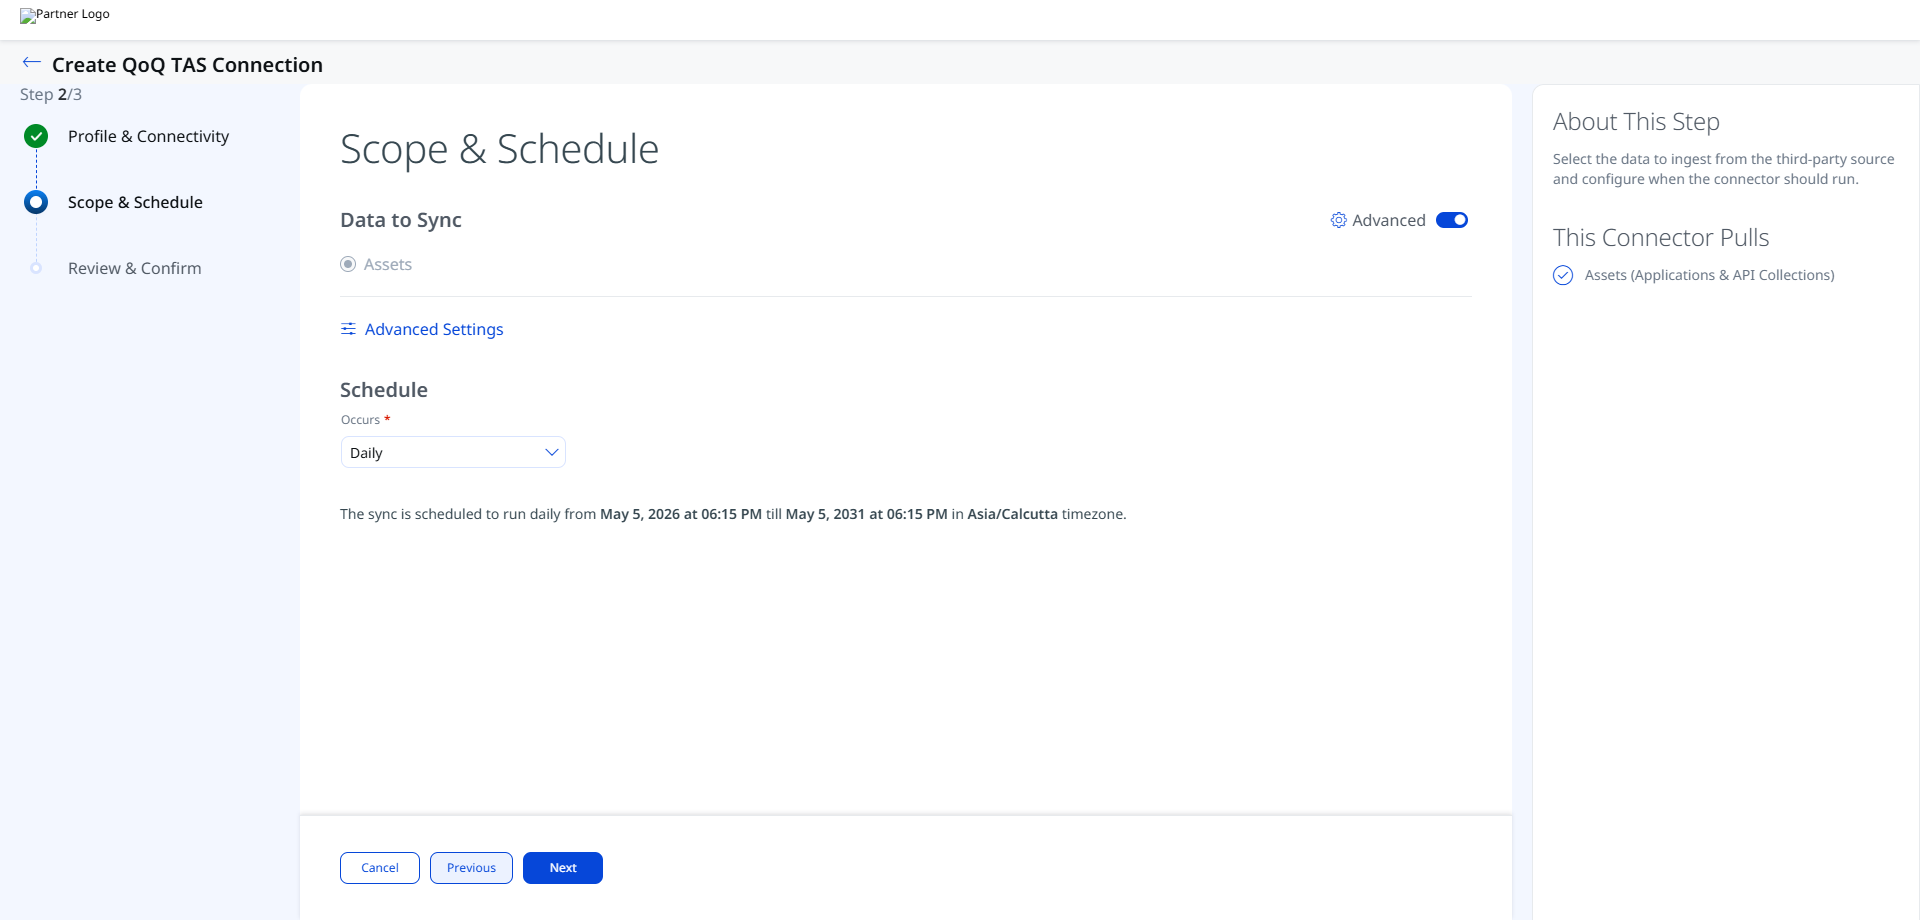
Note: Schedule times are displayed and stored in the timezone of your Qualys account. The schedule runs for a default duration of 5 years from the start date unless otherwise configured. Example: daily from May 5, 2026 at 06:39 PM till May 5, 2031 at 06:39 PM in Asia/Calcutta timezone.
Click Create to save and register the connector. After creation, the connector appears in the Connections list with a Registered state.
Advanced Settings
Advanced Settings are accessible from Step 2 (Scope & Schedule) by clicking the Advanced Settings link. These settings are optional. Click Save after making changes in any tab.
Note: Changes made in Advanced Settings are not saved automatically. Click Save before closing the Advanced Settings panel.
Filters Tab
The Filters tab is present in the Advanced Settings panel for this connector. However, this connector does not currently support filter queries. No filter input fields are available.
Transform Map Tab
The Transform Map tab displays the active transformation map used when importing device records from Microsoft Entra ID into Qualys. The transformation map defines how source fields from the Microsoft Graph Devices API are mapped to Qualys asset fields. Refer to the Transformation Maps section for the complete field mapping reference.
How the Connection Works
The Microsoft Entra ID (Devices) Connector synchronizes device records from Microsoft Entra ID into the Qualys asset inventory. When the connector is created and run for the first time, it performs a full pull, retrieving all device records from Microsoft Entra ID and importing them into the inventory to establish the initial baseline. Subsequent scheduled runs perform delta pulls, retrieving only changes since the previous synchronization.
Connector States
A successfully configured connector progresses through the following states:
- Registered – The connector is successfully created and registered to fetch data from Microsoft Entra ID.
- Scheduled – The connector is scheduled to execute a connection with Microsoft Entra ID.
- Processing – A connection is executing and the connector is fetching device asset data.
- Processed – The connector has successfully fetched the assets. The Connections list will show this state once sync is complete.
- Errored – The connector encountered an error during data retrieval. Check the Logs tab for details and refer to the Troubleshooting section.
Note: The Processed state indicates that the connector is successfully configured, but assets may still be in the process of being fully imported into the inventory. The initial full pull may take up to 2 hours or more depending on the number of devices in your Entra ID directory.
Note: When the state shows Processed, device assets may still be importing. Allow additional time before verifying asset counts in ETM or CSAM.
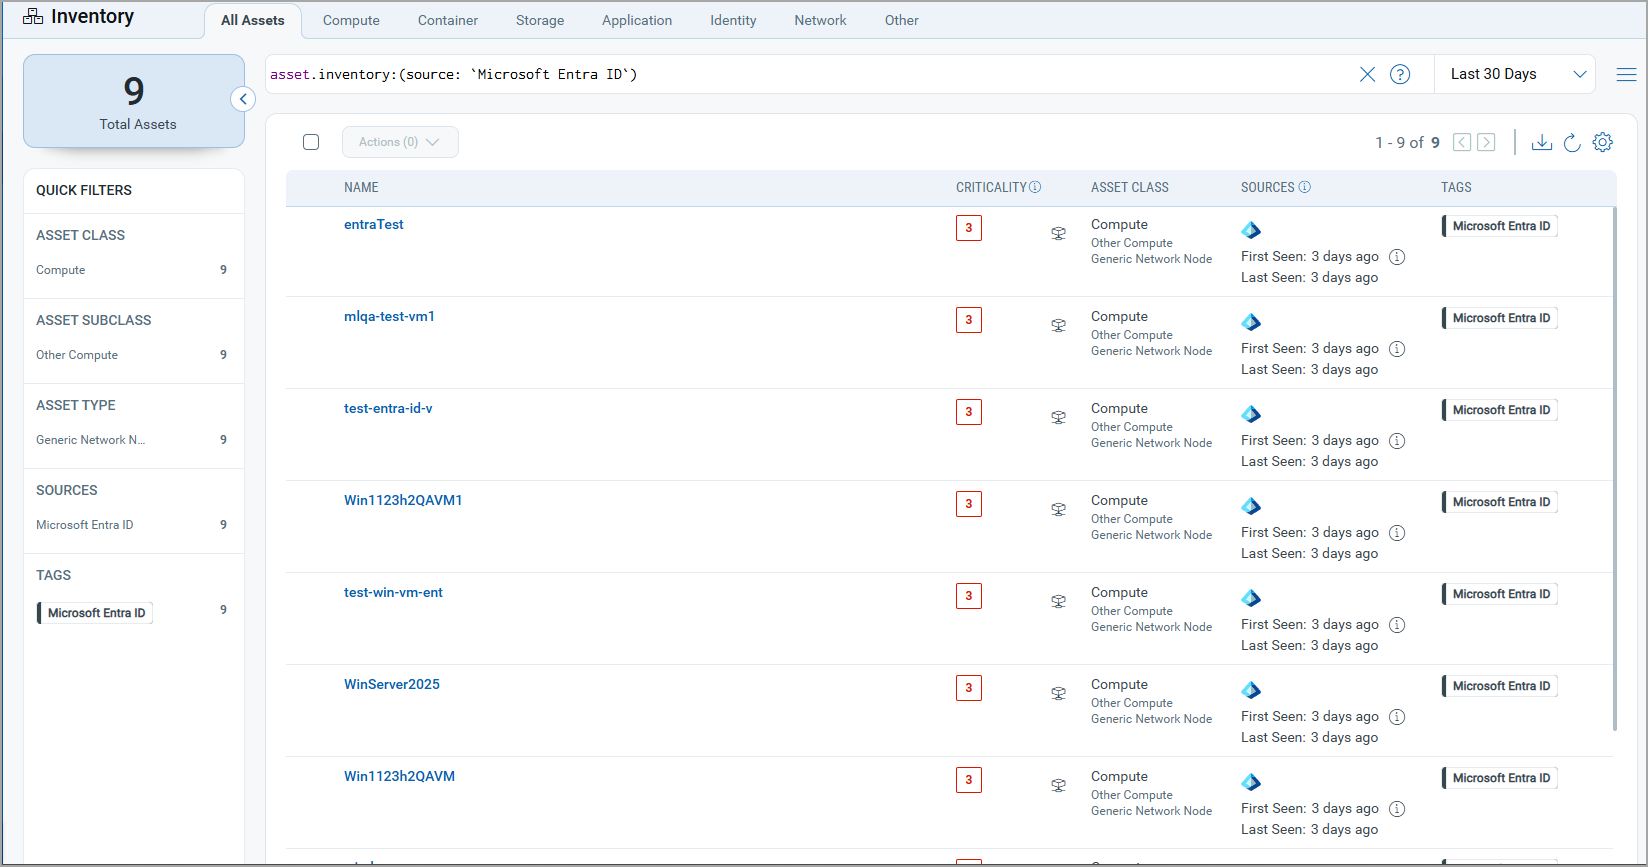
Viewing Assets in ETM
After the connector reaches the Processed state, imported device assets are available in Qualys ETM and CSAM.
View Device Assets in ETM / CSAMView Device Assets in ETM / CSAM
- Navigate to ETM or CSAM > Inventory > Assets.
- Use the inventory filter
inventory:(source:"Microsoft")to display assets imported from Microsoft Entra ID (Devices).
Troubleshooting
| 401 Unauthorized | The Client Secret is invalid, expired, or the Tenant ID or Client ID is incorrect. Verify all three values in the Azure app registration and regenerate the Client Secret if needed. Update the connector configuration in Qualys with the correct credentials. |
| 403 Forbidden | The app registration does not have the Device.Read.All permission, or admin consent has not been granted. Navigate to API permissions in the Azure app registration and verify the permission is listed with a green checkmark indicating admin consent. If consent is missing, click Grant admin consent. |
| Connection test fails | Verify that Qualys cloud can reach the Microsoft Graph API endpoint (https://graph.microsoft.com) over HTTPS (port 443). Confirm that the Tenant ID corresponds to the correct Azure AD directory. If your organization uses conditional access policies, ensure they do not block the application from accessing the Graph API. |
| No devices imported after first run | Verify the app registration has Device.Read.All with admin consent. Confirm that devices are actually registered in your Entra ID tenant by checking the Devices section in the Azure portal. The first run performs a full pull, which may take time depending on the number of devices in the directory. |
Additional Information
API Reference
| API | Endpoint |
|---|---|
| Authorization (Token) | https://login.microsoftonline.com/{tenant_id}/oauth2/token |
| Devices – List | https://graph.microsoft.com/v1.0/devices |
Transformation Maps
The following transformation map defines how device records retrieved from the Microsoft Graph Devices API are mapped to Qualys host asset fields.
Devices – Transformation MapDevices – Transformation Map
Transformation map used while transforming source Devices data from Microsoft Entra ID.
| Source Field | Target Field |
|---|---|
id |
asset.assetHeader.externalAssetId (Required) |
id |
asset.assetHeader.vendorAssetId (Required) |
displayName |
asset.assetDetail.name (Required) |
operatingSystem |
asset.assetDetail.hostAssetClass.operatingSystem |
operatingSystemVersion |
asset.assetDetail.hostAssetClass.operatingSystemVersion |
isCompliant |
asset.assetDetail.untypedAttributes.entraDeviceIsCompliant |
isManaged |
asset.assetDetail.untypedAttributes.entraDeviceIsManaged |
deviceId |
asset.assetDetail.typedAttributes.entraDeviceId |
trustType |
asset.assetDetail.typedAttributes.entraDeviceTrustType |
approximateLastSignInDateTime |
asset.assetDetail.typedAttributes.entraDeviceLastSignIn |