Microsoft Entra ID Directory Sync Connector
The Microsoft Entra ID Directory Sync Connector ingests user and group data from Microsoft Entra ID into Qualys Enterprise TruRisk Management (ETM) to streamline identity and access management. The connector automates synchronization of user group memberships, enabling unified identity governance within the Qualys platform.
The Microsoft Entra ID Directory Sync Connector is available on demand. To activate it for your subscription, contact your Technical Account Manager (TAM) or Qualys Support.
Overview
The Microsoft Entra ID Directory Sync Connector pulls user and group data from Microsoft Entra ID using the Microsoft Graph API. On first execution, the connector performs a full snapshot of all configured groups and their members. Subsequent executions fetch only the delta, incremental changes since the last successful run, reducing API overhead and synchronization time.
Synchronized data is imported into Qualys AdminUI, where user group memberships can be managed and applied to access control policies within ETM.
Connector Details
The following table summarizes the capabilities and characteristics of the Microsoft Entra ID Directory Sync Connector.
|
Vendor |
Microsoft |
|
Product Name |
Microsoft Entra ID Directory Sync |
|
Connector Category |
Assets (User Groups) |
|
Asset Types Supported |
User Groups |
|
Finding Types Supported |
Not Supported |
|
Supported Version & Type |
SaaS (Latest) |
|
Integration Method |
API Integration (REST) — Microsoft Graph API |
|
Direction |
Unidirectional (Microsoft Entra ID to Qualys) |
|
Incremental Sync (Delta) |
Supported |
|
Import of Installed Software |
Not Supported |
|
Import of Source Tags |
Not Supported |
|
Filters/Filter Query |
Not Supported |
Connection Settings
User Roles and Permissions
The connector authenticates using an Azure App Registration with application-level permissions. The registered application requires the following Microsoft Graph API permissions granted at the application level:
| Entity Type | Permissions | Reference |
|---|---|---|
|
Vulnerability and Machines |
|
|
|
Vulnerability and Machines |
|
|
|
Machines |
|
After adding the permissions, an administrator must grant admin consent. Navigate to API permissions and click Grant admin consent.
Registering the Application in Azure Portal
Follow these steps to register the application and generate the required credentials.
- Sign in to the Azure portal and open the Microsoft Entra ID blade.
- Browse to App registrations and select New registration.
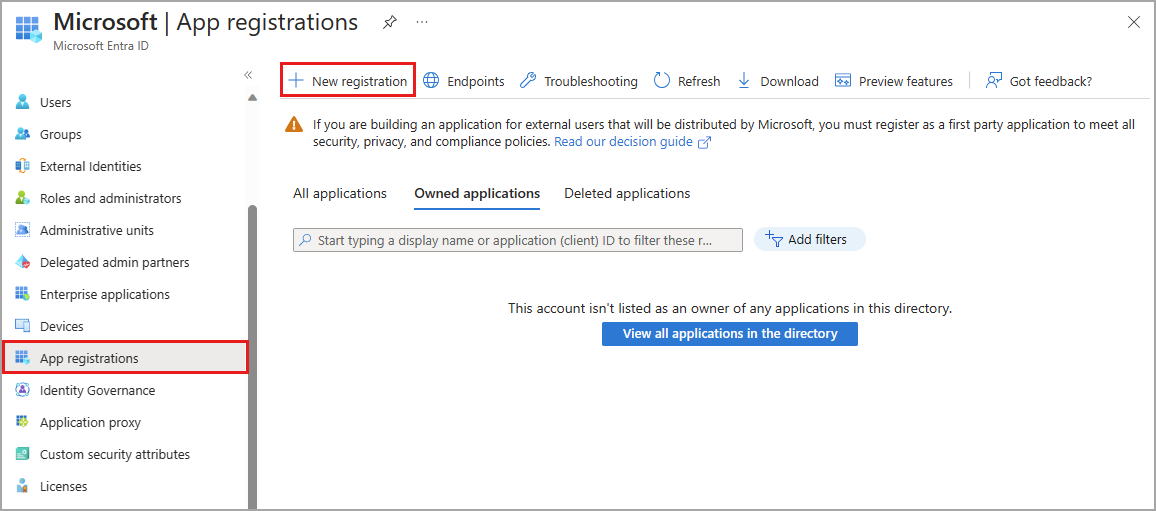
- Enter a name for the application (for example, qualys-entra-connector).
- Select a supported account type that determines who can use the application.
- Under Redirect URI, select Web. The URI field may be left blank.
- Click Register.
- Go to Overview > Essentials to obtain the Client (Application) ID and Tenant (Directory) ID. Store these values securely.
Creating a Client Secret
- In the registered application, click Add a certificate or secret.
- Click New client secret.
- Provide a description and configure the expiry as required. Click Add.
- Copy the Value of the generated client secret and store it securely. This value is not displayed again after you navigate away.
Granting API Permissions
Navigate to API permissions > Add a permission > APIs my organization uses. Select WindowsDefenderATP. Click Application permissions and grant the permissions listed in the table above.
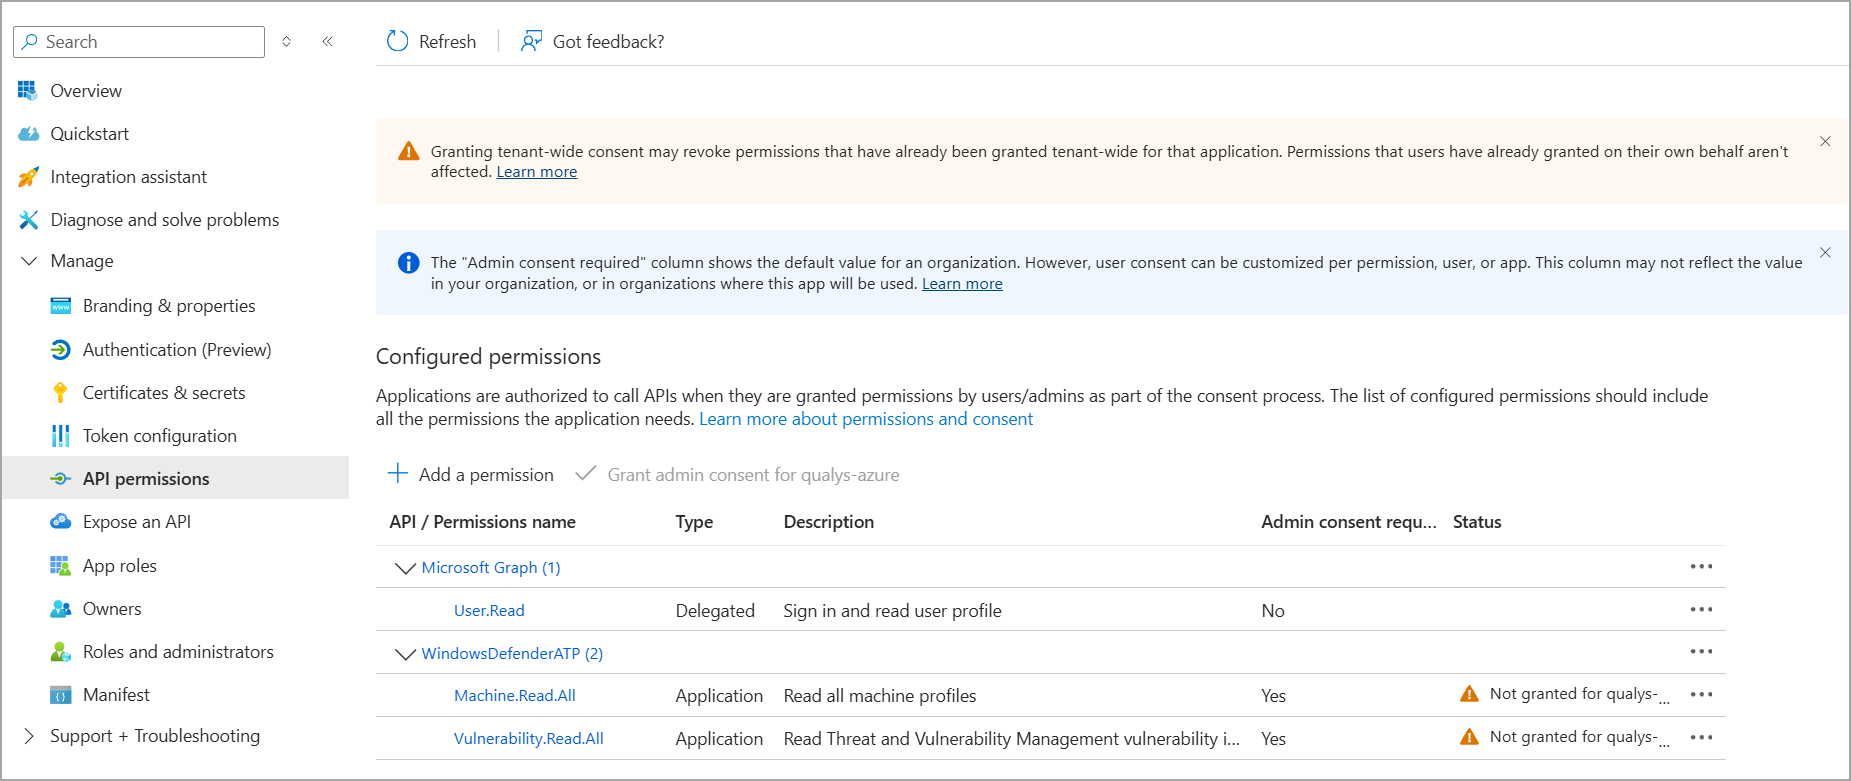
Once all permissions are added, click Grant admin consent to apply them.
Authentication Details
Provide the following credentials in the connector configuration screen:
| Name | Key | Type | Description |
|---|---|---|---|
| Tenant ID | tenantId |
String | Identifies which Azure AD tenant the application should authenticate against. |
| Client ID | clientId |
String | Unique identifier for the application registration in Microsoft Entra ID. |
| Client Secret | clientSecret |
Encrypted | A password-like credential that proves the application’s identity. Generated in Client Secrets. |
Connector Configuration
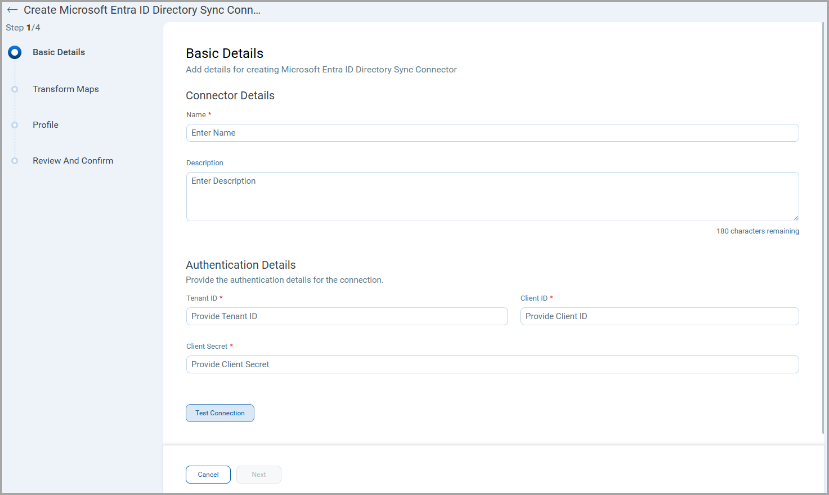
Basic Details
- Log in to Qualys ETM using an account with RBAC-enabled access.
- Go to Connectors > Integration tab and locate the Microsoft Entra ID Directory Sync Connector.
- Click Manage from the ellipses menu.
- Provide a Name and Description for the connector.
- Select the Qualys Data Model and Qualys Data Model Type.
- Enter the authentication credentials: Tenant ID, Client ID, and Client Secret.
Mapping Details
Data Model
The Microsoft Entra ID Directory Sync Connector provides out-of-the-box data model mappings for user group synchronization. The connector does not import vulnerability findings. View the models in ETM to review all supported fields.
Transform Maps
Default transform maps are provided. You can create new maps or clone existing ones to customize field transformations.
- Click Create New to add a new transform map.
- Provide a Transform Map Name, select the Source Data Model (Identity Provider group), and select the Target Data Model (Qualys Group).
- Click Add to save the map.
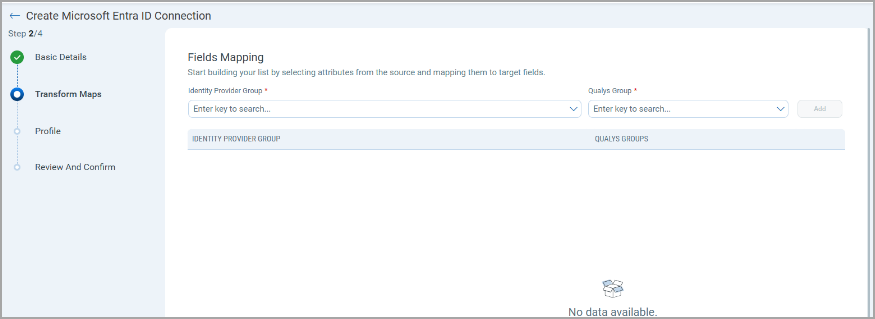
- Alternatively, use Clone from the quick menu to copy and adjust an existing transform map.
Data Model Mapping — User Group Transformation
|
Source Field |
Target Field |
|---|---|
|
id |
identityProviderId |
|
id |
userData.userDetails.externalId |
|
id |
externalId |
|
id |
userData.userDetails.apiExternalId |
|
|
userData.userDetails.emailId |
|
userPrincipalName |
userData.userDetails.userPrincipalName |
|
groupInfo[].idpGroup |
groupInfo[].idpGroup |
|
groupInfo[].qualysGroups |
groupInfo[].qualysGroupUUID |
|
givenName |
userData.userDetails.givenName |
|
surname |
userData.userDetails.lastName |
|
displayName |
userData.userDetails.displayName |
|
streetAddress |
userData.userDetails.address |
|
country |
userData.userDetails.country |
|
displayName |
userData.userDetails.username |
|
jobTitle |
userData.userDetails.title |
|
eventType |
eventType |
|
preferredLanguage |
userData.userDetails.language |
|
notification.* |
userData.notification |
|
classification |
groupInfo[].classification |
|
groupDisplayName |
groupInfo[].customAttributes.groupDisplayName |
|
groupUniqueName |
groupInfo[].customAttributes.uniqueName |
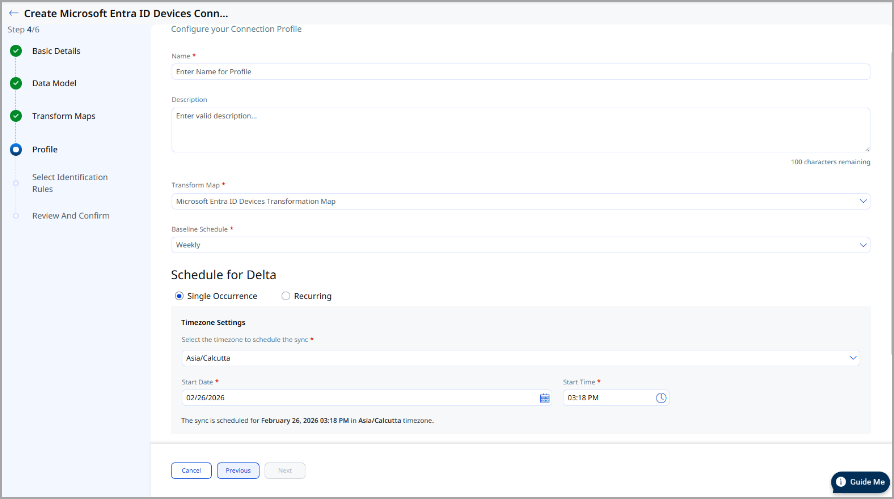
Profiles
Profiles control the execution schedule and behavior of the connector.
- Click + to add a new profile.
- Provide a Name and Description.
- Select the required Transform Map.
- Set Status (Active or Inactive).
- Select a Baseline Schedule - applicable for recurring schedules. This defines how frequently a full snapshot is taken. For example, if the baseline is set to Weekly, the connector fetches a full snapshot on the first run, then fetches only delta changes until the week ends, after which a full snapshot is taken again.
- Configure a Schedule: Single Occurrence or Recurring with start and end dates/times.
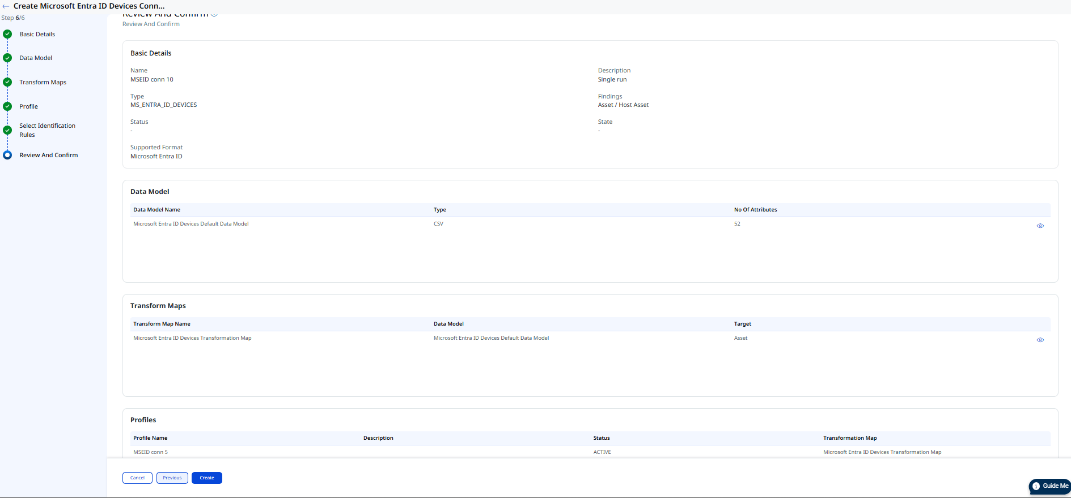
Review all configuration settings on the Review and Confirm screen, then click Create to finalize the connector.
API Endpoints
The connector uses the following Microsoft Graph API endpoints:
| API Function | Endpoint |
|---|---|
|
List Groups (Full Snapshot) |
|
|
Fetch Groups Delta |
|
How Does a Connection Work?
The Microsoft Entra ID Directory Sync Connector executes on schedule or on demand based on the configured profile. On first execution, the connector performs a full pull of all configured groups and their members via the Microsoft Graph API. Subsequent executions use the delta endpoint to fetch only incremental changes, reducing data transfer and processing time.
Fetched user and group data is imported into Qualys AdminUI. In the Connector screen, your newly configured connector will appear with the state Processed once execution completes.
A successfully configured connector transitions through the following states:
- Registered — The connector is successfully created and registered to fetch data from Microsoft Entra ID.
- Scheduled — The connector is scheduled to execute a connection with Microsoft Entra ID.
- Processing — A connection is in progress and the connector is fetching user and group data.
- Processed — The connector has successfully fetched the data. User groups may still be propagating in AdminUI—allow additional time for full synchronization to complete.
The full synchronization process may take up to 2 hours to complete, depending on the number of groups and users being synchronized.
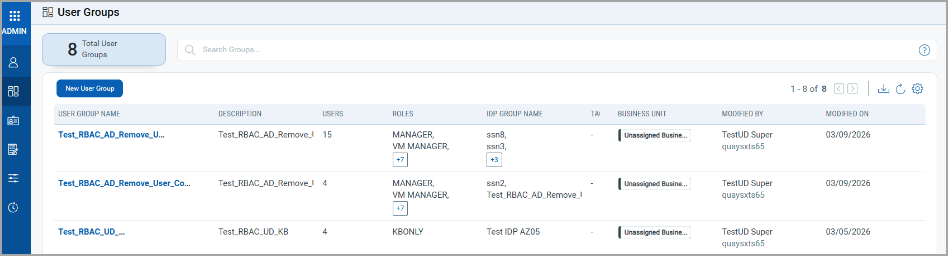
Viewing User Groups in ETM
After a successful connector run, synchronized user groups appear in Qualys AdminUI:
- User Groups: Go to AdminUI > User Groups. Filter or search by group name to locate specific Entra ID groups.