GitHub Infrastructure as Code (IaC) Connector
The GitHub IaC Connector ingests Infrastructure as Code (IaC) files from GitHub repositories into Qualys TotalCloud. This enables centralized visibility and risk analysis of IaC configurations as part of your cloud security posture.
Connector Details
High-level capabilities and supported features of the GitHub IaC Connector.
| Vendor | GitHub |
| Product Name | GitHub |
| Category | Assets |
| Supported Asset Type | Code |
| Findings Support | Supported |
| Integration Type | Cloud |
| Direction | Unidirectional (GitHub to Qualys) |
| Delta Support | Not Supported |
| Version | 1.0.0 |
Files Supported
The connector fetches IaC files with the following extensions:
tf, zip, json, tar, gz, 7z, yaml, yml, template
Connection Settings
User Roles and Permissions
The GitHub IaC Connector requires a Fine-grained Personal Access Token (PAT) with read-only repository access.
Required Permissions
| Entity | Least Permission |
|---|---|
| Contents | Read |
| Metadata | Read (required for private repositories) |
Generate a Fine-grained PAT in GitHub
This section explains how to create a Fine-grained Personal Access Token (PAT) in GitHub with the exact permissions your application or automation workflow needs. Follow the steps carefully to avoid permission-related errors.
1. Open GitHub Settings
-
Log in to your GitHub account.
-
In the top-right corner, click your profile picture.
-
Select Settings from the dropdown menu.
2. Navigate to Developer Settings
-
In the left-side menu, scroll to the bottom.
-
Click Developer settings.
-
Under Developer settings, click Personal access tokens.
-
Select Fine-grained tokens.
3. Create a New Token
-
Click Generate new token.
-
Enter a meaningful Token name (e.g., CI/CD Pipeline Token or Automation Write Token).
-
Set an Expiration - GitHub recommends choosing the shortest practical duration.
-
Under Resource owner, select the GitHub user or organization that owns the repositories.
-
Under Repository access, choose:
-
Only select repositories > Recommended
-
Select the specific repository/ies where the token will be used.
-
4. Assign Required Permissions
Scroll down to Repository permissions and set the following:
a. Contents > Read
Set to: Read
b. Metadata (This will be selected by default when you select Contents permission with Read-Only access)
Assigning this permission is needed for private repositories. For public repositories this permission is not mandatory.
5. Generate the Token
-
Scroll to the bottom of the page.
-
Click Generate token.
-
GitHub will display the token only once. Copy it immediately and store it securely
Authentication Details
Provide the following values when configuring the connector:
| Name | Key | Type | Description |
|---|---|---|---|
| Domain URL | domainUrl |
String | GitHub API base URL (e.g. https://api.github.com) |
| Username | username |
String | GitHub username |
| API Token | apiToken |
Encrypted | Fine-grained GitHub Personal Access Token |
Connector Configuration
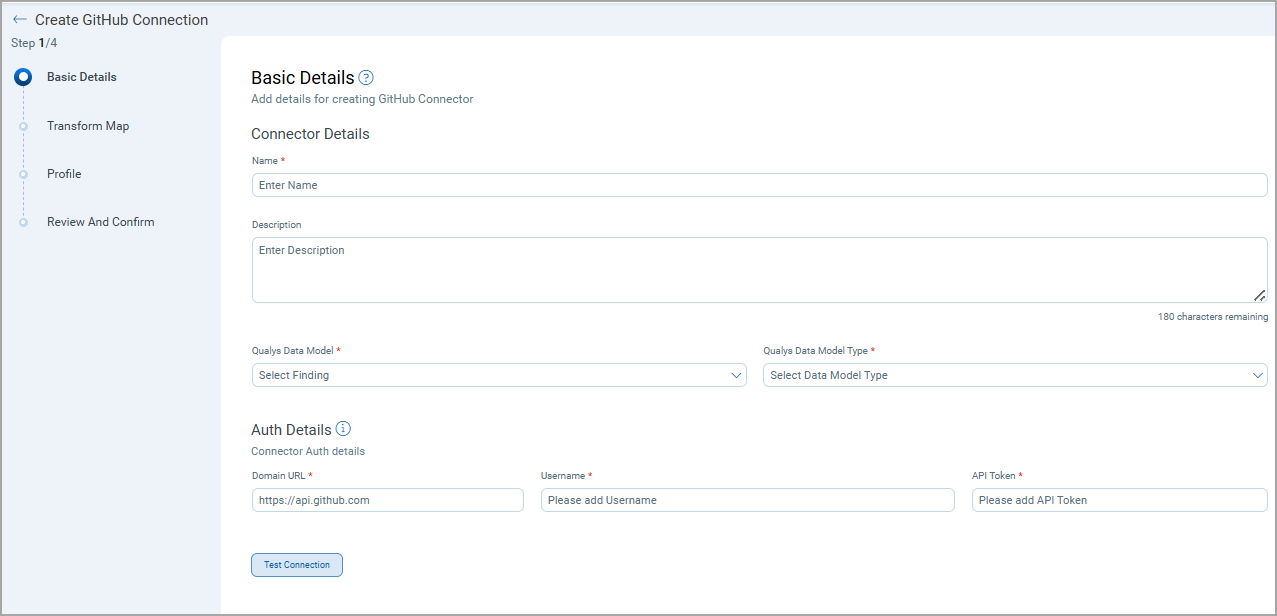
Basic Details
- Log in to Qualys TotalCloud.
- Navigate to Connectors > Integration.
- Locate GitHub IaC Connector and select Manage.
- Provide a connector Name and Description.
- Select Qualys Data Model as Code.
- Enter authentication details.
Transform Map
The GitHub IaC Connector uses a default transform map. Users cannot create or modify transform maps for this connector.
Transformation Map – Code Assets
| Source Field | Target Field |
|---|---|
| repo.name | repo |
| repo.full_name | repo_fullName |
| refs/heads/name | branch_ref |
| name | branch |
| files[].path | files[].path |
| files[].commits.name | files[].lastCommitBy |
| files[].commits.date | files[].lastUpdatedOn |
| files[].path | files[].name |
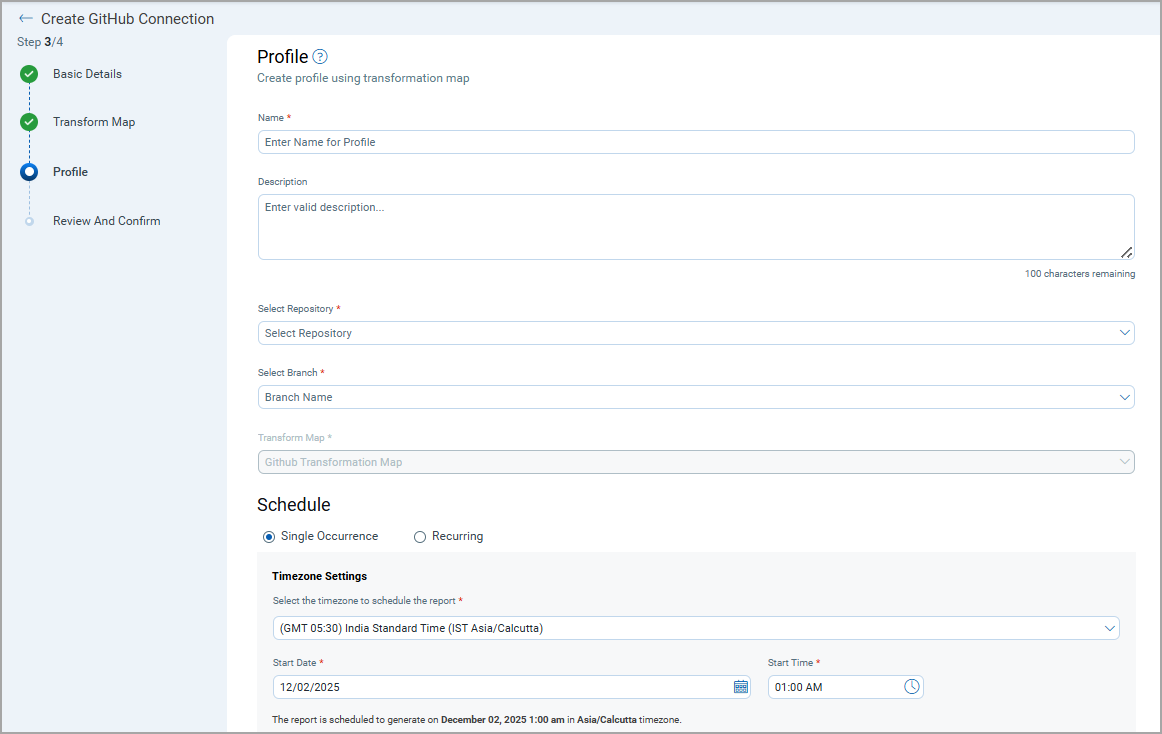
Profiles
Profiles control what data is synchronized and when.
- Create a profile with a name and description.
- Select the target Repository and Branch.
- Use the default GitHub Transformation Map.
- Configure a Single or Recurring schedule.
- Save the profile.
How Does the Connection Work?
On each scheduled or on-demand execution, the connector performs a full pull from the selected GitHub repository and branch. Fetched IaC files are imported into the Code Security section of the TotalCloud module.
In the Connector screen, you can find your newly configured connector listed and marked in the Processed state.
Connector States
A successfully configured connector goes through 4 states.
- Registered - The connector is successfully created and registered to fetch data from the vendor.
- Scheduled - The connector is scheduled to execute a connection with the vendor.
- Processing - A connection is executed and the connector is fetching the asset and findings data.
- Processed - The connector has successfully fetched the assets; it may still be under process of fetching the findings. Wait for some more time for the connector to fetch the findings completely.
The Processed state indicates that the Connector is successfully configured but it is under the process of importing all your assets and findings. This process (specifically for findings) may take some time.
This entire process may take up to 2 hours for completion. Once it is done, you can find the imported data in Enterprise TruRisk Management (ETM).
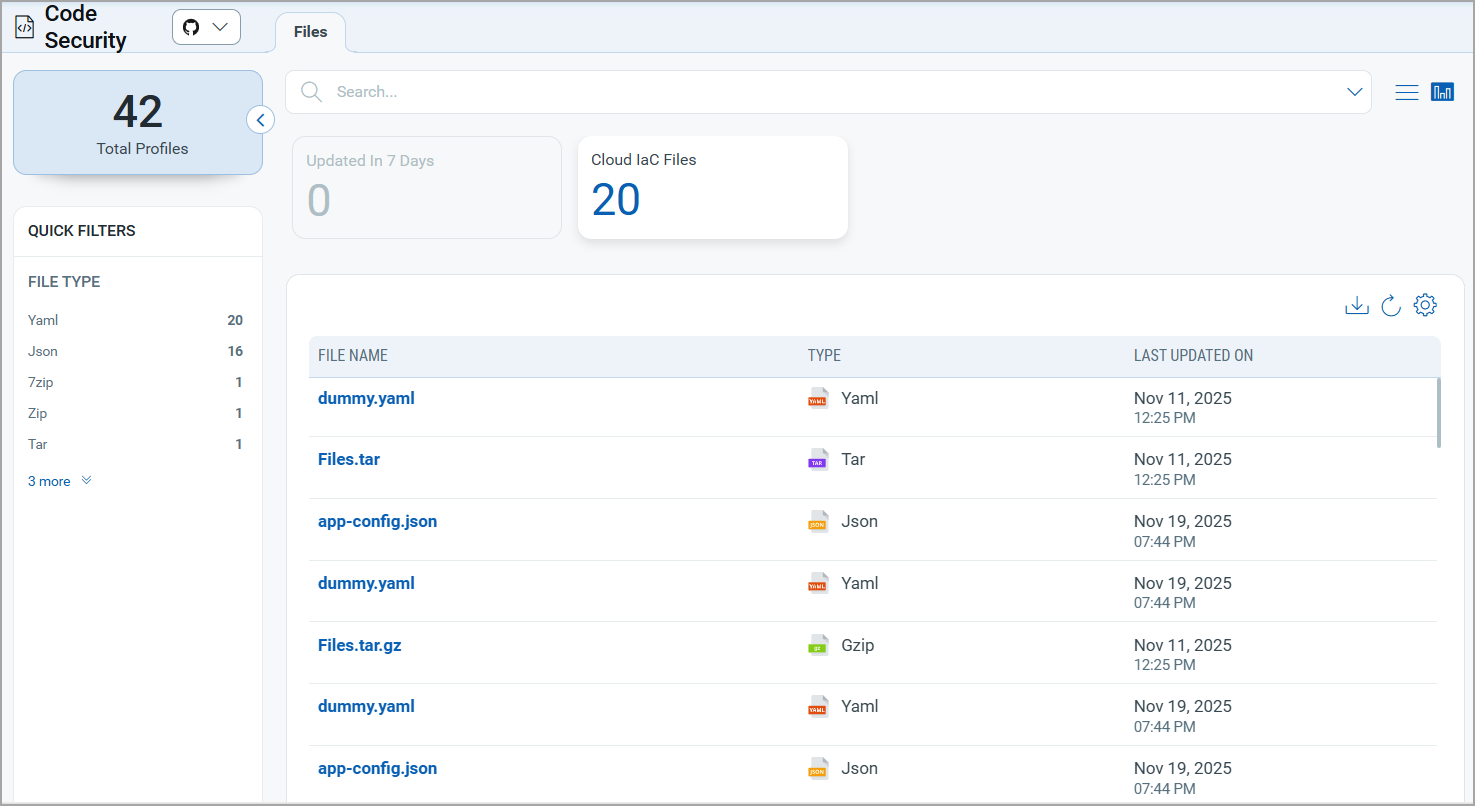
Viewing IaC Files in TotalCloud
- Navigate to TotalCloud.
- Go to Code Security.
- Review imported IaC files and metadata.
You can read more about the findings in the TotalCloud Online Help.
API Reference
| API Function | Endpoint |
|---|---|
| Fetch Repositories | ${domain}/search/repositories |
| Fetch Branches | ${domain}/repos/${username}/${repoName}/branches/${branchName} |
| Fetch Repository Details | ${domain}/repos/${username}/${repoName} |
| Fetch Files | ${domain}/repos/${username}/${repoName}/git/trees/${branch} |
| Fetch Commit Details | ${domain}/repos/${username}/${repoName}/commits |