HCL AppScan (DAST) Connector
The HCL AppScan API Connector bridges application security testing with enterprise risk management by automatically transferring vulnerability data from HCL AppScan into Qualys Enterprise TruRisk Management.
Security teams gain a unified view of web application vulnerabilities alongside other organizational findings, enabling them to deduplicate redundant entries, normalize data formats, and enrich findings with additional context.
This integration reduces manual data consolidation work and leverages Qualys' TruRisk scoring system to prioritize remediation efforts based on actual business risk rather than vulnerability severity alone.
Connector Details
The following table provides a comprehensive overview of what the HCL AppScan (DAST) Connector supports.
| Vendor | HCL |
| Product Name | Appscan |
| Category | Application Security |
| Findings Support | Supported |
| Supported Assets | Web Applications |
| Version | 1.0.0 |
| Integration Type | API Integration (REST) |
| Direction | Unidirectional |
| Delta Support | Supported |
| Supported Version & Type | SaaS (Latest) |
| Import of Installed Software | Not Supported |
| Import of Source Tags | Not Supported |
| Filters/Filter Query | Not Supported |
Configure the Connector
The connector setup wizard contains three steps. A valid Test Connection result in Step 1 is required before you can proceed.
Before You Begin - AuthenticationBefore You Begin - Authentication
Ensure the following prerequisites are in place before configuring the connector in Qualys ETM.
- Ensure you have access to your HCL AppScan account at
https://cloud.appscan.com/with permissions to generate API credentials. - Generate API credentials in HCL AppScan. Navigate to Tools > API and click Generate to obtain a Key ID and Key Secret. Store them securely.
- Note your HCL AppScan Domain URL (for example,
https://cloud.appscan.com). - Confirm network connectivity: Qualys cloud must be able to reach your HCL AppScan instance over HTTPS (port 443).
Generating API Credentials in HCL AppScan
The following steps describe how to generate the Key ID and Key Secret required to authenticate the connector.
- Log in to HCL AppScan at
https://cloud.appscan.com/. - From the navigation menu, go to Tools > API and click Generate to create new API credentials.
- Copy and securely store the Key ID and Key Secret that are displayed. You will need both values during connector setup in Qualys ETM.
Important: The Key Secret may only be visible at the time of generation. If you navigate away without saving it, you may need to generate a new key pair. Store the Key Secret in a secure credential vault immediately.
During connector setup in Qualys ETM, enter the Domain URL, Key ID, and Key Secret in the authentication fields on the Profile & Connectivity screen. Select the appropriate finding type and asset type for web applications.
Permissions Required
The HCL AppScan account used to generate API credentials must have authorization to access the API Key page and generate credentials. The account must have read access to applications and issues data.
Scope and Data Access
The connector queries the following HCL AppScan endpoints:
/api/v4/Apps– retrieves web application asset records with a default batch size of 50 records per request./api/v4/Issues/Application/{ApplicationId}– retrieves DAST vulnerability findings per application with a default batch size of 50 records per request.
Filters are supported using OData-style syntax and can be configured in the connector profile. Example expressions include Name eq 'www.test.com' to filter by application name, or LastUpdated ge 2024-11-18T18:09:14Z for timestamp-based filtering.
Key Rotation
When rotating API credentials, generate new credentials in HCL AppScan under Tools > API. Update the Key ID and Key Secret in Qualys ETM using the Edit Connector option. The connector will use the new credentials on its next scheduled run.
Create a Profile & ConnectionCreate a Profile & Connection
Configure the connector's identity and authenticate with the HCL AppScan source system.
Connector Details
| Name | A unique display name for this connector instance. Example: HCL AppScan (DAST)260506103044544 |
| Description | Optional free-text description (up to 164 characters) to describe the purpose of this connector. |
Authentication Details
| Field | Type | Description |
|---|---|---|
| Domain URL | String | The base URL of your HCL AppScan instance. Example: https://cloud.appscan.com |
| Key Id | String | The Key ID generated from the HCL AppScan Tools > API page. Example: a28f120d-549c-1d46-a0a9-80665d8320b4 |
| Key Secret | Encrypted String | The Key Secret paired with the Key ID above. Generated at the same time as the Key ID. Stored encrypted in Qualys ETM. |
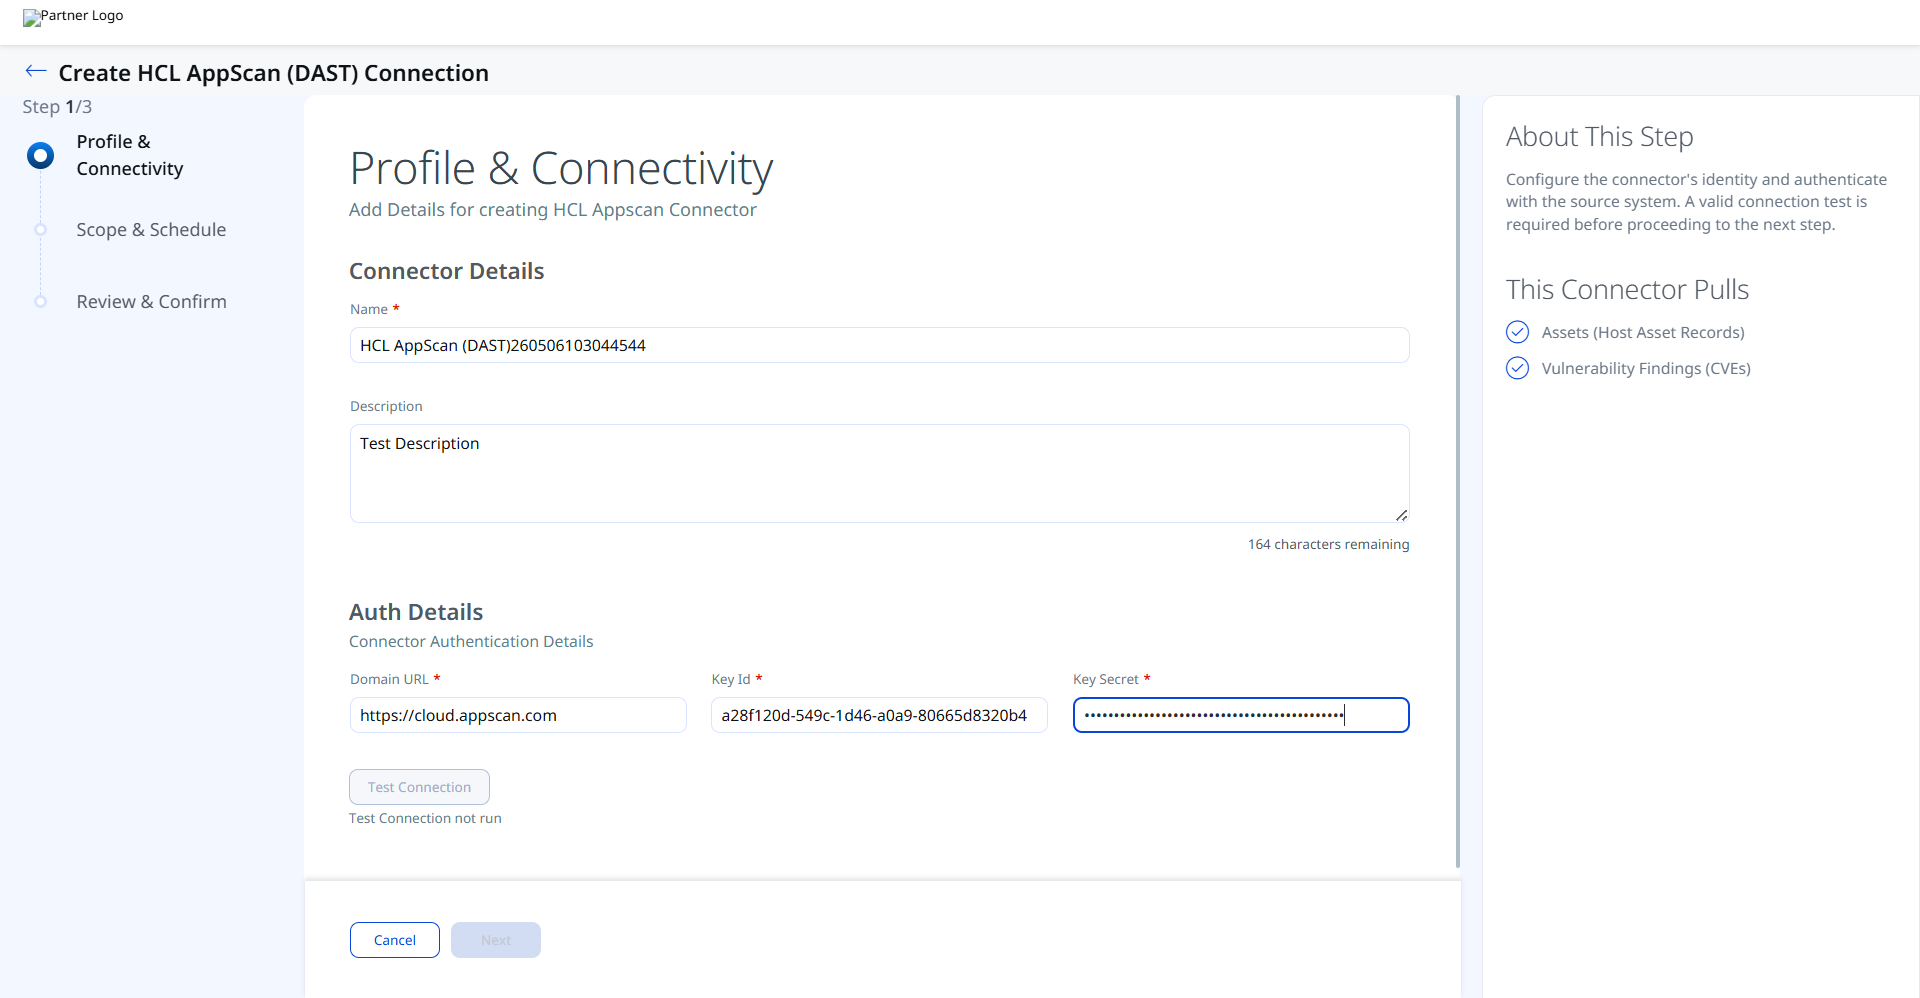
Important: API tokens generated in HCL AppScan expire or may be revoked. If the connector begins reporting authentication failures, regenerate the Key ID and Key Secret in HCL AppScan and update the connector using Edit Connector.
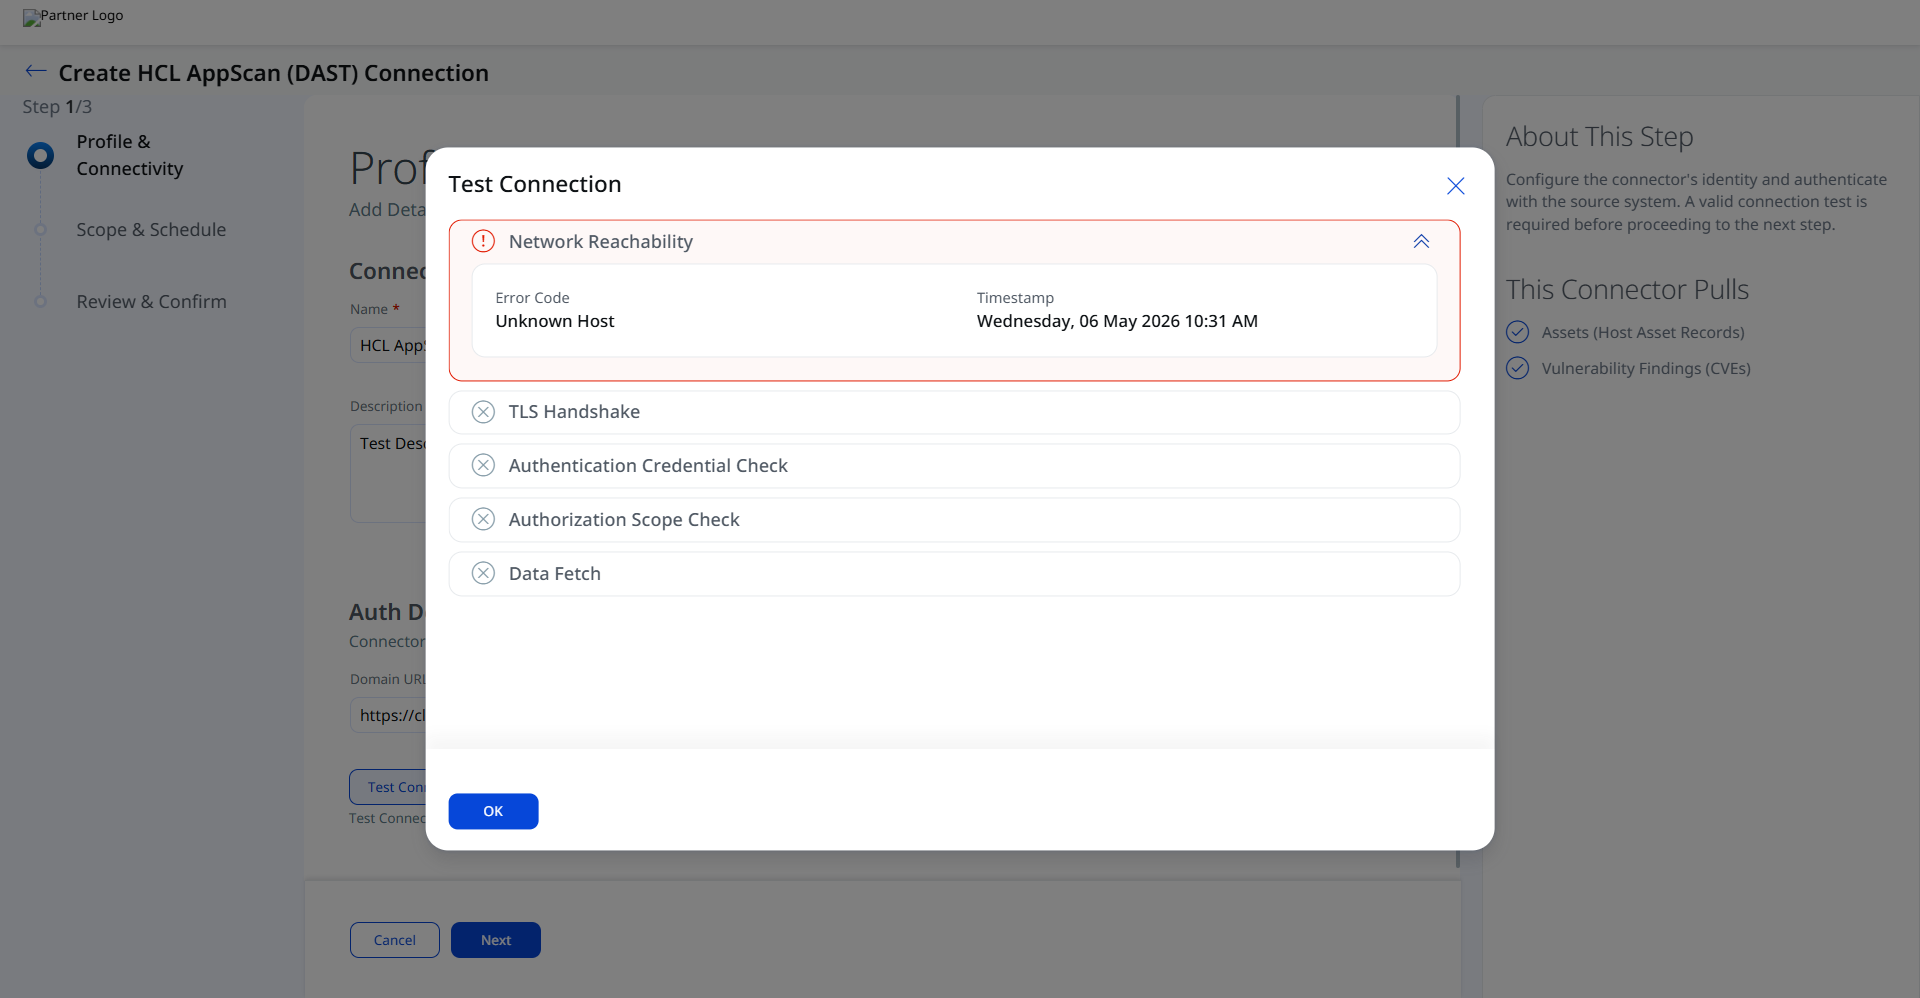
After entering all authentication fields, click Test Connection to validate connectivity before proceeding. The following checks are performed:
- Network Reachability
- TLS Handshake
- Authentication Credential Check
- Authorization Scope Check
- Data Fetch
Important: If Network Reachability fails with error code Unknown Host, verify that the Domain URL is correct and that Qualys cloud can reach the HCL AppScan API over HTTPS (port 443). Check that the API credentials have not been revoked. All subsequent checks (TLS Handshake, Authentication Credential Check, Authorization Scope Check, and Data Fetch) will also fail if network reachability cannot be established.
Set the Scope & ScheduleSet the Scope & Schedule
Define what data to synchronize and how frequently the connector should run.
This connector pulls the following data types on each run:
- Assets (Host Asset Records) – web application records from HCL AppScan.
- Vulnerability Findings (CVEs) – DAST issue records associated with each application.
Configure the sync schedule to set the frequency at which Qualys ETM will poll HCL AppScan for new and updated data.
Delta (incremental) synchronization is supported. After the initial full sync, subsequent runs retrieve only records that have been added or modified since the last successful run, reducing API load and sync duration.
Review all connector settings before saving.
Click Save to create the connector. The connector will be registered in Qualys ETM and will run according to the configured schedule.
After saving, navigate to Advanced Settings to configure optional filters or review the transform map. Changes to Advanced Settings require clicking Save again within that panel.
Advanced Settings
Advanced Settings are available after the connector has been created. Access them by opening the connector and selecting the Advanced Settings option.
Filters Tab
The HCL AppScan (DAST) Connector supports OData-style free-text filter expressions applied to the applications endpoint. Enter filter expressions in the filter query field to restrict which applications and their associated findings are retrieved.
Supported OData filter fields include:
Name– application name. Example:Name eq 'www.test.com'LastUpdated– timestamp of last update. Example:LastUpdated ge 2024-11-18T18:09:14Z
Filters use standard OData comparison operators such as eq (equals) and ge (greater than or equal to). Multiple conditions can be combined using and.
Note: If filters are configured and return no data, verify that the OData syntax is correct and that the filter values match data present in your HCL AppScan environment.
Transform Map Tab
The HCL AppScan (DAST) Connector includes an out-of-box transform map that handles field-level mapping from HCL AppScan source attributes to the Qualys ETM target schema. No additional configuration is required to use the default map.
To view the active mapping or clone the map to create a customized version, open the Transform Map tab in Advanced Settings. Click Create New to define a custom transform map specifying a Source Data Model and Target Data Model.
Note: Always click Save after making any changes in the Advanced Settings panel to ensure your configuration is persisted.
HCL AppScan Web Application Asset MappingHCL AppScan Web Application Asset Mapping
| Source Attribute Key | Target Attribute Label |
|---|---|
apps.Url |
webAppUrl (Required) |
apps.Name |
webAppName (Required) |
HCL AppScan Vulnerability Finding MappingHCL AppScan Vulnerability Finding Mapping
| Source Attribute Key | Target Attribute Label |
|---|---|
Items[].Id |
externalFindingId (Required) |
Items[].IssueType |
findingName (Required) |
Items[].SeverityValue |
findingSeverity (Required) |
Items[].Cve |
cveId |
Items[].CvssVersion |
cvss3Base |
Items[].Cwe |
cweId |
Items[].DateCreated |
findingFirstFoundOn |
Items[].LastFound |
findingLastFoundOn |
Items[].Port |
findingPort |
Items[].Scheme |
findingProtocol |
Items[].IssueTypeId |
findingSubType |
Items[].IssueXml |
detectionResult |
Status
Open | In Progress | Noise | Fixed | Passed | Reopened
|
findingStatus
NEW | ACTIVE | NONE | FIXED | IGNORED | REOPENED
|
How the Connection Works
The HCL AppScan (DAST) Connector bridges application security testing with enterprise risk management by automatically transferring vulnerability data from HCL AppScan into Qualys ETM. Each run retrieves web application assets including application name and URL, along with DAST vulnerability findings including issue type, CVE, CVSS version, CWE, creation date, severity, status, port, protocol, and detection results.
After the connector is created and saved, Qualys ETM manages the sync lifecycle automatically according to the configured schedule.
Connector States
The connector transitions through the following states during each sync cycle:
- Registered – the connector has been created and saved in Qualys ETM. It is ready to run.
- Scheduled – the connector is queued and waiting for its next scheduled execution window.
- Processing – the connector is actively querying HCL AppScan APIs and ingesting data into Qualys ETM.
- Processed – the connector has successfully fetched asset records. Findings import may still be in progress at this point.
- Errored – the connector encountered an error during the last run. Review the error details and consult the Troubleshooting section.
Note: The Processed state indicates that asset records have been fetched, but the import of all associated findings may still be in progress. This entire process may take up to 2 hours for completion on the first run.
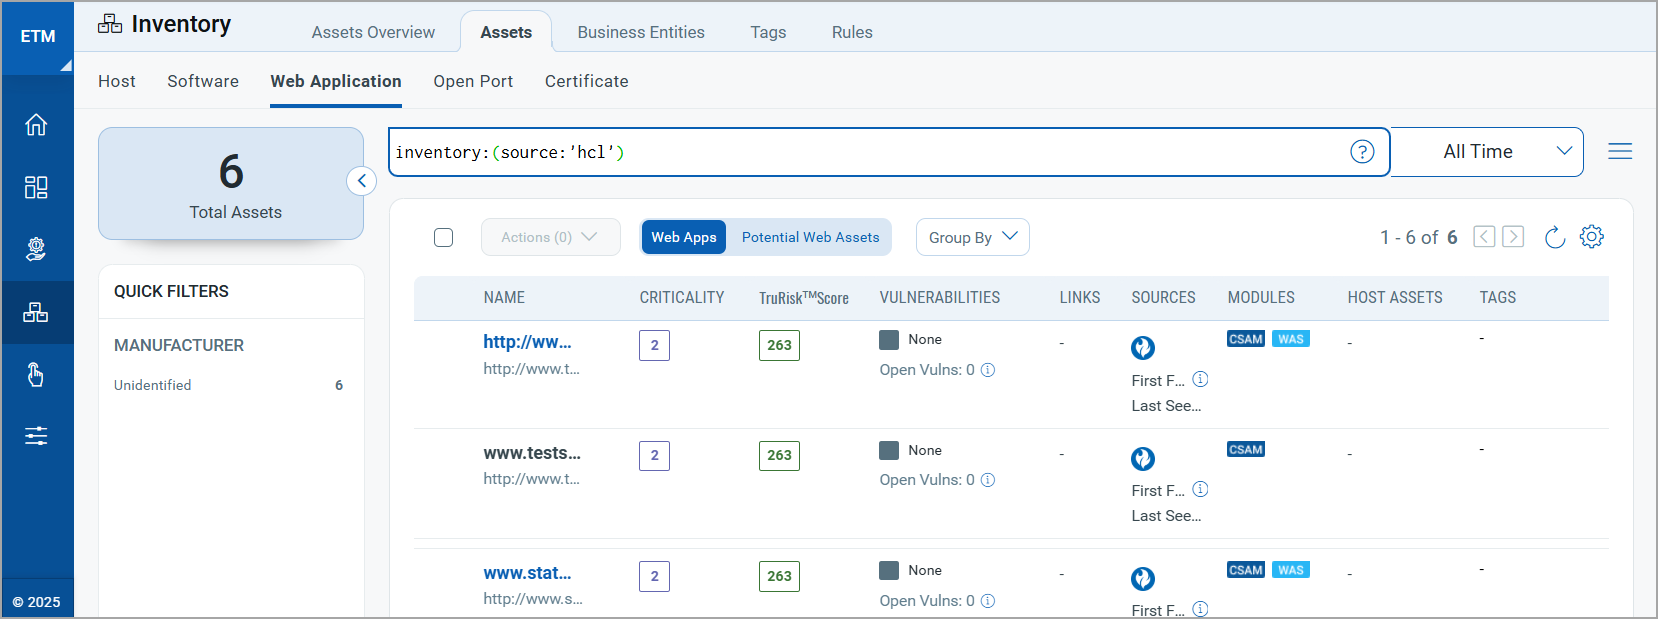
Viewing Assets and Findings in ETM
Once the connector reaches the Processed state, imported data is available in Qualys Enterprise TruRisk Management (ETM).
To view imported web application assets, navigate to the Inventory tab in ETM and go to Assets > Application. Use the following filter token to display all assets imported from HCL AppScan:
inventory:(source:"HCL AppScan")
To view vulnerability findings, navigate to the Risk Management tab and go to Findings > Vulnerability. Use the following filter token to display all findings from HCL AppScan:
findings.vendorProductname:"HCL AppScan"
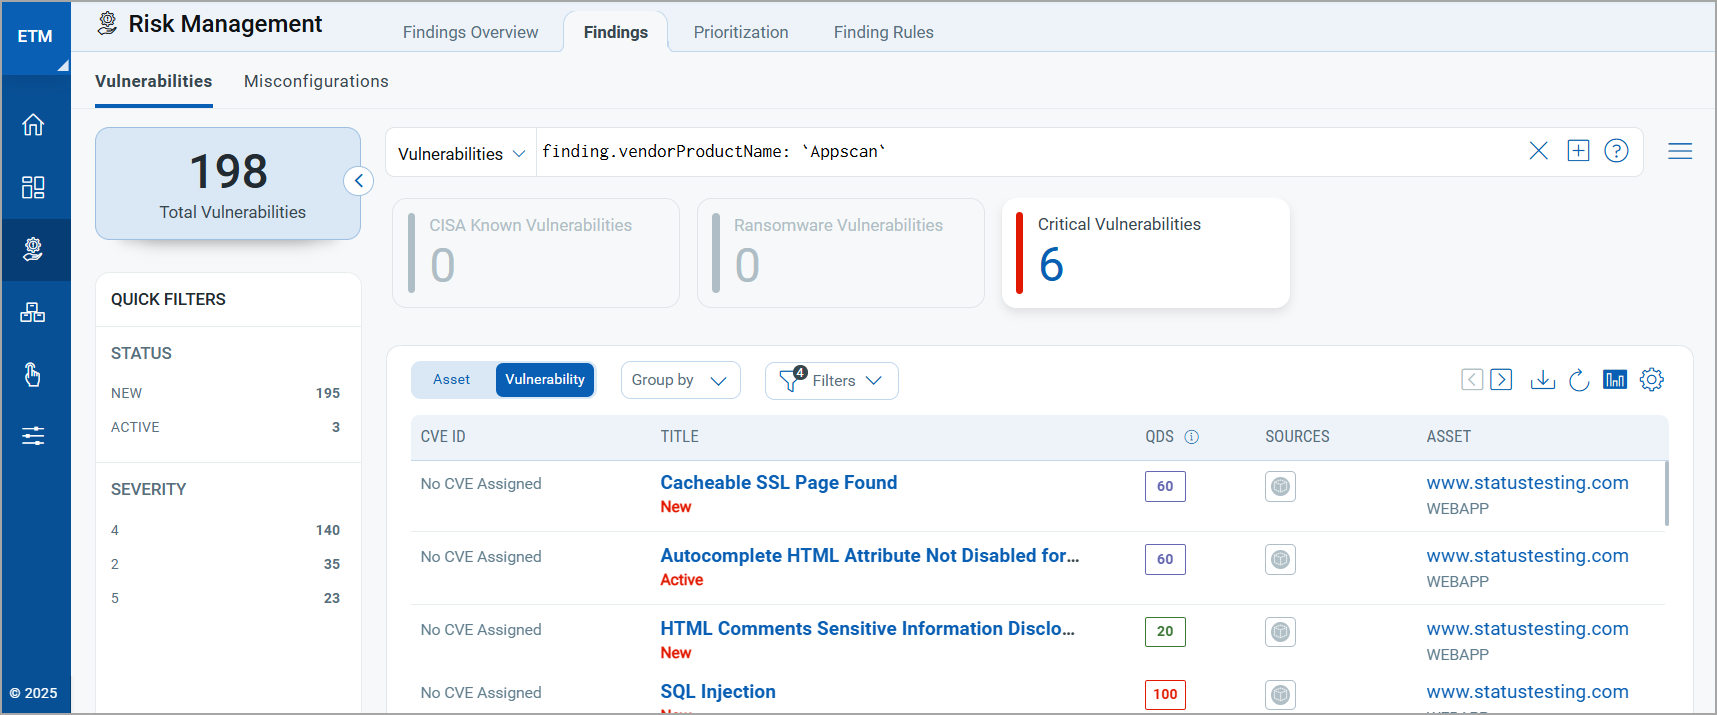
Click any asset or finding to view detailed information including risk scores, CVE identifiers, CVSS data, and remediation context. Use these findings in conjunction with Qualys' TruRisk scoring to prioritize remediation efforts.
Troubleshooting
The following table describes common issues and their resolutions for the HCL AppScan (DAST) Connector.
| Issue | Resolution |
|---|---|
| Authentication failure on the connector run | Verify the Domain URL, Key ID, and Key Secret entered in Qualys ETM are correct. Confirm the HCL AppScan account has API access permissions. The authentication token is valid for 30 minutes and auto-refreshes; persistent failures indicate incorrect credentials. Regenerate credentials in HCL AppScan under Tools > API and update the connector using Edit Connector. |
| No findings imported after first run | The connector transitions through Registered, Scheduled, Processing, and Processed states. The entire process may take up to 2 hours for completion. The Processed state indicates assets have been fetched but findings import may still be in progress. Wait for the full cycle to complete before troubleshooting further. |
| Connection test fails | Verify the Domain URL is correct and that Qualys cloud can reach the HCL AppScan API over HTTPS (port 443). Check that the API credentials have not been revoked. If the error code shown is Unknown Host, the Domain URL may be malformed or unreachable from the Qualys network. |
| Filtered results return no data | If filters are configured in the connector profile, verify the OData syntax is correct and that the filter values match data present in your HCL AppScan environment. Check field names and operators against the supported OData fields listed in the Advanced Settings section. |
Additional Information
Additional reference information for the HCL AppScan (DAST) Connector.
API Reference
The following APIs are executed during each HCL AppScan connector run:
| Name | Endpoint | Info |
|---|---|---|
| Auth API | /api/v4/Account/ApiKeyLogin/ |
Exchanges Key ID and Key Secret for an authentication token. Token is valid for 30 minutes and is auto-refreshed by the connector. |
| Fetch Applications | /api/v4/Apps |
Retrieves web application asset records. Default batch size: 50 records per request. |
| Fetch Vulnerabilities | /api/v4/Issues/Application/{ApplicationId} |
Retrieves DAST vulnerability findings per application. Default batch size: 50 records per request. |