JFrog Artifactory & Xray Connector
Security teams operating in software-driven environments often lack visibility into vulnerabilities embedded within the artifacts, packages, and container images that make up their software supply chain. The JFrog Artifactory & Xray Connector brings that visibility into Qualys Enterprise TruRisk Management (ETM) by ingesting Artifactory inventory and software composition analysis findings from Xray's binary-level scans into a centralized risk platform. This allows practitioners to correlate application-layer vulnerabilities discovered in build artifacts and container images with the broader asset inventory already tracked in Qualys ETM. By consolidating software supply chain risk alongside cloud and endpoint security data, security teams can prioritize remediation based on true organizational risk rather than managing findings in isolation across separate toolchains.
Note: Qualys ETM is compatible with JFrog Artifactory and JFrog Xray. JFrog is not affiliated with or endorsing this integration.
Connector Details
The following table provides a comprehensive overview of what the JFrog Artifactory & Xray Connector supports.
|
Vendor |
JFrog |
|
Product Name |
JFrog Artifactory & JFrog Xray (JFrog Security Essentials) |
|
Category |
Application Security |
|
Works With |
Qualys Enterprise TruRisk Management (ETM) |
|
Connector Type |
Third-Party Integration |
|
Supported Assets |
Container Images (Docker), Binary Repositories |
|
Findings Support |
Yes |
|
Supported Version & Type |
SaaS (Latest) |
|
Integration Type |
API Integration (REST) |
|
Authentication Type |
REST API Token (Access Token) |
|
Direction |
Unidirectional (JFrog Artifactory & Xray → Qualys) |
|
Incremental Sync (Delta) |
Not Supported |
|
Import of Installed Software |
Not Supported |
|
Import of Source Tags |
Not Supported |
|
Filters / Filter Query |
Not Supported |
Configure the Connector
The connector setup wizard in Qualys ETM walks through the following steps. Complete each step before proceeding to the next.
Before You Begin - AuthenticationBefore You Begin - Authentication
Complete the following preparation steps before configuring the connector in Qualys ETM.
- Ensure you have access to the JFrog platform with Administrator-level permissions.
- Generate an Access Token in JFrog (see the procedure below).
- Copy the generated token immediately – it cannot be retrieved later.
- Have your JFrog instance base URL ready (for example,
https://yourorg.jfrog.io).
Generate an Access Token in JFrog
- Log in to your JFrog platform instance.
- Navigate to Administration > User Management > Access Tokens.
- Click Generate Token.
- Enter a description for the token.
- Set the token scope to Admin.
- Under services, select All to include both Artifactory and Xray.
- Click Generate and copy the token value immediately – it is only shown once and cannot be retrieved later. Store it in a secure location.
Important: The token value is shown only once. If you navigate away from the page without copying the token, you must generate a new one. Qualys recommends using a dedicated service account for this integration rather than a personal administrator account.
Note: If you already have an existing Admin-scoped Access Token with access to all services (Artifactory and Xray), you may use it directly without generating a new one.
Permissions Required
The JFrog Access Token must have Admin-level scope with access to all services (Artifactory and Xray). This is required to retrieve Docker image and repository data as well as Xray vulnerability findings.
| Entity Type | Required Permission |
|---|---|
| JFrog Access Token | Admin |
Scope and Data Access
The connector retrieves two types of data from JFrog, depending on the asset type configured in the connector profile:
- Docker Image – Full asset records and associated vulnerability findings from Xray. Findings include vulnerability details such as CVE IDs, CWE IDs, CVSS v3 scores, severity, and remediation information.
- Repositories – Asset records only. Vulnerability findings are not supported for this asset type.
The data flow is unidirectional, from JFrog to Qualys ETM. Delta synchronization is not supported; all data within the JFrog instance is retrieved on each connector run.
Key Rotation
When rotating the Access Token, generate a new token in JFrog under Administration > User Management > Access Tokens. Update the connector configuration in Qualys ETM with the new token using the Edit Connector option. Revoke the old token in JFrog only after confirming the new token is working correctly.
Create a Profile & ConnectionCreate a Profile & Connection
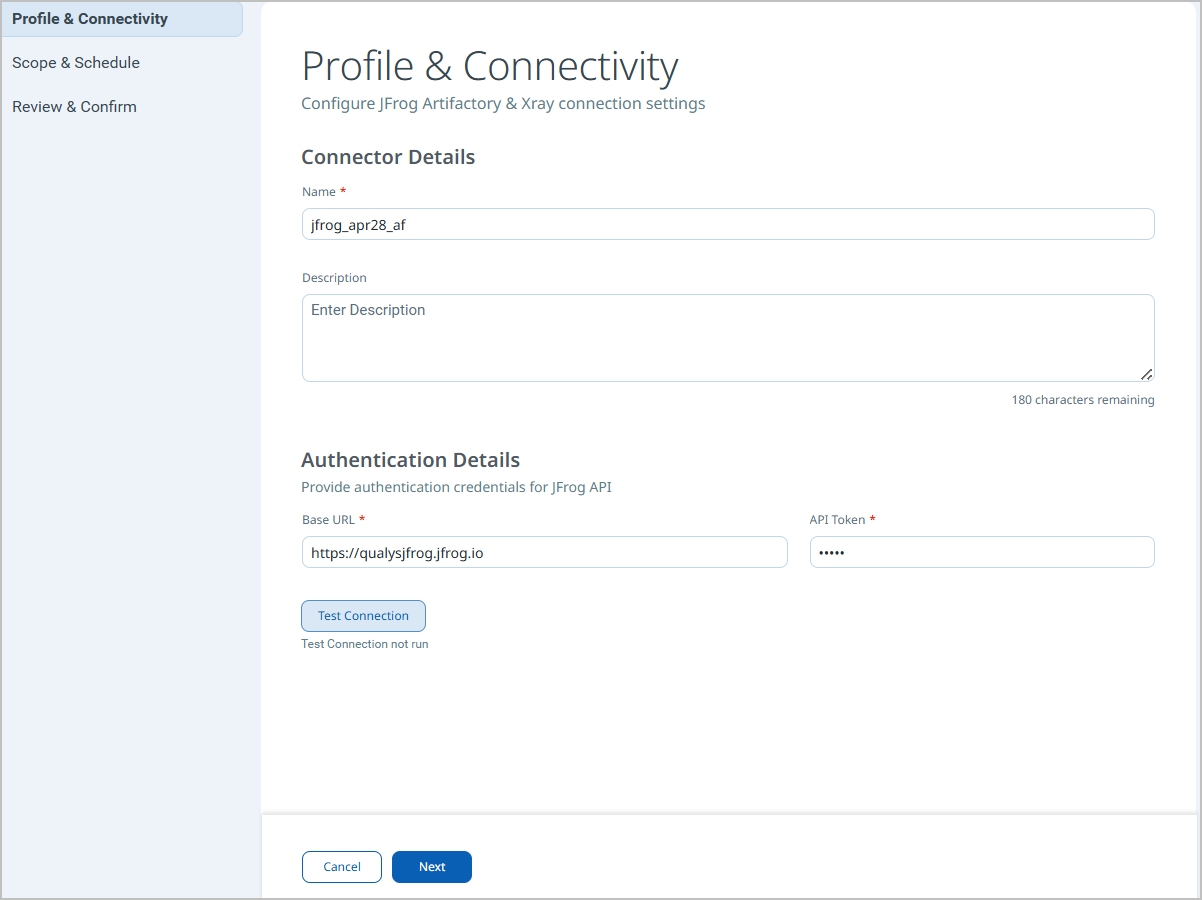
In this step, provide the connector name, description, and authentication credentials used to connect to JFrog.
- Log in to Qualys ETM.
- Navigate to Connectors > Integration tab and locate the JFrog Artifactory & Xray connector tile in the Connector Marketplace.
- Click Manage from the ellipsis menu on the connector tile.
- Complete the Connector Details fields (see table below).
- Complete the Authentication Details fields (see table below).
- Click Test Connection to validate the credentials before proceeding.
- Click Next to continue to Step 2.
Connector Details
|
Name |
A display name for this connector instance. |
|
Description |
An optional description identifying the purpose or environment of this connector. |
Authentication Details
| Field | Type | Description |
|---|---|---|
| Domain Name | String | Base URL of the JFrog instance. Example: https://yourorg.jfrog.io |
| API Token | Encrypted String | Access Token generated in JFrog with Admin scope and access to all services (Artifactory and Xray). |
Important: The API Token field accepts an Encrypted String. Once saved, the token value is not displayed again within Qualys ETM. If the token is lost, generate a new one in JFrog and update the connector.
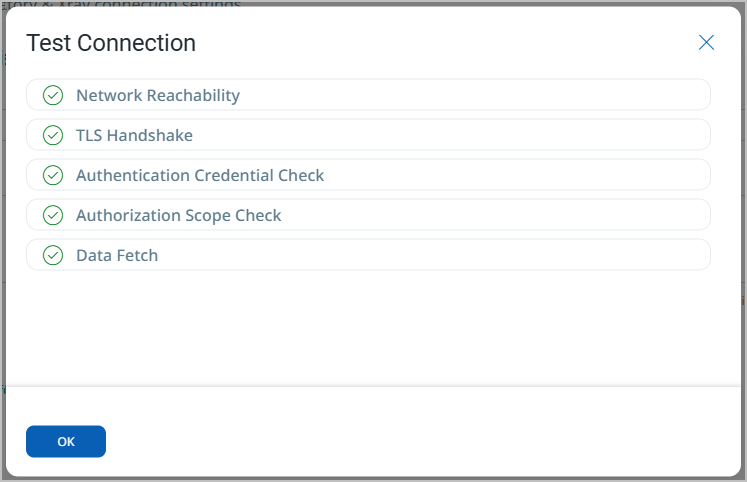
When you click Test Connection, the connector runs the following checks:
- Network Reachability
- TLS Handshake
- Authentication Credential Check
- Authorization Scope Check
- Data Fetch
All five checks must pass before the connector can be saved. If a check fails, refer to the Troubleshooting section for resolution steps.
Set the Scope & ScheduleSet the Scope & Schedule
In this step, select the asset types to synchronize and configure the connector execution schedule.
- Under Data to Sync, select the asset type(s) to include:
- Docker Image – Imports asset records and vulnerability findings from Xray.
- Repositories – Imports asset records only (no vulnerability findings).
- Both asset types may be selected simultaneously.
- If the Docker Image type is selected, also select Vulnerability as the finding type to enable Xray vulnerability ingestion.
- Select the required Transform Map for each selected asset type.
- Configure the Schedule:
- Select Single Occurrence or Recurring.
- Set the start date, end date, and execution time.
- Click Next to proceed to the Review step.
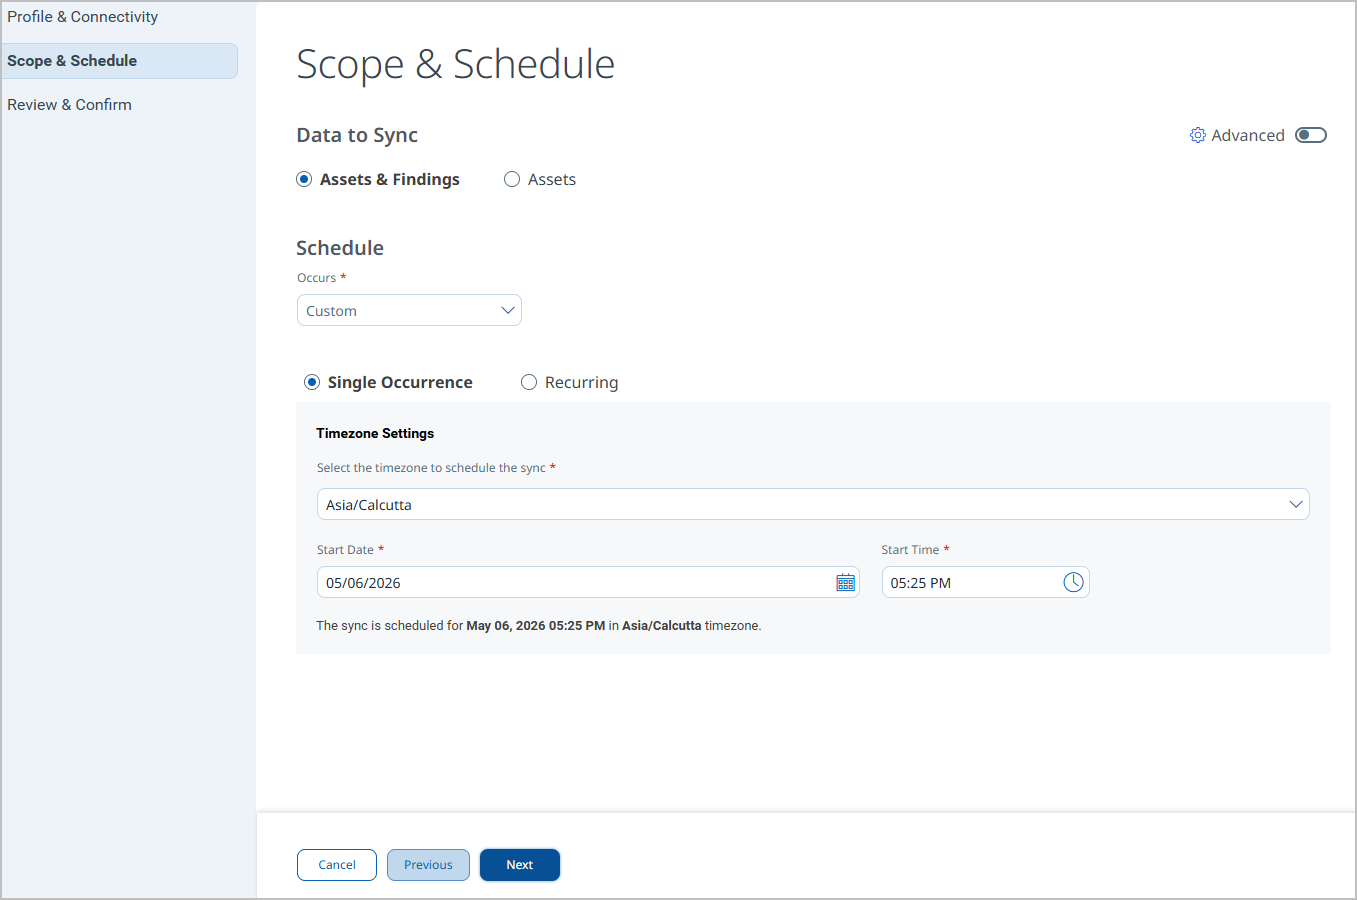
- Review the changes and create your connector.
Note: Delta synchronization is not supported. Each scheduled execution performs a complete data pull from JFrog. Schedule frequency should be set based on how often the JFrog environment changes.
Advanced Settings
Advanced settings are available after the connector is created. Access them by selecting the connector from the Connections list and navigating to the relevant tab.
Note: After modifying any Advanced Settings, click Save to apply the changes before navigating away.
Filters Tab
The Filters tab is present in the connector configuration. However, filter queries are not currently supported for the JFrog Artifactory & Xray Connector. The connector retrieves all accessible Docker images and repositories from the configured JFrog instance on each run.
Transform Map Tab
The Transform Map tab displays the active transformation maps applied to ingested data. The following default transform maps are provided:
- JFrog Docker Image Asset – Maps Docker image asset fields from JFrog to the Qualys ETM container image asset data model.
- JFrog Repository Asset – Maps repository asset fields from JFrog to the Qualys ETM repository asset data model.
- JFrog Docker Image Vulnerability – Maps Xray vulnerability findings to the Qualys ETM findings data model.
Transform maps can be cloned and customized. To create a custom map, click Create New, provide a Transform Map Name, select a Source Data Model, and select a Target Data Model, then save. Alternatively, use Clone from the quick menu to copy and adjust an existing default map.
How the Connection Works
The JFrog Artifactory & Xray Connector executes on a configured schedule or on demand based on the active profile. On each execution, the connector authenticates to the JFrog REST API using the configured domain and access token, fetches the list of repositories and container images, retrieves vulnerability data from JFrog Xray for each applicable asset, applies the configured transform map, and imports the results into ETM. Each execution performs a full pull; incremental (delta) synchronization is not supported.
Connector States
The connector transitions through the following states during execution:
- Registered – The connector has been created and registered to fetch data from JFrog. It will execute on its next scheduled run.
- Scheduled – The connector is queued and waiting for its next scheduled execution window.
- Processing – The connector is actively fetching asset and findings data from JFrog via the REST API.
- Processed – Asset data has been fetched and imported successfully. Findings processing may still be in progress; allow additional time for findings to appear in ETM.
- Errored – The connector encountered an error during execution. Check the connector log and refer to the Troubleshooting section.
Note: On the first run, the full import of assets and findings – particularly for large JFrog environments – may take up to 2 hours to complete. The connector will show Processed once the asset fetch is complete, but findings may continue processing in the background.
Viewing Assets and Findings in ETM
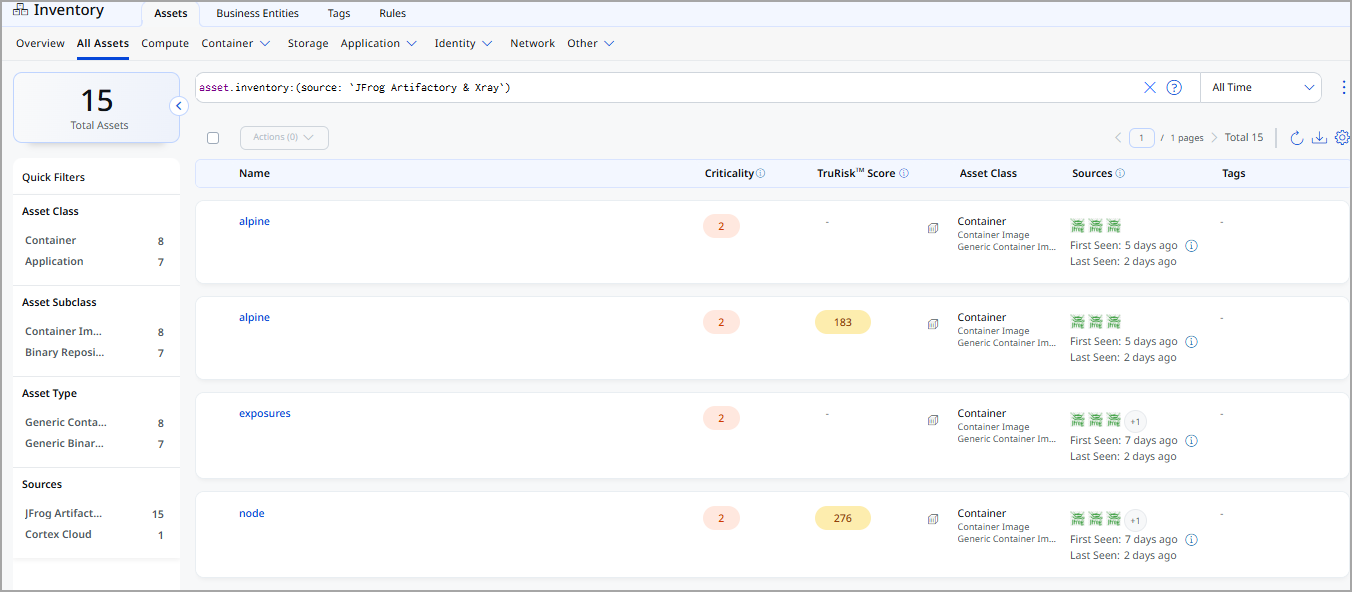
After a successful connector run, JFrog assets and findings are available in Qualys ETM as follows:
- Assets: Navigate to Inventory > Assets. Use the following filter to list assets imported from this connector:
inventory:(source:"JFrog")
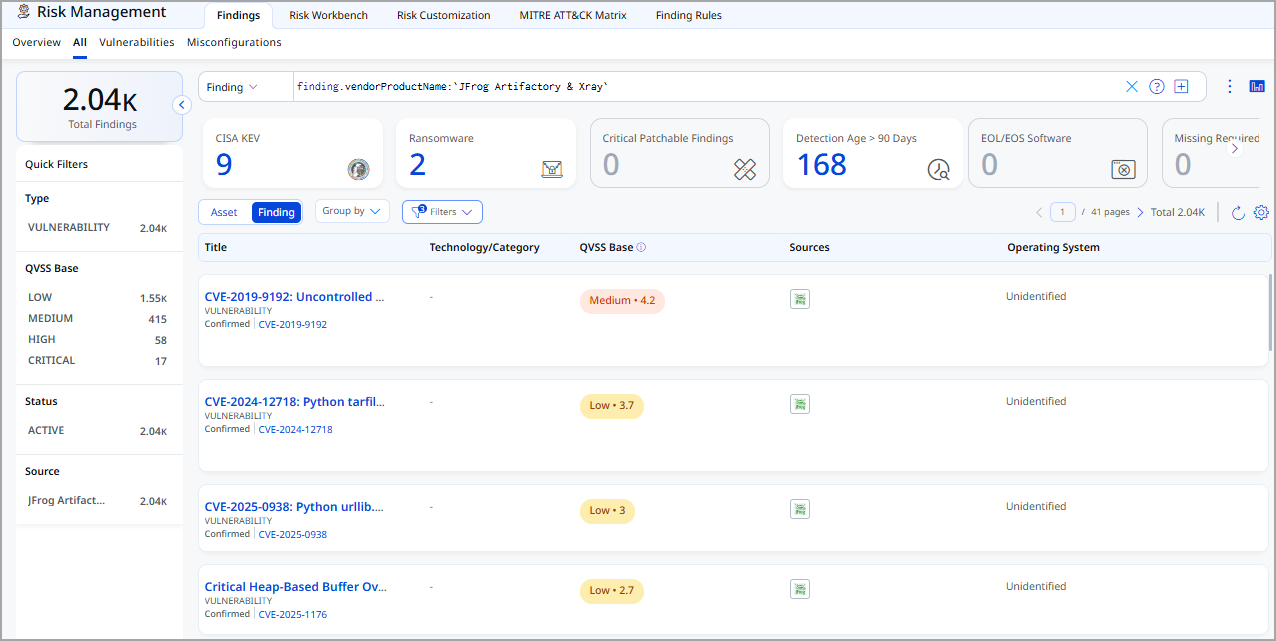
- Findings: Navigate to Risk Management > Findings > Vulnerability. Use the following filter to list vulnerability findings from this connector:
findings.vendorProductname:"JFrog Artifactory & Xray"
Troubleshooting
Use the following table to resolve common issues encountered with the JFrog Artifactory & Xray Connector.
| Issue | Resolution |
|---|---|
| Authentication failure on connector run | Verify the Domain Name and API Token entered in Qualys ETM are correct. Confirm the token has not expired or been revoked in JFrog under Administration > User Management > Access Tokens. Verify the token has Admin scope and includes access to all services. |
| No assets imported after first run | The connector transitions through Registered, Scheduled, Processing, and Processed states. The entire process may take up to 2 hours to complete. Verify that Docker images or repositories exist in JFrog Artifactory and that the correct asset type is selected in the connector profile. |
| Connection test fails | Verify the Domain Name is correct and accessible from the Qualys cloud over HTTPS. Confirm the JFrog instance base URL format is correct (for example, https://yourorg.jfrog.io). Check that the Qualys cloud IP ranges are not blocked by your JFrog instance's network policies. |
| Vulnerability findings not imported | Vulnerability findings are only supported for the Docker Image asset type – they are not available for Repositories. Confirm that JFrog Xray is enabled on your JFrog instance and that Xray scanning is configured for the repositories containing the Docker images. Verify that the Vulnerability finding type is selected in the connector profile. |
Additional Information
API Reference
The connector uses the following JFrog REST API endpoints to retrieve data.
| Operation | Endpoint |
|---|---|
| Authentication / Base URL | https://yourorg.jfrog.io |
| Fetch asset list (repositories) | /artifactory/api/repositories |
| Fetch Docker image blob config | /artifactory/api/docker/{repoKey}/v2/{imageName}/blobs/{configDigest} |
| Fetch asset details and vulnerability findings | /xray/api/v1/summary/artifact |
Transformation Maps
The following default transformation maps are provided for the JFrog Artifactory & Xray Connector. Each map defines how source fields from the JFrog API response are mapped to target fields in the Qualys ETM data model.
Docker Image Asset TransformationDocker Image Asset Transformation
| Source Field | Target Field |
|---|---|
container-image (constant) |
asset.assetHeader.assetTypeName |
imageName |
asset.assetDetail.name (Required) |
IMAGE_DIGEST |
asset.assetDetail.containerImageAssetClass.digestType |
imageRegistry |
asset.assetDetail.containerImageAssetClass.registry |
imageRepository |
asset.assetDetail.containerImageAssetClass.repository |
imageName |
asset.assetDetail.containerImageAssetClass.name |
imageTag |
asset.assetDetail.containerImageAssetClass.tag |
blobConfig.architecture |
asset.assetDetail.containerImageAssetClass.architecture |
config.digest |
asset.assetDetail.containerImageAssetClass.digest |
storageManifest.checksums.sha256 |
asset.assetDetail.containerImageAssetClass.manifestDigest |
ImageSize |
asset.assetDetail.containerImageAssetClass.sizeInBytes |
blobConfig.created |
asset.assetDetail.containerImageAssetClass.creationDate |
layers[].digest |
asset.assetDetail.containerImageAssetClass.layers[].digest |
layers[].size |
asset.assetDetail.containerImageAssetClass.layers[].sizeInBytes |
evalExternalId |
asset.assetHeader.externalAssetId (Required) |
evalVendorAssetId |
asset.assetHeader.vendorAssetId (Required) |
storageManifest.downloadUri |
asset.assetDetail.typedAttributes.jfrog_artifactory_manifestUrl |
storageManifest.createdBy |
asset.assetDetail.typedAttributes.jfrog_artifactory_createdBy |
storageManifest.modifiedBy |
asset.assetDetail.typedAttributes.jfrog_artifactory_modifiedBy |
blobConfig.config.Cmd |
asset.assetDetail.untypedAttributes.jfrog_container_cmd |
blobConfig.config.Env |
asset.assetDetail.untypedAttributes.jfrog_container_env |
blobConfig.config.WorkingDir |
asset.assetDetail.typedAttributes.jfrog_container_workingDir |
blobConfig.os |
asset.assetDetail.typedAttributes.jfrog_container_os |
blobConfig.docker_version |
asset.assetDetail.typedAttributes.jfrog_container_dockerVersion |
blobConfig.rootfs |
asset.assetDetail.untypedAttributes.jfrog_container_uncompressed_layers |
blobConfig.history |
asset.assetDetail.untypedAttributes.jfrog_container_history |
Binary Repository Asset TransformationBinary Repository Asset Transformation
| Source Field | Target Field |
|---|---|
binary-repository (constant) |
asset.assetHeader.assetTypeName |
key |
asset.assetHeader.externalAssetId (Required) |
key |
asset.assetHeader.vendorAssetId (Required) |
key |
asset.assetDetail.name (Required) |
packageType |
asset.assetDetail.repositoryAssetClass.repositoryPackageType |
url |
asset.assetDetail.repositoryAssetClass.repoUrl |
description |
asset.assetDetail.typedAttributes.jfrog_artifact_description |
type |
asset.assetDetail.typedAttributes.jfrog_artifact_type |
Docker Image Vulnerability TransformationDocker Image Vulnerability Transformation
| Source Field | Target Field |
|---|---|
container-image (constant) |
asset.assetHeader.assetTypeName |
imageName |
asset.assetDetail.name (Required) |
evalExternalId |
asset.assetHeader.externalAssetId (Required) |
evalVendorAssetId |
asset.assetHeader.vendorAssetId (Required) |
imageRegistry |
asset.assetDetail.containerImageAssetClass.registry |
imageRepository |
asset.assetDetail.containerImageAssetClass.repository |
imageName |
asset.assetDetail.containerImageAssetClass.name |
imageTag |
asset.assetDetail.containerImageAssetClass.tag |
dockerManifest.config.digest |
asset.assetDetail.containerImageAssetClass.imageDigest |
dockerManifest.layers[].digest |
asset.assetDetail.containerImageAssetClass.layers[].digest |
dockerManifest.layers[].size |
asset.assetDetail.containerImageAssetClass.layers[].sizeInBytes |
dockerManifest.config.size |
asset.assetDetail.containerImageAssetClass.sizeInBytes |
storageManifest.checksums.sha256 |
asset.assetDetail.containerImageAssetClass.manifestDigest |
storageManifest.created (formatted → ISO8601) |
asset.assetDetail.containerImageAssetClass.creationDate |
storageManifest.downloadUri |
asset.assetDetail.typedAttributes.jfrog_artifactory_manifestUrl |
storageManifest.createdBy |
asset.assetDetail.typedAttributes.jfrog_artifactory_createdBy |
storageManifest.modifiedBy |
asset.assetDetail.typedAttributes.jfrog_artifactory_modifiedBy |
vulnerabilities[].severity |
findingGroup.findings[].severity |
vulnerabilities[].externalFindingId |
findingGroup.findings[].externalFindingId (Required) |
vulnerabilities[].cve |
findingGroup.findings[].name |
vulnerabilities[].summary |
findingGroup.findings[].description |
vulnerabilities[].severity |
findingGroup.findings[].sourceSeverity |
vulnerabilities[].cve |
findingGroup.findings[].findingType.vulnerability.cveId |
vulnerabilities[].cwe |
findingGroup.findings[].findingType.vulnerability.cweIds |
vulnerabilities[].cwe |
findingGroup.findings[].findingType.vulnerability.cweId |
vulnerabilities[].cvss_v3 |
findingGroup.findings[].findingType.vulnerability.cvss.cvss3Base |
vulnerabilities[].created |
findingGroup.findings[].firstFoundOn |
vulnerabilities[].findingDetectionUrl |
findingGroup.findings[].findingDetectionURL |
vulnerabilities[].extended_information.remediation |
findingGroup.findings[].solutionRecommendation |
vulnerabilities[].extended_information.full_description |
findingGroup.findings[].attributes.jfrog_fullDescription |
vulnerabilities[].extended_information.short_description |
findingGroup.findings[].attributes.jfrog_shortDescription |
vulnerabilities[].extended_information.jfrog_research_severity |
findingGroup.findings[].attributes.jfrog_researchSeverity |
vulnerabilities[].provider |
findingGroup.findings[].attributes.jfrog_provider |
vulnerabilities[].impact_path |
findingGroup.findings[].attributes.jfrog_impactPath |