MS Defender for Cloud (VM Assets) Connector
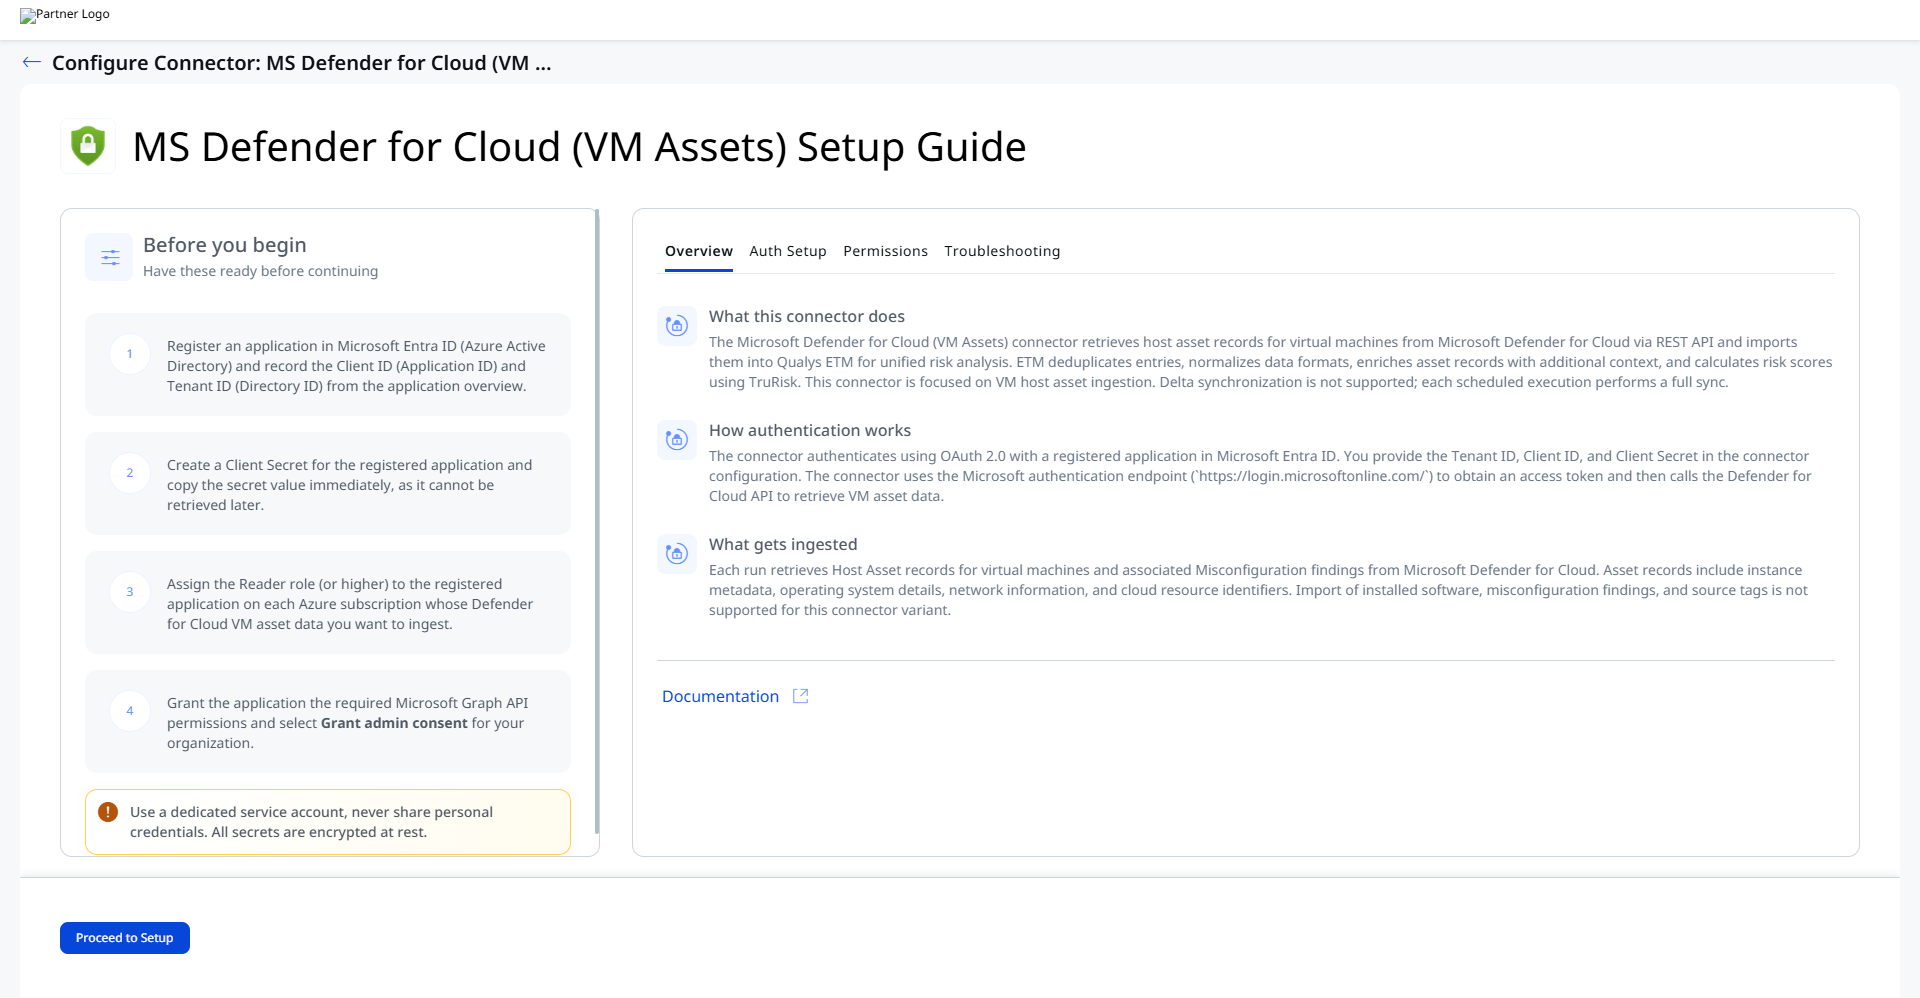
The Microsoft Defender for Cloud (VM Assets) connector retrieves host asset records for virtual machines from Microsoft Defender for Cloud via REST API and imports them into Qualys ETM for unified risk analysis. ETM deduplicates entries, normalizes data formats, enriches asset records with additional context, and calculates risk scores using TruRisk.
By centralizing VM asset data and associated misconfiguration findings from Microsoft's cloud security service, security teams gain unified visibility into cloud infrastructure alongside other organizational findings–transforming disconnected security alerts into actionable intelligence for risk-driven prioritization.
Note: This connector is focused on VM host asset ingestion. Delta synchronization is not supported; each scheduled execution performs a full sync. Use a dedicated service account and never share personal credentials. All secrets are encrypted at rest.
Connector Details
The following table summarizes what the MS Defender for Cloud (VM Assets) connector supports.
|
Vendor |
Microsoft |
|
Product Name |
Defender for Cloud |
|
Category |
Cloud Security |
|
Findings Support |
Assets and Misconfigurations (Findings) |
|
Supported Assets |
Cloud Assets |
|
Version |
1.0.0 |
| Supported Version & Type | SaaS (Latest) |
|
Integration Type |
API Integration (REST) |
|
Direction |
Unidirectional |
|
Delta Support |
Not Supported |
|
Import of Installed Software |
Not Supported |
|
Import of Source Tags |
Not Supported |
| Filters/Filter Query | Not Supported |
Configure the Connector
Follow the three-step wizard to create an MS Defender for Cloud (VM Assets) connection. A valid connection test is required to proceed.
Before You Begin - AuthenticationBefore You Begin - Authentication
Before configuring the connector, complete the following steps in the Microsoft Azure portal to register an application and gather the credentials required by Qualys ETM.
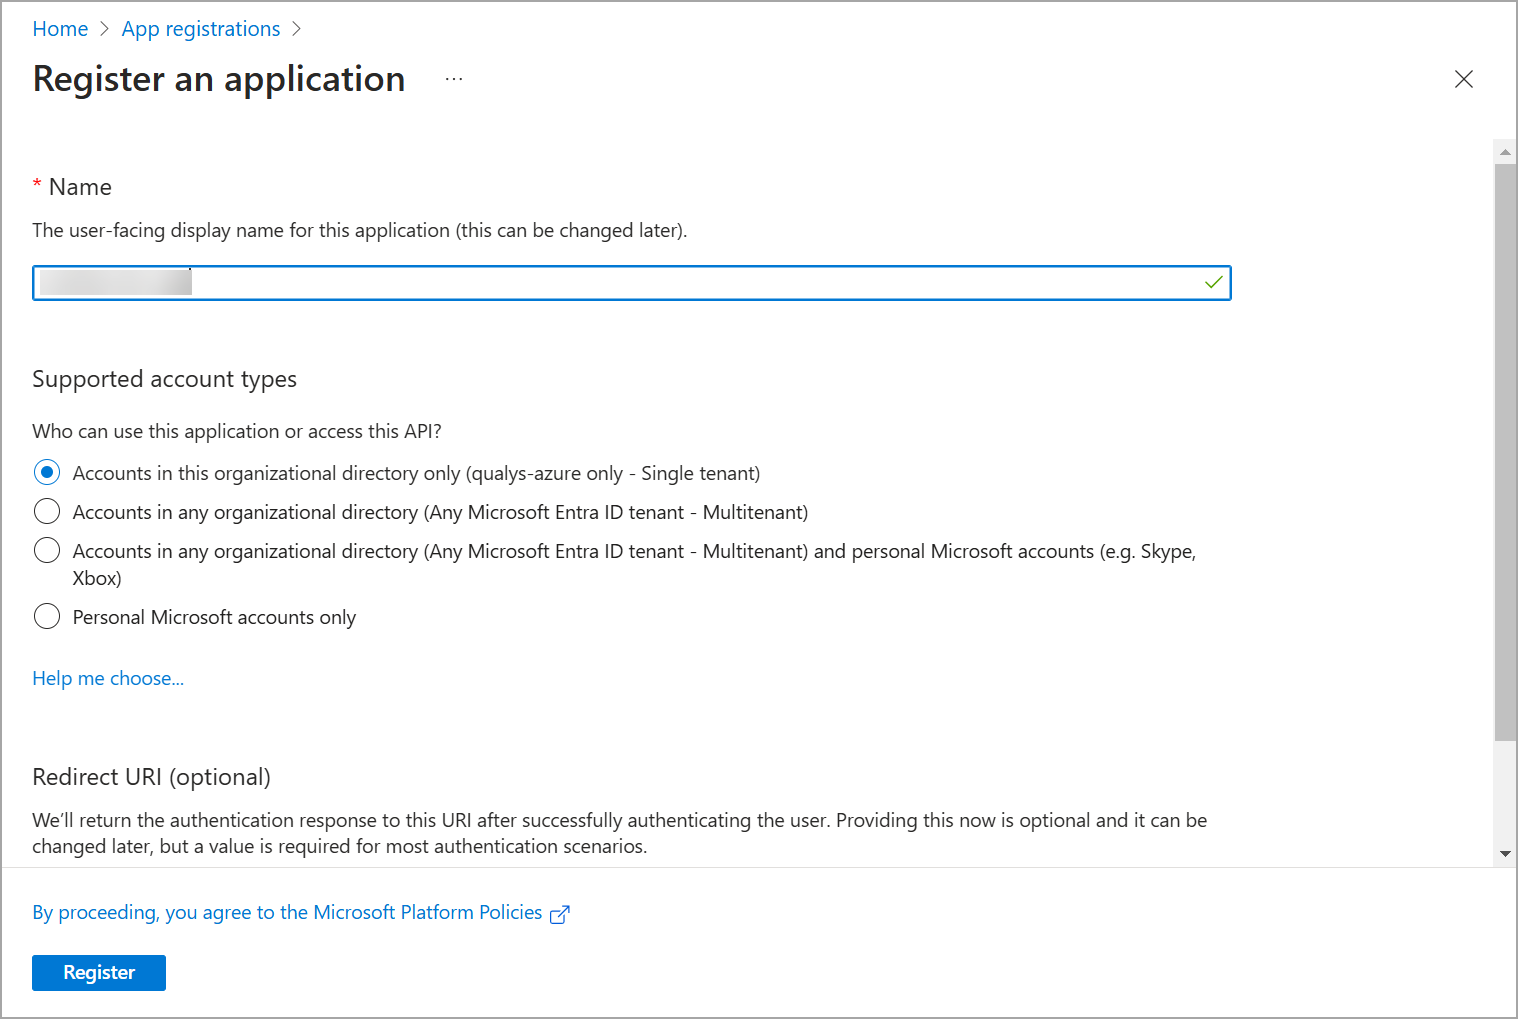
Register an Application in Microsoft Entra ID
- Register an application in Microsoft Entra ID.
- Sign in to the Azure portal and navigate to Azure Active Directory in the left navigation pane.
- Select App registrations and click New Registration.
- Provide an application name and select the appropriate supported account type. A redirect URI is optional.
- Click Register to complete the process.
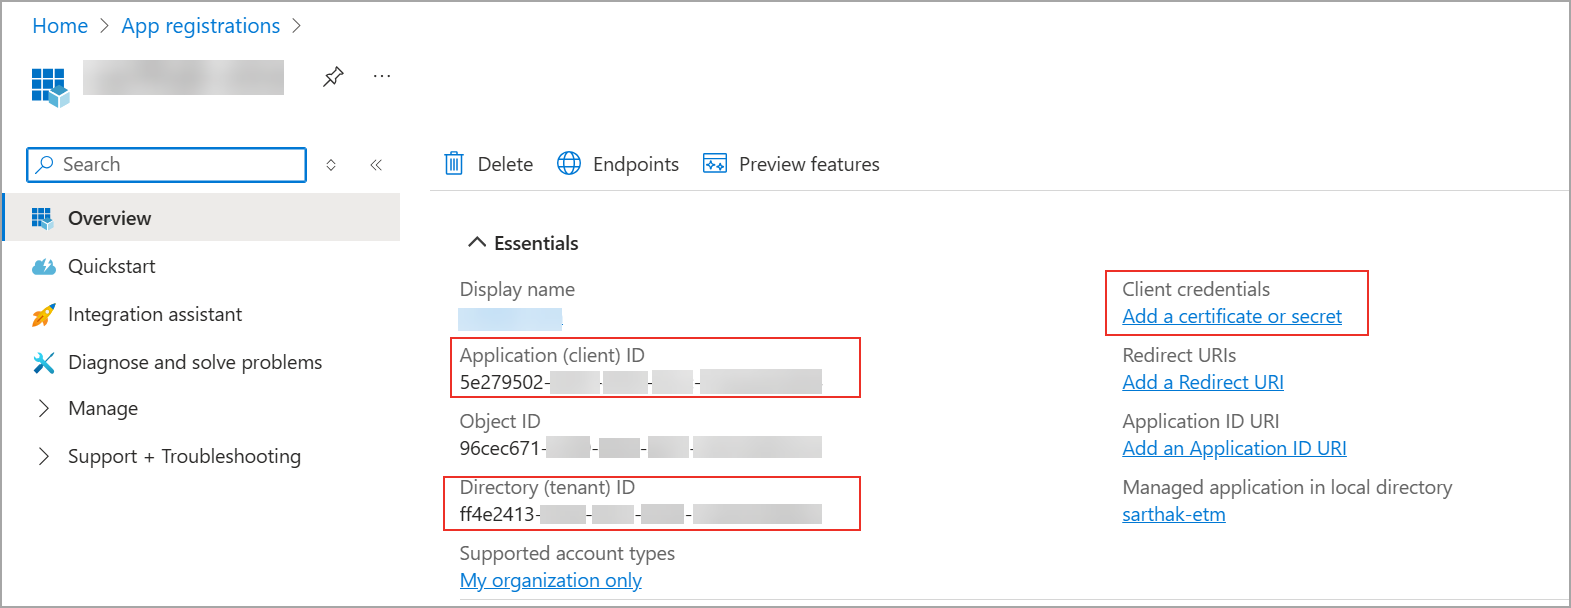
- Retrieve the Client ID and Tenant ID.
- After registration, go to the application Overview page and locate the Essentials section.
- Copy the Application (client) ID and the Directory (tenant) ID. These values are entered as the Client ID and Tenant ID fields in the Qualys ETM connector configuration.
- Create a Client Secret.
- On the application page, select Certificates & secrets and click New client secret.
- Provide a description and set an expiration period, then click Add.

- Copy the Value of the generated secret immediately.
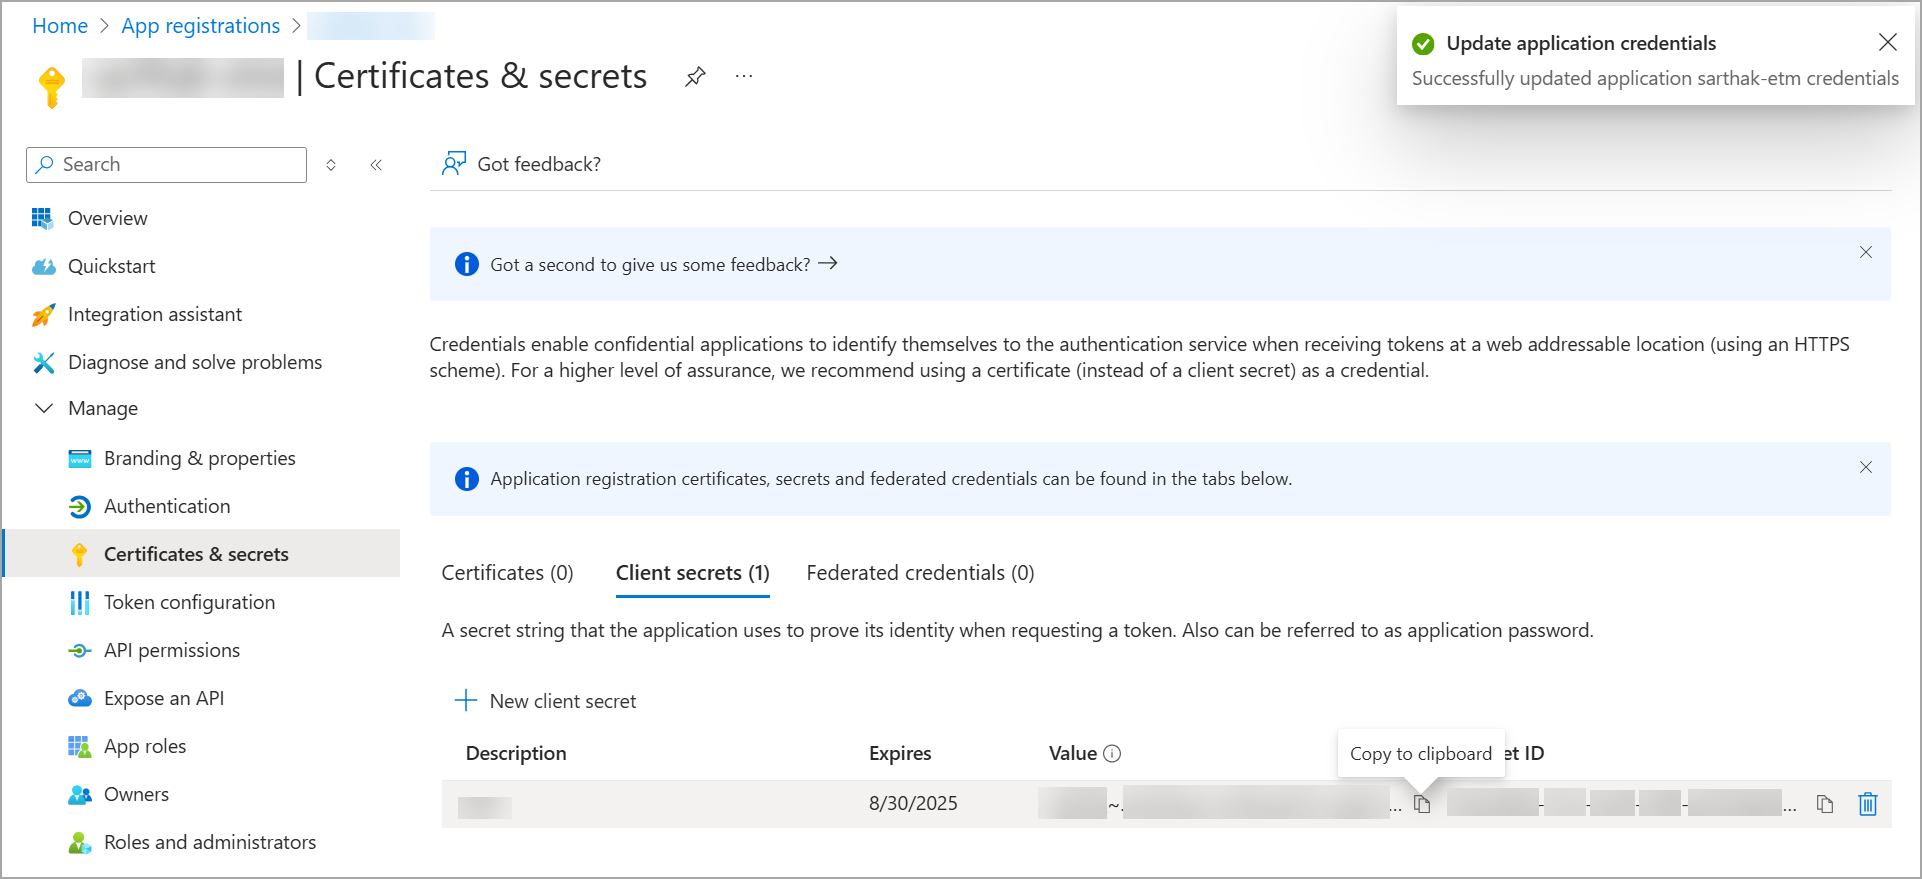
Important: The Client Secret value is shown only once. It cannot be retrieved after you navigate away from the page. Store it securely before closing this view.
- Configure API permissions.
- Navigate to API Permissions on the application page.
- Click Add a permission, select Microsoft Graph, and choose either Delegated or Application permissions depending on your deployment model.
- After adding the required permissions, click Grant admin consent for [Your Organization] to activate them.
Important: Admin consent must be granted for the permissions to take effect. Without it, the connector will return a 403 Forbidden error.
- Assign the Reader role to the application.
- In the Azure portal, navigate to the subscription whose Defender for Cloud VM data you want to ingest.
- Select Access Control (IAM), click Add, then Add role assignment.
- On the Role tab, search for and select Reader, then click Next.
- On the Members tab, click Select members, search for the registered application, and confirm. Save the role assignment.
- Repeat for each Azure subscription from which you want to ingest Defender for Cloud VM asset data.
Note: Use a dedicated service account for the registered application. Never share personal credentials. All secrets are encrypted at rest in Qualys ETM.
Permissions Required
The registered application must be assigned the Reader role (or higher) on each Azure subscription from which you want to ingest Defender for Cloud VM asset data. Microsoft Graph API permissions must also be granted with admin consent.
Scope and Data Access
The connector ingests Host Asset records for virtual machines. Filters are not supported for this connector; all VM assets within the subscription scope are retrieved. The data flow is unidirectional, from Microsoft Defender for Cloud to Qualys ETM. Import of installed software and source tags is not supported.
Key Rotation
When the Client Secret approaches its expiration date, generate a new secret under Certificates & secrets in the application registration. Update the Qualys ETM connector configuration with the new secret value. Verify the connector reaches the Processed state after the next scheduled execution to confirm the new secret is working correctly.
Create a Profile & ConnectionCreate a Profile & Connection
Configure the connector's identity and authenticate with the source system.
Connector Details
| Name | Enter a unique display name for this connector instance. Example: MS Defender for Cloud (VM Assets)260505061423523 |
| Description | Optional. Enter a description of up to 200 characters to identify the purpose of this connection. |
Authentication Details
| Field | Type | Description |
|---|---|---|
| Subscription | String | The Azure Subscription ID from which VM assets will be ingested. Example: 54505ff6-e254-4e01-a964-d0ce78bf87a9 |
| Tenant ID | String | The Directory (tenant) ID of your Microsoft Entra ID tenant. Example: ff4e2413-65ab-4dc2-9e5b-1ea02d3d94eb |
| Client ID | String | The Application (client) ID of the registered Entra ID application. Example: e78a9c6a-7635-45e9-ad52-9c53b6547fe3 |
| Client Secret | Encrypted String | The client secret value generated under Certificates & secrets in the application registration. This field is masked after entry. |
Important: The Client Secret is visible only at the time of creation in the Azure portal. Copy and store it securely before saving the application registration page, as it cannot be retrieved later.
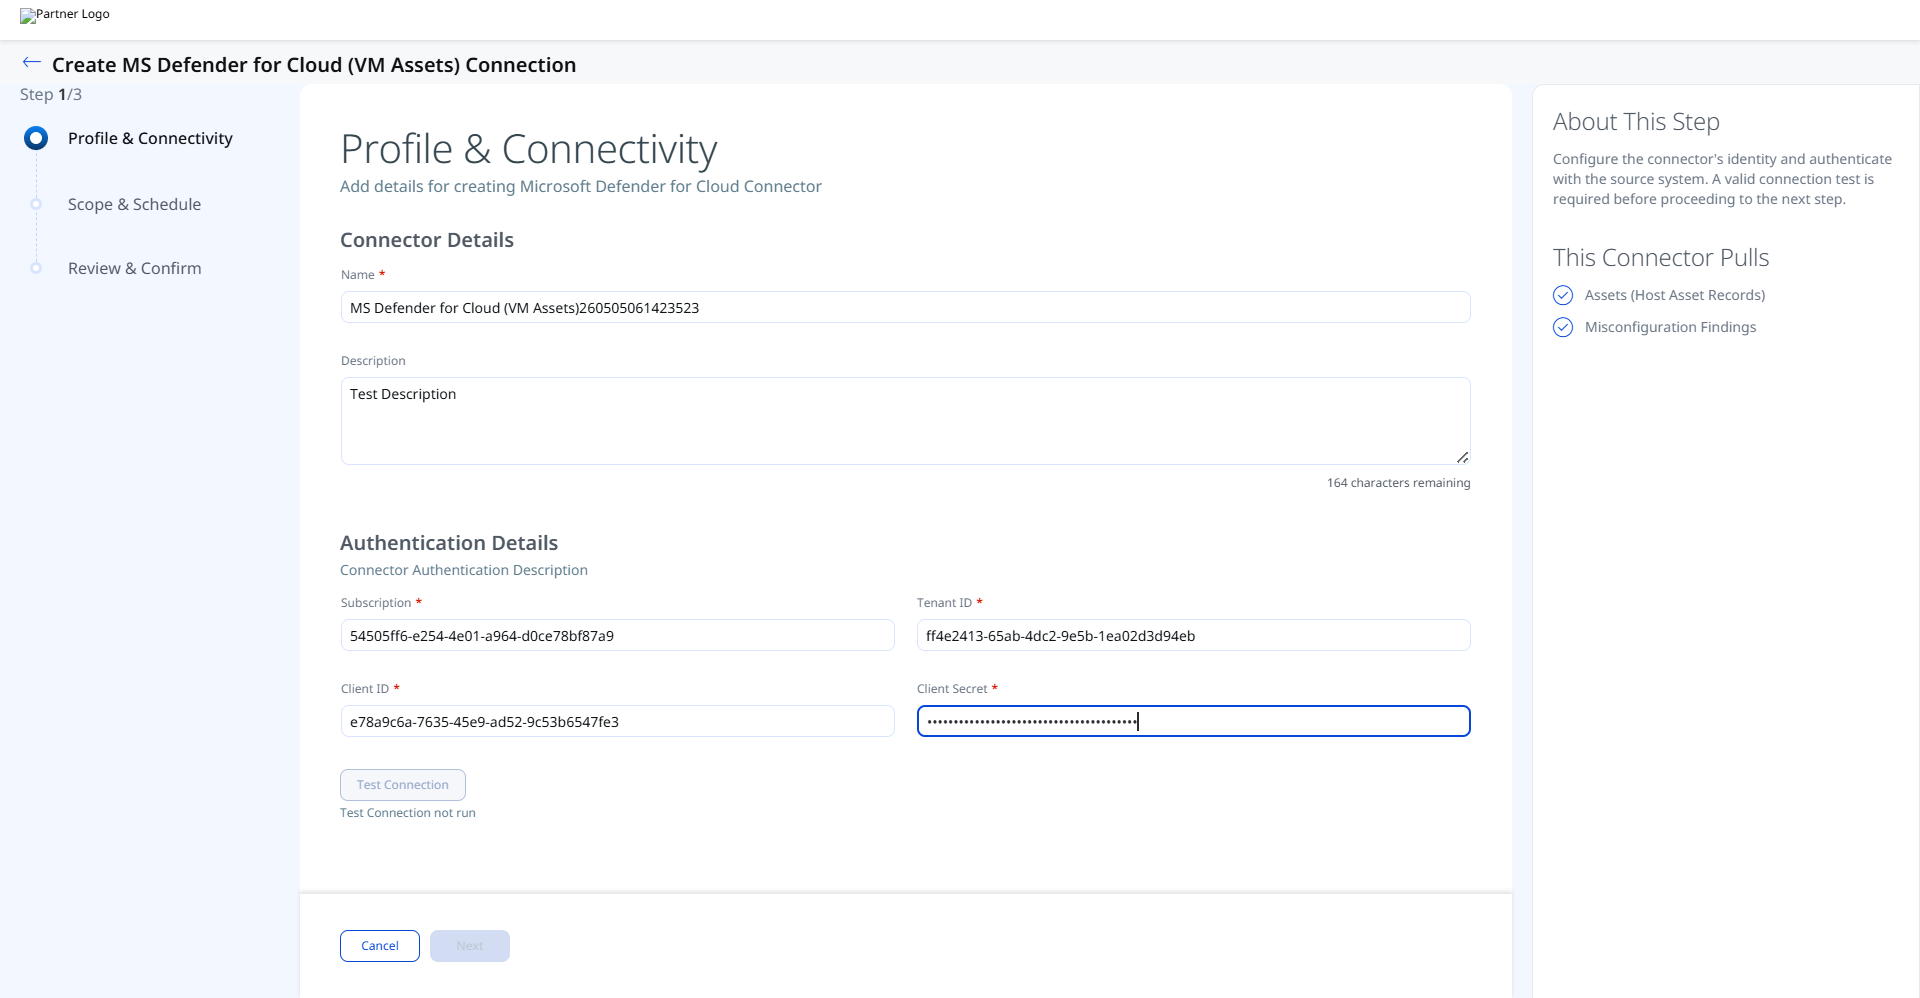
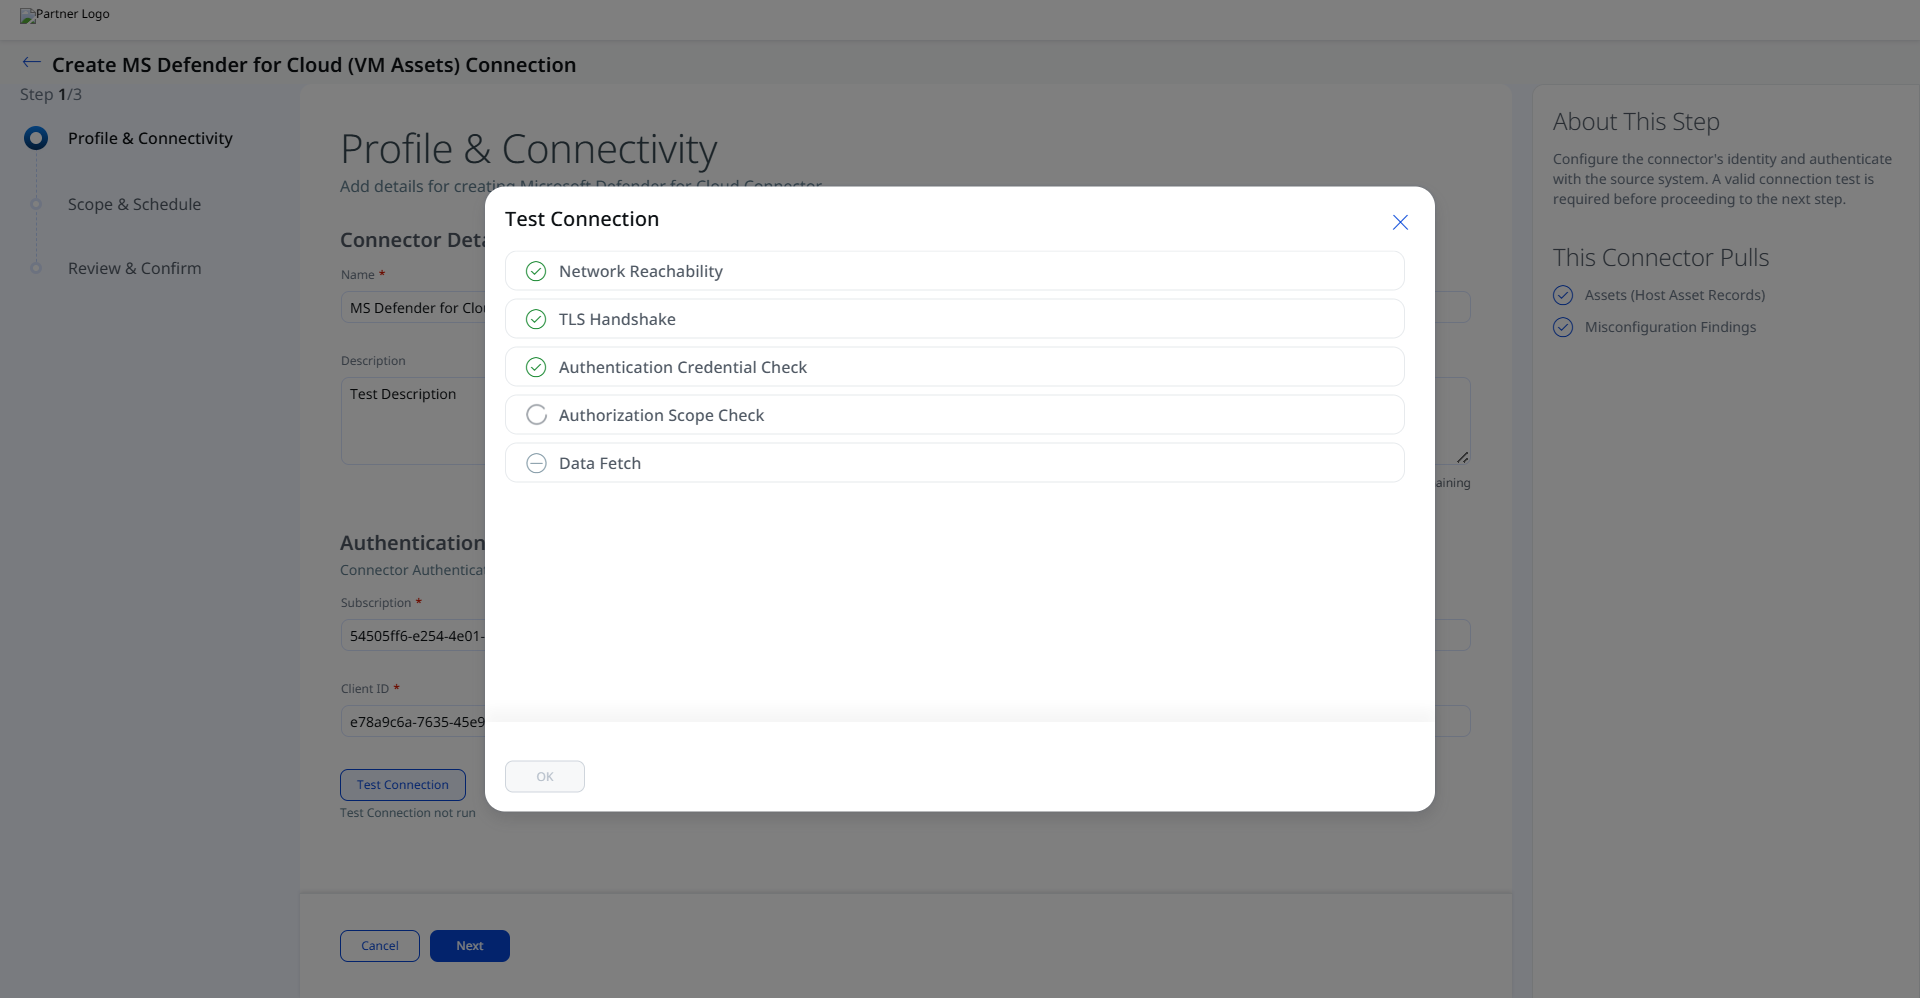
After entering all authentication details, click Test Connection to validate the credentials before proceeding. The following checks are performed:
- Network Reachability — Verifies that the connector endpoint is reachable over HTTPS (port 443).
- TLS Handshake — Confirms that a secure TLS connection can be established with the remote endpoint.
- Authentication Credential Check — Validates the configured credentials against the source system's authentication endpoint.
- Authorization Scope Check — Confirms that the provided credentials have the required permissions to access the configured data scope.
- Data Fetch — Verifies that data can be successfully retrieved from the source system using the configured connection.
All checks must pass before the Next button becomes active. If a check fails, refer to the Troubleshooting section for resolution steps.
Set the Scope & ScheduleSet the Scope & Schedule
Define the data to synchronize and set the execution schedule for the connector.
This connector retrieves the following data types on each execution:
- Assets (Host Asset Records)
- Misconfiguration Findings
Note: Delta synchronization is not supported. Each scheduled execution performs a full sync of all VM assets within the subscription scope.
Review all configuration settings before saving. Verify that the connector name, subscription, Tenant ID, Client ID, and authentication type are correct. Once confirmed, save the connector to complete setup.
After saving, the connector appears in the Connections list in the Registered state and transitions automatically through its processing states.
Advanced Settings
Note: Changes made in Advanced Settings are not saved automatically. Click Save after modifying any advanced configuration.
Filters Tab
Filters are not supported for this connector variant. The filter field is present in the interface but the connector does not currently support filter queries. All VM assets within the configured subscription scope are retrieved on each execution.
Transform Map Tab
The connector provides an out-of-box transform map for MDC VM asset data. You can view the active map to understand the field-level data transformation, or clone it to create a custom configuration. Refer to Transformation Maps for the complete field mapping reference.
How the Connection Works
Each run retrieves Host Asset records for virtual machines and associated Misconfiguration findings from Microsoft Defender for Cloud. Asset records include instance metadata, operating system details, network information, and cloud resource identifiers. Import of installed software, misconfiguration findings source tags, and filter queries are not supported for this connector variant.
The MS Defender for Cloud (VM Assets) connector executes according to its configured schedule, performing a full sync of all VM assets within the subscription scope on each run. There is no incremental (delta) sync mode.
Connector States
A successfully configured connector transitions through the following states:
- Registered – The connector has been successfully created and registered to fetch data from Microsoft Defender for Cloud.
- Scheduled – The connector is queued and scheduled to execute a connection with the vendor.
- Processing – A connection is executing and the connector is actively fetching asset and findings data.
- Processed – The connector has successfully fetched the assets. Findings ingestion may still be in progress.
Note: The Processed state indicates that asset records have been imported, but findings (misconfigurations) may still be processing. The complete first-run import process can take up to 2 hours. If no data appears after this period, verify that the Reader role is assigned at the subscription level and that the subscription contains Defender for Cloud VM asset data.
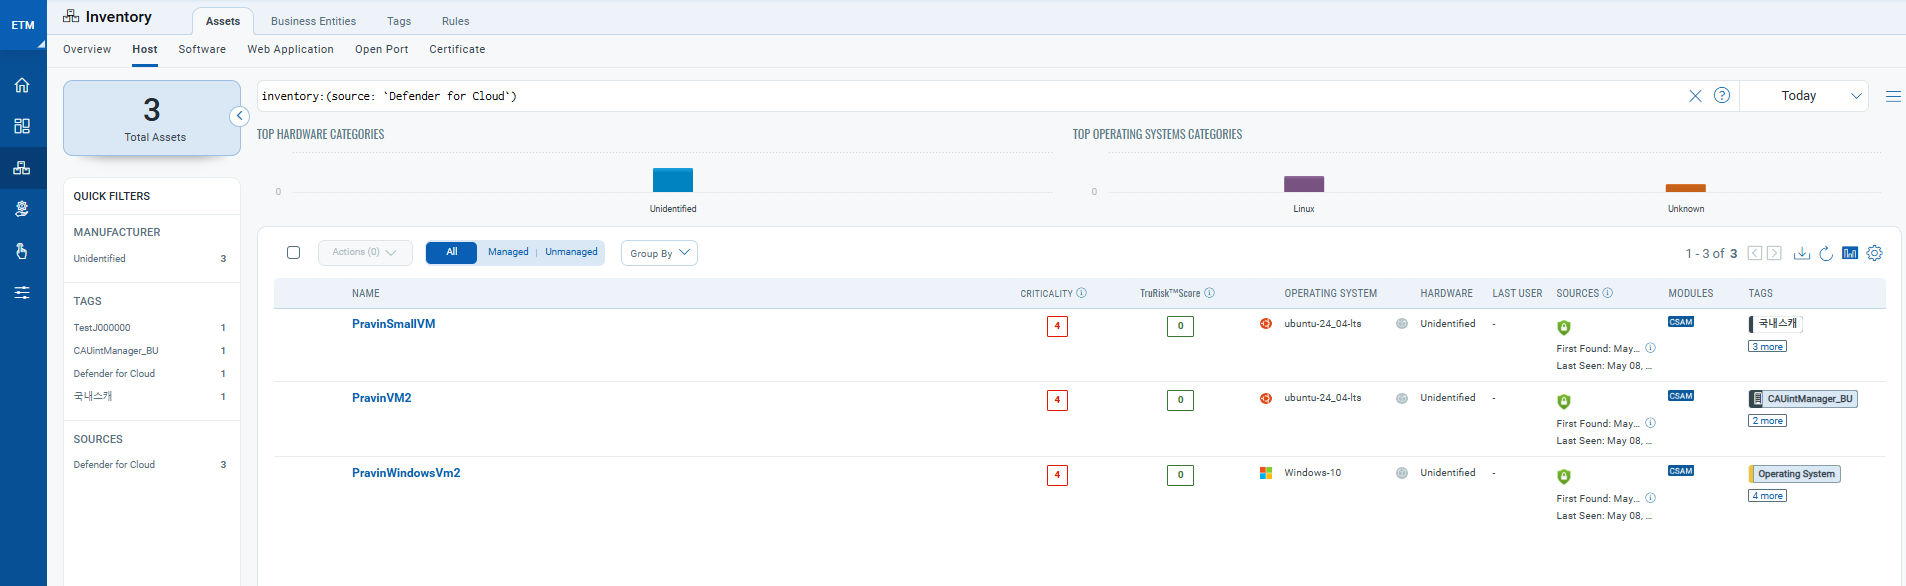
Viewing Assets and Findings in ETM
Once the connector reaches the Processed state, navigate to Enterprise TruRisk Management (ETM) to analyze the imported data.
To view imported VM assets: Go to Inventory and use the following filter token:
inventory:(source:"Defender for Cloud")
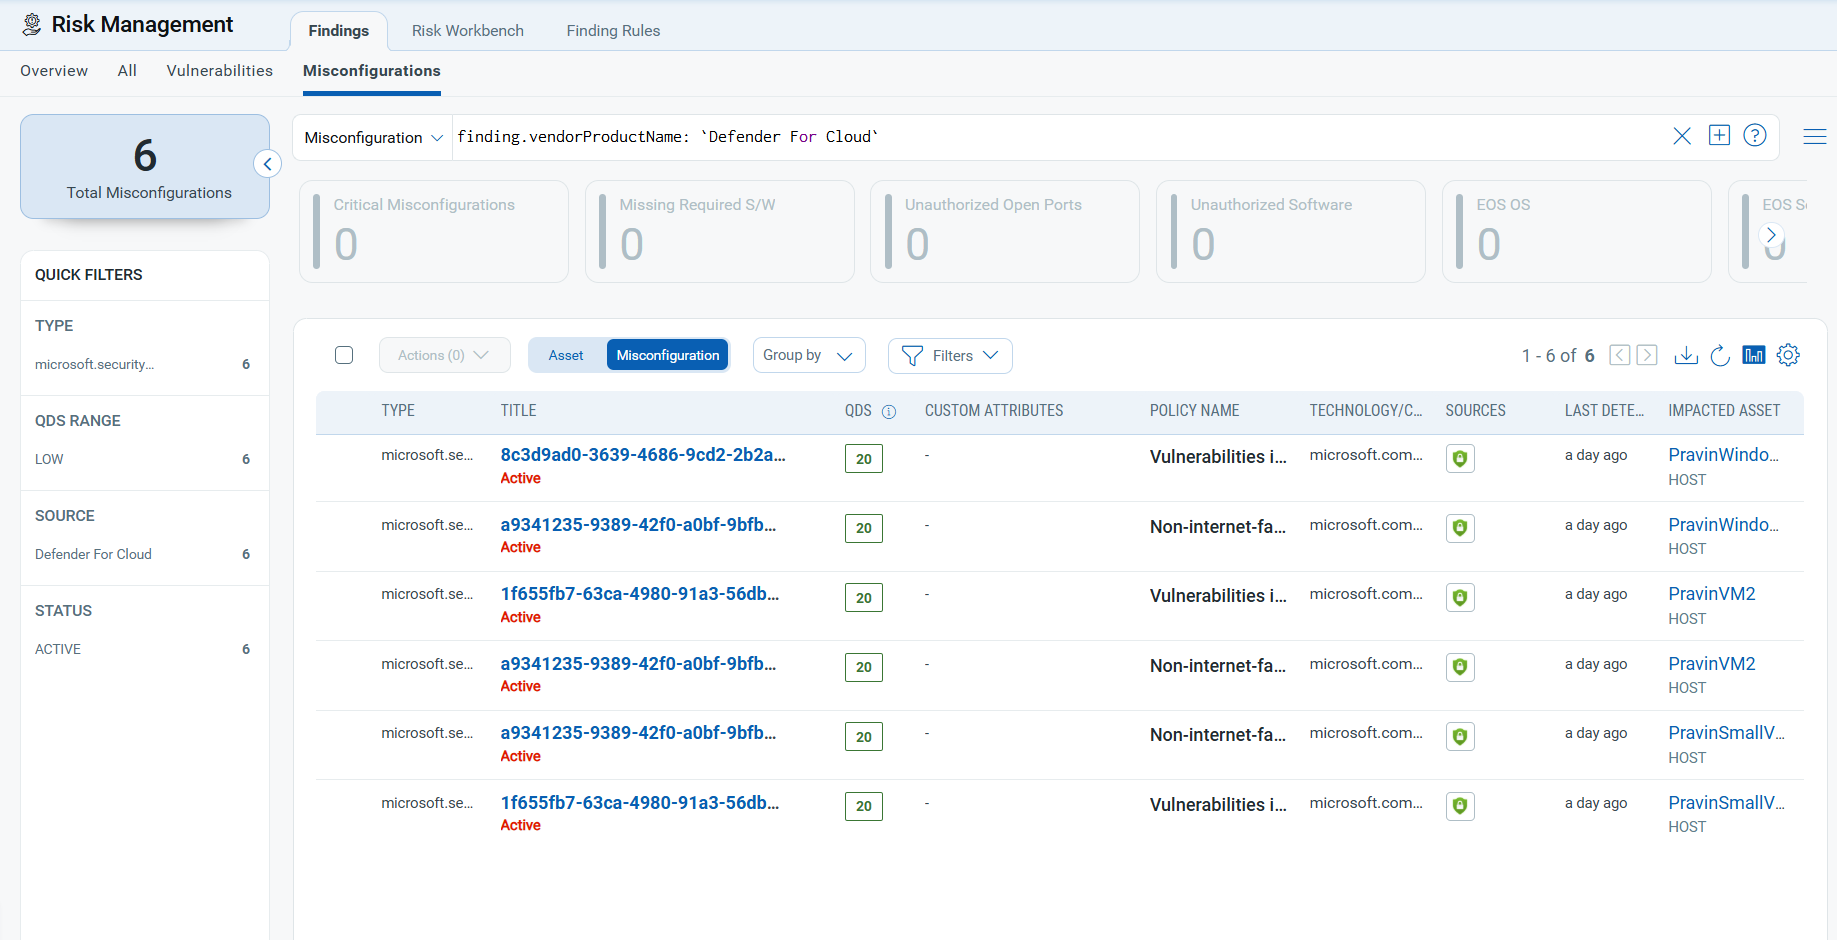
To view Misconfiguration findings: Go to Risk Management > Findings > Misconfigurations and use the following filter token:
findings.vendorProductname:"Defender for Cloud"
Troubleshooting
Use the following reference to resolve common connector errors.
| 401 Unauthorized | The Client Secret is invalid, expired, or incorrectly entered. Verify the secret has not expired in the Azure portal under Certificates & secrets. Generate a new secret if needed and update the connector configuration with the new value. |
| 403 Forbidden | The registered application does not have sufficient permissions. Verify the application has been assigned the Reader role on the target subscription and that Microsoft Graph API permissions have been granted with admin consent. |
| Connection test fails | Confirm the Tenant ID and Client ID match the values shown on the application Overview page in the Azure portal. Verify network connectivity from the Qualys cloud to the Microsoft authentication endpoint at https://login.microsoftonline.com/. |
| No assets imported after first run | The connector progresses through Registered, Scheduled, Processing, and Processed states. The full import process may take up to 2 hours to complete. If no data appears after this period, verify the Reader role is assigned at the subscription level and that the subscription contains Defender for Cloud VM asset data. |
Additional Information
API Reference
The following APIs are executed during each connector run.
| Name | Endpoint | Description |
|---|---|---|
| Auth API | https://login.microsoftonline.com/ |
Obtains an OAuth 2.0 access token using the Tenant ID, Client ID, and Client Secret. |
| Fetch Asset | https://management.azure.com/providers/Microsoft.ResourceGraph/resources?api-version=2021-03-01 |
Retrieves virtual machine resource records. Sample query: Resources | where type =~ 'microsoft.compute/virtualmachines' |
| Fetch Resources and Assessments | https://management.azure.com/providers/Microsoft.ResourceGraph/resources?api-version=2021-03-01 |
Retrieves security assessment findings linked to each VM resource. Sample query: securityresources | where type == "microsoft.security/assessments" |
| Fetch Network Interfaces | https://management.azure.com/providers/Microsoft.ResourceGraph/resources?api-version=2021-03-01 |
Retrieves network interface details including MAC address, private IP, and public IP for each VM resource. |
Transformation Maps
The connector includes an out-of-box transformation map that translates Microsoft Defender for Cloud attributes to the corresponding Qualys ETM schema fields. The table below documents each field mapping.
MDC Vulnerability Transformation MappingMDC Vulnerability Transformation Mapping
| Defender Attribute Key | Qualys Attribute Label |
|---|---|
vmId |
externalAssetId |
assessments_name |
findingName |
assessments_id |
externalFindingId |
assessments[].properties.metadata.severity |
findingSeverity |
name |
assetName |
imageReference_offer |
operatingSystemName |
networkInterfaces_macAddress |
macAddress |
networkInterfaces_publicIP |
ipAddress |
imageReference_version |
operatingSystemVersion |
assessments_firstEvaluationDate |
findingFirstFoundOn |
assessments_displayName |
findingDescription |
assessments_recommendationCategory |
recommendation |
assessments_links_azurePortal |
policyFindingUrl |
assessments_userImpact |
impact |
assessments_type |
findingSubType |
assessments_metadata_displayName |
policyTitle |
assessments_severity
Informational | Low | Medium | High |
findingSeverity
0 | 1 | 2 | 3 | 4 |
assessments_status_code
PASS | FAIL | PASS | FAIL | PASS |
findingStatus
open | resolved | active | closed |
assessments_metadata_description |
policyDescription |
assessments_managedBy |
createdBy |
assessments_managedBy |
updatedBy |
assessments_policyDefinitionId |
policyId |
assessments_remediationDescription |
remediationStrategy |
ResourceType |
productVendor |
assessments_statusChangeDate |
updatedOn |
assessments_assessmentType |
policyType |
ResourceProvider |
productName |