OnPrem Connector
CrowdStrike Spotlight provides an automated vulnerability management solution that delivers real-time visibility into your organization's security posture. Crowdstrike provides continuous scanning and prioritization of vulnerabilities based on active exploitation trends and threat intelligence.
What is the OnPrem API Connector?
The CrowdStrike OnPrem Connector on the Qualys platform seamlessly integrates asset data monitored for Extended Detection and Response (XDR) and Vulnerability Management (VM), along with the vulnerabilities reported on these assets, directly into Qualys Enterprise TruRisk™ Management (ETM).
Prerequisites
These are the required configurations you need to successfully create a CrowdStrike connection for Qualys ETM.
User Roles and Permissions
You need the following CrowdStrike API Access information to configure the connection:
- Auth URL
- Client ID
- Client Secrets
For quick reference on how to obtain the required values, follow the steps below.
Auth URL
To obtain the Auth URL, refer to your CrowdStrike Cloud Environment URL. For example, https://api.us-2.crowdstrike.com or https://api.eu-1.crowdstrike.com.
Client ID and Client Secret
- Naviagate to your CrowdStrike portal.
- Go to Support > API Clients and Keys. When the API Key page appears, select Add a new API client.
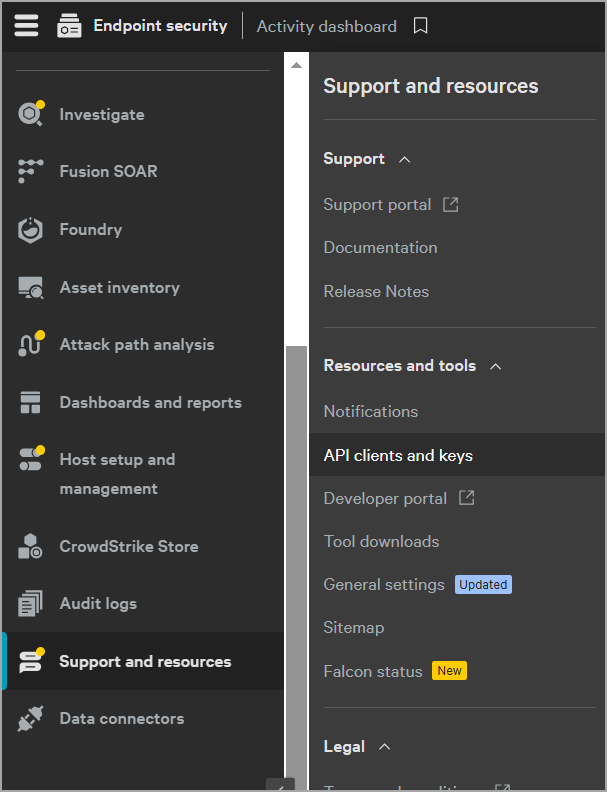
- Provide the following details for the API client:
- Client name : Provide an API client name of your choice.
- API scope :
- To ingest host details, search and include read permissions for Hosts and Host Groups.
- To ingest vulnerability data, search and include read permissions for Vulnerabilities.
- To ingest software data, search and include read permissions for Assets.
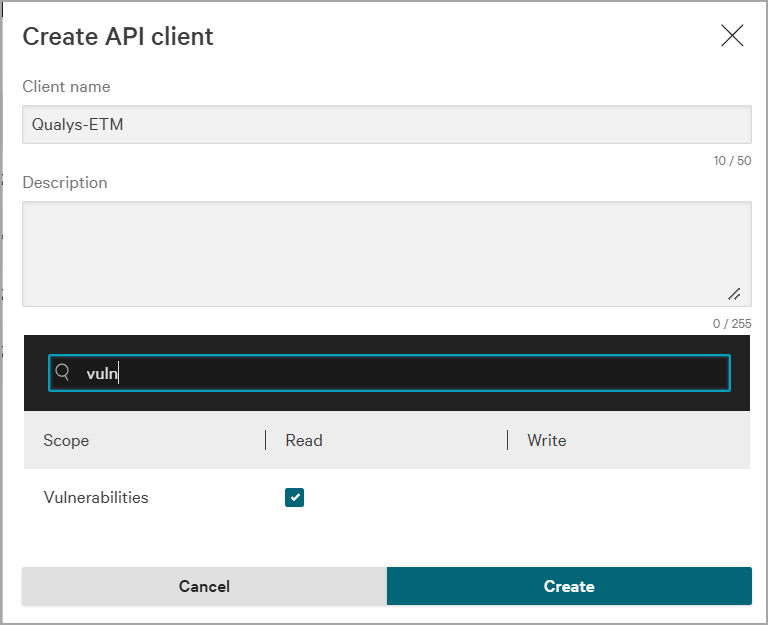
When you are done, add the client. An API client created window appears and displays the Client ID and Client Secret. Store them securely for later use.
Required Permissions
Enable these permissions for the Connection.
|
Permission |
Permission display name |
|---|---|
|
Vulnerabilities |
Read permissions for Vulnerabilities. |
|
Hosts |
|
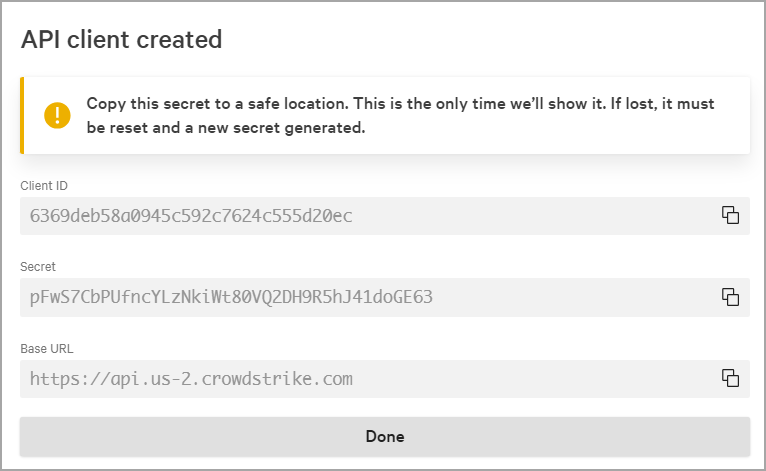
Create a New API Connector
- Provide the Connector's Name and Description.
- Select the type of findings you want to import or export - currently, we support Vulnerability.
- Select the Asset Type - currently we support Host Asset.
- Select the Supported Format - currently, we support CrowdStrike Spotlight.
The following screenshot displays the Basic Details fields.
-
Next, provide the API authentication details of the OnPrem environment. You need to provide the following.
- URL: Enter the authentication URL of your OnPrem environment.
- Client ID: Provide the application client ID from your OnPrem instance.
- Client Secret: Enter the secret key generated for your application.
These values can be obtained by following the steps laid out in the User Roles and Permissions section.
The OnPrem API Connector offers an out-of-box data model mapping for you to map with Qualys ETM schema. You can view the schema to understand the attributes in the data model.
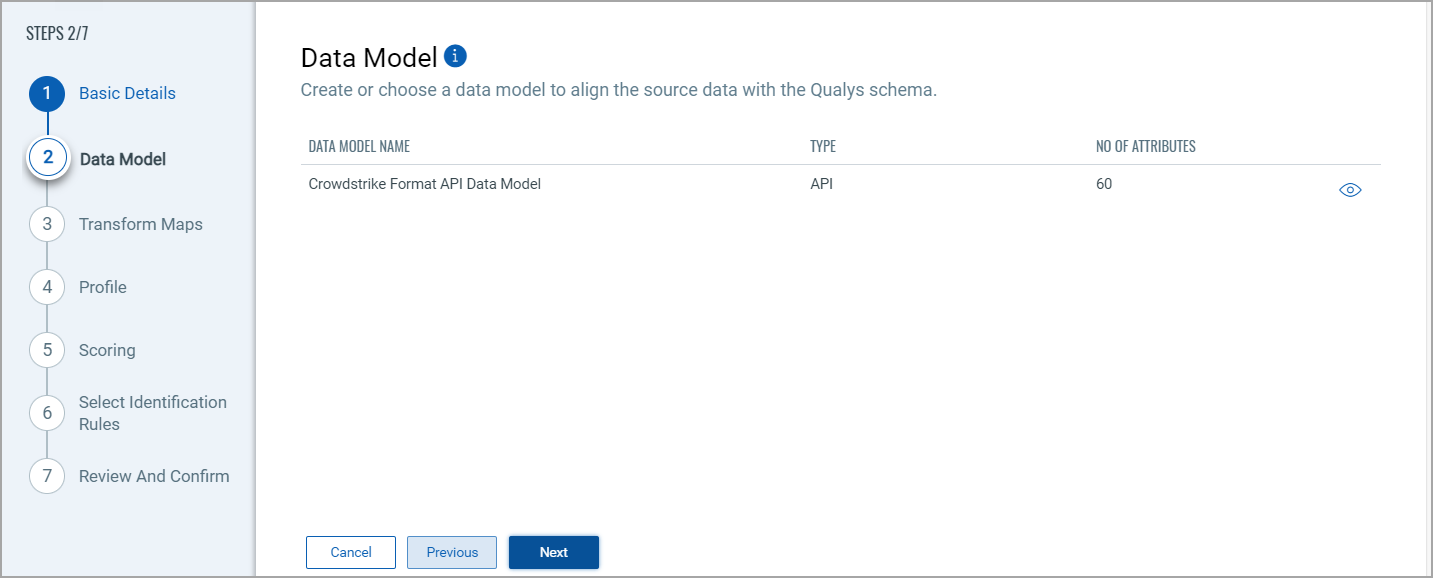
Map the fields from CrowdStrike to the corresponding fields in your target system. Transform Maps ensure the data is transformed correctly during the import or export process.
The OnPrem Connector offers an out-of-box transform map for you to proceed without further configuration. View the map to understand the data transformation or clone the map to edit its configurations.
![]()
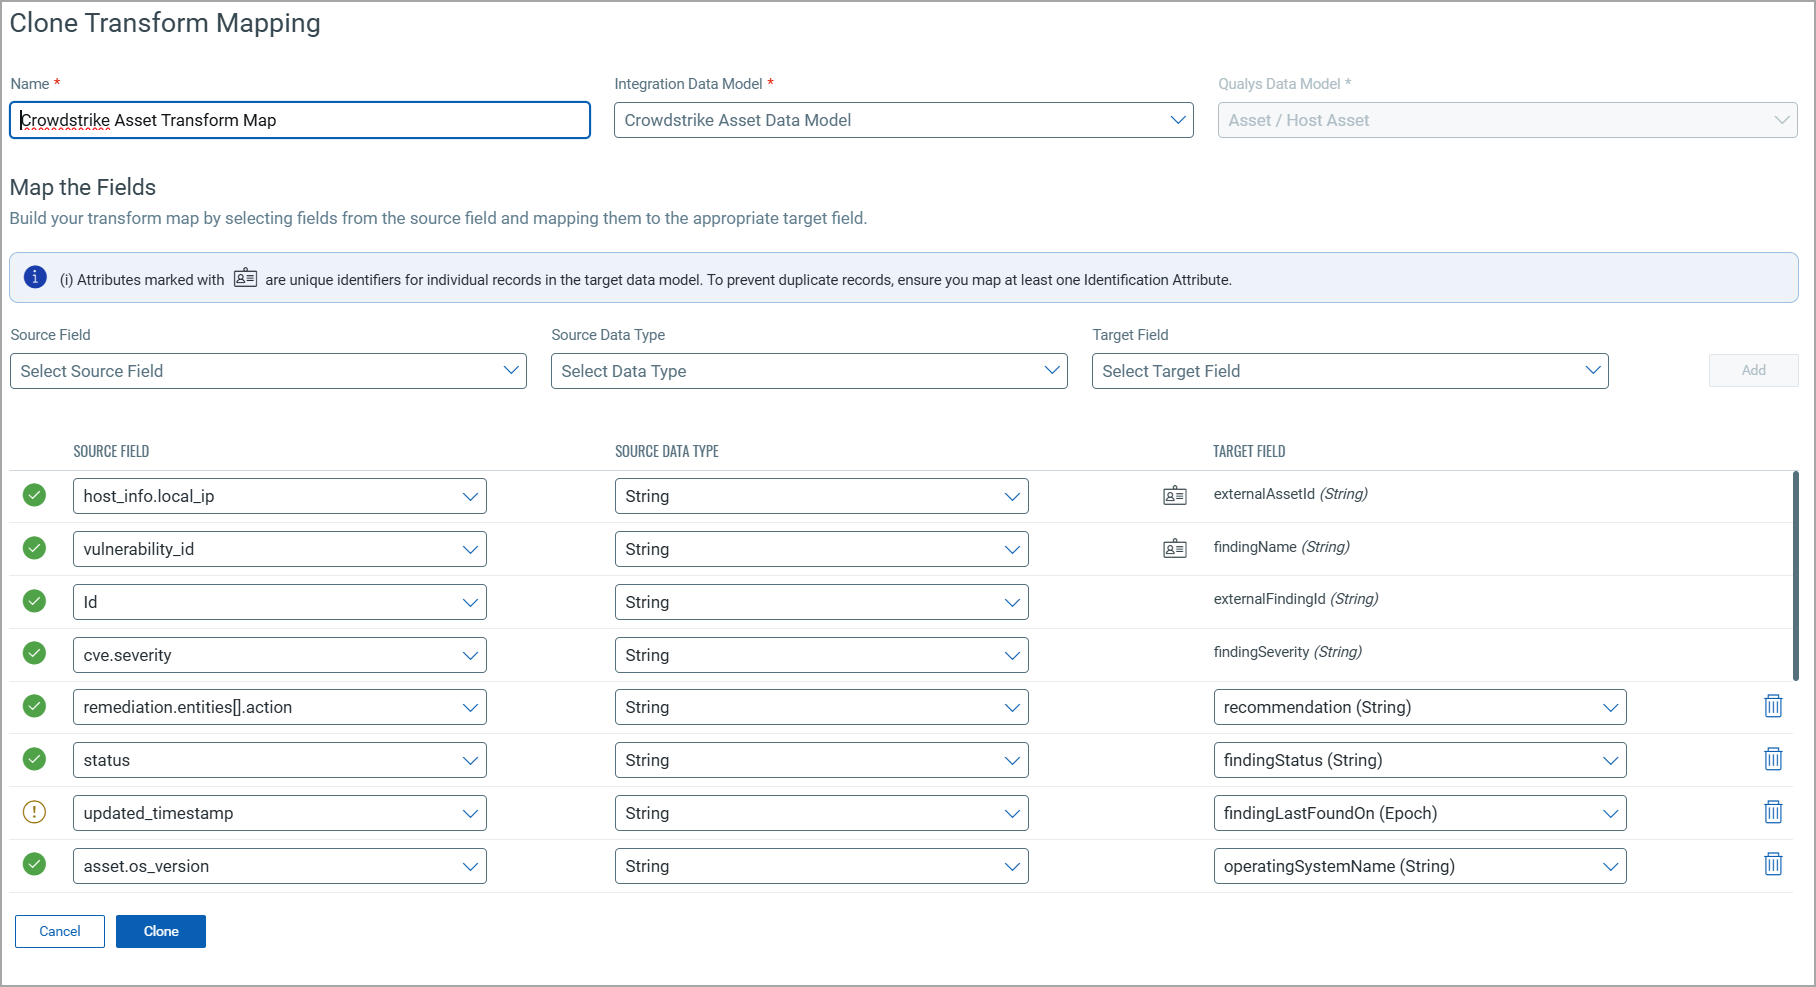
Click Create New for a new Transform Map.
Perform the following steps to configure a Transform Model:
- Transform Map Name: Enter a unique name for the Transform Map. This name helps identify the specific transformation configuration within this connector.
- Source Data Model: Select the data model that serves as the input for the transformation. This is the model from which data will be extracted.
- Target Data Model: Choose the data model that receives the transformed data. This model defines how the data will be structured after the transformation.
To learn more about the data mapping from CrowdStrike OnPrem to Qualys ETM, refer to Data Model Mapping.
Fields Mapping
The Fields Mapping section maps fields from the Source Data Model to the Target Data Model.
- Source Field: Specify the field in the Source Data Model containing the transformed data.
- Data Type: Indicate the data type of the Source Field (e.g., string, integer, date).
- Target Field: Designate the corresponding field where the transformed data will be placed in the Target Data Model.
Click Add to create and display the mapping for the Source Field, Data Type, and Target Field below the section. This visual helps ensure that all necessary fields are mapped correctly and allows easy verification and adjustments.
Create a profile for your connector. A profile decides the connector status, execution schedule and transform map to choose. The connector follows the configurations of this profile for all future executions.
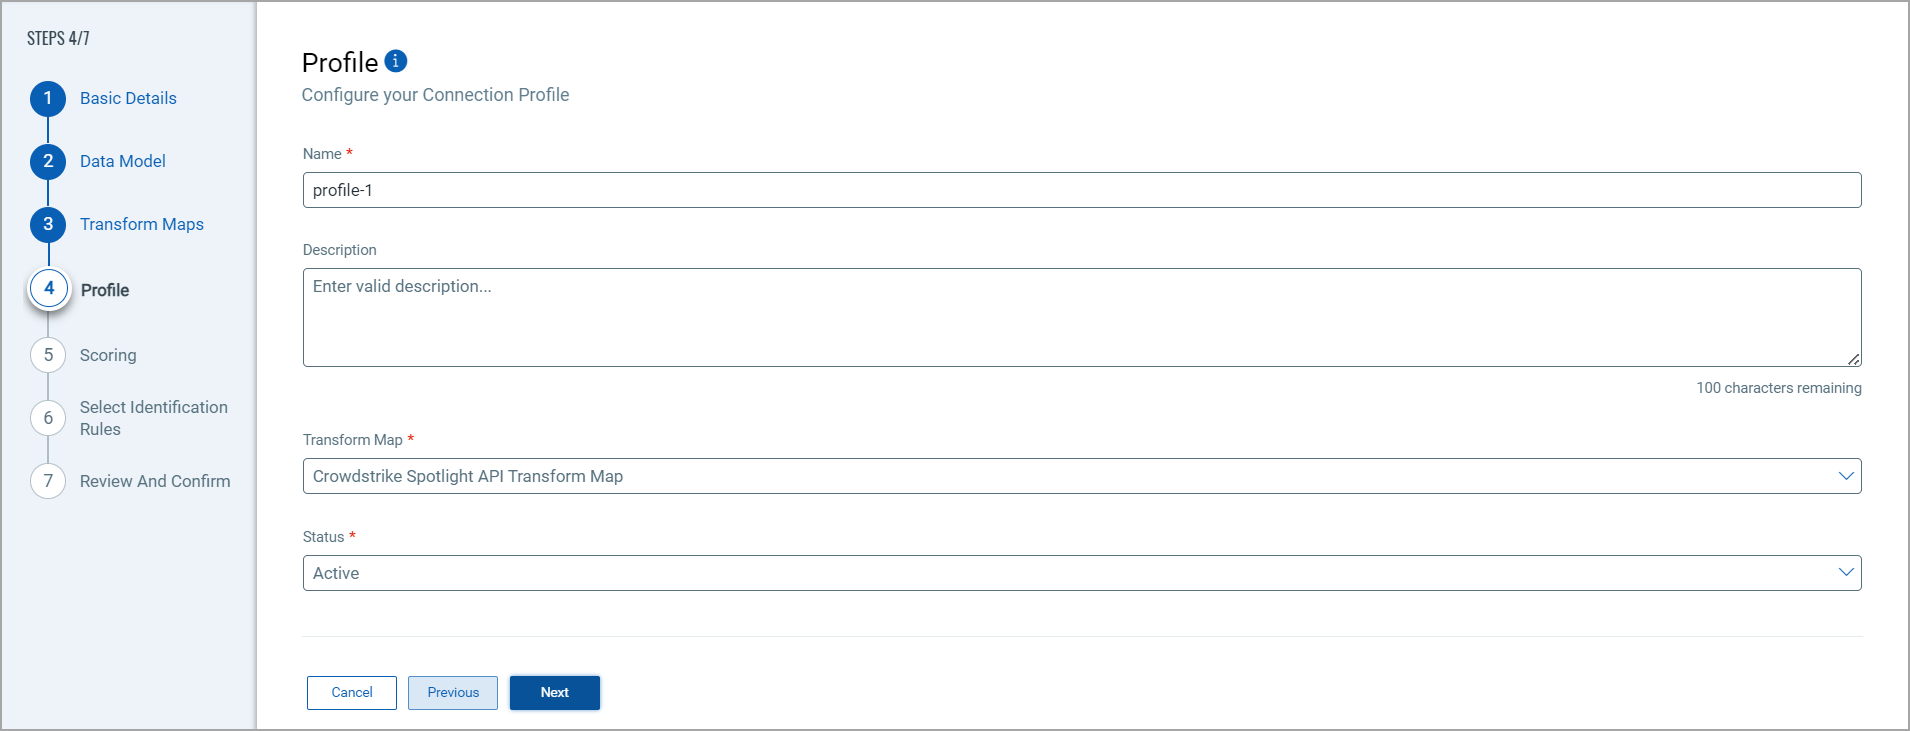
Click the "+" to create a new profile.
In the Add Profile screen, provide the necessary inputs for your new profile.
Provide a Name and Description.
Select the required Transform Map for the data mapping.
The Status field determines whether the connector should be in Active or Inactive state after creation.
The OnPrem connector does not have a schedule option in its profile creation. However, if you wish to set a schedule for this connector, you can follow the steps at Run Docker Image for OnPrem Connector.
Select Identification RulesSelect Identification Rules
The Identification Rules are a set of out-of-the-box precedence rules set by Qualys CSAM. The connector discovers findings based on the order set by the selected Identification Rules.
You can proceed to the next step without making any changes to this screen.
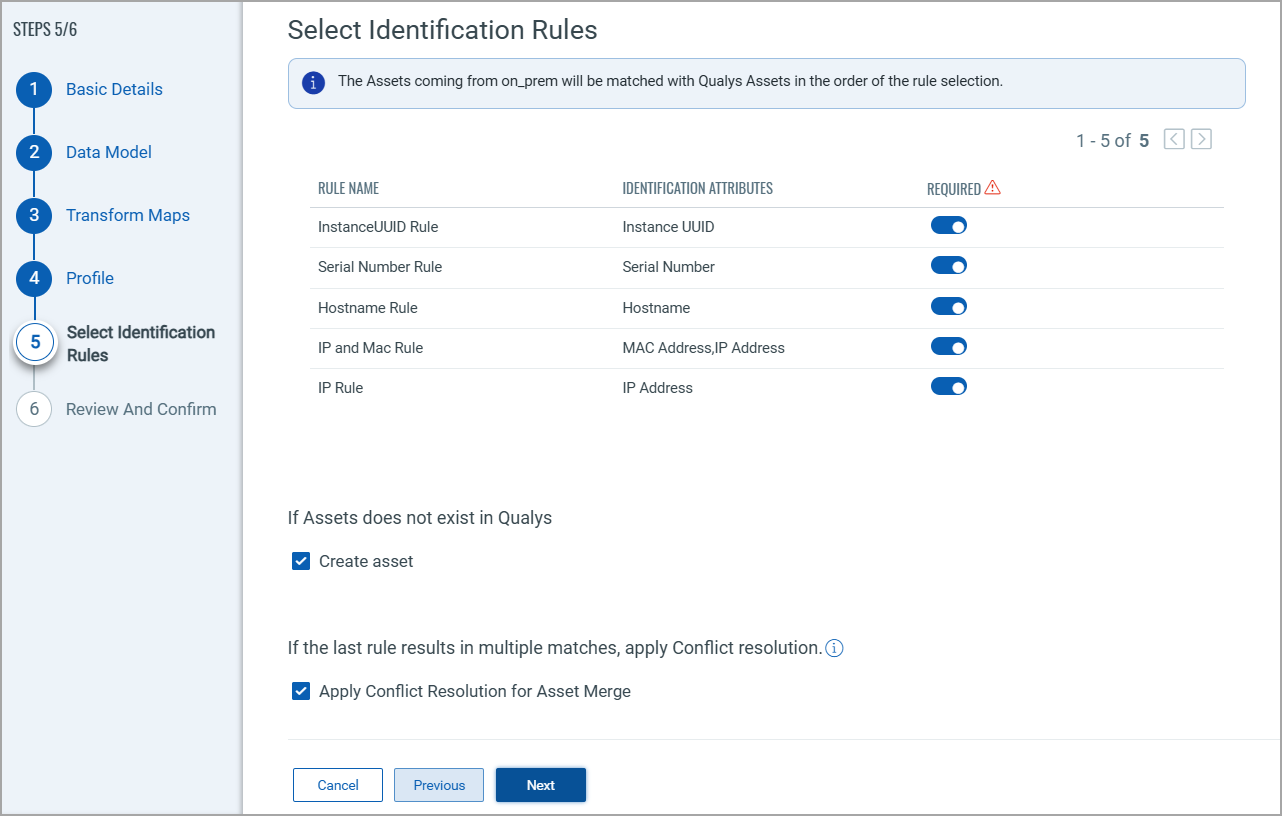
If you don't want to choose a specific rule, turn off the toggle next to it. But, ensure that at least one rule is selected.
To learn more about the different rules and options present in this screen, refer to the CSAM Online Help.
Once you are done with all the configuration, review the configurations provided in the previous steps. Ensure all details are correct and complete. Confirm the setup to finalize the configuration of the API connector.
Save and run the connector to process the data accordingly, transforming and importing it as per the configurations set.
How Does a Connection Work?
The CrowdStrike connector functions through configured profiles that determine what data gets synchronized and when.
A Connection usually involves creating a profile that defines which vulnerabilities to import based on detection data types and asset types. The connector then automatically executes according to the schedule (or on-demand), pulling vulnerability data from CrowdStrike into Qualys ETM where it can be viewed alongside other security findings.
With the CrowdStrike API Connector successfully configured, you are almost ready to view all the assets and findings of your CrowdStrike environment.
In the Connector screen, you can find your newly configured connector listed and marked in the Processed state.
Connector States
A successfully configured connector goes through 4 states.
- Registered - The connector is successfully created and registered to fetch data from the vendor.
- Scheduled - The connector is scheduled to execute a connection with the vendor.
- Processing - A connection is executed and the connector is fetching the asset and findings data.
- Processed - The connector has successfully fetched the assets, it may still be under process of fetching the findings. Wait for some more time for the connector to fetch the findings completely.
The Processed state indicates that the Connector is successfully configured but it is under the process of importing all your assets and findings. This process (specifically for findings) may take some time.
This entire process may take up to 2 hours for completion. Once it is done, you can find the imported data in Enterprise TruRisk Management (ETM).
View Assets and Findings in ETM
Navigate to Enterprise TruRisk Management to get started with analyzing your Connector's vulnerability findings.
You can view the assets imported from the CrowdStrike connection by navigating to Inventory tab of ETM.
Go to Assets > Host to find all of your imported assets.
Use the token, inventory: (source: `CrowdStrike Spotlight`) to view all the imported CrowdStrike assets.
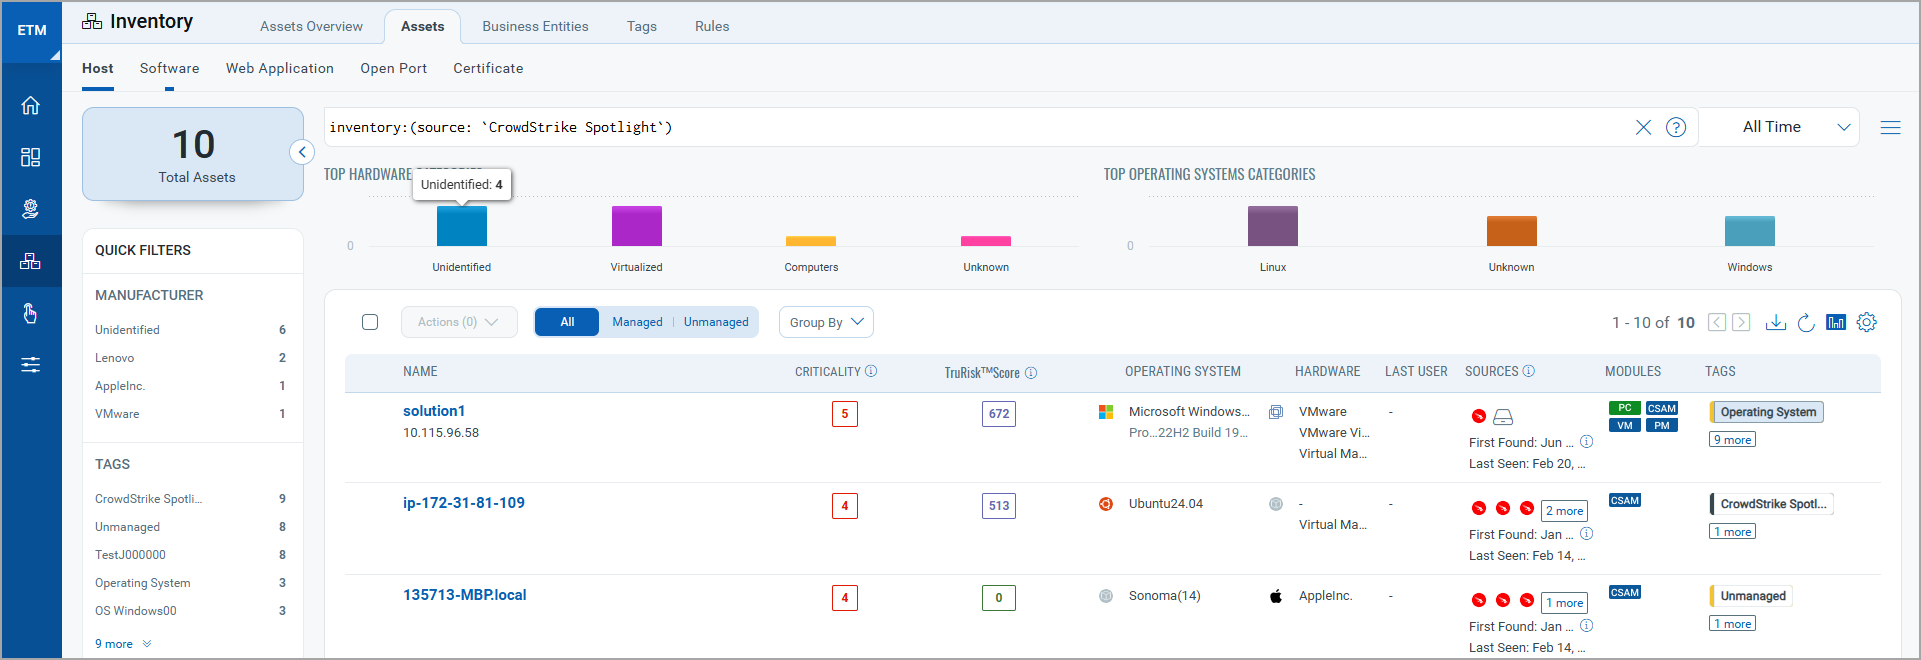
Here, you can learn about the criticality of your assets and their Risk Scores. Click any of the asset to find more details about them.
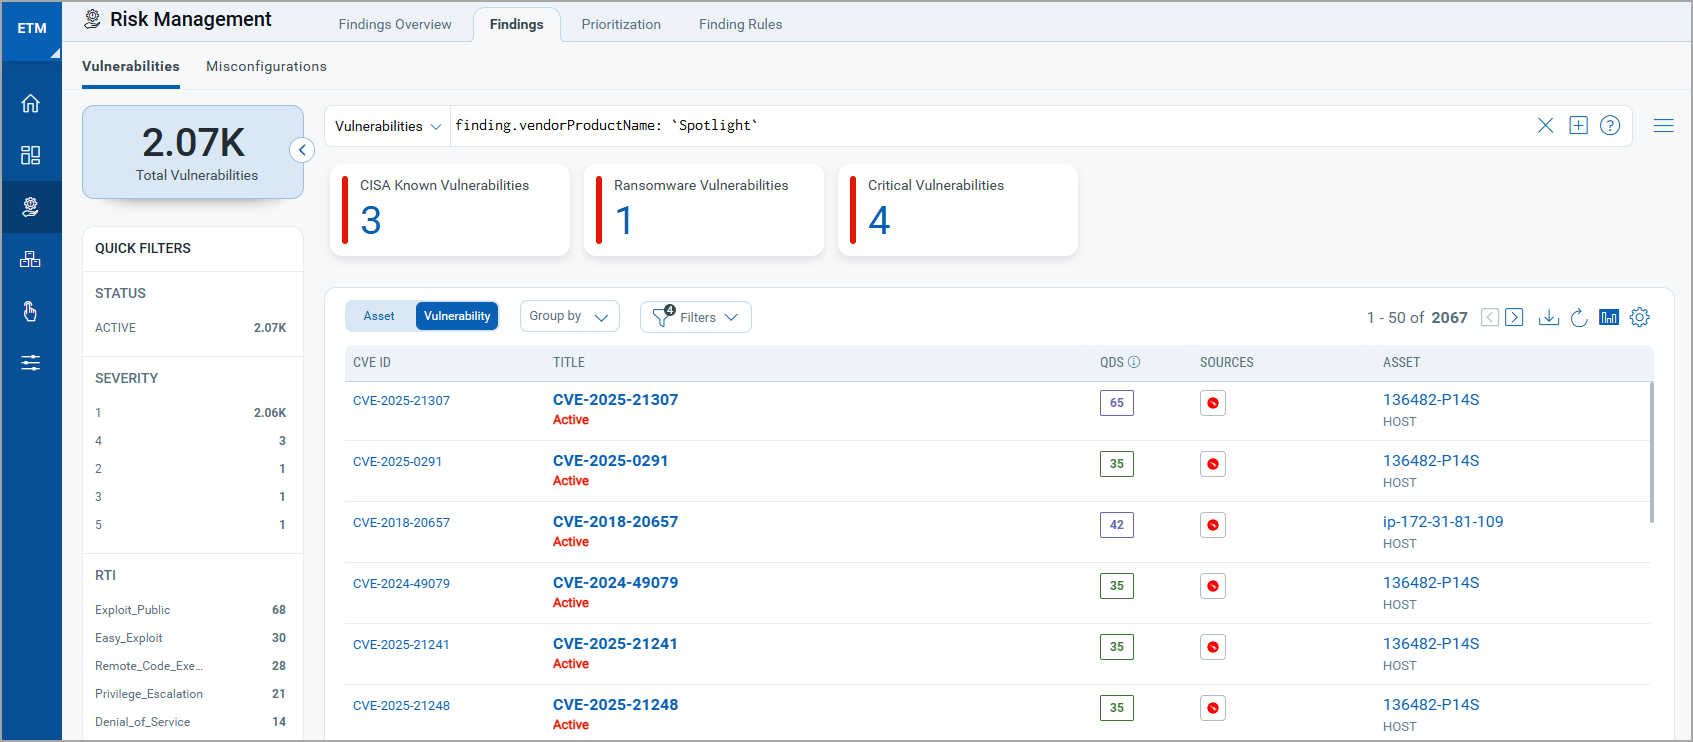
Next, you can navigate to the Risk Management tab to view your vulnerability findings.
Go to Findings > Vulnerability to view all the discovered vulnerabilities.
Use the token, finding.vendorProductName: `Spotlight` to view all the discovered CrowdStrike vulnerabilities.
To know more about how the CrowdStrik API Connector leverages the findings, refer to the Qualys ETM Documentation.
Additional Resources
Additional Information related to CrowdStrike Connector.
API Reference
Here are the APIs executed for the OnPrem connection.
|
Name |
Filters |
Endpoint |
|---|---|---|
|
Auth API |
N/A | /oauth2/token |
|
Fetch Vulnerabilities API |
Finding Type: Vulnerabilities |
|
| Fetch Assets/Resources API | Asset type: Hosts |
Data Model Map
CrowdStrike Vulnerability Transformation Mapping
| Source Attribute Key | Target Attribute Label |
|---|---|
| network_interfaces[].local_ip | externalAssetId |
| Vulnerability Id | findingName |
| id | externalFindingId |
| CVE Severity | findingSeverity |
| Remediation Entities action | recommendation |
| Status | findingStatus |
| Updated Timestamp | findingLastFoundOn |
| os_version | operatingSystemName |
| Data Provider | detectectionMethod |
| CVE Id | cveId |
| CVE Description | findingDescription |
| CVE Base Score | cvssV2Base |
|
confidence Available values: |
findingSubType Available values: |
| system_serial_number | biosInfoSerialNumber |
| bios_manufacturer | biosInfoManufacturer |
| hostname | assetName |
| network_interfaces[].mac_address | macAddress |
| network_interfaces[].local_ip | ipAddress |
Advanced Configuration
Download and Run the OnPrem Docker Image
The OnPrem Connector fetches host assets and vulnerabilities through configurable source APIs, currently supporting CrowdStrike Spotlight with plans to expand in future releases. This lightweight execution engine operates in a docker container within your environment. It runs based on your configurations in the .env file, making periodic API calls to retrieve host assets and associated vulnerabilities. After configuring the Docker container, the asset and vulnerability data is passed to the OnPrem Connector with each API call. This ensures the Connector fetches the latest data of your environment for Qualys ETM to process.
The Container Deployment Workflow is as below,
- Select your source and create a connection.
- Download and unzip the docker image.
- Create an environment file using the provided template.
- Run the docker container on your desired schedule.
You can find the downloadable docker image by selecting your OnPrem Connector and opening its Quick Actions menu.
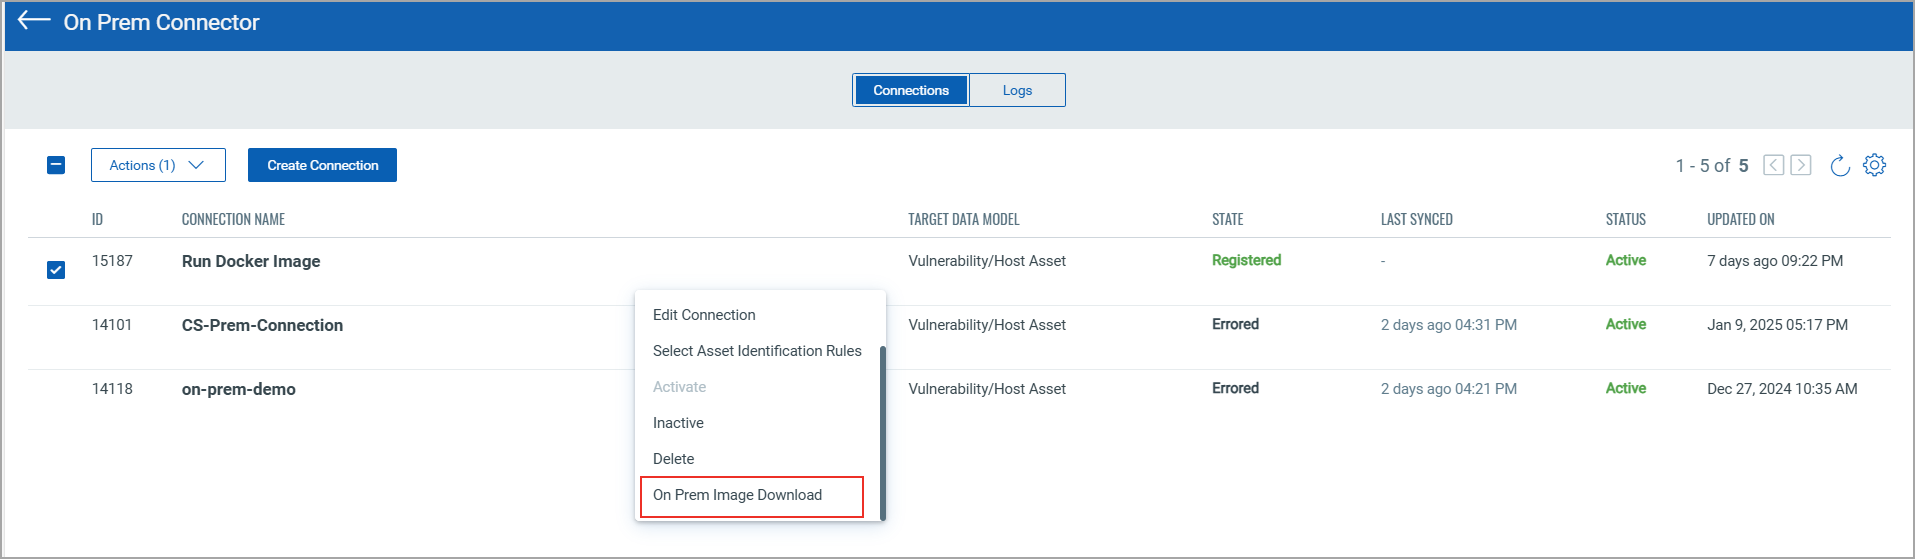
Download the Image from the Image URL.
To run the OnPrem Connector via Docker image, follow the steps described below.
Run Docker Image for OnPrem Connector
Prerequisites
Before you begin, ensure your environment meets these requirements:
- Docker version 24.X or higher installed
- Virtual machine with:
- 8 GB memory
- 4 CPU cores
- Access to ETM platform
- CrowdStrike Spotlight credentials
Deployment Steps
Download Docker Image
Navigate to the OnPrem Connector > Select a connector and open the Quick Actions menu. Download the OnPrem Connector docker image. This image serves as the lightweight execution engine for collecting host asset and vulnerability data.
Prepare Image for Installation
Open your terminal and unzip the downloaded file:
gunzip onprem-execution-engine.tar.gzLoad Docker
Image Install the docker image using the following command:
docker load -i onprem-execution-engine.tarVerify the docker images are loaded using the following command:
docker imagesCreate Environment Configuration
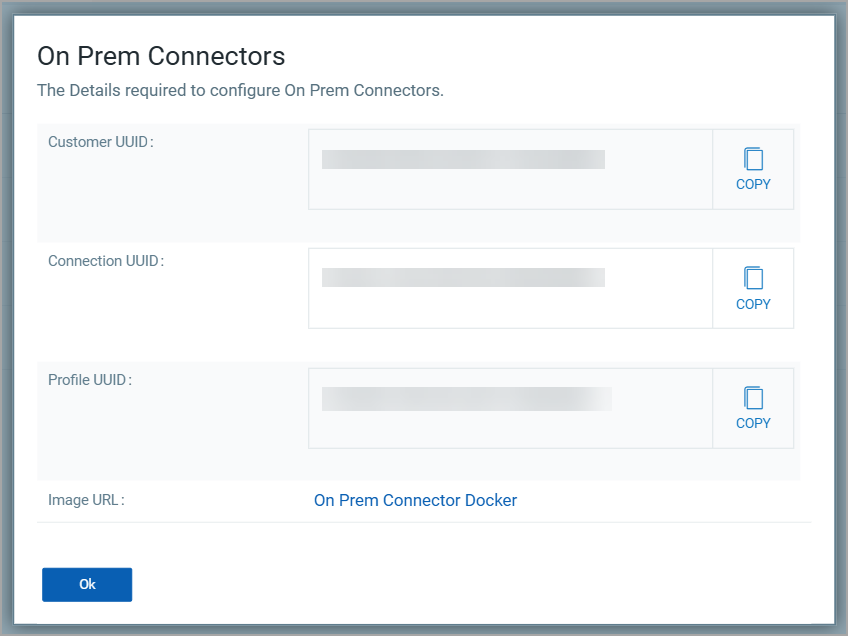
Generate a .env file using the provided template. This file contains critical connection and execution parameters.
Here's a sample Environment file for your reference.
connector.api.url=https://<gateway POD URL> qualys.customerUuid=<Customer UUID> qualys.connectionUuid=<Connection UUID> qualys.profileUuid=<Profile UUID> qualys.user.username= <Qualys Username> qualys.user.password= <Qualys Password> service.child-thread-pool=<Number of threads to run with for multithreaded support>service.cron-expression=0 * * * * * service.http.proxy.enabled=true service.http.proxy.host= service.http.proxy.scheme=http service.http.proxy.port=8080
Run the docker container with your environment file:
docker run --env-file <env_filename> <image_id>Execution Modes
You can edit the Environment configuration file to execute the OnPrem connector in two specific modes.
Scheduled Execution
Include a cron expression in your .env file. The connector runs periodically based on the specified schedule of the cron expression.
On-Demand Execution
If you omit the cron expression, the connector runs once and exits after completion. You can run it again from the Quick Actions menu.
Additional Properties
You can add additional properties to the Env file to customize them further.
web-client.config.connection-timeout=700000
web-client.config.read-timeout=700000
web-client.config.write-timeout=700000
web-client.config.response-timeout=700000
service.child-thread-pool=50
HEAPSIZEMAX=13000M
HEAPSIZEMIN=1000M
service.exitWhenDone=false
LOGLEVEL=debug
Timeout Settings for Qualys Gateway
These properties must be added to the .env file to increase the timeout period when sending data to the transformation service (which then sends it to ETM):
web-client.config.connection-timeout=700000- Time allowed to establish a connectionweb-client.config.read-timeout=700000- Time allowed to read data from connectionweb-client.config.write-timeout=700000- Time allowed to write data to connectionweb-client.config.response-timeout=700000- Time allowed to wait for response
Resource Allocation
These properties allow the container to run with more resources:
HEAPSIZEMAX=13000M- Maximum heap size (13GB)HEAPSIZEMIN=1000M- Minimum heap size (1GB)
Container Behavior
service.exitWhenDone=false- Prevents the container from stopping when a job completes or if a fatal error occurs
Logging Level
LOGLEVEL=debug- Enables detailed debug logs (not recommended for normal operation as it generates more logs and consumes more space)
Additional Setting
service.child-thread-pool=50- Sets the thread pool size to 50 for child processes
Cron Expression in ENV File
Follow the instructions below to create the cron expression to use in the ENV file.
The cron expression used in the env file is a Spring Cron Expression and must be formatted according to Spring recommendations.
**service.cron-expression=0 * * * * ***
For explanation: **0 15 03 * * ***
Second (0-59) → 0 (Runs at the 0th second)
Minute (0-59) → 15 (Runs at the 15th minute)
Hour (0-23) → 03 (Runs at 3 AM)
Day of Month (1-31) → * (Every day)
Month (1-12) → * (Every month)
Day of Week (0-7) → * (Every day of the week)
Meaning: This expression (0 15 03 * * *) executes your command at exactly 3:15 AM (03:15:00) every day of every month on every day of the week.
Execution Frequency: The command runs once daily at precisely 3:15 AM.
Run the Docker Container
The following command mounts the container log locally on setup. You can use it for troubleshooting and learning more about the container flow.
docker run -d --env-file <env-file-name> -v /home/user/<path-to-directory>/:/var/log/app/onprem-execution-service <IMAGE ID>\
Where, -v /home/user/<path-to-directory>
Specifies the directory path where you want to store container logs. Logs are automatically compressed as .json.gz files and each log file is compressed when it reaches 50MB.
Note: Ensure sufficient disk space is available. Standard logging (DEBUG mode off) typically requires up to 2GB, while recurring jobs with cron will generate logs more frequently. Make sure your local environment has adequate storage space and your user account has write permissions for the specified directory.