Orca Security V2 Connector
The Orca Security V2 Connector ingests cloud asset and vulnerability data from Orca Security into Qualys Enterprise TruRisk Management (ETM) for centralized visibility and risk prioritization. The connector uses Orca's Serving-Layer APIs to retrieve asset inventory and vulnerability findings across supported cloud providers and synchronizes them into ETM for unified analysis alongside other enterprise risk sources.
Connector Details
Here is a comprehensive overview of what the Orca Security V2 Connector supports.
| Vendor | Orca |
| Product Name | Orca Security |
| Category | Cloud Security |
| Findings Supported | Assets and Vulnerabilities |
| Assets Supported | AwsEc2Instance, AzureComputeVm, GcpVmInstance, VmwareVmInstance, OciComputeVmInstance, AliCloudEcsInstance |
| Version | 1.0.0 |
| Supported Version & Type | SaaS (Latest) |
| Integration Type | API Integration (REST) |
| Direction | Unidirectional (Orca to Qualys) |
| Delta Support | Not Supported (Full pull on every run) |
| Import of Installed Software | Supported (Maximum 200 entries per asset) |
| Import of Source Tags | Supported (Maximum 200 tags per asset) |
| Filters / Query Support | Not Supported |
Configure the Connector
The connector is configured through a three-step wizard in Qualys ETM. A valid connection test is required before you can proceed.
Before You Begin - AuthenticationBefore You Begin - Authentication
Before configuring the connector in Qualys ETM, ensure you have the following ready:
- Ensure you have access to your Orca Security account with permissions to create API tokens.
- Determine the role to assign to the API token – either the built-in Viewer role or a custom role with the minimum required permissions (see the Permissions section below).
- Generate an API token in Orca. Navigate to Settings > Users & Permissions > API and click Create API Token. Save the token immediately – it cannot be accessed again after clicking Continue.
Generating an API Token in Orca
Follow these steps to create an API token in your Orca Security environment:
- Log in to your Orca environment using your regional domain.
- Navigate to Settings > Users & Permissions > API.
- Click Create API Token.
- Provide a Name and Description for the token.
- Select an expiration option: Never Expire or a specific Expiration Date.
- Select the required Role: the built-in Viewer role, or a custom role with the minimum required permissions.
- Optionally configure Scope to restrict data access to specific Accounts, Business Units, or Shift Left Projects.
Note: Restricting the token's scope means data is fetched only for the selected scope (Accounts, Business Units, Shift Left Projects). If you require unrestricted data flow, do not select any scope restriction checkbox.
- Click Add, then click Continue.
Important: Save the API token immediately after creation. The token cannot be retrieved or viewed again after you click Continue.
Permissions Required
You may use the built-in Viewer role, which provides the necessary read permissions for assets and vulnerabilities. Alternatively, create a custom role with the following minimum permissions:
Required Permissions
The connector uses Orca’s Serving-Layer APIs to fetch:
- Host Assets
- VulnerabilityV2 findings
You may use the out-of-the-box Viewer role, which provides the necessary read permissions, such as
-
View/List only
-
Assets - View asset information
-
Cloud account - View cloud account information
-
Domain - View Domains information
-
Jira - View tickets
-
Compliance - View checks foundation benchmark standards for AWS, GCP, and Azure
-
CVE's - View Common Vulnerabilities and Exposures
-
Sonar actions - Query and Update Rules
-
Read-only access to all Shift-Left related resources
Or, you can create a custom role with the following minimum required permissions. Read more at Default Roles and Permissions (Requires Orca support login).
| Risk Permissions | Asset Permissions |
|---|---|
 |
Keep in mind that restricting the token's scope means that data is fetched only for the selected scope. If you require unrestricted data flow, we recommend not selecting the checkbox.
Scope and Data Access
The connector uses Orca's Serving-Layer query API to retrieve assets and vulnerabilities. Asset retrieval covers six cloud provider types: AwsEc2Instance, AzureComputeVm, GcpVmInstance, OciComputeVmInstance, VmwareVmInstance, and AliCloudEcsInstance. Vulnerability retrieval uses the VulnerabilityV2 model. The API rate limit is 1 request per second per user. Filters and query support are not available. Import of installed software is supported with a maximum of 200 entries per asset. Import of source tags is supported with a maximum of 200 tags per asset. The data flow is unidirectional, from Orca Security to Qualys ETM.
Key Rotation
If you rotate or regenerate your Orca API token, update the API Token field in the connector's Profile & Connectivity configuration in Qualys ETM immediately to prevent authentication failures. Confirm the new token has not expired and retains the required role permissions before saving.
- Log in to Qualys ETM.
- Navigate to Connectors > Integrations.
- Locate Orca Security V2 and click Manage.
Create a Profile & ConnectionCreate a Profile & Connection
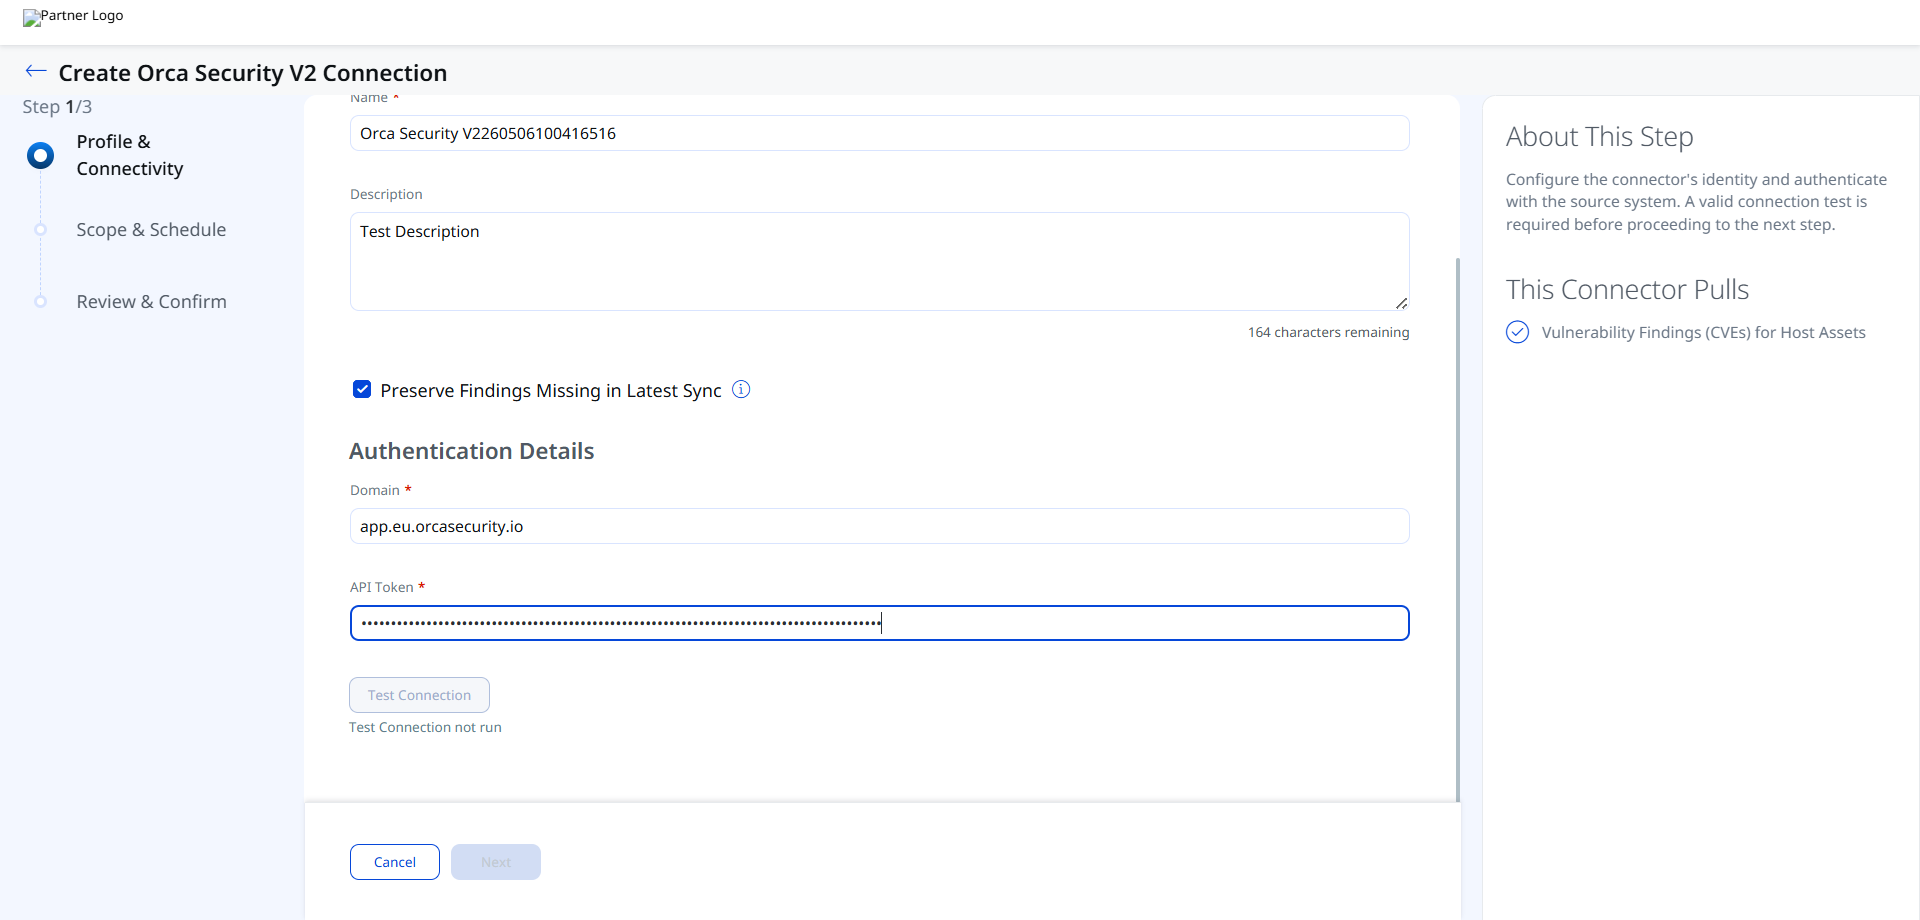
Configure the connector's identity and authenticate with the Orca Security source system. A valid connection test is required before proceeding to the next step.
Connector Details
| Name | A unique display name for this connector instance. Example: Orca Security V2260506100416516 |
| Description | Optional description of up to 200 characters explaining the purpose of this connector. |
| Preserve Findings Missing in Latest Sync | When selected, findings absent in a new sync run retain their previous status. When deselected, missing findings are automatically marked as Fixed. This behavior is determined at initial connector creation and cannot be changed afterwards. |
Authentication Details
| Field | Type | Description |
|---|---|---|
| Domain | String | The region-specific Orca domain for your environment. Example: app.eu.orcasecurity.io. The domain must include the /api/ path suffix. See the supported regional domains table in the API Reference section. |
| API Token | Encrypted String | The API token generated from the Orca Security console (Settings > Users & Permissions > API). This field is masked after entry. |
Important: The API Token cannot be retrieved from Orca after clicking Continue during token creation. Store it securely before entering it here.
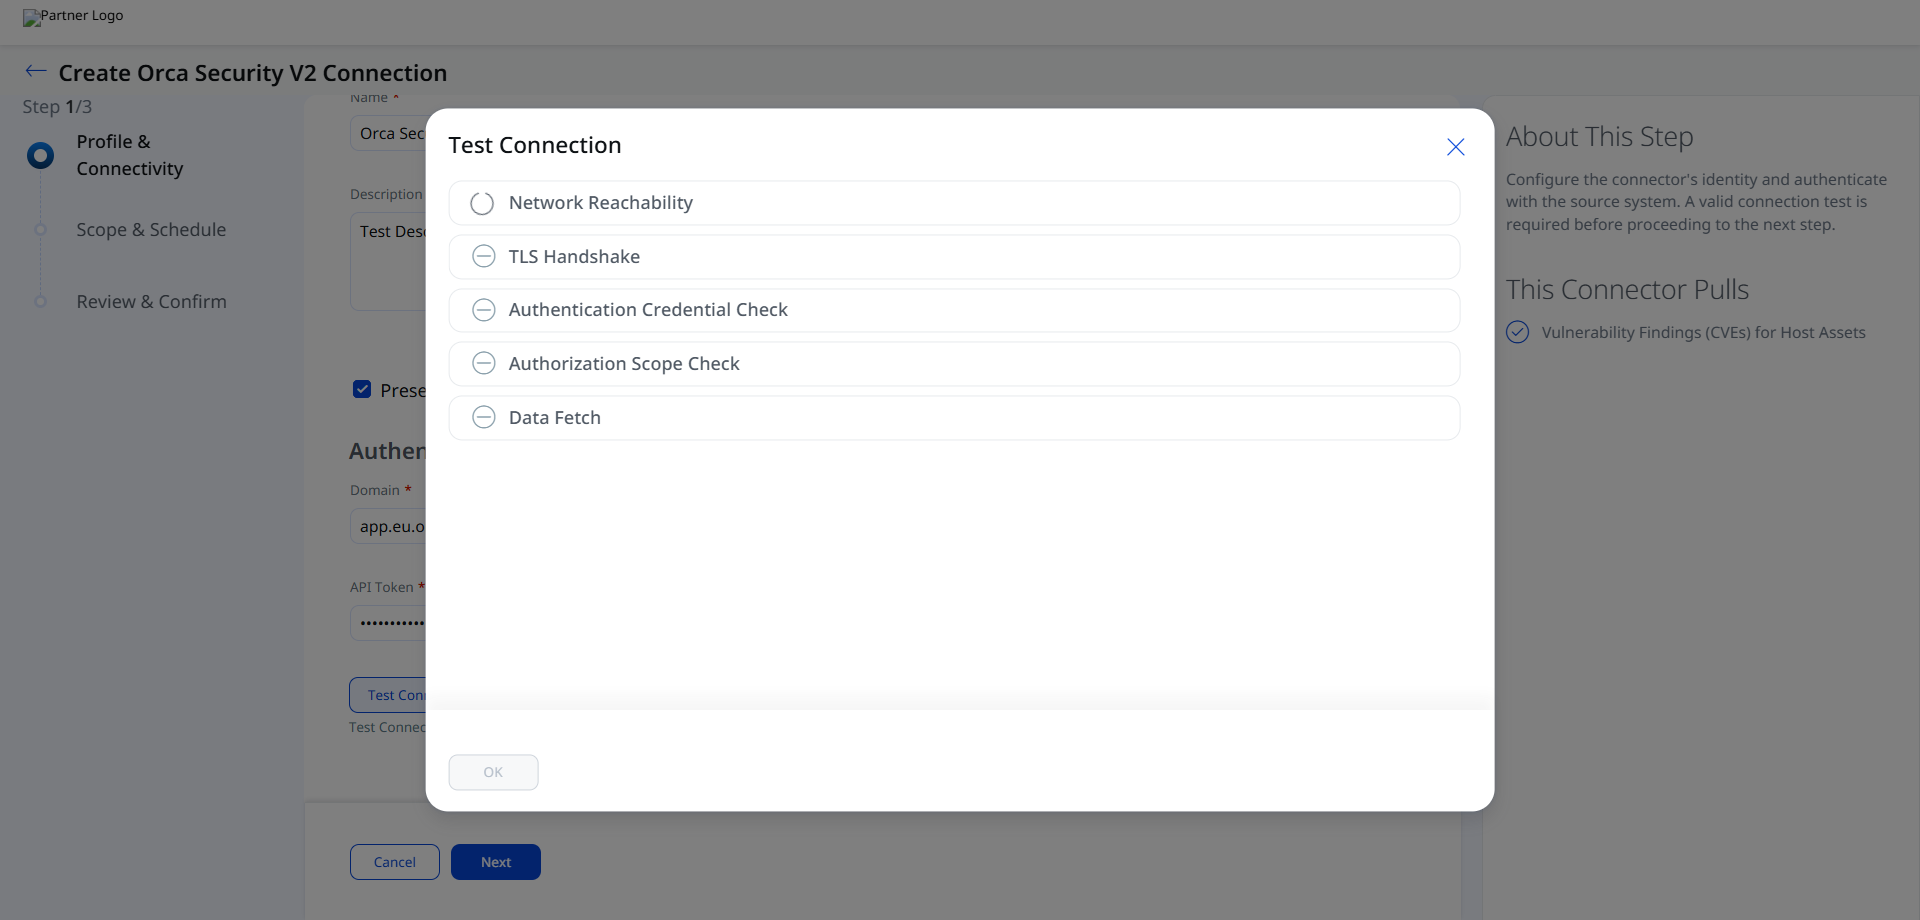
After entering your credentials, click Test Connection. The following checks are performed:
- Network Reachability — Verifies the API endpoint is reachable.
- TLS Handshake — Confirms a secure connection can be established.
- Authentication Credential Check — Validates the Client ID, Client Secret, and Token URL.
- Authorization Scope Check — Confirms the service account has the required permissions.
- Data Fetch — Verifies that data can be retrieved from the Orca Security API.
All five checks must pass before you can proceed to Step 2. If any check fails, refer to the Troubleshooting section for resolution steps.
Set the Scope & ScheduleSet the Scope & Schedule
Configure what data to synchronize and how frequently the connector runs. The connector pulls Vulnerability Findings (CVEs) for Host Assets.
Set a Single Occurrence or a Recurring schedule to control when the connector executes. Each scheduled run performs a full data pull from Orca Security; delta synchronization is not supported.
Note: Schedule times are stored in UTC. A recurring schedule with a 5-year maximum duration is supported.
Advanced Settings
Advanced Settings are accessible after the connector has been created. Navigate to the connector listing and click the connector name to open the configuration. Advanced settings are organized into tabs.
Note: Click Save after making changes in any Advanced Settings tab to ensure your configuration is retained.
Filters Tab
The Filters tab is present in the connector configuration. However, the Orca Security V2 Connector does not currently support filter queries. The API rate limit of 1 request per second per user applies, and no OData or other filter expressions can be applied to restrict the data set returned by the Serving-Layer query API.
Transform Map Tab
The Transform Map tab displays the active mapping between Orca Security data fields and Qualys ETM schema fields. A default out-of-the-box transform map is provided. You may clone the default map to create a customized version. For full field-level mapping details, see Transformation Maps.
Orca Security V2 – Asset & Vulnerability MappingOrca Security V2 – Asset & Vulnerability Mapping
| Orca Source Field | Qualys ETM Target Field |
|---|---|
data.Hostname.value |
hostName (Required) |
data.InstanceId.value |
instanceId (Required) |
data.MacAddresses.value[] |
networkInterfaces[].macAddress |
asset_unique_id |
externalAssetId (Required) |
data.Memory.value |
biosInfo.totalMemory |
data.PublicDnsName.value |
fqdn |
data.DistributionName.value |
operatingSystem.name |
data.DistributionVersion.value |
operatingSystem.version |
data.assetIps[] |
networkInterfaces[].ipAddress |
data.CloudAccount.data.CloudProvider.value*AWSGCPAzureOCIAlibabaVMWare / Vmware
|
cloudProviderEC2GCPAZUREOCIALIBABASOURCE_TYPE_UNKNOWN
|
data.Tags.value |
temp_q_customAttributes.orcaCustomAttributes |
data.assetPorts[].data.PortNumber.value |
ports[].port |
data.assetPorts[].data.Protocol.value |
ports[].protocol |
data.assetPorts[].data.ServiceName.value |
ports[].detectedService |
data.assetPorts[].data.FirstSeen.value* |
ports[].firstFound |
data.assetPorts[].data.LastUpdated.value* |
ports[].lastUpdated |
data.RunningServices.value[].data.Name.value |
services[].name |
data.RunningServices.value[].data.Exec.value |
services[].description |
data.OsBitMode.value |
operatingSystem.architecture |
vulnerabilities[].data.CvssSeverity.value* |
finding[].severity |
data.CpuType.value |
processor.description |
data.CpuCount.value |
processor.numberOfCpu |
data.CpuFrequency.value |
processor.speed |
data.TotalDisksBytes.value |
volumes[].size |
data.assetApplications[].data.Name.value |
softwares[].name |
data.assetApplications[].data.Version.value |
softwares[].version |
data.assetApplications[].data.InstallDate.value* |
softwares[].installedDate |
data.assetApplications[].data.IsOsPackage.value |
softwares[].isSystemApp |
vulnerabilities[].data.CVE.data.Id.value |
finding[].externalFindingId (Required) |
vulnerabilities[].data.CVE.data.PublicName.value |
finding[].name |
vulnerabilities[].data.Description.value |
finding[].description |
vulnerabilities[].data.FirstSeen.value* |
finding[].firstFoundOn |
vulnerabilities[].data.CvssVector.value |
finding[].findingType.vulnerability.cvss.vector |
vulnerabilities[].data.PatchAvailable.value* |
finding[].findingType.vulnerability.isPatchAvailable |
vulnerabilities[].data.CVE.data.HasExploit.value |
finding[].findingType.vulnerability.isExploitAvailable |
vulnerabilities[].data.CVE.data.CweTypes.value[] |
finding[].findingType.vulnerability.cweIds[] |
vulnerabilities[].data.CVE.data.Id.value |
finding[].findingType.vulnerability.cveId |
vulnerabilities[].id |
finding[].findingType.vulnerability.vendorId |
vulnerabilities[].data.CVE.data.Cvss2Score.value |
finding[].findingType.vulnerability.cvss.cvss2Base |
vulnerabilities[].data.CVE.data.Cvss3Score.value |
finding[].findingType.vulnerability.cvss.cvss3Base |
vulnerabilities[].data.ThreatImpact.value.0 |
finding[].impact |
Fields marked with * require date/value transformation before mapping. (Required) denotes mandatory target fields in the Qualys ETM schema.
How the Connection Works
The Orca Security Connector ingests cloud asset and vulnerability data from Orca Security into Qualys ETM for centralized visibility and risk prioritization. The connector uses Orca's Serving-Layer APIs to retrieve asset inventory and vulnerability findings across supported cloud providers – AwsEc2Instance, AzureComputeVm, GcpVmInstance, OciComputeVmInstance, VmwareVmInstance, and AliCloudEcsInstance – and synchronizes them into ETM for unified analysis alongside other enterprise risk sources.
Each execution pulls all data from Orca. Delta synchronization is not supported.
Once configured, the Orca Security V2 Connector executes according to its schedule, performing a full data pull from Orca Security and synchronizing cloud asset inventory and vulnerability findings into Qualys ETM. Each execution pulls all data from Orca; there is no incremental or delta synchronization.
Connector States
A successfully configured connector transitions through the following states:
- Registered – The connector has been successfully created and registered to fetch data from Orca Security.
- Scheduled – The connector is scheduled to execute a connection with Orca Security.
- Processing – A connection is being executed and the connector is actively fetching asset and findings data.
- Processed – The connector has successfully fetched assets. Findings may still be under process. Wait for the connector to complete fetching findings.
Note: The Processed state indicates the connector has completed the asset import phase but findings may still be processing. This entire process – including findings ingestion – may take up to 2 hours to complete on the first run.
Viewing Assets and Findings in ETM
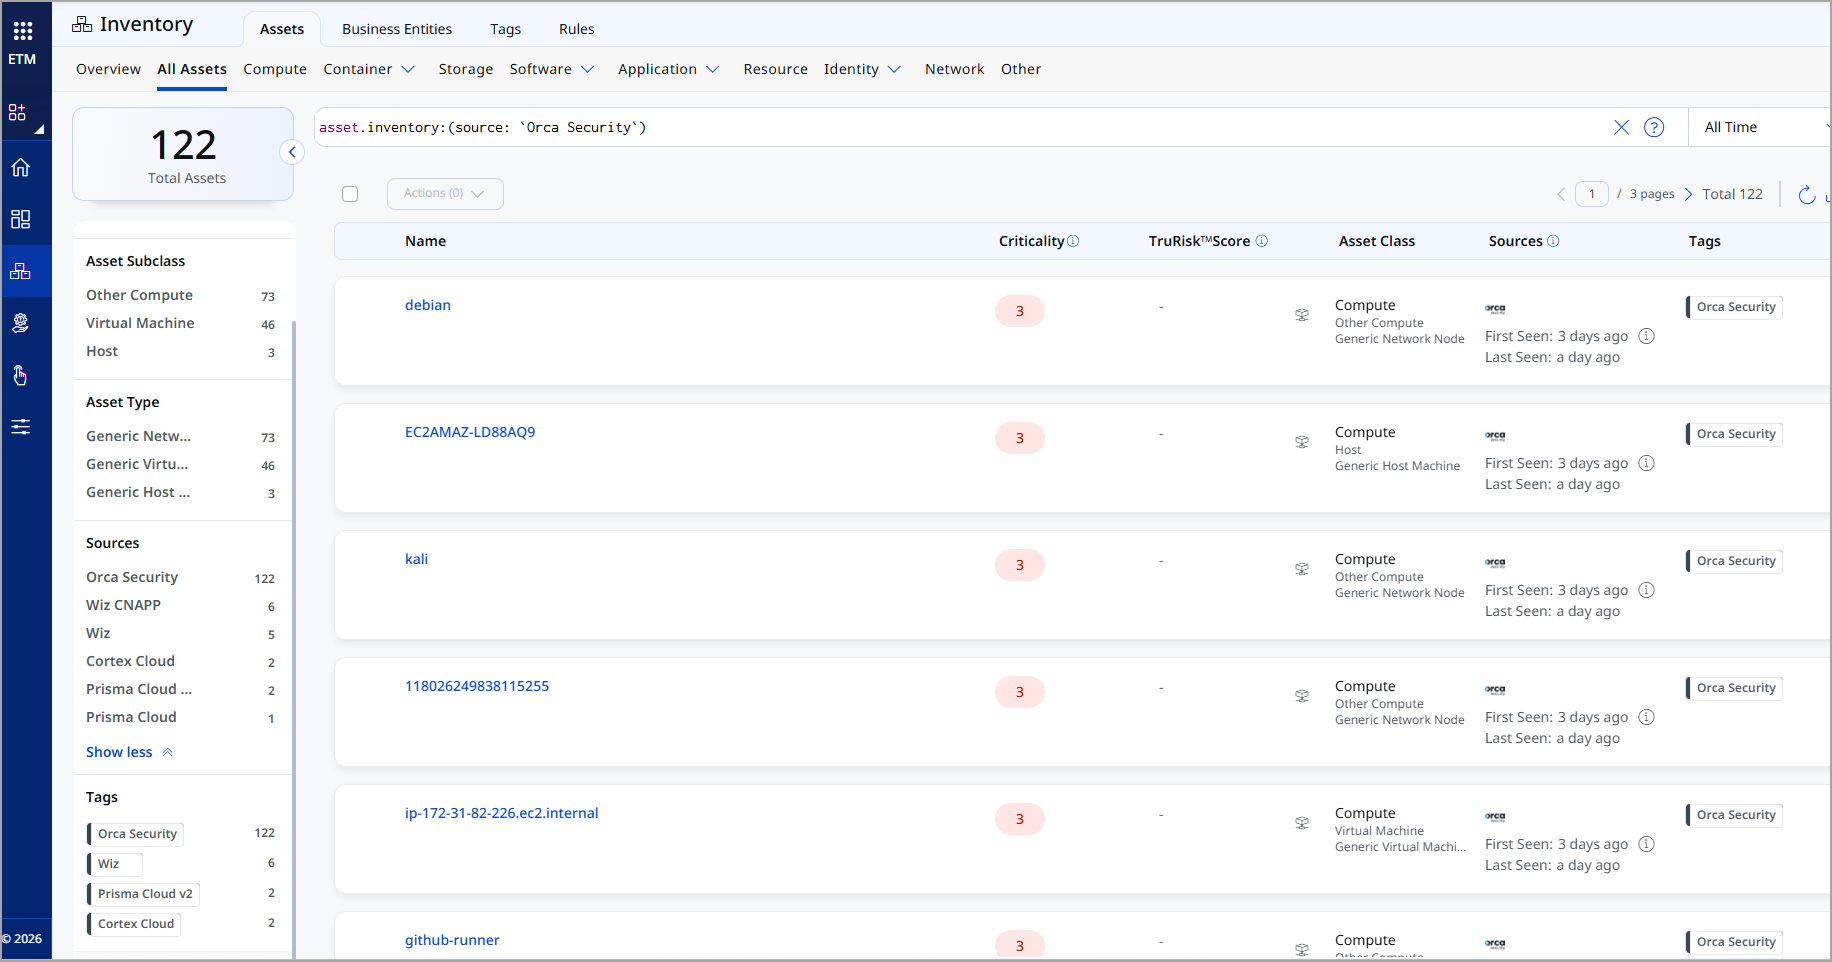
After a successful run, Orca data appears within ETM.
To view assets: Navigate to Enterprise TruRisk Management > Inventory > Assets > Host and apply the filter:
inventory:(source:"Orca Security")
To view vulnerability findings: Navigate to Enterprise TruRisk Management > Risk Management > Findings > Vulnerability and apply the filter:
findings.vendorProductname:"Orca Security"
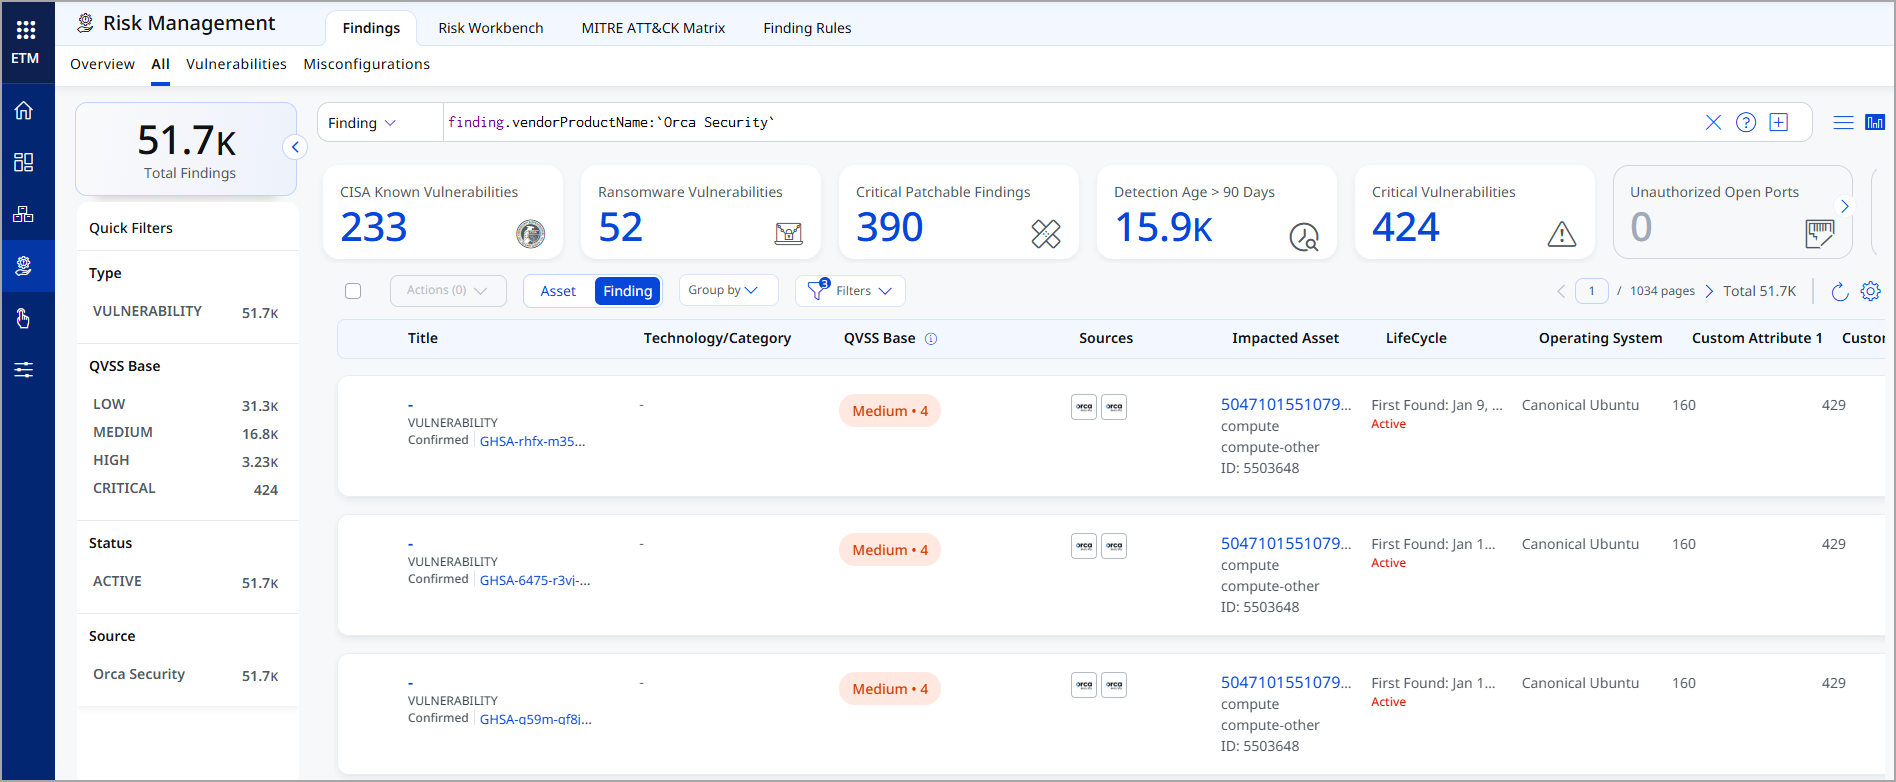
The Findings view displays all imported Orca vulnerabilities with CVE details, CVSS and EPSS data, patch availability, exploit status, and associated asset linkage.
Troubleshooting
| Authentication failure on connector run | Verify the API Token and Domain entered in Qualys ETM are correct. Confirm the token has not expired and has not been deleted in Orca. Check that the Domain URL matches your Orca deployment region and includes the /api/ path suffix. |
| No assets imported after first run | The connector transitions through Registered, Scheduled, Processing, and Processed states. The entire process may take up to 2 hours to complete. Verify the API token's role has Asset Read and Query Read permissions. Confirm that cloud assets exist in your Orca environment. |
| Vulnerability findings not appearing | Verify the API token's role includes Cve Read permission under Risks. Confirm the Vulnerability finding type is selected in the connector configuration and that Orca has active vulnerability findings for the scanned assets. |
Additional Information
API Reference
The Orca Security V2 Connector uses the following Orca Serving-Layer API endpoints:
| Function | Endpoint | Model(s) | Rate Limit | Description |
|---|---|---|---|---|
| Fetch Assets | https://<domain>/api/serving-layer/query |
AliCloudEcsInstance, AwsEc2Instance, AzureComputeVm, GcpVmInstance, OciComputeVmInstance, VmwareVmInstance |
1 request/second/user | Retrieves cloud asset metadata, installed packages, services, tags, network exposure, and risk attributes. |
| Fetch Vulnerabilities | https://<domain>/api/serving-layer/query |
VulnerabilityV2 |
1 request/second/user | Retrieves CVE data, CVSS scores, EPSS data, patch availability, exploit indicators, and associated asset linkage. |
Supported Regional Domains
Enter the domain for your Orca deployment region in the Domain field. The domain must include the /api/ path suffix.
| Region | Domain URL |
|---|---|
| US (Default) | https://api.orcasecurity.io/api/ |
| Europe | https://app.eu.orcasecurity.io/api/ |
| Australia | https://app.au.orcasecurity.io/api/ |
| India | https://app.in.orcasecurity.io/api/ |
| Israel | https://api.il.orcasecurity.io/api/ |
| Brazil (SA) | https://api.sa.orcasecurity.io/api/ |