Palo Alto Networks Prisma Cloud (CWPP) Connector
The Prisma Cloud (CWPP) Connector retrieves host asset records, vulnerability findings, and misconfiguration data from Prisma Cloud via its REST API and imports them into Qualys ETM for unified risk analysis and prioritization. Qualys ETM processes the incoming data by de-duplicating redundant entries, normalizing data formats, enriching findings with additional context, and calculating risk scores using TruRisk. The connector supports cloud providers including AWS, Alibaba, Azure, GCP, and OCI.
Connector Details
The following table summarizes the capabilities and configuration attributes of the Prisma Cloud (CWPP) Connector.
| Vendor | Palo Alto Networks |
| Product Name | Prisma Cloud (CWPP) |
| Category | Cloud Security |
| Works With | Qualys ETM |
| Connector Type | API Connector |
| Supported Assets | Host Asset Records |
| Findings Support | Yes |
| Version | 1.0.0 |
| Supported Version & Type | SaaS (Latest) |
| Integration Type | API Integration (REST) |
| Authentication Type | Key ID (Username) / Key Secret (Password) |
| Direction | Unidirectional (Palo Alto Networks > Qualys) |
| Incremental Sync (Delta) | Not Supported – each run performs a full pull |
| Import of Installed Software | Not Supported |
| Import of Source Tags | Not Supported |
| Filters / Filter Query | Yes – JSON format |
Configure the Connector
The connector is configured through a three-step wizard in Qualys ETM. A successful connection test is required before you can advance from Step 1.
Before You Begin - AuthenticationBefore You Begin - Authentication
Complete the following prerequisites before configuring the connector in Qualys ETM. Have these items ready before continuing.
Create a Role in Prisma Cloud
- Sign in to the Prisma Cloud console at
https://app.prismacloud.ioor the applicable regional pod URL. - Navigate to Settings > Access Control > Roles
- Click Add Role and provide a name (e.g., Qualys-ETM-Connector)
- Set the Permission Group to Account Group Read Only
- Under Account Groups, select All to allow the connector to fetch assets across your entire tenant, or choose specific groups if you want to limit the scope
- Save the role
Generating Access Keys in Prisma Cloud
The connector uses an Access Key ID and Secret Key to authenticate with the Prisma Cloud API. Follow these steps to generate credentials.
- Navigate to Settings > Access Control > Service Accounts tab.
- Assign the role created in the previous step
- Click Generate Access Keys
- Copy and save the Access Key ID and Secret Key — the Secret Key is shown only once and cannot be retrieved later.
Note: Qualys recommends using a dedicated service account user with the minimum required permissions to generate and manage API credentials, rather than a personal administrator account.
One-Time Display: The Secret Key is visible only at the time of creation. If you navigate away without saving it, you must regenerate a new key. Store credentials in a secure secrets manager before proceeding.
Permissions Required
The Prisma Cloud user account used to generate API credentials must hold the Prisma Cloud User Role for Cloud Security API requests with access to the Access Control section. Read more about Prisma Cloud administrator roles in the Prisma Cloud documentation.
Scope and Data Access
The connector queries the following Prisma Cloud API endpoints during each run:
- Authentication endpoint –
https://api.prismacloud.io/login - Resource scan endpoint –
https://api.prismacloud.io/v2/resource/scan_info - Asset details / vulnerability endpoint –
https://api.prismacloud.io/uai/v1/asset - Policy / misconfiguration endpoint –
https://api.prismacloud.io/policy/
API rate limits apply at 5 requests per second with a default batch size of 100 records per request. Filters are expressed in JSON format, for example {"cloud.region":["AWS Oregon"]} or {"resource.type":["EC2 Instance"]}. Import of installed software and source tags is not supported.
Key Rotation
If the API key expires, regenerate a new key in Prisma Cloud under Settings > Access Control > Access Keys. Once the new Key ID and Key Secret are available, update the credentials in Qualys ETM by selecting the Edit Connector option for the affected connector.
Create a Profile & ConnectionCreate a Profile & Connection
Configure the connector's identity and authenticate with Prisma Cloud. Navigate to the connector setup wizard and complete the fields described below.
Connector Details
| Field | Type | Description |
|---|---|---|
| Name | String | A unique display name for this connector instance. Example: Palo Alto Networks Prisma Cloud (CWPP)20260505 |
| Description | String | Optional free-text description of the connector's purpose or scope. Maximum 200 characters. |
Authentication Details
Provide authentication credentials for the Prisma Cloud API. These values are obtained during the credential generation steps described in the Before You Begin section.
| Field | Type | Description |
|---|---|---|
| Base URL | String | The tenant-specific Prisma Cloud API base URL. Example: https://api.prismacloud.io |
| Username | String | The Key ID generated from Settings > Access Control > Access Keys in the Prisma Cloud console. Example: eb0175db-fd0d-4a18-950f-4341e0c3df94 |
| Password | Encrypted String | The Key Secret corresponding to the Key ID above. This value is masked after entry. Store it securely before submitting. |
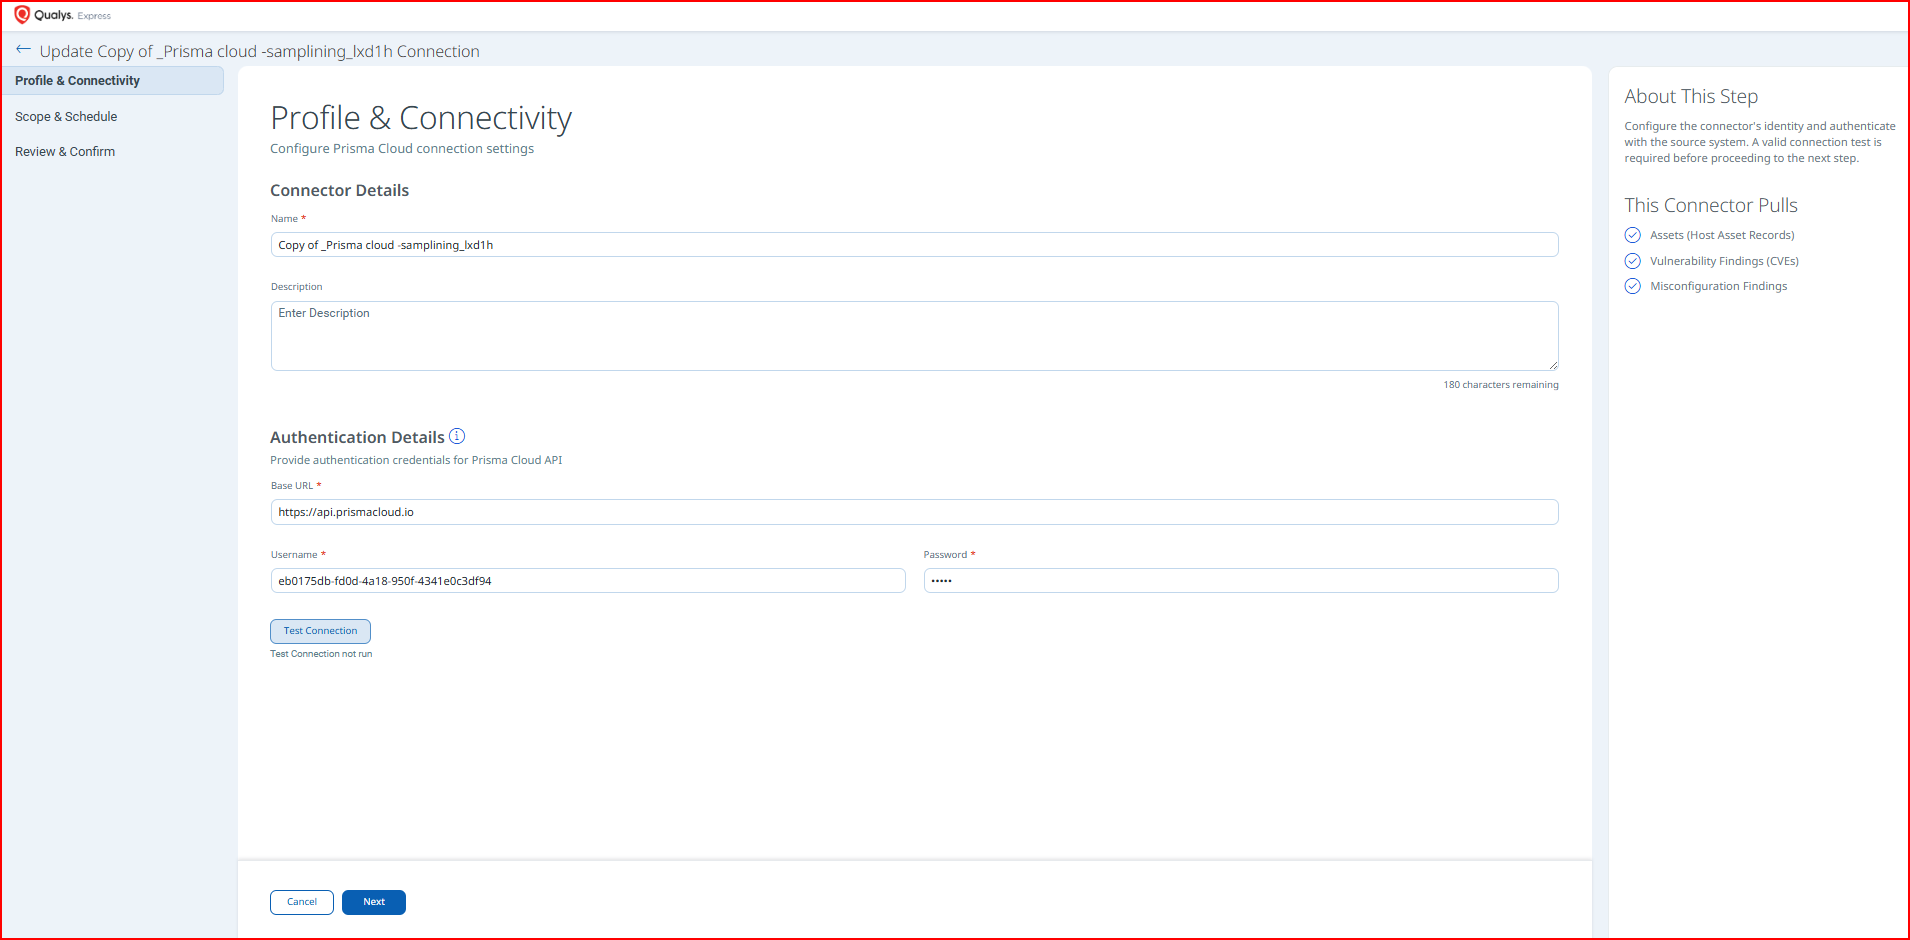
After entering all authentication details, click Test Connection to validate connectivity. The following checks are performed:
- Network Reachability — Verifies that the connector endpoint is reachable over HTTPS (port 443).
- TLS Handshake — Confirms that a secure TLS connection can be established with the remote endpoint.
- Authentication Credential Check — Validates the configured credentials against the source system's authentication endpoint.
- Authorization Scope Check — Confirms that the provided credentials have the required permissions to access the configured data scope.
- Data Fetch — Verifies that data can be successfully retrieved from the source system using the configured connection.
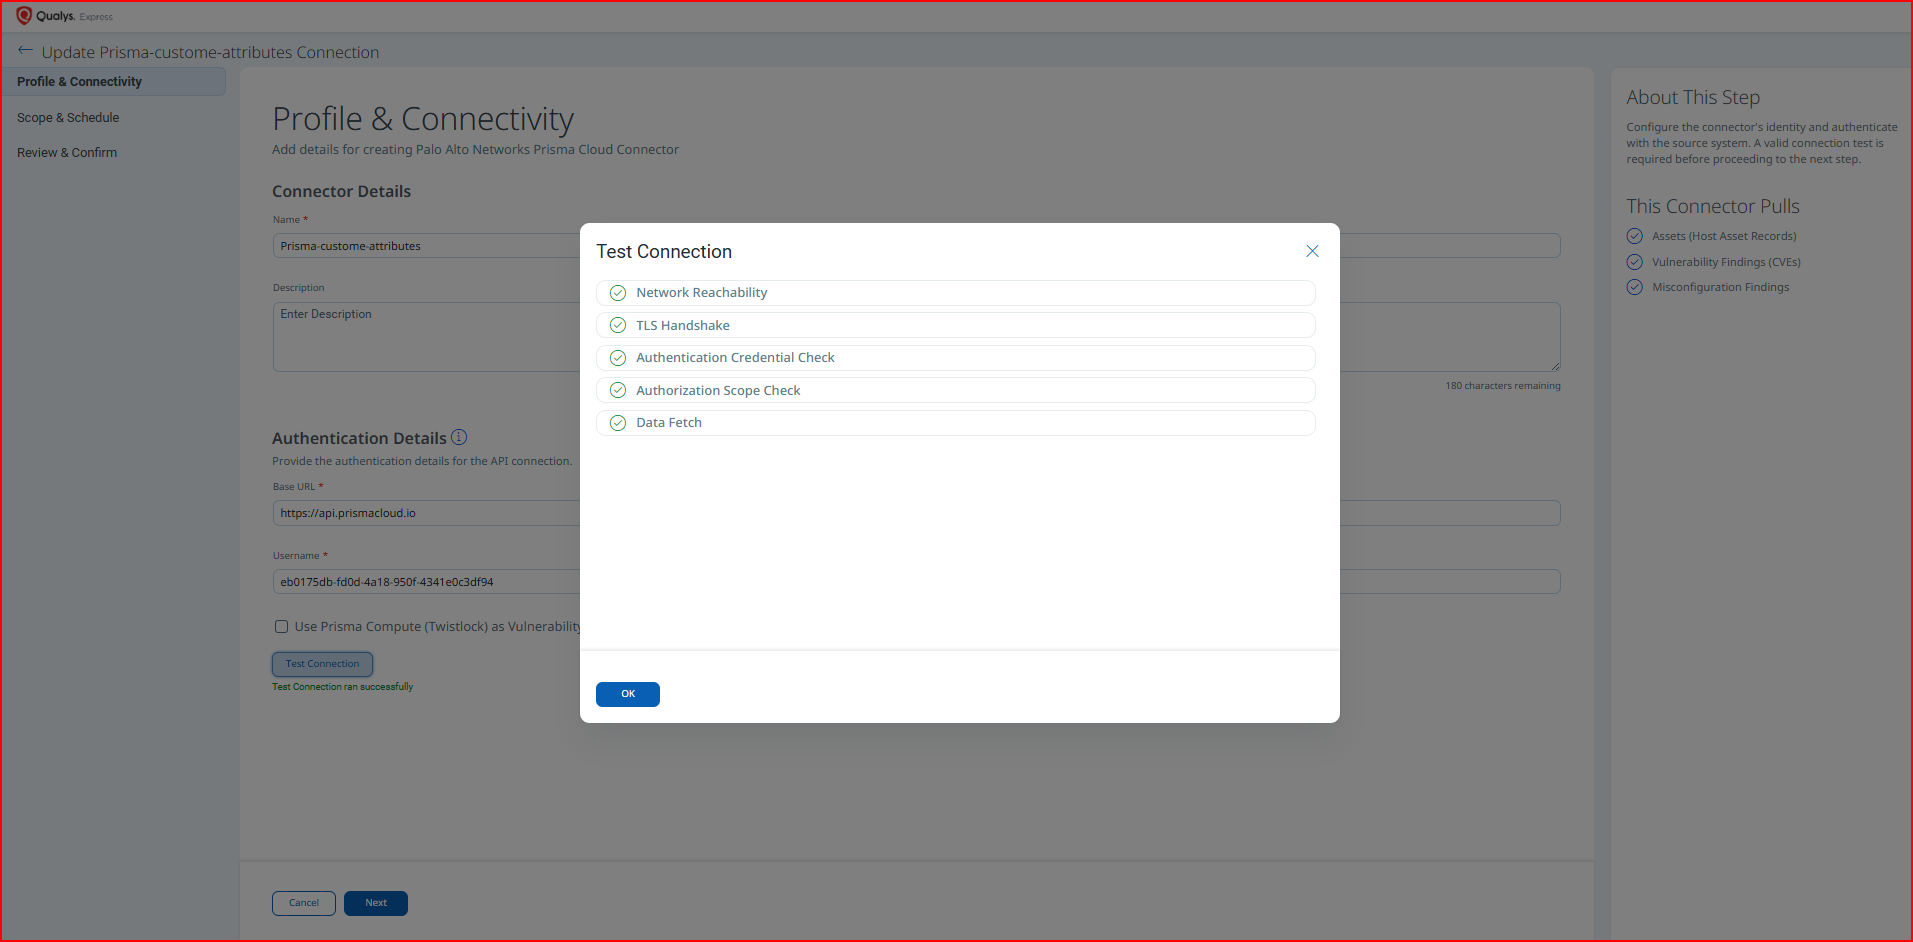
Important: If the Test Connection dialog displays an error (for example, Error: Some unexpected error occurred), verify that the Base URL, Key ID, and Key Secret are entered correctly and that the API key has not expired in Prisma Cloud. Persistent failures after re-entering correct credentials indicate a base credential issue. See the Troubleshooting section for additional guidance.
Note: A valid, passing connection test is required before the wizard allows you to proceed to Step 2
Set the Scope & ScheduleSet the Scope & Schedule
Define what data the connector imports and when it runs.
- Data to Sync – Select the data types to import: Assets (Host Asset Records), Vulnerability Findings (CVEs), and/or Misconfiguration Findings.
- Filters – Optionally restrict the scope of imported data using JSON filter expressions. Filters are applied against the Prisma Cloud API at query time. Example expressions:
{"cloud.region":["AWS Oregon"]}{"resource.type":["EC2 Instance"]}
- Schedule – Configure when the connector runs. Options include a single-occurrence execution (specify exact date and time) or a recurring schedule (specify start date, end date, and recurrence interval).
Sampling Mode - Limit Sync to Top 1,000 Assets and Findings
Sampling Mode can restrict data ingestion to a targeted subset of up to 1,000 assets and their associated findings. You can quickly validate integration and review meaningful security data without a full environment sync.
You can select the Limit sync to top 1,000 assets and findings checkbox to limit the fetch 1000 assets using risk-based filter criteria. The assets, along with their associated findings, are discovered and shared with ETM. The connector applies risk-based filters during asset fetch to ensure the ingested subset represents the most relevant assets in your environment rather than a random or arbitrary sample. Assets are filtered by cloud service type. All findings associated with the fetched assets are ingested.
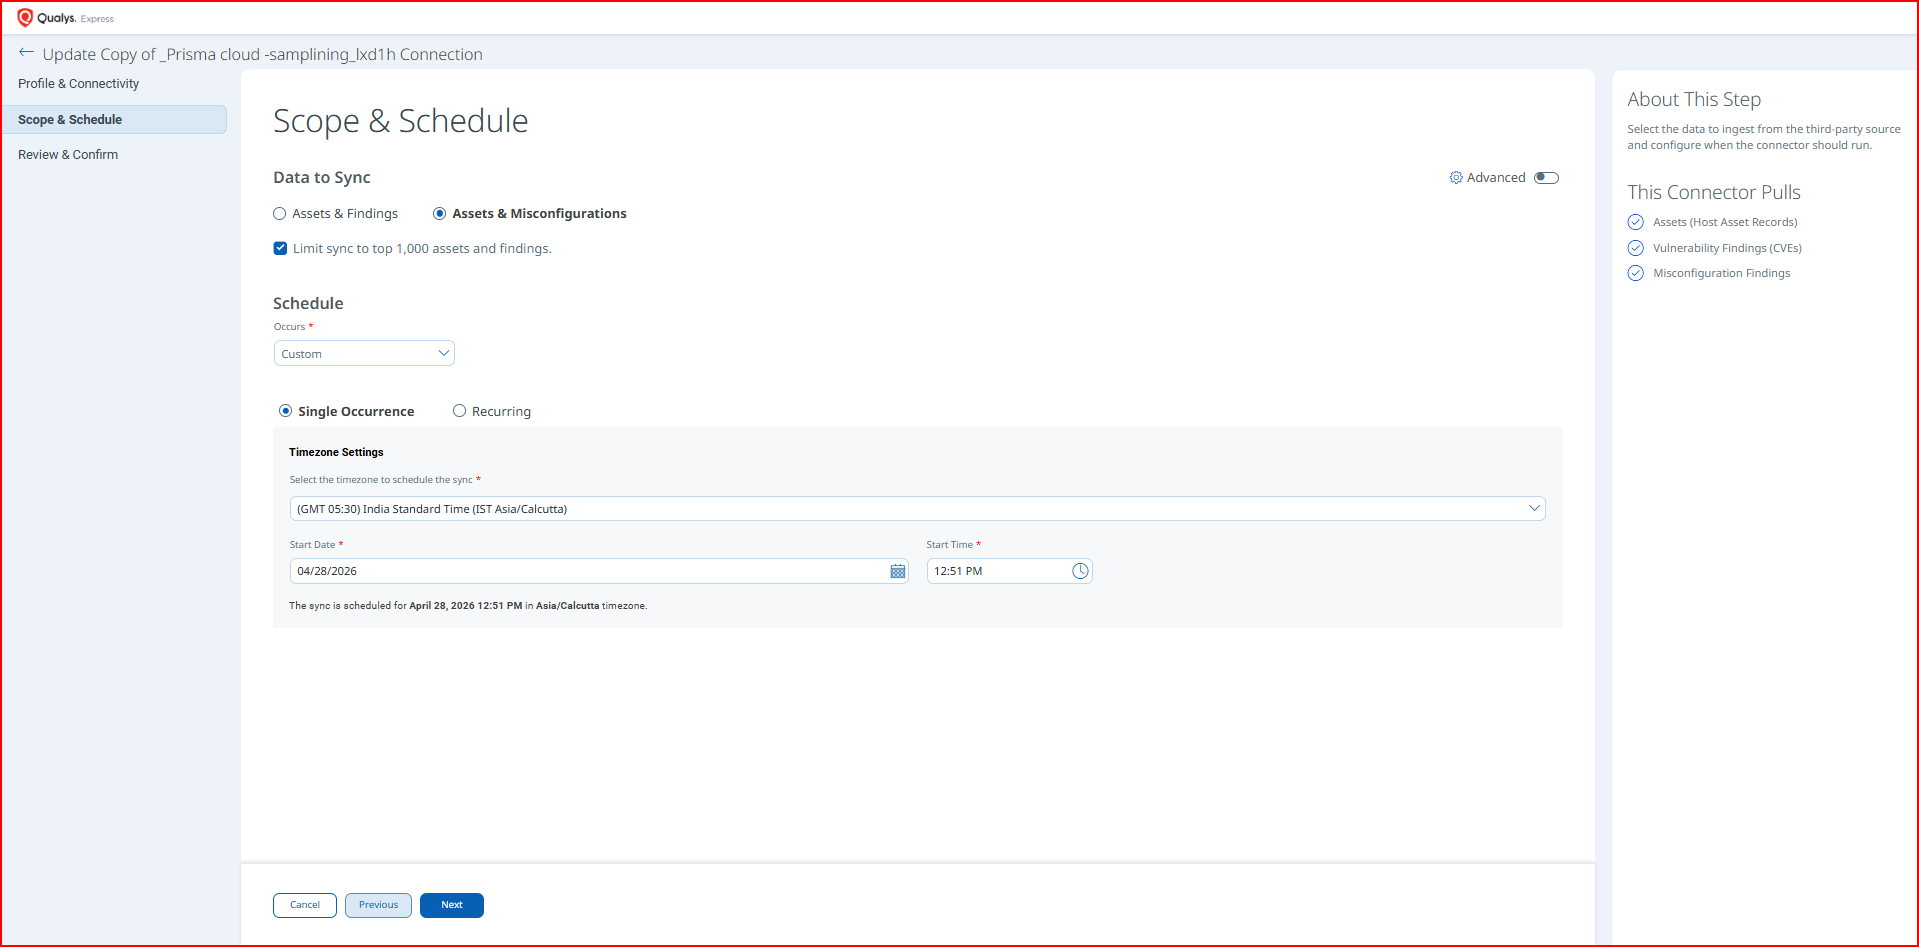
Note: Delta synchronization is not supported. Each scheduled run performs a complete full pull from Prisma Cloud.
Review all configuration settings entered in the previous steps. Verify connector name, authentication type, Base URL, selected data types, filter expressions, and schedule before confirming. Click Save (or Confirm) to finalize the connector configuration and register it in Qualys ETM.
Note: After saving, any changes to Advanced Settings (Filters, Transform Map) require returning to the connector's edit view and saving again before they take effect.
Advanced Settings
Advanced Settings allow you to refine connector behavior after initial creation. Access these settings by editing the connector from the Connections list.
Filters Tab
The Filters tab accepts JSON-format filter expressions that are passed directly to the Prisma Cloud API to restrict which assets and findings are retrieved. Filters are evaluated server-side by Prisma Cloud before data is returned to the connector.
Supported filter fields include cloud.region, resource.type, and other queryable Prisma Cloud asset attributes. Provide filter expressions as valid JSON objects. Example expressions:
{"cloud.region":["AWS Oregon"]}– restrict to assets in a specific AWS region{"resource.type":["EC2 Instance"]}– restrict to a specific resource type
Note: If filters are configured and no findings appear after the first run, confirm that the filter values match data available in your Prisma Cloud environment.
Transform Map Tab
The Transform Map tab displays the active transformation maps applied when data is ingested. The Prisma Cloud (CWPP) Connector ships with out-of-box transform maps for vulnerability and misconfiguration data. You can view the active map to understand field-level transformations or clone it to create a customized version.
Active maps:
- Prisma Cloud Vulnerability Transformation Map
- Prisma Cloud Misconfiguration Transformation Map
How the Connection Works
The Prisma Cloud (CWPP) Connector automates the ingestion of cloud workload security data from Palo Alto Networks Prisma Cloud into Qualys Enterprise TruRisk Management (ETM). Each connector run retrieves host asset records and associated vulnerability findings including CVE data, severity, and detection details. Misconfiguration findings are also imported, including policy details, remediation strategies, and impact assessments.
Security teams gain unified visibility into vulnerabilities, misconfigurations, and asset criticality across multiple cloud providers—AWS, Alibaba, Azure, GCP, and OCI—enabling faster risk prioritization and informed remediation decisions.
Connector States
After creation, a connector transitions through the following states:
- Registered – Connector created and registered to fetch data from Prisma Cloud.
- Scheduled – Connector is queued for execution according to its configured schedule.
- Processing – Connector is actively fetching data from Prisma Cloud APIs.
- Processed – Data has been successfully imported into ETM. Note that findings may still be processing within ETM after this state is reached.
Note: The first connector run may take up to 2 hours to complete. If no findings appear immediately after the connector reaches the Processed state, allow additional time for ETM to finish ingesting and indexing the data.
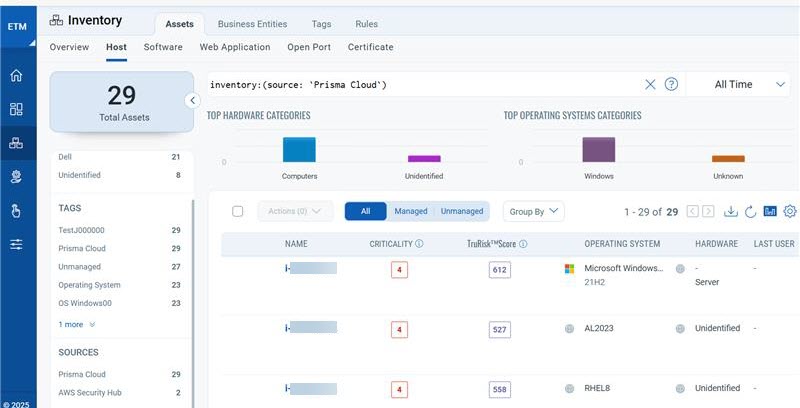
Viewing Assets and Findings in ETM
Once the connector has reached the Processed state, navigate to Enterprise TruRisk Management (ETM) to analyze the imported Prisma Cloud data.
To view imported assets:
- Go to the Inventory tab in ETM.
- Navigate to Assets > Host Assets.
- Use the following filter token to display all assets imported from Prisma Cloud:
inventory:(source:"Palo Alto Networks")
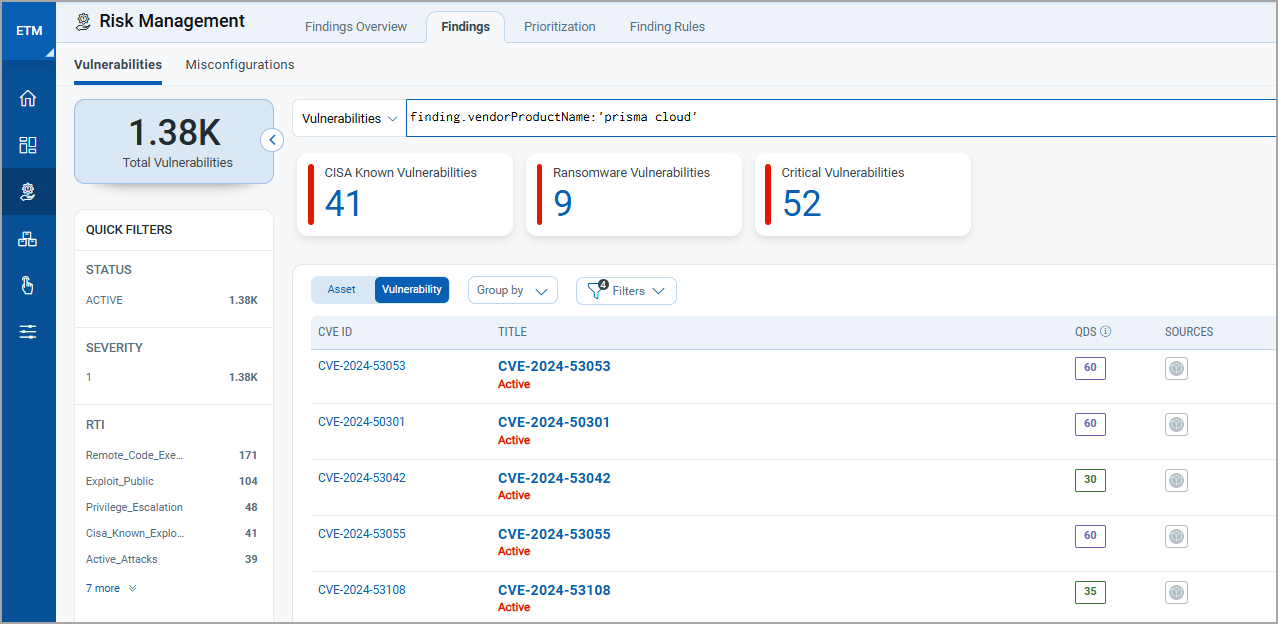
To view vulnerability findings:
- Go to Risk Management > Findings > Vulnerability.
- Use the following filter token to display Prisma Cloud vulnerability findings:
findings.vendorProductname:"Prisma Cloud"
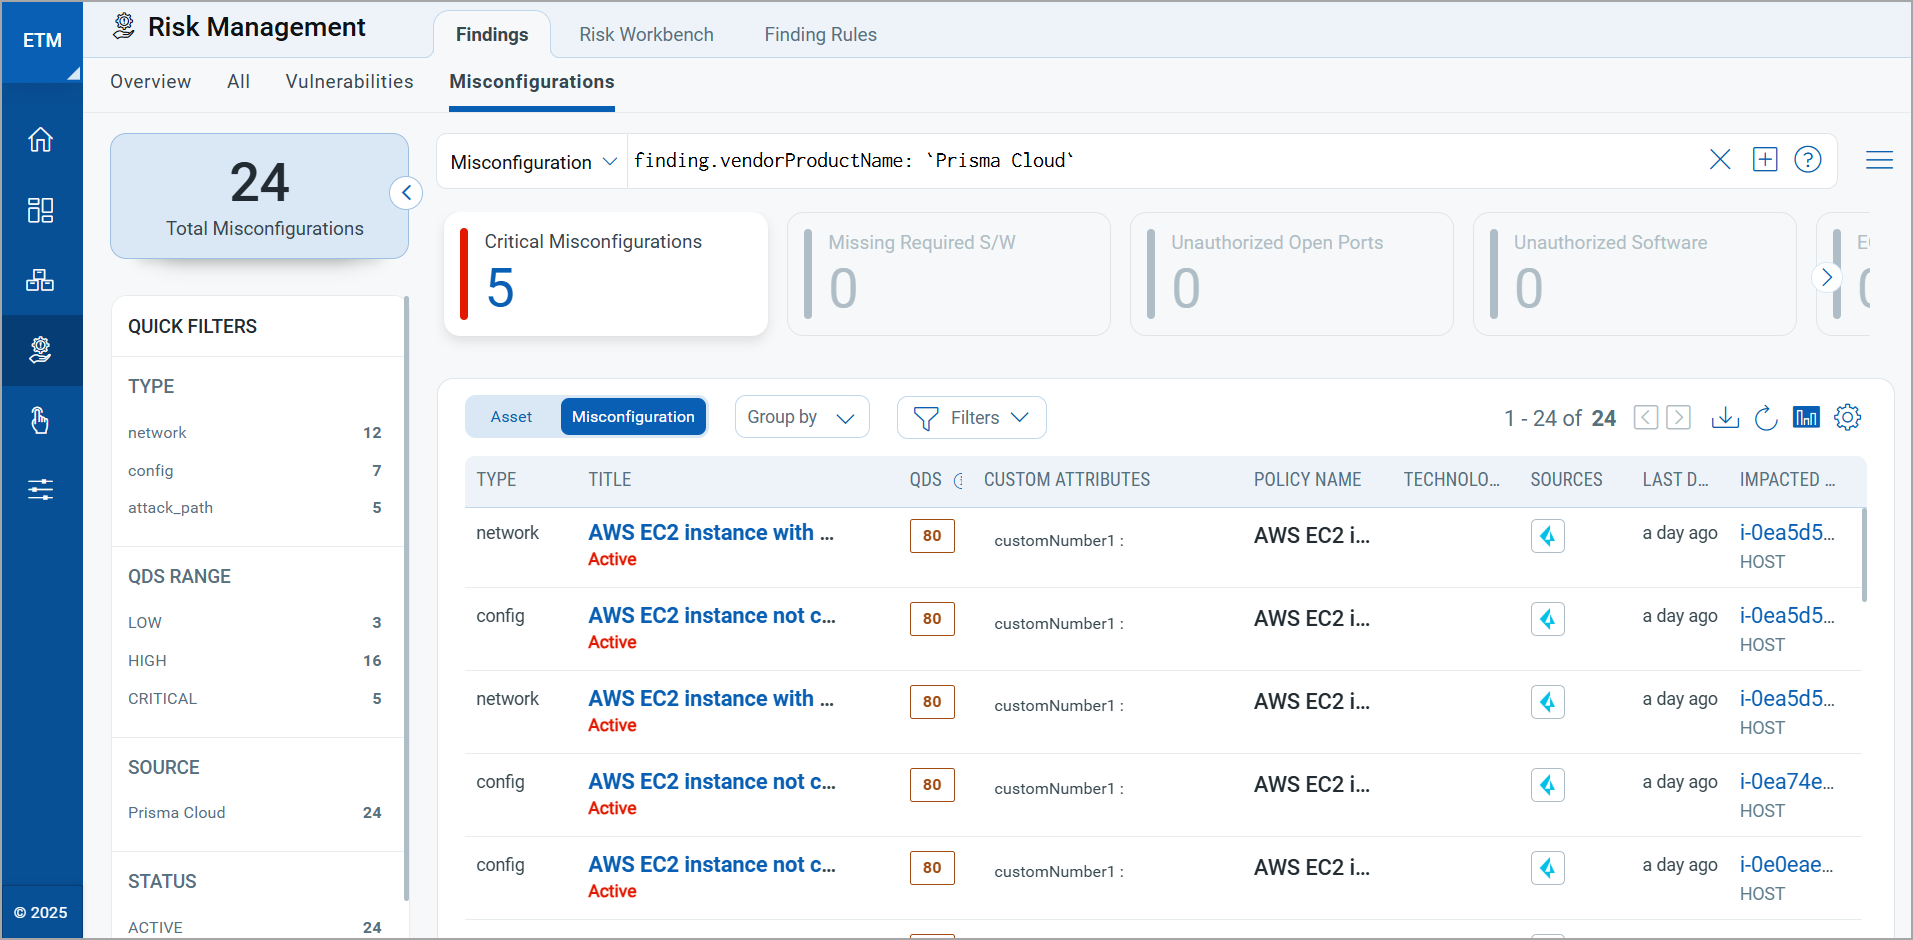
To view misconfiguration findings:
- Go to Risk Management > Findings > Misconfigurations.
- Use the following filter token to display Prisma Cloud misconfiguration findings:
findings.vendorProductname:"Prisma Cloud"
To learn more about ETM, refer to the Qualys ETM Documentation.
Troubleshooting
Use the table below to diagnose and resolve common issues encountered when configuring or running the Prisma Cloud (CWPP) Connector.
| Issue | Resolution |
|---|---|
| Authentication failure on connector run | Verify the Base URL, Key ID (Username), and Key Secret (Password) entered in Qualys ETM are correct. Confirm the API key has not expired in Prisma Cloud—the auth token is valid for 30 minutes and auto-refreshes during runs, but persistent failures indicate incorrect base credentials. Regenerate the key under Settings > Access Control > Access Keys if needed and update the connector via Edit Connector. |
| No findings imported after first run | The process may take up to 2 hours to complete. Verify the connector has reached the Processed state in the Connections list. If filters are configured, confirm the filter values (region, resource type, etc.) match data available in your Prisma Cloud environment. |
| Connector not available in the integrations list | Contact your TAM or Qualys Support to activate the connector and enable the connector. |
Additional Information
API Reference
The following table lists the Prisma Cloud API endpoints queried by the connector during each run.
| Name | Endpoint | Details |
|---|---|---|
| Auth API | https://api.prismacloud.io/login |
Returns an auth token. Valid for 30 minutes; auto-refreshed during scheduled pulls. |
| Fetch Asset List | https://api.prismacloud.io/v2/resource/scan_info |
Retrieves the list of cloud assets. Default batch size: 100. Rate limit: 5 requests per second. |
| Fetch Asset Details / Vulnerabilities | https://api.prismacloud.io/uai/v1/asset |
Retrieves vulnerability data for cloud assets. Default batch size: 100. Rate limit: 5 requests per second. |
| Fetch Asset Details / Misconfigurations | https://api.prismacloud.io/policy/ |
Retrieves misconfiguration data for cloud assets. Default batch size: 100. Rate limit: 5 requests per second. |
Transformation Maps
This section describes the field-level attribute mappings used when transforming data from Prisma Cloud into the Qualys ETM schema. Two out-of-box transformation maps are provided.
Prisma Cloud Vulnerability Transformation MapPrisma Cloud Vulnerability Transformation Map
Maps vulnerability and host asset fields from the Prisma Cloud asset and vulnerability endpoints to Qualys ETM target attributes.
| Source Attribute Key | Target Attribute Label |
|---|---|
asset.externalAssetId |
externalAssetId (Required) |
vulnerabilities[].normalizedName |
findingName (Required) |
vulnerabilities[].id |
externalFindingId (Required) |
vulnerabilities[].severity
Informational | Low | Medium | High |
findingSeverity
1 | 2 | 3 | 4 |
asset.attributes.osDistro |
operatingSystemVersion |
asset.attributes.osRelease |
operatingSystemName |
asset.attributes.resourceName |
assetName |
asset.data.networkInterfaces[].association.publicIp |
ipAddress |
asset.data.networkInterfaces[].macAddress |
macAddress |
asset.data.instanceId |
cloudInstanceId |
asset.assetType |
System Type |
vulnerabilities[].createdOn |
findingFirstFoundOn |
vulnerabilities[].cveId |
cveId |
vulnerabilities[].description |
findingDescription |
vulnerabilities[].sourceData.link |
sourceFindingURL |
vulnerabilities[].sourceData.cvss |
cvss3Base |
vulnerabilities[].sourceData.vecStr |
vector |
vulnerabilities[].status
pending | no_error | error | enabled | disabled | open | dismissed | resolved | descoped | risk_scoring_error | active | closed | suppressed |
findingStatus
ACTIVE | NONE | ACTIVE | ACTIVE | NONE | ACTIVE | NONE | FIXED | NONE | NONE | ACTIVE | FIXED | NONE |
vulnerabilities[].updatedOn |
findingLastFoundOn |
asset_cloudType
aws | alibaba | azure | gcp | oci | other | EC2 |
cloudProvider
EC2 | ALIBABA | AZURE | GCP | OCI | SOURCE_TYPE_UNKNOWN | EC2 |
Prisma Cloud Misconfiguration Transformation MapPrisma Cloud Misconfiguration Transformation Map
Maps misconfiguration and host asset fields from the Prisma Cloud policy endpoint to Qualys ETM target attributes.
| Source Attribute Label | Target Attribute Label |
|---|---|
asset.externalAssetId |
externalAssetId (Required) |
asset.attributes.osDistro |
operatingSystemVersion |
asset.attributes.osRelease |
operatingSystemName |
name |
assetName |
asset.networkInterfaces[].association.publicIp |
ipAddress |
asset.networkInterfaces[].macAddress |
macAddress |
asset.instanceId |
cloudInstanceId |
asset.assetType |
System Type |
scannedPoliciesInfo[].name |
findingName (Required) |
scannedPoliciesInfo[].policyType |
policyType |
scannedPoliciesInfo[].description |
policyDescription |
scannedPoliciesInfo[].severity
Informational | low | medium | high |
findingSeverity
1 | 2 | 3 | 4 |
scannedPoliciesInfo[].rule.name |
ruleName |
scannedPoliciesInfo[].recommendation |
remediationStrategy |
scannedPolicies[].name |
policyTitle |
cloudType
aws | alibaba | azure | gcp | oci | other | EC2 |
cloudProvider
EC2 | ALIBABA | AZURE | GCP | OCI | SOURCE_TYPE_UNKNOWN | EC2 |
scannedPoliciesInfo[].remediation.impact |
impact |
scannedPoliciesInfo[].policyType |
findingSubType |
scannedPoliciesInfo[].status
pending | no_error | error | enabled | disabled | open | dismissed | resolved | descoped | risk_scoring_error | active | closed | suppressed |
findingStatus
ACTIVE | NONE | ACTIVE | ACTIVE | NONE | ACTIVE | NONE | FIXED | NONE | NONE | ACTIVE | FIXED | NONE |
vulnerabilities[].updatedOn |
findingLastFoundOn |