Qualys Dataflow for TotalAppSec (TAS) Connector
The Qualys Dataflow for TotalAppSec (TAS) connector aggregates application asset data and associated vulnerability findings from your existing Qualys TotalAppSec subscription and imports them into Qualys Enterprise TruRisk™ Platform (ETM) for unified risk analysis and prioritization. TotalAppSec is an application security platform that provides visibility into web applications and APIs along with vulnerability and risk findings across the application layer. ETM correlates this data with other asset types to deliver unified exposure and risk insights across the attack surface. The connector supports delta (incremental) synchronization for ongoing scheduled runs.
Connector Details
Overview of the TAS connector capabilities and integration characteristics.
| Vendor | Qualys |
| Product Name | TotalAppSec (TAS) |
| Category | Application Security |
| Works With | Qualys Enterprise TruRisk™ Platform (ETM) |
| Connector Type | QoQ TAS |
| Supported Assets | Applications, API Collections |
| Findings Support | Yes – Vulnerability findings |
| Version | 1.0.0 |
| Supported Version & Type | QoQ TAS |
| Integration Type | API Integration (REST) |
| Authentication Type | OAuth 2.0 (Client ID and Client Secret) |
| Direction | Unidirectional (Qualys TAS → Qualys ETM) |
| Incremental Sync (Delta) | Supported |
| Import of Installed Software | Not Applicable |
| Import of Source Tags | Not Applicable |
| Filters / Filter Query | Asset Types (chip selector): API Collection, Application. Findings type: Vulnerability. |
What This Connector Does
The Qualys Dataflow for TotalAppSec connector retrieves Application and API Collection asset records from TotalAppSec, along with their associated vulnerability findings, and imports them into Qualys ETM. Asset records include application URLs, identifiers, and metadata. Vulnerability findings include details such as CVE identifiers, CVSS scores, severity ratings, and finding descriptions. ETM then correlates this application-layer risk data with other asset types to surface unified exposure insights across the attack surface.
How Authentication Works
The connector authenticates using OAuth 2.0 with a user-level Client ID and Client Secret generated from the Qualys platform. These credentials are provided alongside the Gateway URL during connector configuration in Qualys ETM. TotalAppSec supports only user-level client credentials; subscription-level credentials are not supported.
Before You Begin
Before configuring the connector in Qualys ETM, ensure the following prerequisites are in place.
- Ensure you have an active Qualys TotalAppSec (TAS) subscription.
- Generate a user-level Client ID and Client Secret from your Qualys profile. Navigate to your profile page, locate the Auth ID Client Management section, and create a new user-level client. Copy the Client Secret immediately — it is displayed only once.
- Note that TotalAppSec supports only user-level client credentials. Subscription-level credentials are not supported.
- Have your Qualys Gateway URL ready. This can be found at the Qualys Platform Identification page (for example,
https://gateway.qg1.apps.qualys.com).
Generating Client ID and Client Secret
Log in to the Qualys platform with your user credentials. Click your avatar and select View Profile to navigate to your profile page. Locate the Auth ID Client Management section. Click to create a new user-level client. The system will generate a Client ID and Client Secret.
Important: Copy the Client Secret immediately — it is displayed only once at the time of creation and cannot be retrieved later. If you lose the Client Secret, you must generate a new one.
Note: TotalAppSec supports only user-level client credentials. Each user generates their own Client ID and Client Secret from their profile page. Subscription-level credentials are not supported and will result in authentication failures.
Permissions Required
The Qualys user account must have an active TotalAppSec subscription and API access enabled. The Client ID must be created at the user level (not subscription level), as TotalAppSec currently supports only user-level client credentials.
Scope and Data Access
The connector queries TotalAppSec endpoints to retrieve Application and API Collection assets along with their associated vulnerability findings. Delta synchronization is supported for ongoing runs after the initial full pull. The data flow is unidirectional, from TotalAppSec to Qualys ETM. The following API endpoints are queried during each connector run:
| Get Applications + Findings | /tas/rest/webapp/4.0/search |
| Get API Collections + Findings | /tas/rest/api/1.0/search |
Key Rotation
When rotating credentials, generate a new Client ID and Client Secret from the Auth ID Client Management section on your Qualys profile page. Update the credential in Qualys ETM via the Edit Connector option and enter the new values. The old client can be removed after the new one is confirmed to be working.
Configure the Connector
The connector setup wizard consists of three steps: Profile & Connectivity, Scope & Schedule, and Review & Confirm. A successful Test Connection is required before you can proceed from Step 1.
Step 1: Profile & Connectivity
Configure the connector's identity and authenticate with the TotalAppSec source system.
Connector Details
| Name | Enter a unique display name for this connector instance (for example, QoQ TAS26050505450454). |
| Description | Optional. Enter a description to identify the purpose of this connection (maximum 164 characters). |
| Supported Format | QoQ TAS (automatically populated; not editable). |
Authentication Details
Provide the authentication details for the connection under the Authentication Details section.
| Field | Type | Description |
|---|---|---|
| Is IP Restricted | Checkbox | Optional. Enable this checkbox to disable certificate validation for the Qualys API by replacing the gateway FQDN with its public IP address. Use when your environment enforces IP-based access restrictions. |
| Base URL | Dropdown (String) | Select your Qualys Gateway URL from the dropdown. This is your platform-region-specific gateway URL (for example, https://gateway.qg1.apps.qualys.com). Find your URL on the Qualys Platform Identification page. |
| Client Id | String | Enter the user-level OAuth Client ID generated from the Auth ID Client Management section of your Qualys profile (for example, 7339480b-22e0-46e9-87f0-dcceed894f0d). |
| Client Secret | Encrypted String | Enter the OAuth Client Secret generated at the same time as the Client ID. This field is masked on entry. |
Important: The Client Secret is shown only once at the time of generation in Qualys TotalAppSec. If you did not copy it when it was created, you must generate a new Client ID and Client Secret pair before continuing.
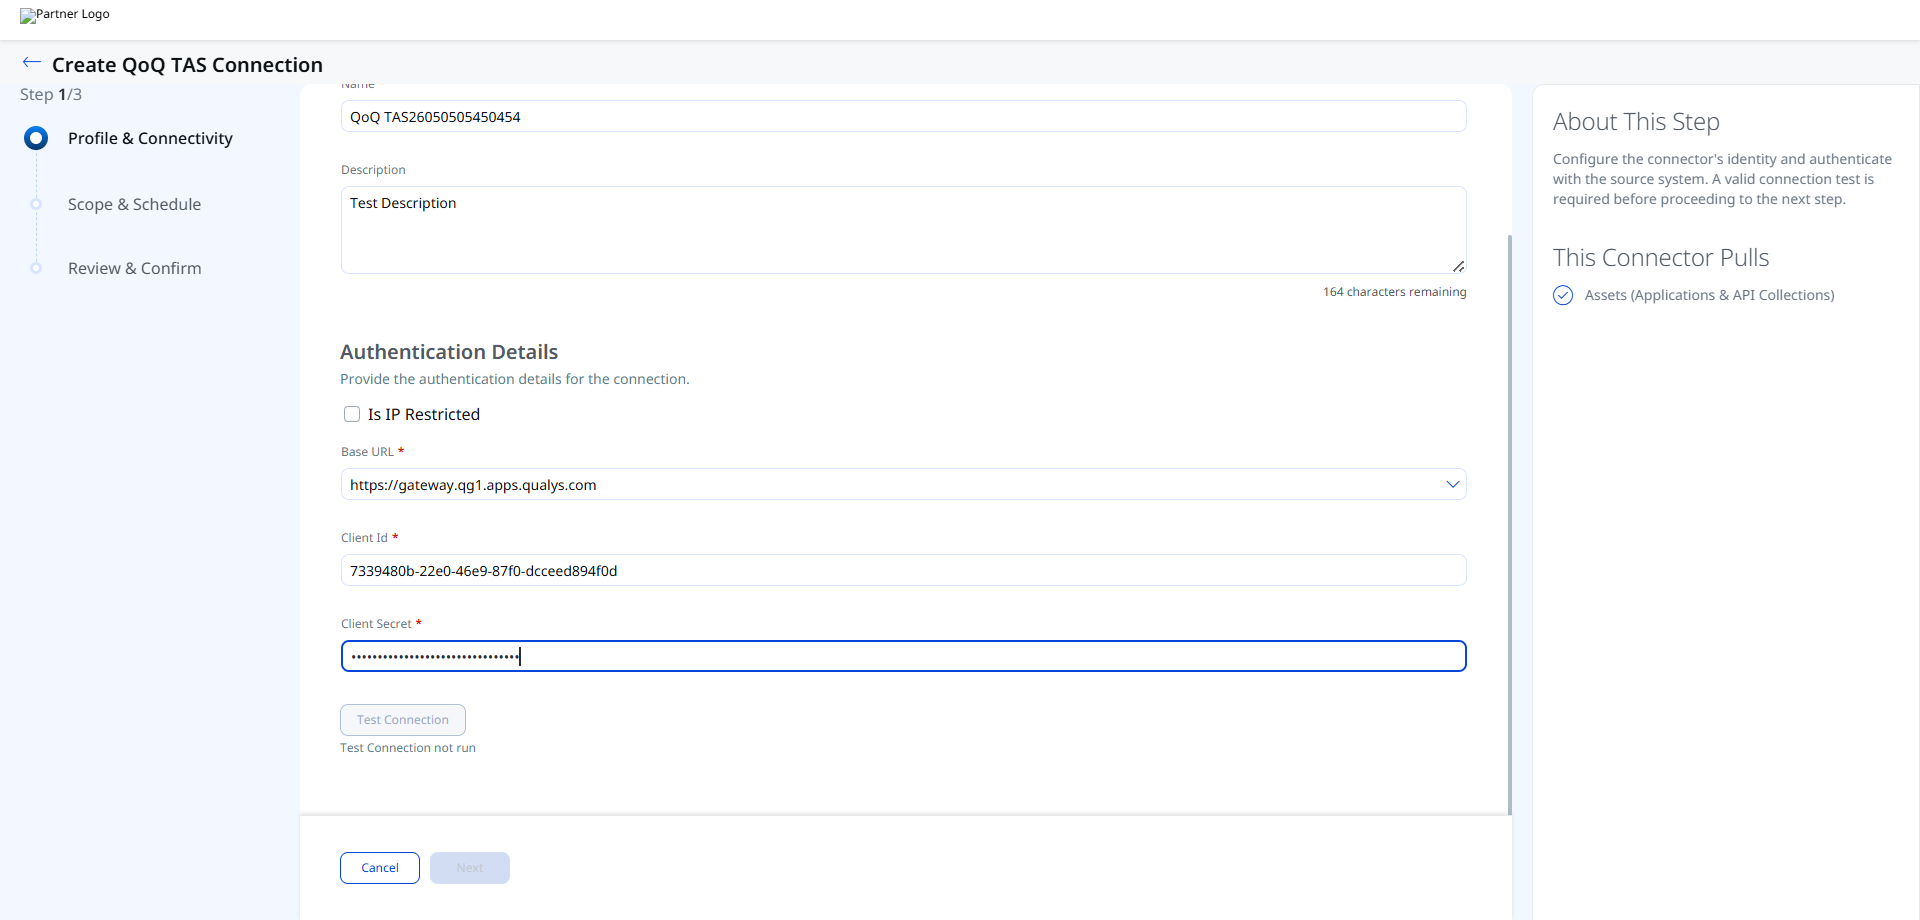
After entering all authentication fields, click Test Connection to validate connectivity before proceeding. The following checks are performed:
- Network Reachability
- TLS Handshake
- Authentication Credential Check
- Authorization Scope Check
- Data Fetch
Important: If the Test Connection returns Error: Some unexpected error occurred, verify that the Gateway URL matches your Qualys platform region, the Client ID was created at the user level (not subscription level), and the Client Secret has not been regenerated since it was entered. If your environment uses IP restrictions, ensure the Is IP Restricted checkbox is enabled. See Troubleshooting for additional guidance.

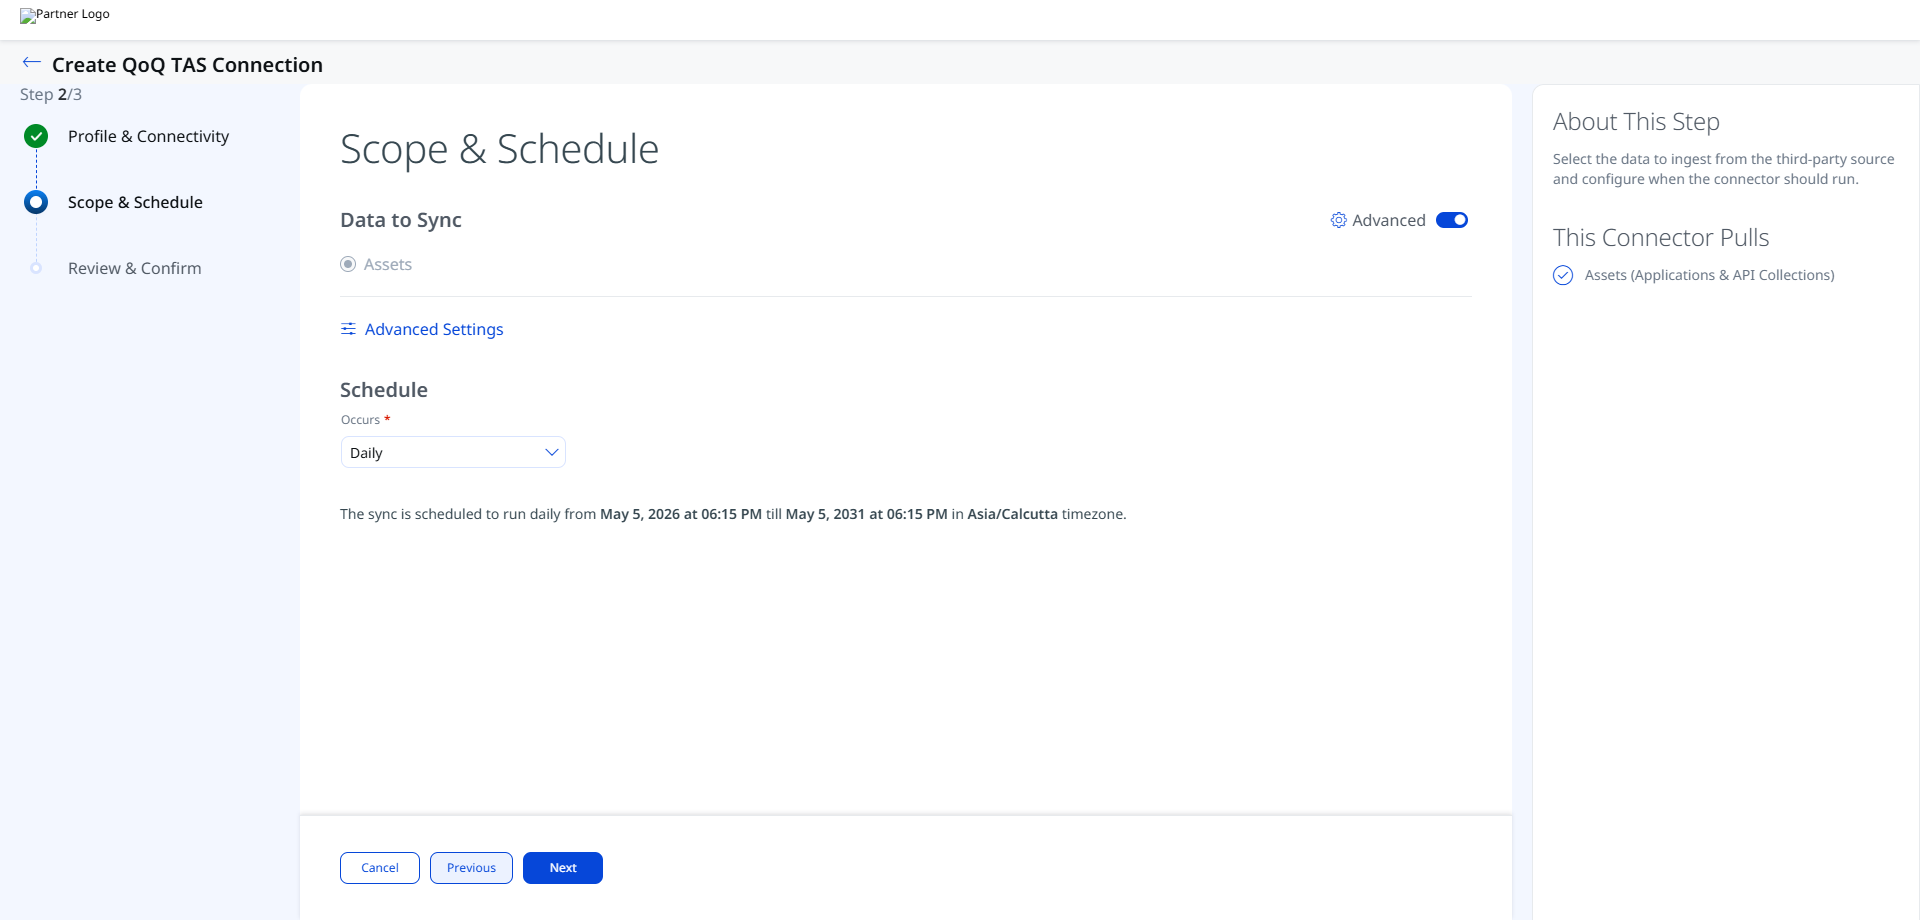
Step 2: Scope & Schedule
Select the data to ingest from TotalAppSec and configure when the connector should run.
Data to Sync: The connector syncs Assets. This option is pre-selected and includes both Application and API Collection asset types.
Schedule – Occurs: Select the sync frequency from the dropdown. The available option shown in the setup is Daily. The schedule runs from the configured start date and time for a duration of five years (for example, from May 5, 2026 at 06:15 PM through May 5, 2031 at 06:15 PM).
Note: The schedule timezone is derived from your browser locale at the time of configuration (for example, Asia/Calcutta). The five-year end date is set automatically. You can review the exact start date, end date, start time, end time, and frequency on the Review & Confirm screen before creating the connector.
Click Advanced Settings to open the filters and transform map panel. See Advanced Settings for details. Click Next to proceed to Step 3.
Step 3: Review & Confirm
Review all configuration settings before saving. The Review & Confirm screen is organized into two groups.
Profile & Connectivity displays the Connector Profile group (Name, Description, Supported Format) and the Authentication group (Authentication Type, Base URL, Client Id, Client Secret). The Authentication Type is shown as Basic Auth and the Supported Format as QoQ TAS. The Client Secret is masked with asterisks.
Scope & Schedule displays the Timezone, Start Date, Start Time, End Date, End Time, and Frequency configured in Step 2.
Click Previous to return to any earlier step, or click Create to save the connector. After creation, the connector appears in the Connections list with an initial state of Registered.
Advanced Settings
The Advanced Settings panel (accessible from Step 2: Scope & Schedule via the Advanced Settings link) contains two tabs: Filters and Transform Map. Changes are applied per-session and must be saved before closing the panel.
Note: Click Save in the Advanced Settings panel before proceeding to the next step. Unsaved changes in the panel are discarded if you navigate away.
Filters Tab
The Filters tab uses a chip selector to specify which asset types and finding types the connector imports.
Asset Types (required): Select one or more asset types to import. Both chips are selected by default:
- API Collection – imports API Collection assets from TotalAppSec.
- Application – imports web Application assets from TotalAppSec.
Remove a chip by clicking its × button. At least one asset type must remain selected.
Findings (required): The findings type is fixed at Vulnerability. This field is a dropdown and is pre-populated; no change is required.
You can also filter based on the required TruRisk Score or a specific date when the asset was modified.
Transform Map Tab
The Transform Map tab displays the active transformation maps used during connector execution. Default maps are provided and applied automatically. You can clone or customize them if needed from the ETM administration interface.
Two active transformation maps are defined for this connector:
- Application Mapping
- API Collection Mapping
Refer to Transformation Maps in the Additional Information section for the complete field mapping tables.
How the Connection Works
The connector runs on a configured schedule or on-demand to fetch TAS Application and API Collection data. On each scheduled run, the connector queries the TotalAppSec REST API, retrieves asset records and associated vulnerability findings, transforms the data using the active transformation maps, and imports it into ETM.
Connector States
After creation, the connector transitions through the following states:
- Registered – The connector has been created and saved. It is awaiting its first scheduled execution.
- Scheduled – The connector's next execution has been queued according to the configured schedule.
- Processing – The connector is actively fetching and ingesting data from TotalAppSec into ETM.
- Processed – Assets have been successfully fetched and the connector run has completed.
Note: The first connector run may take up to 2 hours to complete, depending on the volume of assets and findings in your TotalAppSec environment. Subsequent delta sync runs are typically faster. When the connector reaches the Processed state, it indicates that assets have been fetched; however, vulnerability findings import may still be in progress. Monitor the connector state in Qualys ETM until the run fully completes.
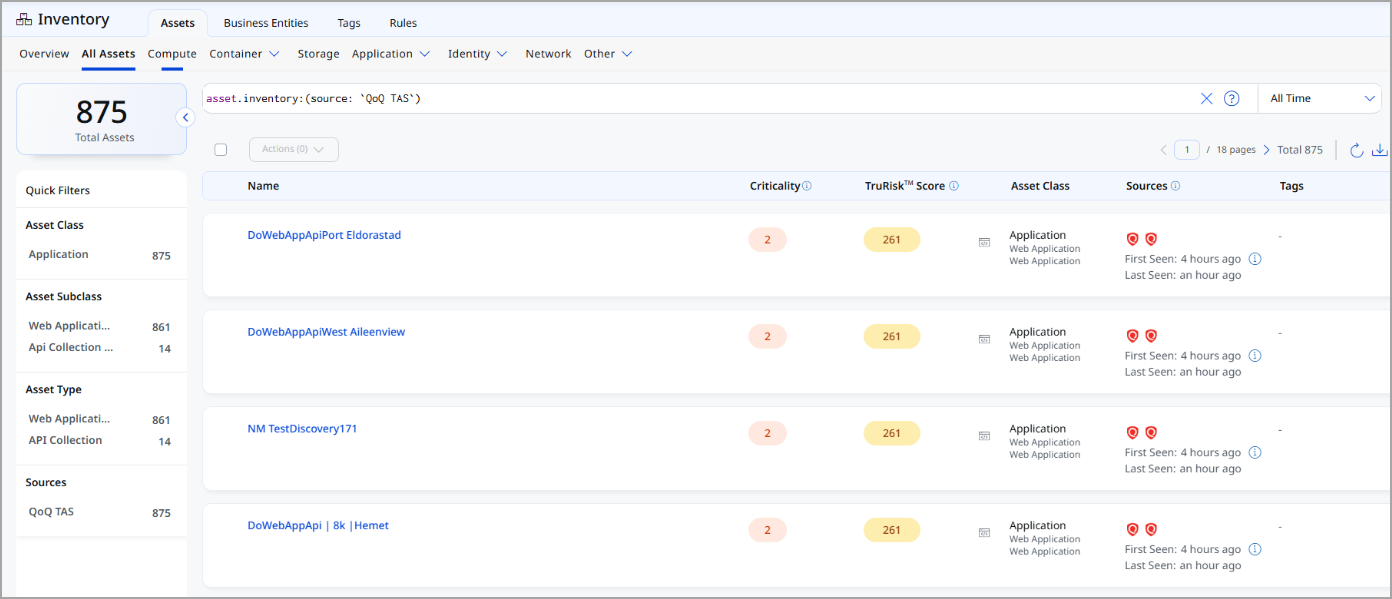
Viewing Assets and Findings in ETM
After a successful connector run, you can view the imported data in Qualys ETM.
Assets: Navigate to Inventory > Assets and apply the filter inventory:(source:"TotalAppSec") to view Application and API Collection assets imported by the connector.
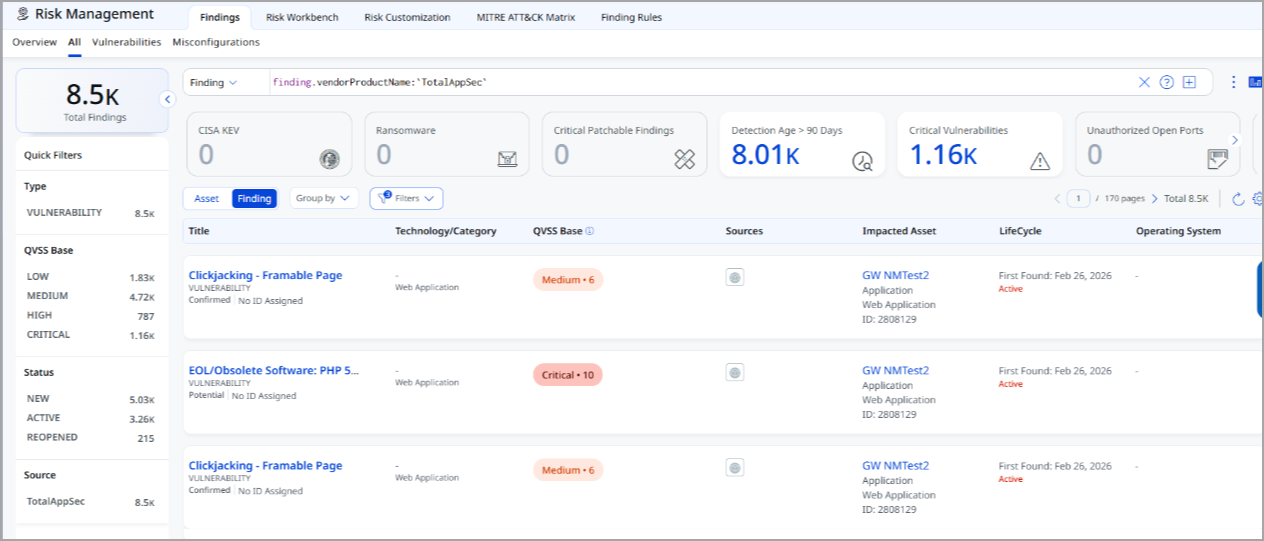
Findings: Navigate to Risk Management > Findings and apply the filter findings.vendorProductname:"TotalAppSec" to view vulnerability findings associated with TAS assets.
Troubleshooting
| Authentication failure on connector run | Verify that the Gateway URL, Client ID, and Client Secret entered in Qualys ETM are correct. Confirm that the Client ID was created at the user level (not subscription level). Check that the Client Secret has not been regenerated since it was entered in the connector configuration. If it has been regenerated, update the connector with the new Client Secret. |
| No assets or findings imported | Verify that the TotalAppSec subscription is active and contains Application or API Collection data. Confirm that the selected asset types (APPLICATION, APICOLLECTION) match the data available in your TAS environment. |
| Connection test fails | Verify that the Gateway URL matches your Qualys platform region. Confirm that Qualys ETM can reach the Gateway URL over HTTPS. If your environment uses IP restrictions, ensure the Is IP Restricted checkbox is enabled in the connector configuration. |
| Findings import takes longer than expected | The Processed state indicates that assets have been fetched, but findings import may still be in progress. Vulnerability data processing can take additional time depending on the volume of findings in your TotalAppSec environment. Monitor the connector state in Qualys ETM until it fully completes. |
Additional Information
API Reference
The following TotalAppSec REST API endpoints are queried by the connector during each run. All endpoints are relative to your configured Base URL (for example, https://gateway.qg1.apps.qualys.com).
| Operation | Endpoint |
|---|---|
| Get Applications + Findings | /tas/rest/webapp/4.0/search |
| Get API Collections + Findings | /tas/rest/api/1.0/search |
Transformation Maps
The connector uses two default transformation maps. These maps define how source fields from TotalAppSec are translated to target fields in Qualys ETM. You can clone or customize them from the ETM administration interface if needed.
Application MappingApplication Mapping
| Source Field (TotalAppSec) | Target Field (ETM) |
|---|---|
id |
asset.assetHeader.externalAssetId (Required) |
url |
asset.assetDetail.applicationAssetClass.baseUrl |
name |
asset.assetDetail.name (Required) |
createdDate |
asset.assetDetail.sourceCreatedAt |
updatedDate |
asset.assetDetail.sourceUpdatedAt |
findings[].id |
findingGroup.findings[].externalFindingId (Required) |
findings[].title |
findingGroup.findings[].name |
findings[].severity |
findingGroup.findings[].severity |
API Collection MappingAPI Collection Mapping
| Source Field (TotalAppSec) | Target Field (ETM) |
|---|---|
id |
asset.assetHeader.externalAssetId (Required) |
openApiFile.url |
asset.assetDetail.apiCollectionAssetClass.specificationUrl |
name |
asset.assetDetail.name (Required) |
createdDate |
asset.assetDetail.sourceCreatedAt |
updatedDate |
asset.assetDetail.sourceUpdatedAt |
findings[].id |
findingGroup.findings[].externalFindingId (Required) |
findings[].severity |
findingGroup.findings[].severity |