Symantec Endpoint Protection Connector
The Symantec Connector bridges Symantec Endpoint Protection and Qualys ETM to centralize endpoint security visibility by automatically transferring asset inventory and security findings through scheduled API calls. It solves the fragmentation problem by consolidating endpoint data from Symantec into a unified risk management platform that deduplicates, normalizes, and enriches it with risk-scoring capabilities.
Security teams gain consolidated visibility across their endpoint infrastructure and can correlate endpoint assets with other enterprise data sources for more informed risk decisions. The connector operates on a schedule to continuously synchronize endpoint metadata like hostname, operating system, and agent status without requiring manual data transfers.
Connector Details
The following table summarizes what the Symantec Endpoint Protection Connector supports.
| Vendor | Broadcom Symantec |
| Product Name | Symantec |
| Category | Endpoint Security |
| Findings Support | No |
| Supported Assets | Host Assets (Compute) |
| Version | 1.0.0 |
| Integration Type | API Integration (REST) |
| Direction | Unidirectional |
| Delta Support | Not Supported |
| Supported Version & Type | SaaS (Latest) |
| Import of Installed Software | Not Supported |
| Import of Source Tags | Not Supported |
| Filters/Filter Query | Not Supported |
Note: The connector performs a full data pull during each run because the Broadcom API does not support incremental (delta) data retrieval.
Configure the Connector
The connector setup wizard walks you through three steps. Complete each step in order, then click Create to create the connector.
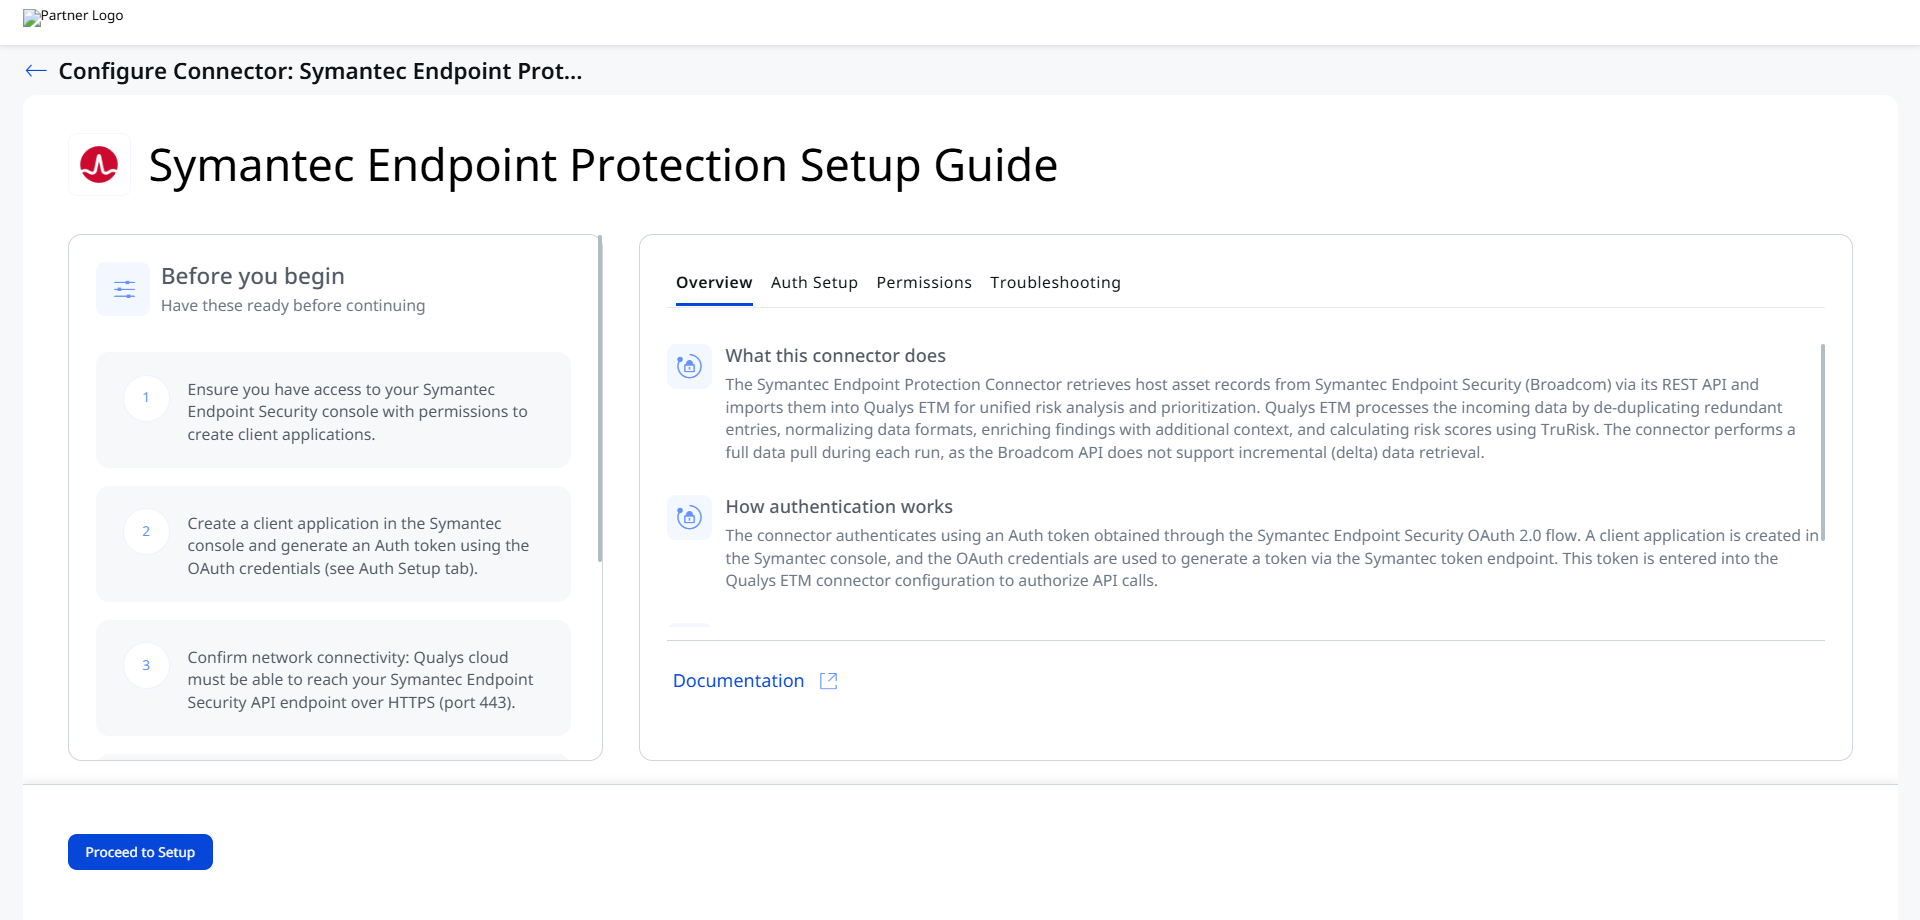
Before You Begin - AuthenticationBefore You Begin - Authentication
Complete the following prerequisite steps before configuring the connector in Qualys ETM. You will need access to your Symantec Endpoint Security console with permissions to create client applications.
- Ensure you have access to your Symantec Endpoint Security console with permissions to create client applications.
- Create a client application in the Symantec console and generate an Auth token using the OAuth credentials (see the steps below).
- Confirm network connectivity: Qualys cloud must be able to reach your Symantec Endpoint Security API endpoint over HTTPS (port 443).
Creating a Client Application and Generating the Auth Token
Follow these steps to create a client application in Symantec Endpoint Security and obtain the Auth token required by the connector.
- Log in to your Symantec Endpoint Security console.
- In the left navigation menu, navigate to Integration > Client Application.
- Click Add to create a new client application and provide a name for the application.
- Configure the application privileges to include the following, then click Save:
- For Group Management, select View, Create, and Edit.
- For Remotely Run Commands, select Run Commands.
- In the Client Application list, locate your application. Click the kebab icon (three-dot menu) next to your application and select Client Secret.
- Copy the OAuth credentials value displayed on the screen.
Important: This value is shown only once. Copy and store it securely before leaving this screen.
- Use the OAuth credentials to generate an Auth token by executing a POST request to the Symantec token endpoint. The request should include the credentials in the Authorization header:
curl -X POST https://api.sep.eu.securitycloud.symantec.com/v1/oauth2/tokens -H "accept: application/json" -H "authorization: {{OAuth Credentials value}}" -H "content-type: application/x-www-form-urlencoded" - Copy the Auth token value from the response. You will enter this token in the connector configuration in Qualys ETM.
Note: Qualys recommends using a dedicated service account in Symantec when creating the client application, so that token regeneration and permission management are independent of individual user accounts.
Permissions Required
The client application created in the Symantec console must have the following privileges enabled. These permissions allow the connector to query the devices endpoint and retrieve asset data.
- Group Management – View, Create, Edit
- Remotely Run Commands – Run Commands
Scope and Data Access
The connector queries the Symantec devices endpoint (/v1/devices) to retrieve endpoint inventory. The API has a rate limit of 5,000 requests per hour with a default batch size of 1,000 records per request. Custom filtering and filter queries are not supported for this connector. Import of installed software and source tags is not supported.
Key Rotation
When the Auth token expires or needs to be rotated, generate a new token using the OAuth credentials from your Symantec client application and update the token value in the connector configuration in Qualys ETM. Refer to Troubleshooting if connector runs fail after token expiry.
Create a Profile & ConnectionCreate a Profile & Connection
In this step you provide the connector name, description, and the authentication token used to connect to the Symantec Endpoint Security API.
Connector Details
| Field | Description |
| Name | A unique display name for this connector instance within Qualys ETM. |
| Description | (Optional) A brief description of the connector's purpose or scope. |
Authentication Details
| Field | Type | Description |
| Domain / API Endpoint | String | The hostname of your Symantec Endpoint Security regional API endpoint. Example: api.sep.eu.securitycloud.symantec.com. Verify this matches your deployment region. |
| Auth Token | Encrypted String | The bearer token generated from the Symantec OAuth 2.0 flow using your client application's OAuth credentials. This token authorizes API calls to the devices endpoint. |
Important: Auth tokens expire. When a token expires, the connector will fail with an authentication error. Regenerate the token from your Symantec client application and update this field.
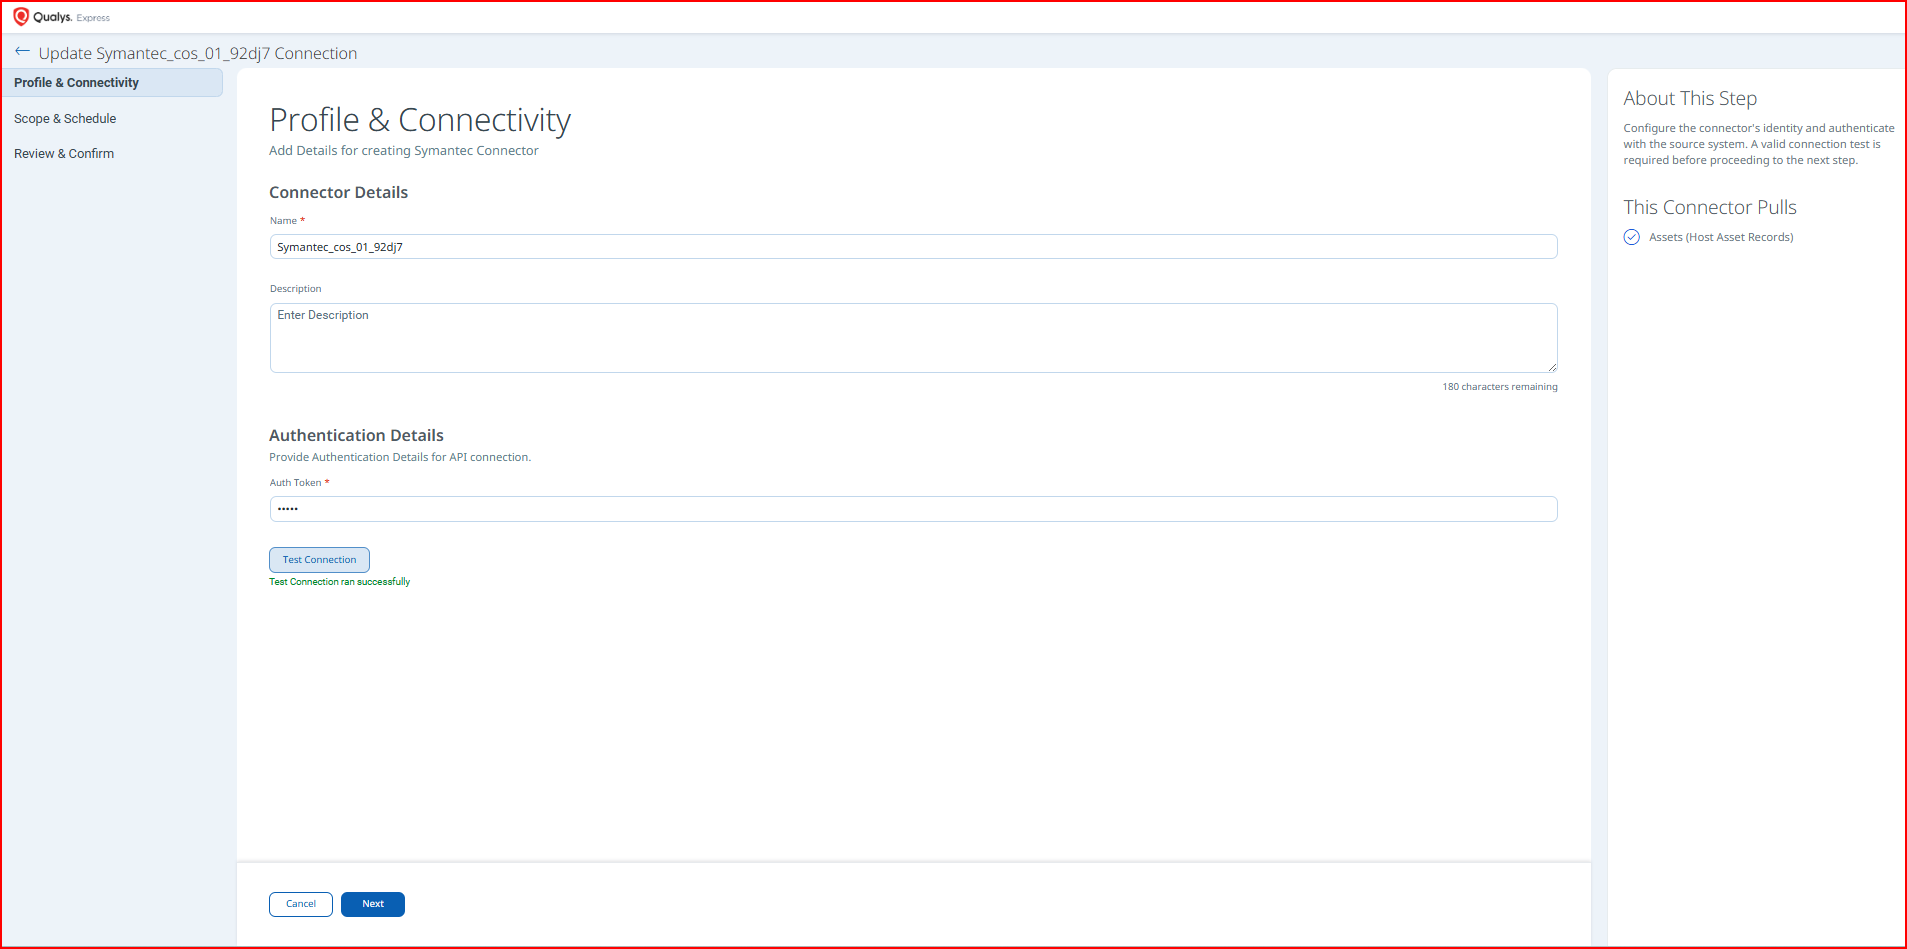
After entering credentials, click Test Connection to verify connectivity. The following checks are performed:
- Network Reachability
- TLS Handshake
- Authentication Credential Check
- Authorization Scope Check
- Data Fetch
All five checks must pass before you can proceed to the next step. If any check fails, refer to Troubleshooting.

Set the Scope & SchedulSet the Scope & Schedul
Configure which data the connector synchronizes and how frequently it runs.
The connector imports Host Assets (Compute) from the Symantec devices endpoint. Because the Broadcom API does not support incremental retrieval, the connector performs a full data pull on every run.
In the Schedule section, configure when the connector runs:
- Single Occurrence – specify an exact date and time for a one-time run.
- Recurring – specify start date/time, end date/time, and recurrence interval for ongoing synchronization.
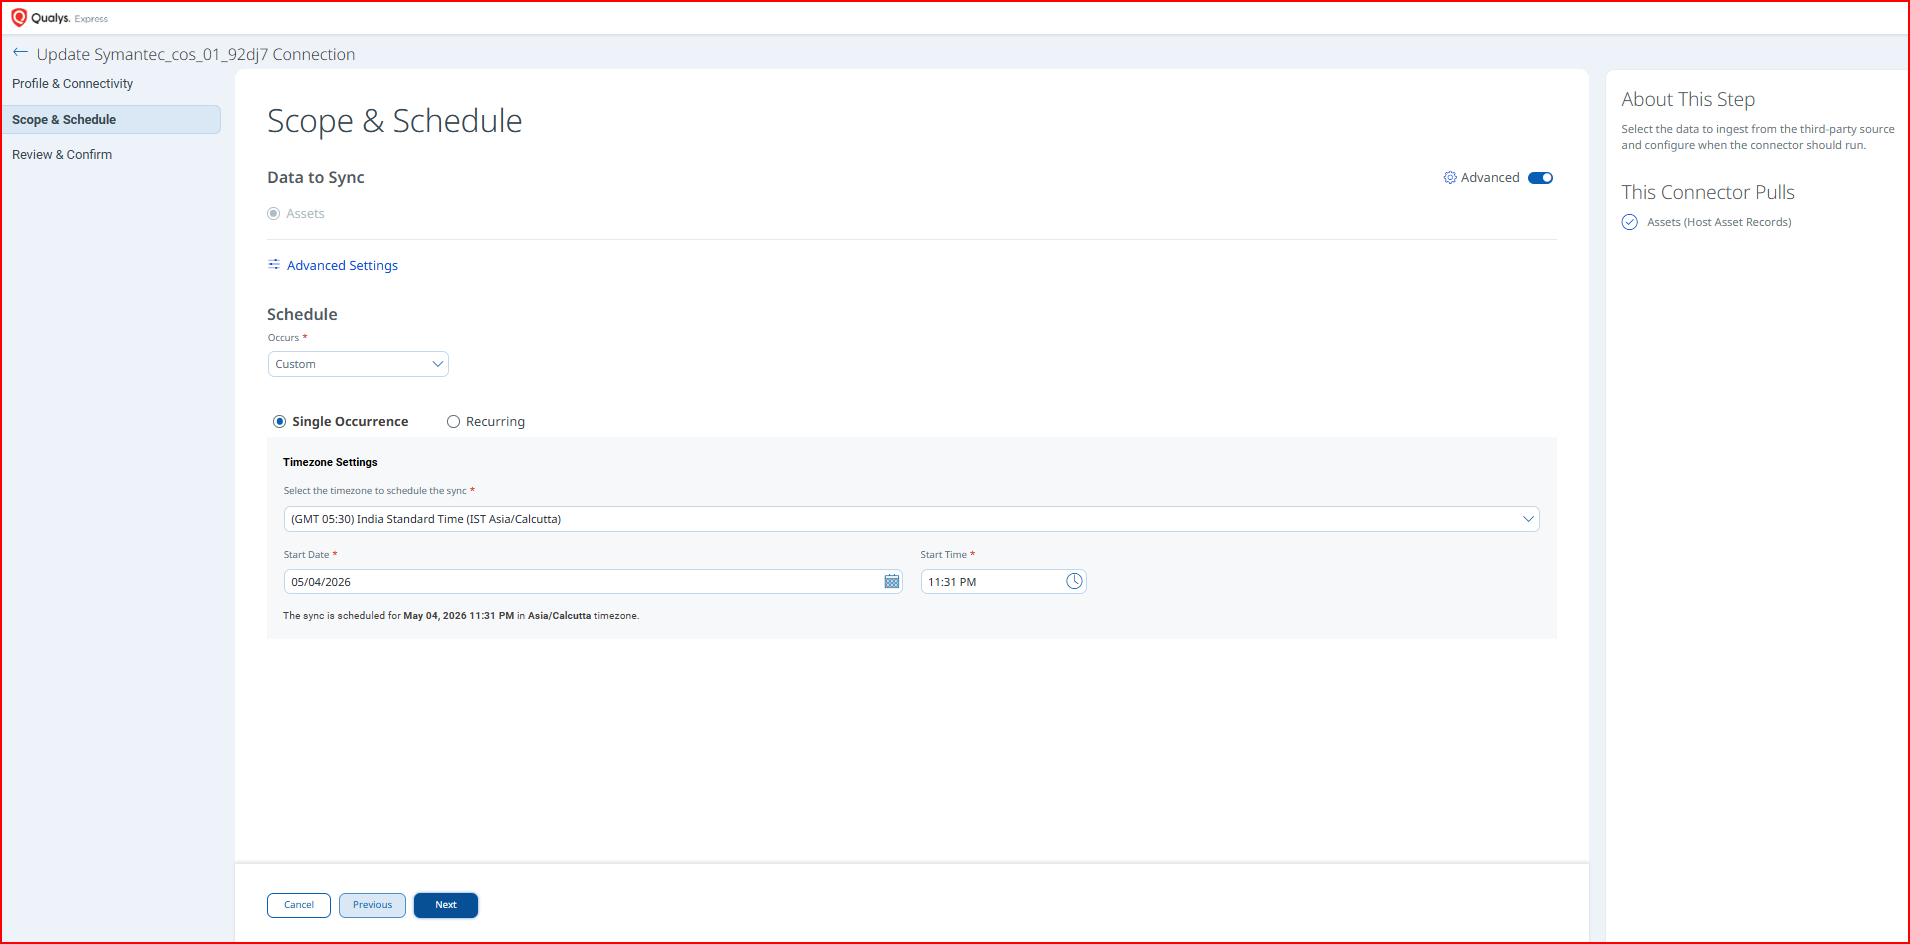
Note: Schedule times are interpreted in UTC. Recurring schedules can be configured for up to a 5-year duration.
Advanced Settings
Note: Advanced Settings are available after the connector has been created. Navigate to the connector's settings and click Save after making any changes on these tabs.
Filters Tab
Custom filtering and filter queries are not supported for this connector. The Filters tab is present in the interface but no filter expressions can be applied. The connector retrieves all available device records from the /v1/devices endpoint on each run.
Transform Map Tab
The connector ships with an out-of-the-box transform map that maps Symantec device fields to the Qualys ETM Host Asset schema. The active map is displayed on this tab.
How the Connection Works
The Symantec Endpoint Protection Connector retrieves host asset records from Symantec Endpoint Security (Broadcom) via its REST API and imports them into Qualys ETM for unified risk analysis and prioritization. Qualys ETM processes the incoming data by de-duplicating redundant entries, normalizing data formats, enriching findings with additional context, and calculating risk scores using TruRisk.
The connector performs a full data pull during each run, as the Broadcom API does not support incremental (delta) data retrieval. Endpoint metadata synchronized includes hostname, operating system, agent version, IP address, MAC address, and serial number.
Connector States
A successfully configured connector progresses through the following states:
- Registered – Connector created and ready to fetch data.
- Scheduled – Connector is queued to run at the configured time.
- Processing – Connector is actively pulling data from the Symantec devices endpoint.
- Processed – Connector has completed the asset data import successfully.
Note: It may take up to 2 hours after the first run for asset data to be fully processed and visible in Qualys ETM. Subsequent scheduled runs are typically faster once the initial data set is established.
Viewing Assets in ETM
Navigate to Enterprise TruRisk Management (ETM) to analyze imported endpoint data.
To view assets imported from Symantec:
- Go to Assets > Endpoint Asset.
- Apply the following inventory filter to display only Symantec-sourced assets:
inventory:(source:"Symantec")
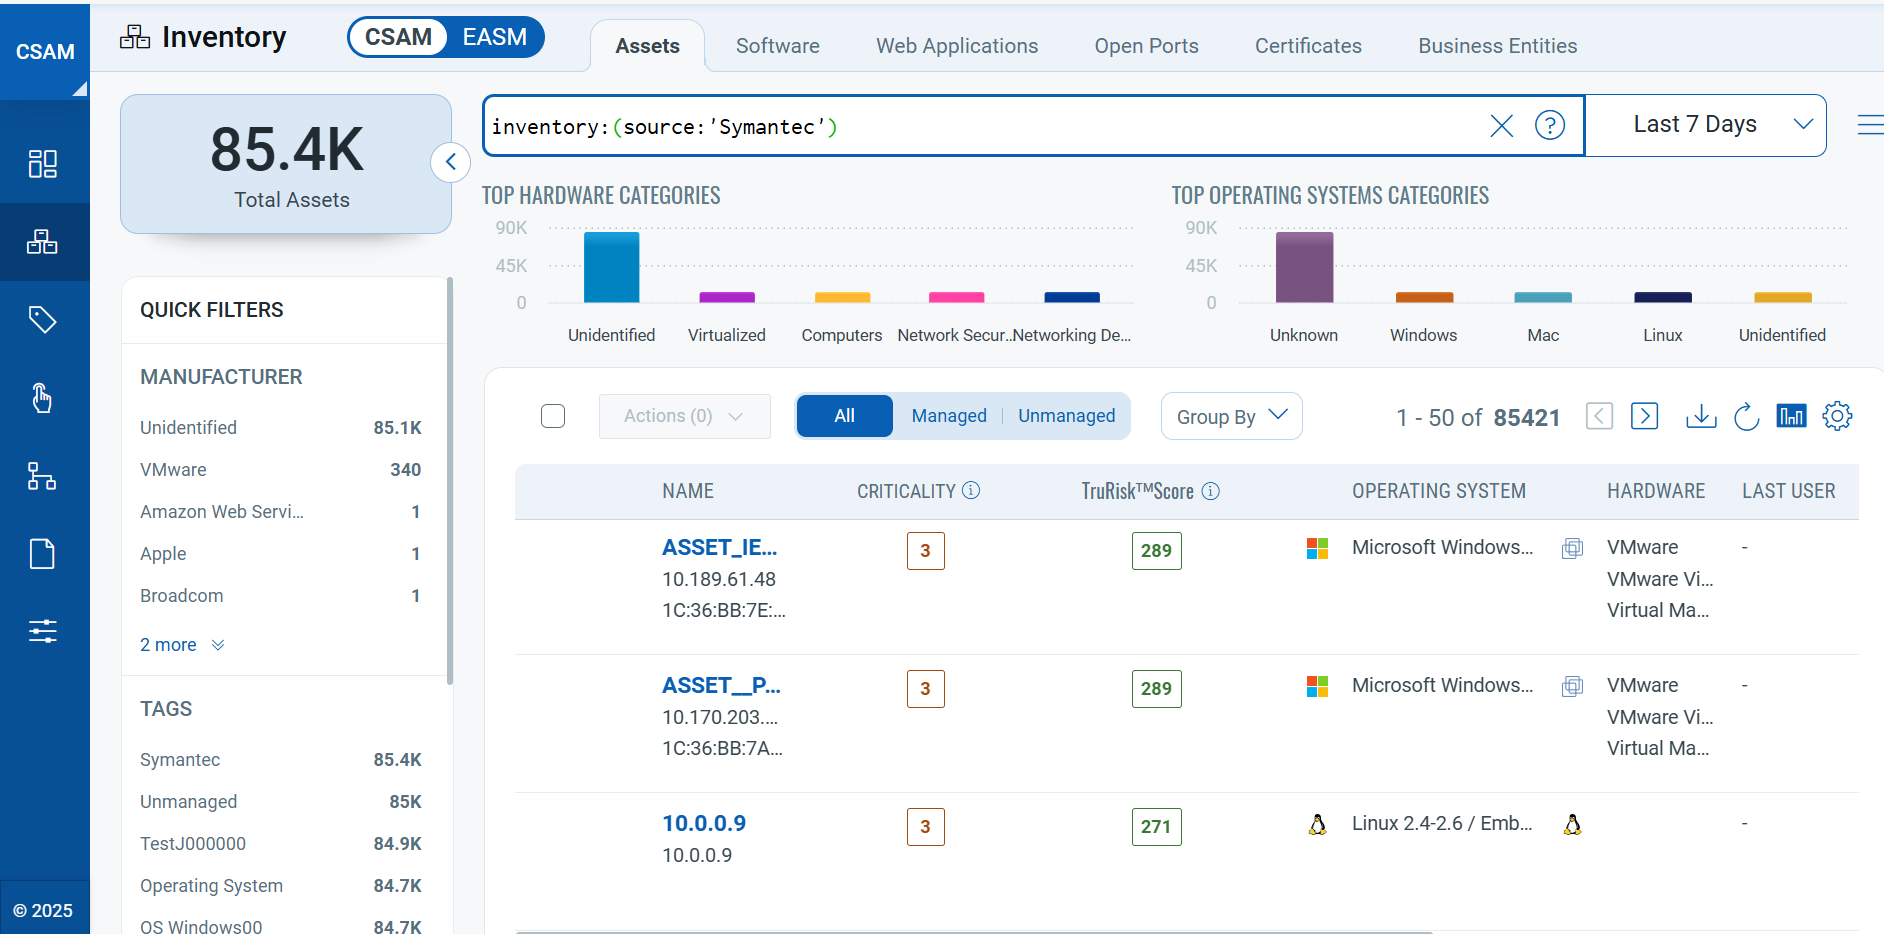
Imported assets include endpoint metadata such as hostname, operating system, agent version, IP address, MAC address, and serial number.
Note: When a connector transitions to Processed state, asset records are confirmed as imported; however, findings enrichment and risk score calculation may still be in progress.
Troubleshooting
Use the following table to diagnose and resolve common issues.
| Issue | Resolution |
| Authentication failure on connector run | Verify the Auth token entered in Qualys ETM is current and has not expired. If expired, regenerate the token using the OAuth credentials from your Symantec client application. Ensure the client application has the required privileges (Group Management and Remotely Run Commands) enabled. |
| Connection test fails | Verify the API endpoint hostname matches your Symantec deployment region. The endpoint may differ from the documented example (api.sep.eu.securitycloud.symantec.com). Confirm that Qualys cloud can reach the Symantec API endpoint over HTTPS (port 443). |
| No assets imported after first run | The connector transitions through Registered, Scheduled, Processing, and Processed states. Full data population may take up to 2 hours to complete. Verify the client application has the required privileges and that the Auth token is valid. Check the connector state in Qualys ETM to confirm it has reached Processed state before concluding data is missing. |
Additional Information
API Reference
The connector interacts with the following Symantec Endpoint Security API resources.
| Name | Key | Type | Details |
| Devices Endpoint | /v1/devices |
String (URL) | GET https://api.sep.eu.securitycloud.symantec.com/v1/devices
Rate limit: 5,000 requests per hour. |
| Token Endpoint | /v1/oauth2/tokens |
String (URL) | POST https://api.sep.eu.securitycloud.symantec.com/v1/oauth2/tokens
Used to generate the bearer Auth token from OAuth credentials. |
Transform Map
| Symantec Field (Source) | Qualys ETM Field (Target) |
id |
externalAssetId (Required) |
name |
assetName |
id |
cloudInstanceId |
domain |
dnsName |
domain |
fqdn |
ipv4Address |
ipAddress |
macAddress |
macAddress |
operating system user |
lastLoggedOnUser |
operating system name |
operatingSystemName |
operating system architecture |
operatingSystemArchitecture |
number of CPU |
numberOfCpu |
operating system type |
systemType |
serialNumber |
serialNumber |
operating system version |
operatingSystemVersion |
cpu type |
processorDescription |
ipv4Address |
interfaceName |
hardware uuid |
netBiosName |