The Veracode connector bridges application security and risk management by automatically ingesting DAST findings from Veracode into Qualys ETM for centralized analysis. This integration eliminates manual data transfer between platforms, enabling security teams to consolidate application vulnerabilities alongside other risk data for unified prioritization and remediation tracking.
By normalizing Veracode issues through TruRisk-based scoring, the connector helps practitioners quickly identify which application flaws pose the greatest risk to their environment. This automation reduces operational overhead while improving visibility into application security posture across the enterprise.
Connector Details
Here is a comprehensive overview of what the Veracode Connector supports.
| Vendor | Veracode |
| Product Name | Veracode DAST |
| Category | Application Security |
| Findings Support | Supported |
| Supported Assets | Web Applications |
| Version | 1.0.0 |
| Integration Type | API Integration (REST) |
| Direction | Unidirectional |
| Delta Support | Not Supported |
| Supported Version & Type | SaaS (Latest) |
| Import of Installed Software | Not Supported |
| Import of Source Tags | Not Supported |
| Filters/Filter Query | Not Supported |
Before You begin - AuthenticationBefore You begin - Authentication
Ensure the following prerequisites are completed before configuring the connector:
- Ensure you have access to the Veracode Platform with permissions to generate API credentials.
- Confirm that Qualys cloud can reach
api.veracode.comover HTTPS (port 443). - Only vulnerability and asset data from the last 6 months is imported due to Veracode API limitations.
The Veracode Connector is available on demand. To activate it for your subscription, please contact your Technical Account Manager (TAM) or Qualys Support.
Permissions Required
To configure the Veracode connector, generate API credentials using HMAC authentication. Use a user account with the required permissions.
To enable the Veracode Reporting API for your account, please contact Veracode Support at [email protected]. If the Reporting API is already enabled for your account, no further action is required and this step can be skipped.
User Account Requirements
Your Veracode user account must meet these requirements:
| Requirement | Value |
|---|---|
| User Type | UI User (The connector does not support the API User type.) |
| Minimum Required Roles | Reviewer, Security Lead |
The connector does not support the API User account type. Use a UI User account with the roles listed above.
Step 1: Verify User Account Permissions
Verify that your UI User account has the required roles before generating API credentials.
- Log in to the Veracode platform.
- Go to Admin > Users.
- Find your user account in the list.
- Confirm the following:
- The User Type is UI User (not API User).
- Your account has these roles:
- Reviewer
- Security Lead
If your account is missing a role, ask your Technical Account Manager to add it.
Step 2: Generate HMAC API Credentials
- Log in to the Veracode platform (https://analysiscenter.veracode.com/) with your UI User account.
- Click your profile icon in the top-right corner.
- Click Create API Credentials.
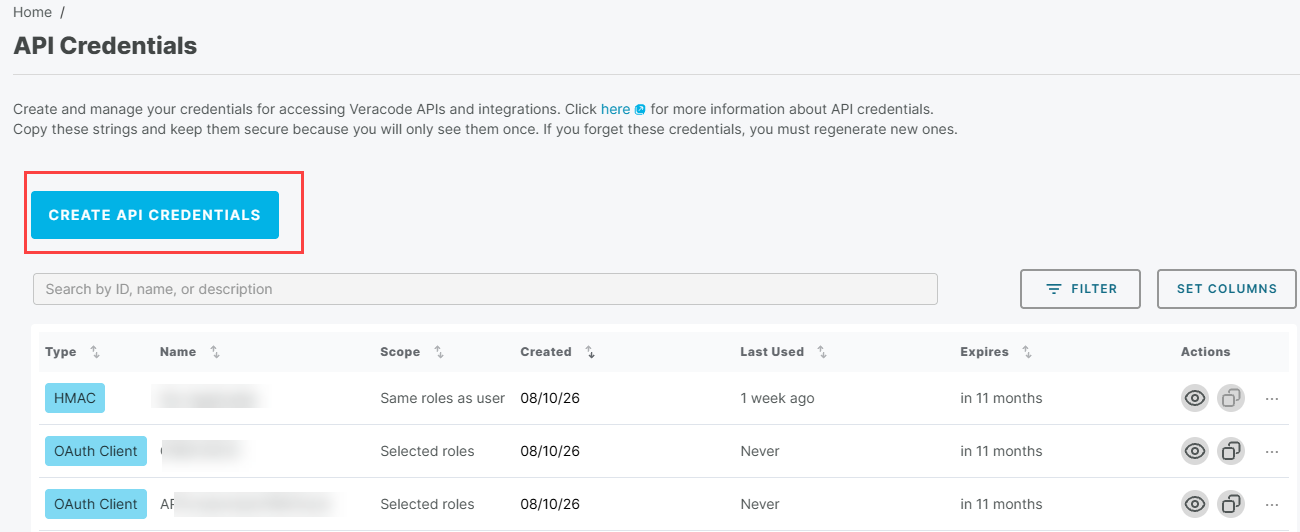
Do not select OAuth. This connector requires HMAC authentication.
- Choose the Credential Type as HMAC and click Generate.
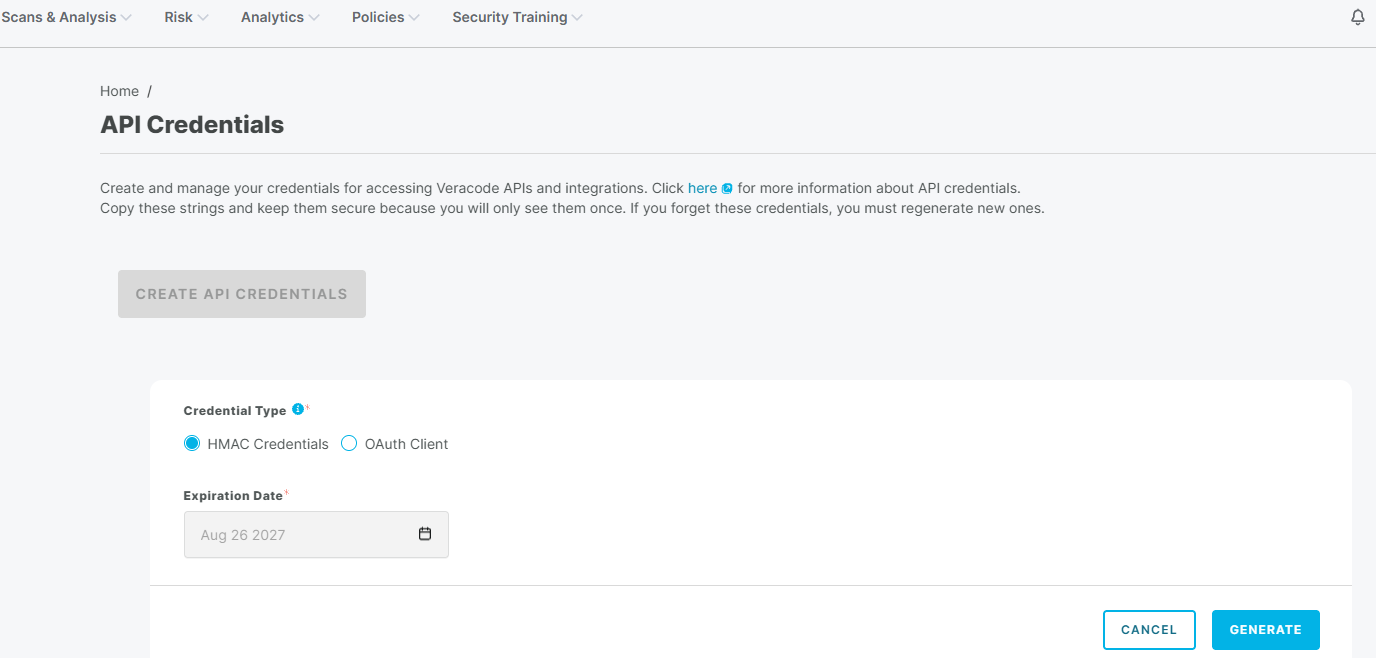
- Copy both the ID and secret key to a secure location immediately. These credentials are used to authenticate API calls and should be stored safely.
The secret key is shown only once. If you navigate away without copying it, you must generate a new credential pair, which will revoke the previous set. The secret key is shown only once. If you navigate away without copying it, you must generate a new credential pair, which will revoke the previous set. Optionally, you can also generate Veracode API credentials using the Veracode Identity API.
Create Profile & ConnectionCreate Profile & Connection
This step establishes the connector's identity and authenticates it with Veracode.
- Log in to Qualys ETM and navigate to Connectors > Integration.
- Locate the Veracode DAST Connector on the Connector Marketplace and click Add. This is a one-time task.
If the connector is already added, navigate to My Connectors, search for the Veracode connector, and click Manage Connections.
- Click Manage Connections from the connector tile.
- Click Create Connection. The Setup Guide opens, displaying the Before You Begin checklist alongside four reference tabs: Overview, Auth Setup, Permissions, and Troubleshooting.
- Click Proceed to Setup.
- On the Profile & Connectivity page, complete the following fields:
Connector Details
Field Description Name (required) A unique display name for this connector. Description An optional description of the connection's purpose. Authentication Details
Provide the following values to authenticate the connector with your Veracode environment.
Field Description URL (required) String The OAuth 2.0 token endpoint for your Veracode environment. API ID(required) String Provide the Veracode API ID. API Key(required) String Enter the API Key generated from Veracode. 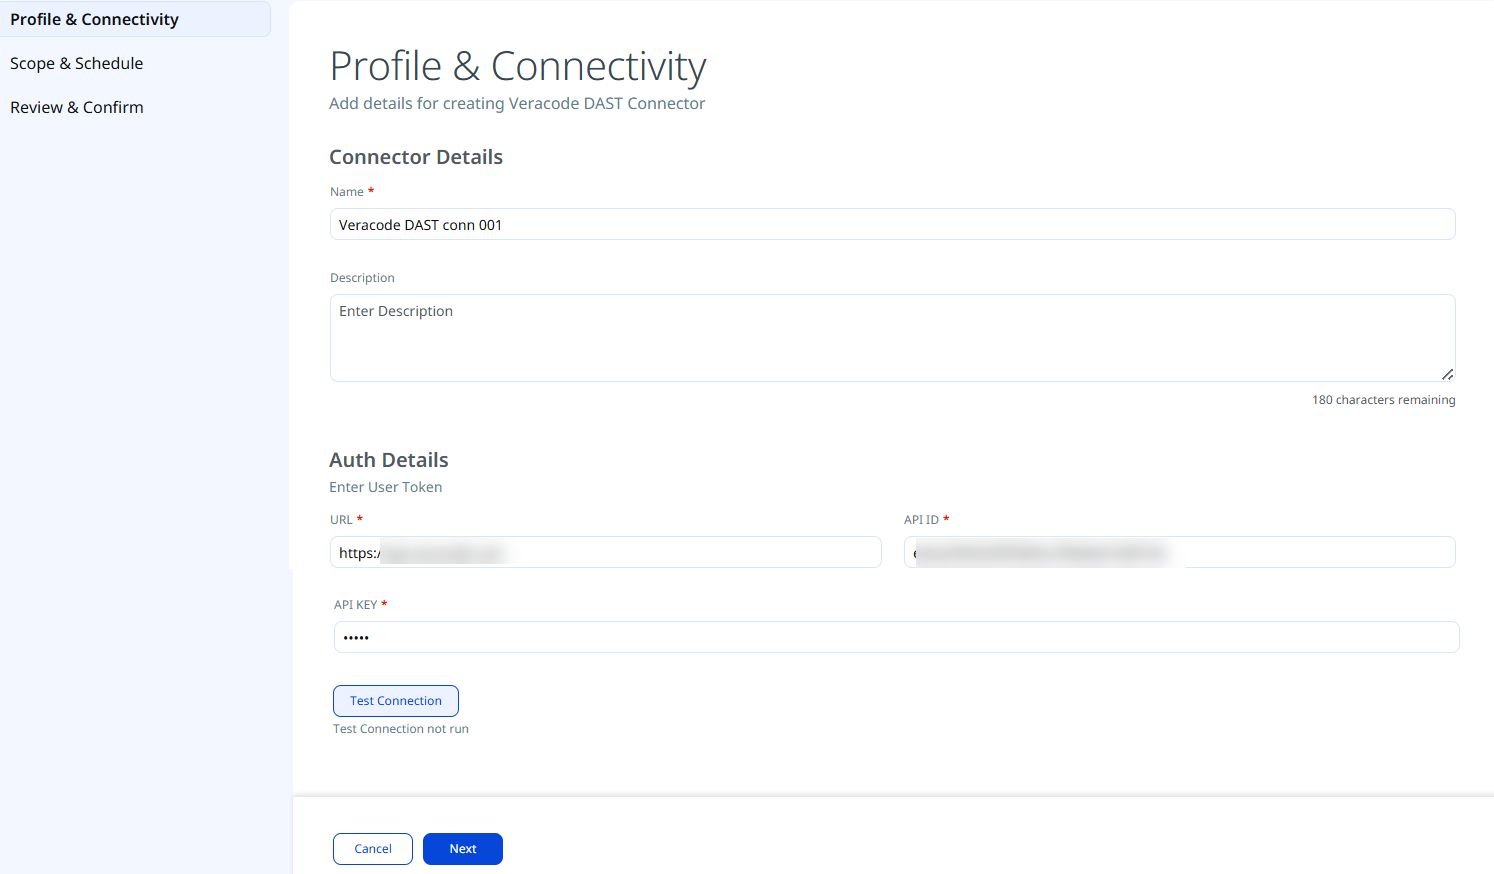
- Click Test Connection. A modal will appear showing the status of five sequential checks:
- Network Reachability — Verifies that the connector endpoint is reachable over HTTPS (port 443).
- TLS Handshake — Confirms that a secure TLS connection can be established with the remote endpoint.
- Authentication Credential Check — Validates the configured credentials against the source system's authentication endpoint.
- Authorization Scope Check — Confirms that the provided credentials have the required permissions to access the configured data scope.
- Data Fetch — Verifies that data can be successfully retrieved from the source system using the configured connection.
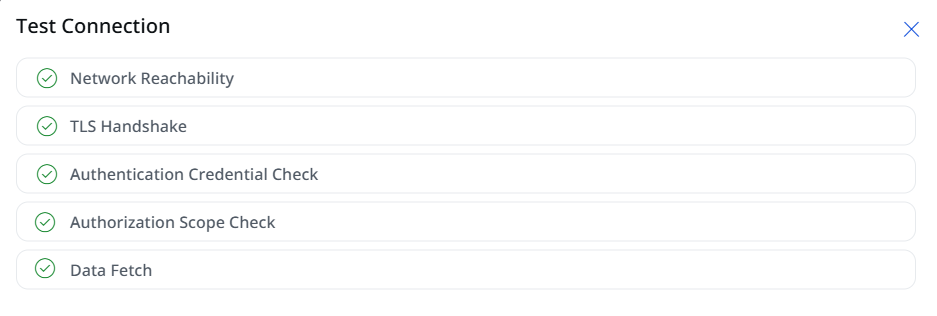
All five checks must pass before you can proceed. If the Authentication Credential Check fails with an Unauthorized error, verify that the Client ID, Client Secret, and Token URL are correct, and that the service account has not been disabled.
- Click OK and then click Next.
Scope and ScheduleScope and Schedule
This step defines what data is ingested and when the connector runs.
- Data to Sync - The below option is selected by default.
- Assets - Ingests asset records only, without findings.
- Advanced Settings (optional) - Turn on the Advanced Settings toggle to see the Filters, Transform Map, and Risk Severity Mapping.
- Schedule - Under the Schedule section, select an execution frequency from the Occurs dropdown (for example, Daily). The system will display the calculated start date, end date, and timezone for the scheduled run. The schedule configuration supports recurring synchronization, such as
Daily.
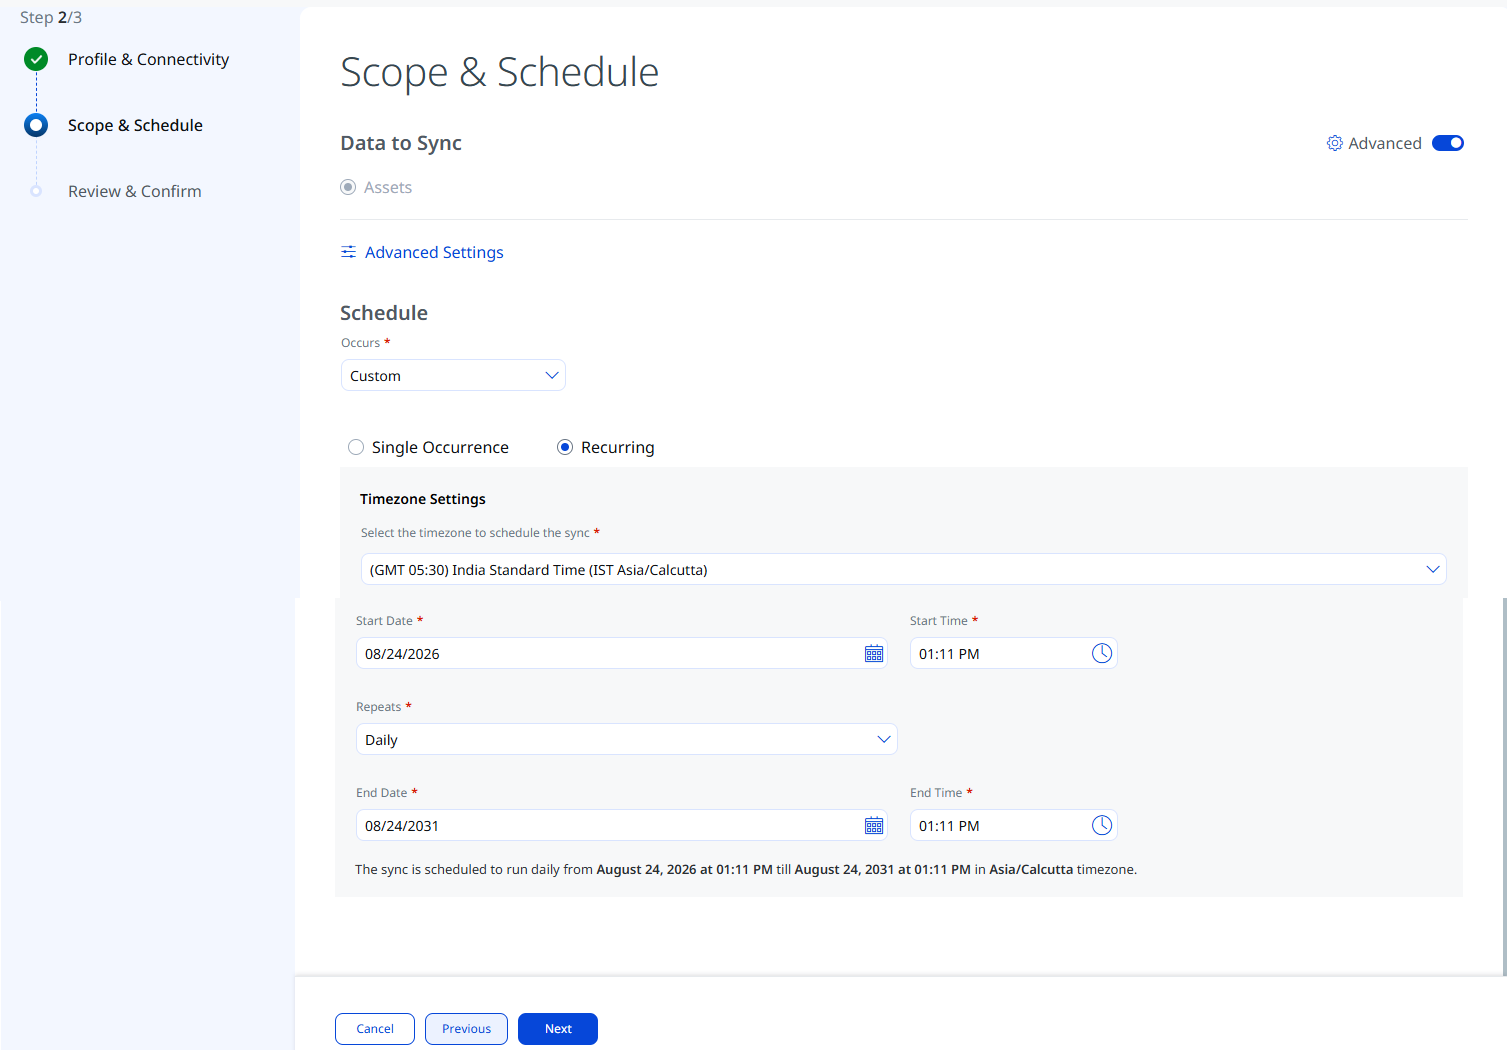
The schedule timezone is determined by your Qualys account settings. The connector will run from the configured start date for a default period of 5 years.
- Click Next.
Advanced Settings
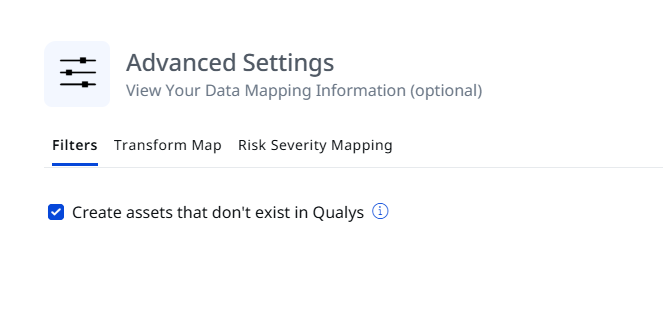
Clicking the Advanced Settings link opens a panel with three tabs: Filters, Transform Map, and Risk Severity Mapping.
Filters Tab
| Filter | Options | Description |
|---|---|---|
| Create assets that don't exist in Qualys | - | If enabled, the connector ingests all those assets that are not created /exist in Qualys |
Transform Map
The Transform Map tab displays the default field mappings from Cybereason source fields to Qualys ETM target fields for each asset class. Map the fields from Cyberreason to the corresponding fields in your target system. Transform Maps ensure that the data is transformed correctly during import or export.
The CyberReason Connector offers an out-of-box transform map for you to proceed without further configuration.
Risk Severity Mapping
The Risk Severity Mapping tab defines how CrowdStrike severity values are translated into Qualys severity levels and QDS scores for findings that are not scored automatically by the Qualys Cloud Threat Database.
Qualys automatically updates scores for CVE-based vulnerabilities available in the Qualys Cloud Threat Database. The severity mapping below applies only to findings that are not CVE-based or are not present in the Qualys Cloud Threat Database.
| Expected Source Value | Severity | QDS Score (Range 1–100) |
|---|---|---|
| 1 | 1 | 20 |
| 2 | 2 | 40 |
| 3 | 3 | 60 |
| 4 | 4 | 80 |
| 5 | 5 | 100 |
The default Severity is 2. This value is applied when the severity value from CrowdStrike is unavailable for a given finding.
Review and ConfirmReview and Confirm
Review all configured settings before creating the connection and then click Create.
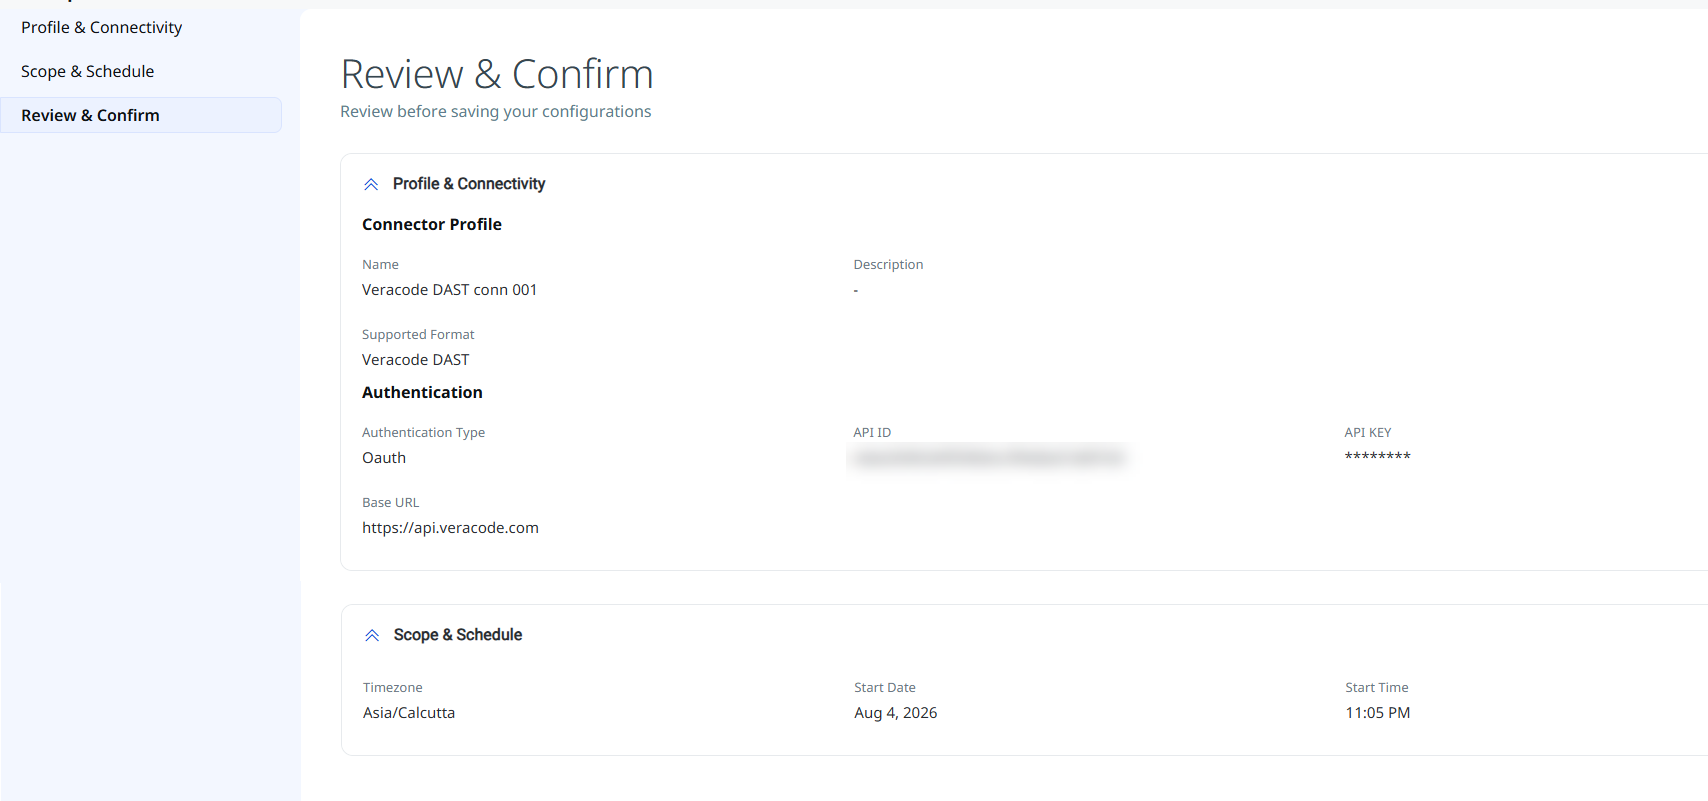
The new connection is displayed in the Connections list with a Registered state and an Active status.
How Does a Connection Work?
On schedule (or on-demand), the connector fetches Veracode application findings and imports them into ETM.
In the Connector screen, you can find your newly configured connector listed and marked in the Processed state.
Connector States
A successfully configured connector goes through 4 states.
- Registered - The connector is successfully created and registered to fetch data from the vendor.
- Scheduled - The connector is scheduled to execute a connection with the vendor.
- Processing - A connection is executed and the connector is fetching the asset and findings data.
- Processed - The connector has successfully fetched the assets, it may still be under process of fetching the findings. Wait for some more time for the connector to fetch the findings completely.
The Processed state indicates that the Connector is successfully configured but it is under the process of importing all your assets and findings. This process (specifically for findings) may take some time.
This entire process may take up to 2 hours for completion. Once it is done, you can find the imported data in Enterprise TruRisk Management (ETM).
View Assets and Findings in ETM
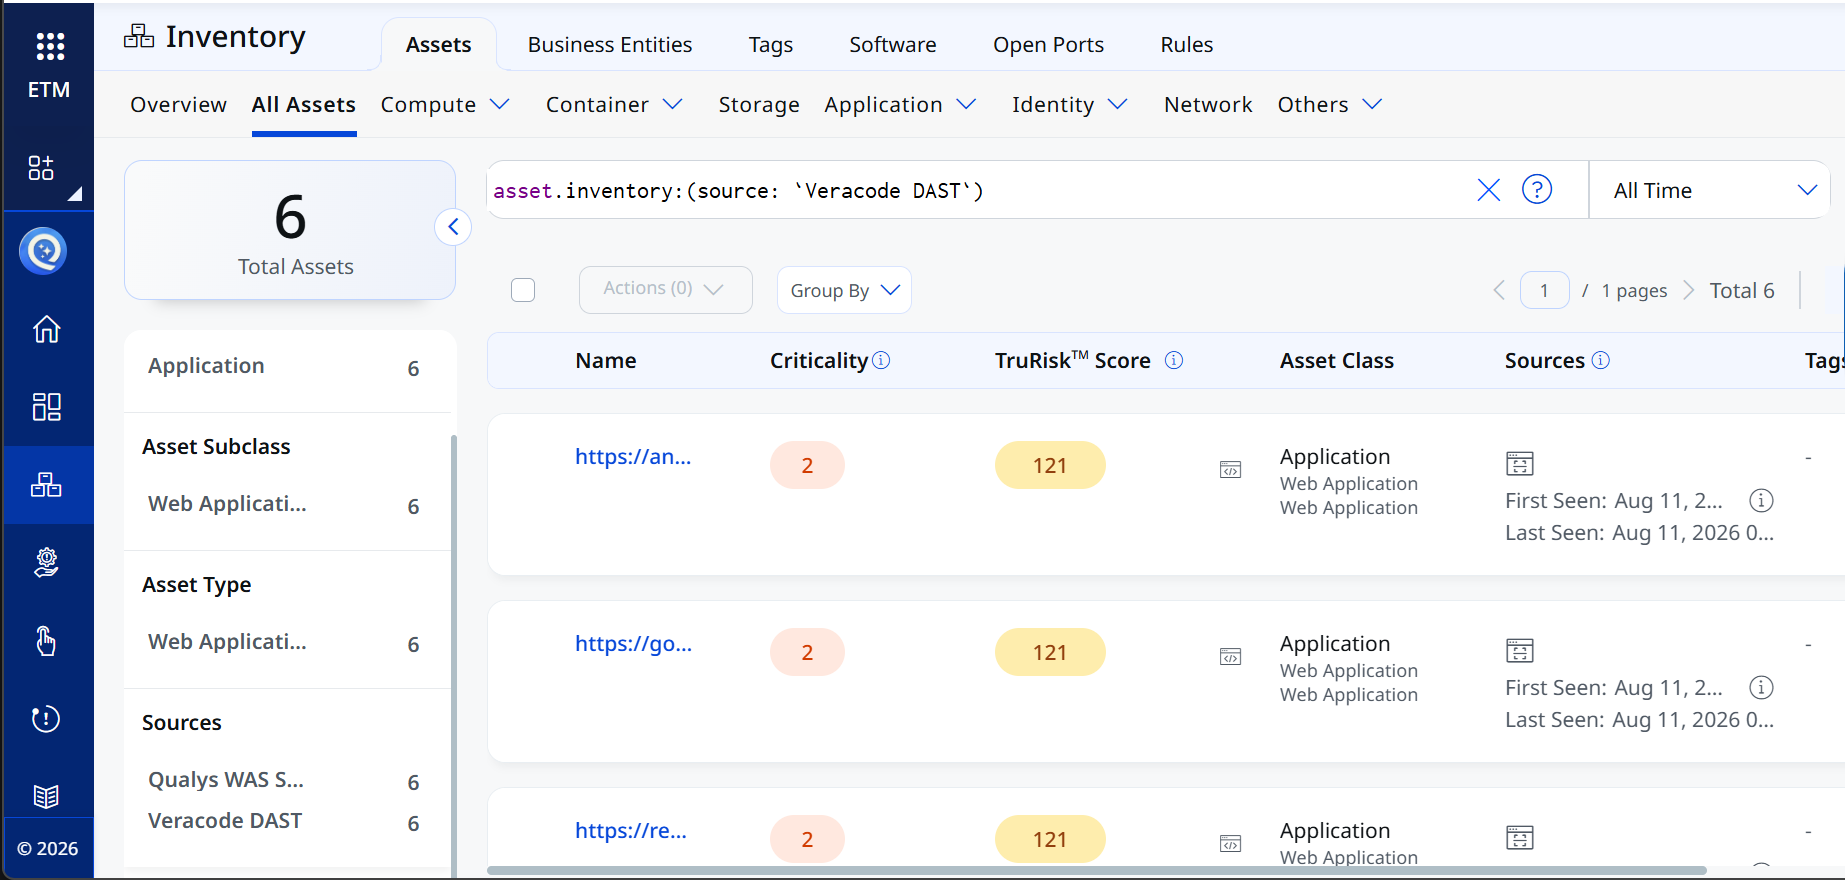
Applications: Inventory views for imported Veracode applications.
To view the assets:
- Navigate to Enterprise TruRisk Management.
- Go to Inventory > Assets > All Assets.
- Use the filter token:
asset.inventory:(source:'Veracode DAST')
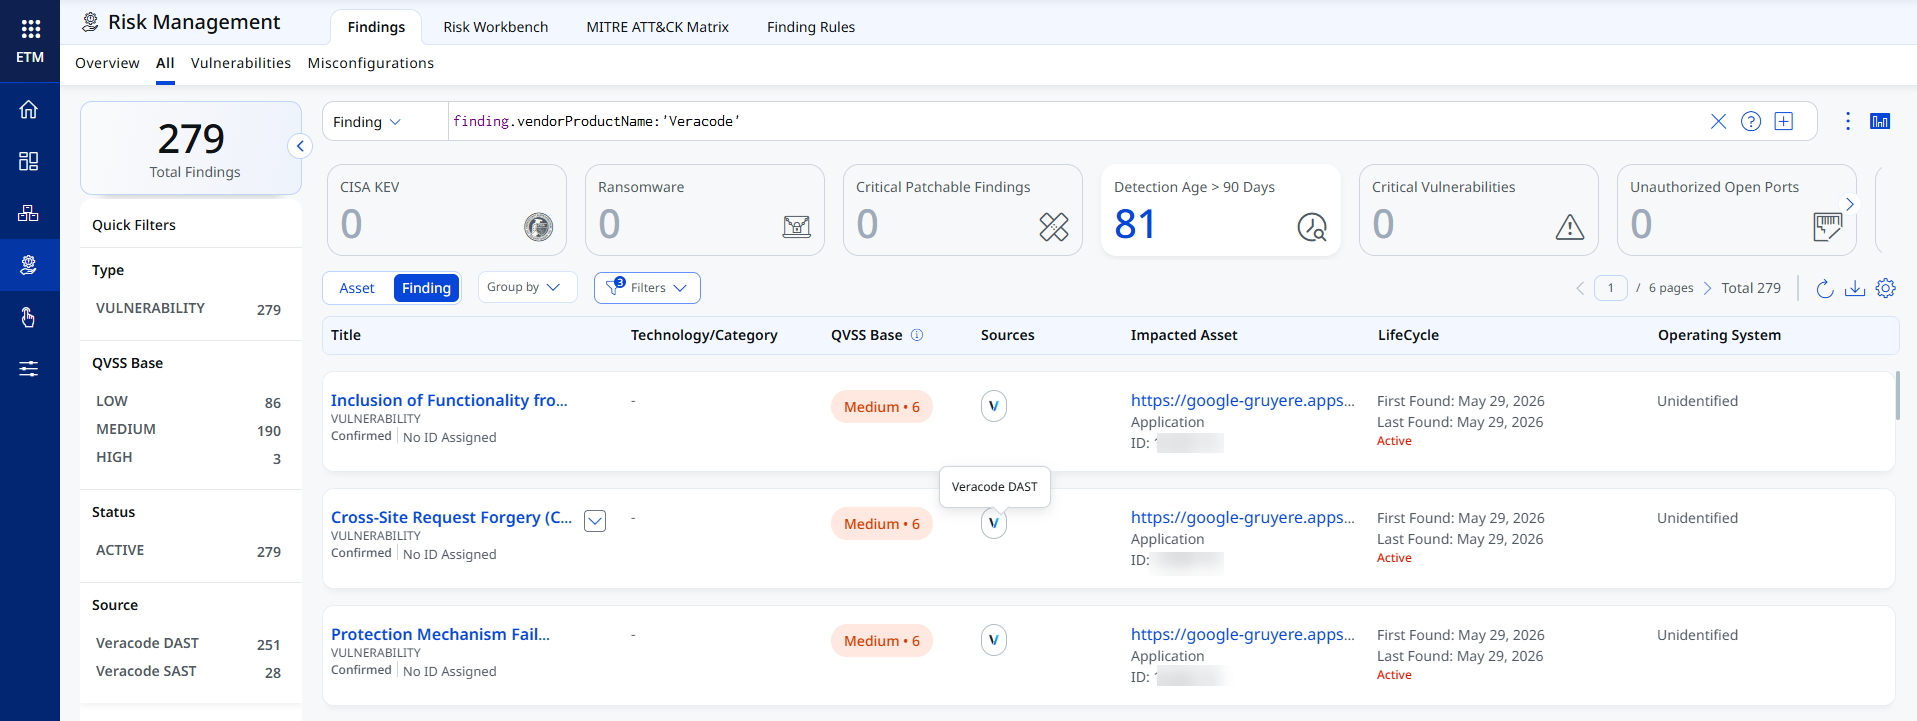
To view the Findings:
- Navigate to Enterprise TruRisk Management.
- Go to Risk Management > Findings.
- Use the filter token:
finding.vendorProductName:'Veracode'.
Activating Web Applications
Web applications synced from the Veracode Connector appear in:
-
ETM
-
CSAM
-
WAS
By default, these applications are not activated for scanning in WAS.
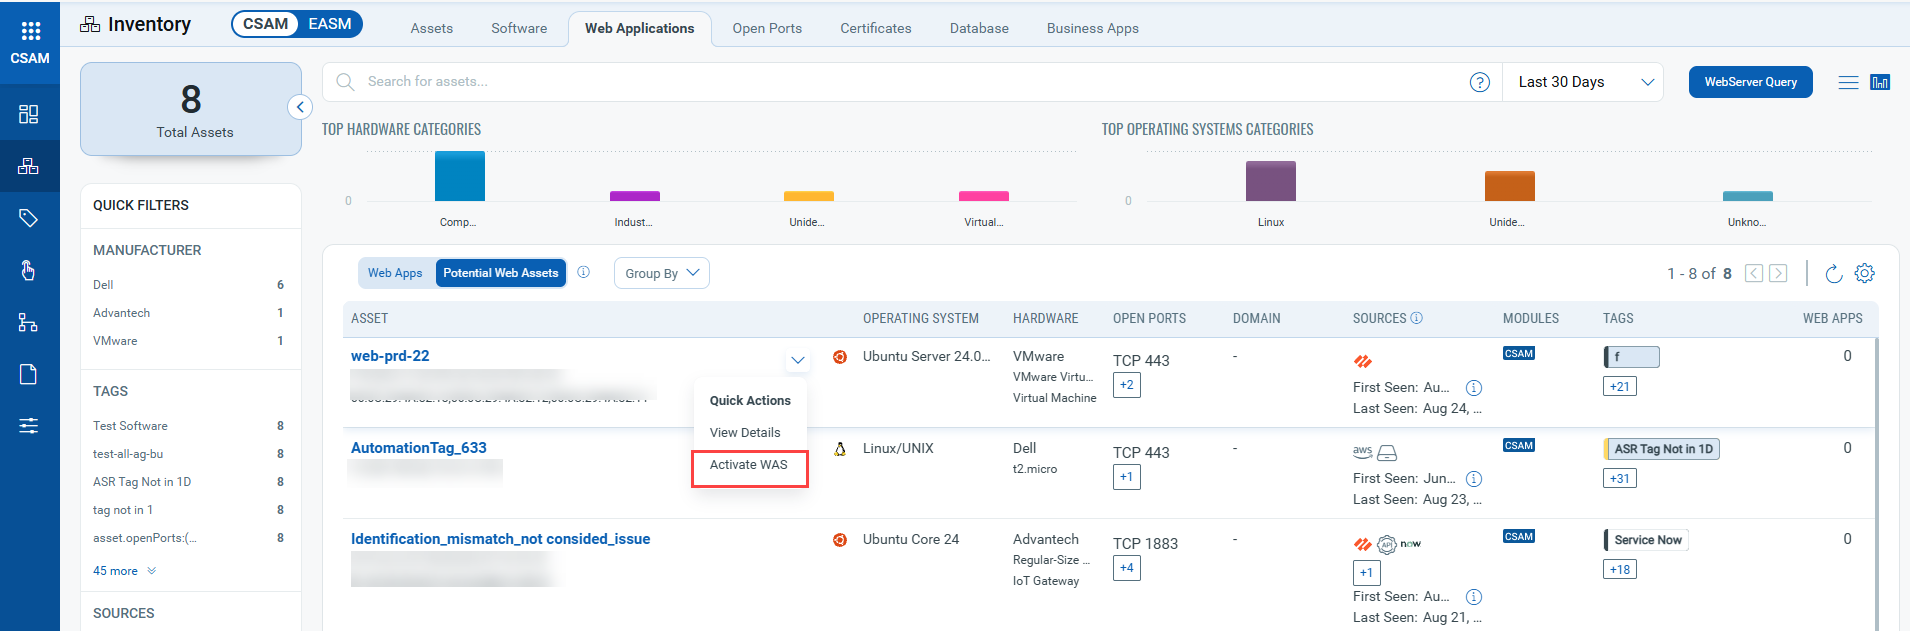
To activate web applications in WAS:
-
Navigate to CSAM > Inventory > Web Applications.
-
Select the Potential Web Assets and then select the desired web application.
-
Select Activate WAS from the Quick Actions menu.
Activating web applications will consume WAS licenses. You should activate only the required applications.
Additional Information
API Reference
| API Details | Endpoint | Notes |
|---|---|---|
| Authentication | Not required | Per spec. |
| List Applications | https://api.veracode.com/appsec/v1/applications |
API limitations may apply. |
| Application Findings | https://api.veracode.com/appsec/v2/applications/ |
API limitations may apply. |
Profile Details
| Name | Key | Type | Description |
|---|---|---|---|
| Raw Message | isEnabledRaw | CheckBox | Include raw API payload in findings. |
| Filter Query | filter | String | Filter expression to refine fetched results. |
| Detection of DataType | — | App Issues | Fetches Veracode application issues. |
Transformation Maps
Veracode DAST Transformation MappingVeracode DAST Transformation Mapping
| Source Field | Target Field |
|---|---|
application_url |
webApp.webAppUrl |
profile.name |
webApp.webAppName |
findings[].issue_id |
finding[].externalFindingId |
findings[].finding_details.attack_vector |
finding[].name |
findings[].finding_details.severity |
finding[].severity |
findings[].description |
finding[].description |
findings[].finding_details.cwe.id |
finding[].findingType.vulnerability.cweId |
_links.self.href |
finding[].findingDetectionURL |
findings[].finding_status.status |
finding[].findingStatus |
findings[].finding_status.last_seen_date |
finding[].lastFoundOn |
findings[].finding_status.first_found_date |
finding[].firstFoundOn |
findings[].finding_details.url |
finding[].findingURL |