Veracode DAST V2 Connector
The Veracode connector bridges application security and risk management by automatically ingesting DAST findings from Veracode into Qualys ETM for centralized analysis. This integration eliminates manual data transfer between platforms, enabling security teams to consolidate application vulnerabilities alongside other risk data for unified prioritization and remediation tracking.
By normalizing Veracode issues through TruRisk-based scoring, the connector helps practitioners quickly identify which application flaws pose the greatest risk to their environment. This automation reduces operational overhead while improving visibility into application security posture across the enterprise.
Connector Details
High-level metadata for the Veracode DAST V2 connector.
| Vendor | Veracode |
| Product Name | Veracode DAST |
| Category | Application Security |
| Findings Support | Supported |
| Supported Assets | Web Applications |
| Version | 1.0.0 |
| Integration Type | API Integration (REST) |
| Direction | Unidirectional |
| Delta Support | Not Supported |
| Supported Version & Type | SaaS (Latest) |
| Import of Installed Software | Not Supported |
| Import of Source Tags | Not Supported |
| Filters/Filter Query | Not Supported |
Configure the Connector
The connector is configured through a 3-step wizard in Qualys ETM. A valid connection test is required before proceeding.
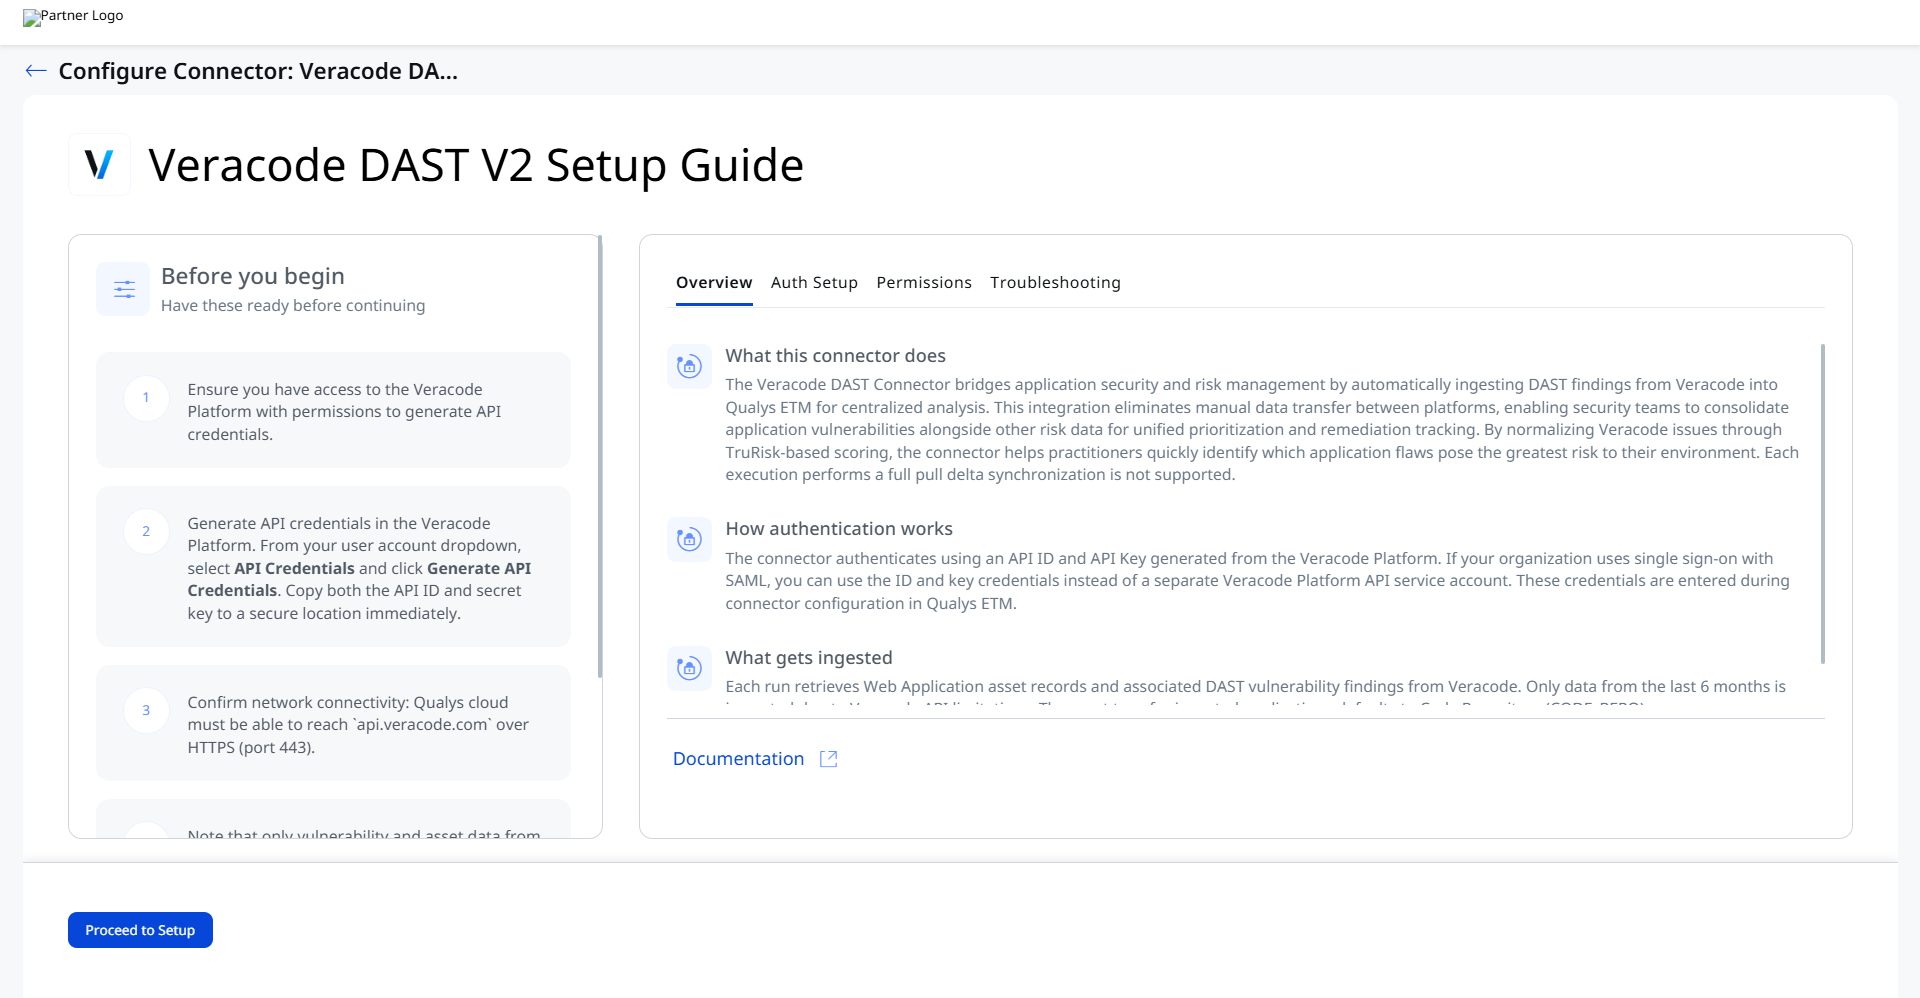
Before You Begin - AuthenticationBefore You Begin - Authentication
Ensure the following prerequisites are completed before configuring the connector:
- Ensure you have access to the Veracode Platform with permissions to generate API credentials.
- Confirm that Qualys cloud can reach
api.veracode.comover HTTPS (port 443). - Only vulnerability and asset data from the last 6 months is imported due to Veracode API limitations.
The Veracode Connector is available on demand. To activate it for your subscription, please contact your Technical Account Manager (TAM) or Qualys Support.
Permissions Required
To configure the Veracode connector, generate API credentials using HMAC authentication. Use a user account with the required permissions.
To enable the Veracode Reporting API for your account, please contact Veracode Support at [email protected]. If the Reporting API is already enabled for your account, no further action is required and this step can be skipped.
User Account Requirements
Your Veracode user account must meet these requirements:
| Requirement | Value |
|---|---|
| User Type | UI User (The connector does not support the API User type.) |
| Minimum Required Roles | Reviewer, Security Lead |
The connector does not support the API User account type. Use a UI User account with the roles listed above.
Step 1: Verify User Account Permissions
Verify your UI User account has the required roles before you generate API credentials.
- Log in to the Veracode platform.
- Go to Admin > Users.
- Find your user account in the list.
- Confirm the following:
- The User Type is UI User (not API User).
- Your account has these roles:
- Reviewer
- Security Lead
If your account is missing a role, ask your Technical Account Manager to add it.
Step 2: Generate HMAC API Credentials
- Log in to the Veracode platform (https://analysiscenter.veracode.com/) with your UI User account.
- Click your profile icon in the top-right corner.
- Click Create API Credentials.
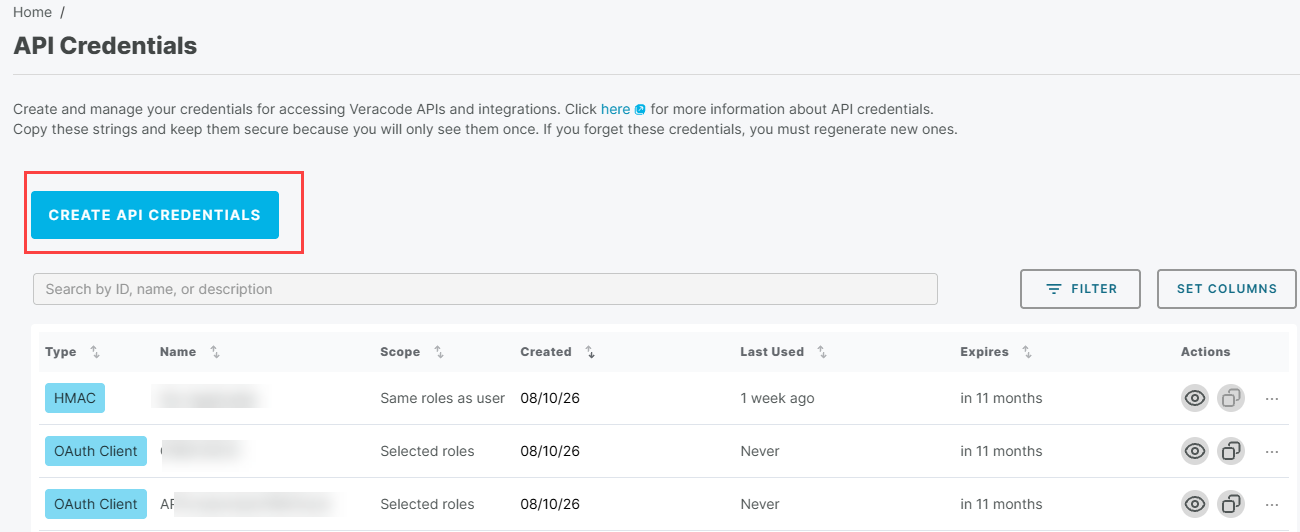
Do not select OAuth. This connector requires HMAC authentication.
- Choose the Credential Type as HMAC and click Generate.
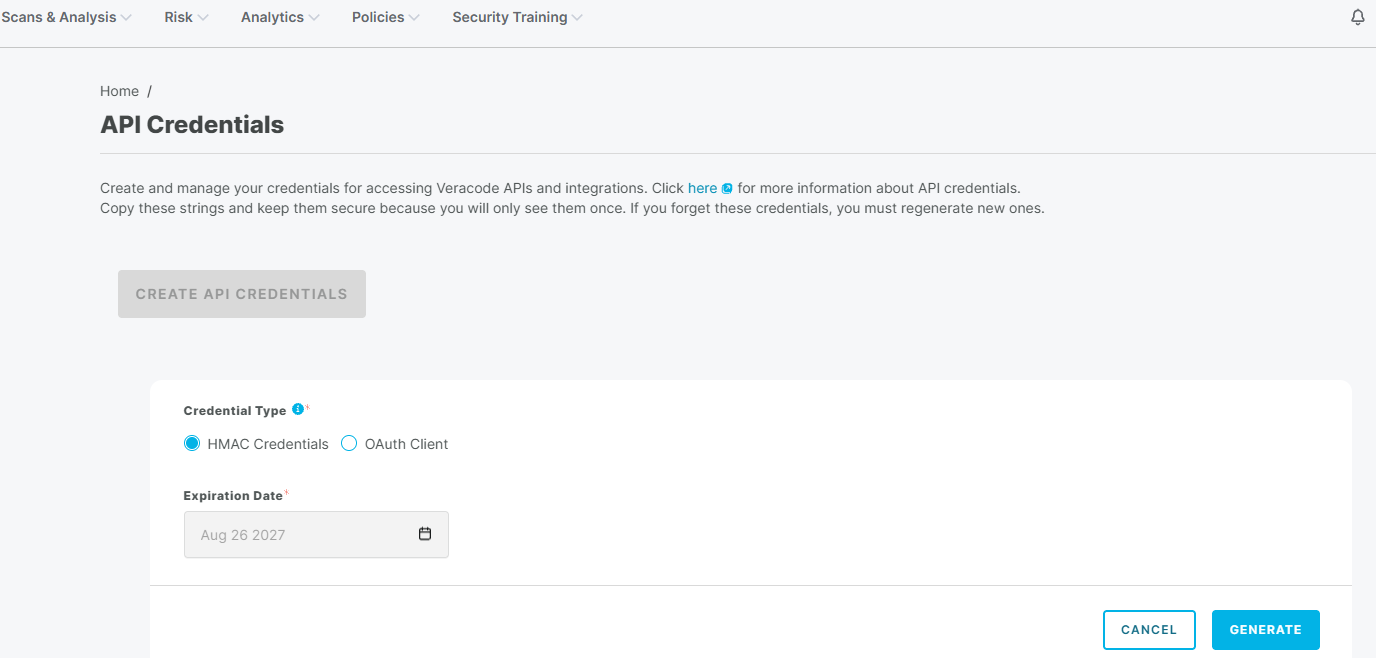
- Copy both the ID and secret key to a secure location immediately. These credentials are used to authenticate API calls and should be stored safely.
The secret key is shown only once. If you navigate away without copying it, you must generate a new credential pair, which will revoke the previous set. The secret key is shown only once. If you navigate away without copying it, you must generate a new credential pair, which will revoke the previous set. Optionally, you can also generate Veracode API credentials using the Veracode Identity API.
Scope and Data Access
The connector calls two Veracode API endpoints:
- The applications and findings endpoint (
https://api.veracode.com/appsec/v2/applications/${app_guid}/findings) – retrieves per-application vulnerability data. - The analytics report endpoint (
https://api.veracode.com/appsec/v1/analytics/report) – retrieves findings reports.
Only data from the last 6 months is imported due to Veracode API limitations. The data flow is unidirectional, from Veracode to Qualys ETM. Delta synchronization is not supported; each run performs a full pull.
Key Rotation
When rotating API credentials, generate new credentials in the Veracode Platform under API Credentials. Note that generating new credentials automatically revokes the previous set. Update the API ID and API Key in Qualys ETM via the Edit Connector option immediately after rotation to avoid connector failures.
Create a Profile & ConnectionCreate a Profile & Connection
This step configures the connector's identity and authenticates with the Veracode source system.
- Log in to Qualys ETM.
- Navigate to Connectors > Integration.
- Locate Veracode DAST V2 Connector and click Manage.
If the connector has already been added, click the connector name to open its configuration instead of clicking Manage.
- Click Proceed to Setup on the setup guide, then click Create Veracode DAST V2 Connection.
Connector Details
Field Type Description Name String A unique display name for this connector instance. Description String Optional free-text description of the connector's purpose. Maximum 200 characters. Authentication Details
Enter the user token credentials generated from the Veracode Platform.
Field Type Description API ID String The API ID generated from the Veracode Platform user account dropdown under API Credentials. API KEY Encrypted String The API secret key paired with the API ID above. Generated at the same time as the API ID. Stored encrypted in Qualys ETM. Important: The API Key (secret key) is displayed only once in the Veracode Platform at the time of generation. Ensure you copy and store it securely before closing the credentials dialog. If lost, you must generate a new credential pair, which revokes the existing one.
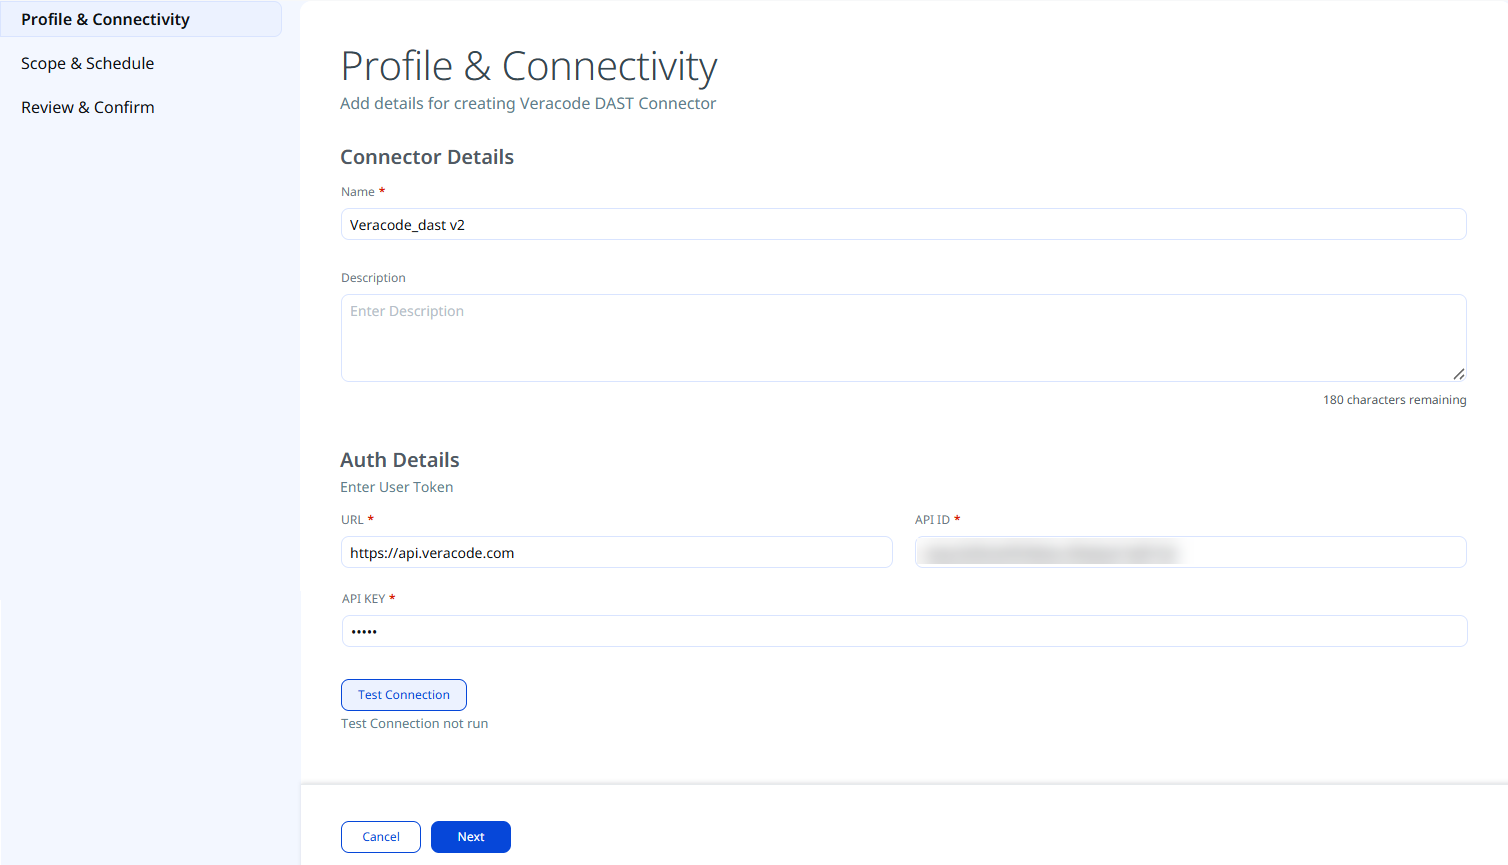
Test Connection
Click Test Connection after entering credentials. The following checks are performed:
- Network Reachability — Verifies that the connector endpoint is reachable over HTTPS (port 443).
- TLS Handshake — Confirms that a secure TLS connection can be established with the remote endpoint.
- Authentication Credential Check — Validates the configured credentials against the source system's authentication endpoint.
- Authorization Scope Check — Confirms that the provided credentials have the required permissions to access the configured data scope.
- Data Fetch — Verifies that data can be successfully retrieved from the source system using the configured connection.
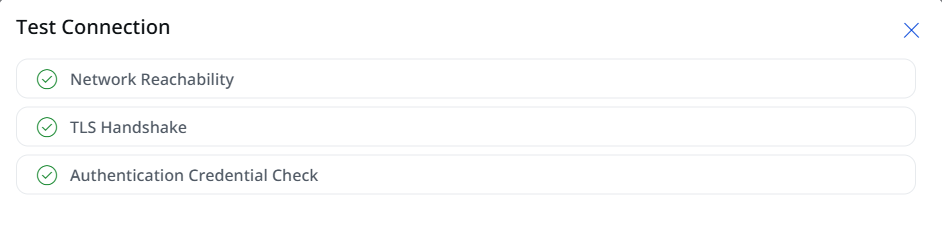
All five checks must pass before you can proceed. If the Authentication Credential Check fails with an Unauthorized error, verify that the Client ID, Client Secret, and Token URL are correct, and that the service account has not been disabled.
Set the Scope & ScheduleSet the Scope & Schedule
Configure which data to synchronize and when the connector should run.
- Under Data to Sync, the connector ingests Assets & Findings by default. This option reflects what this connector pulls, as shown in the setup guide.
The Info icon identifies the default selections for Assets as Application and Findings as Vulnerability used in data mapping.
- Set the Status to Active or Inactive.
- Configure the Schedule as a single occurrence or recurring run.
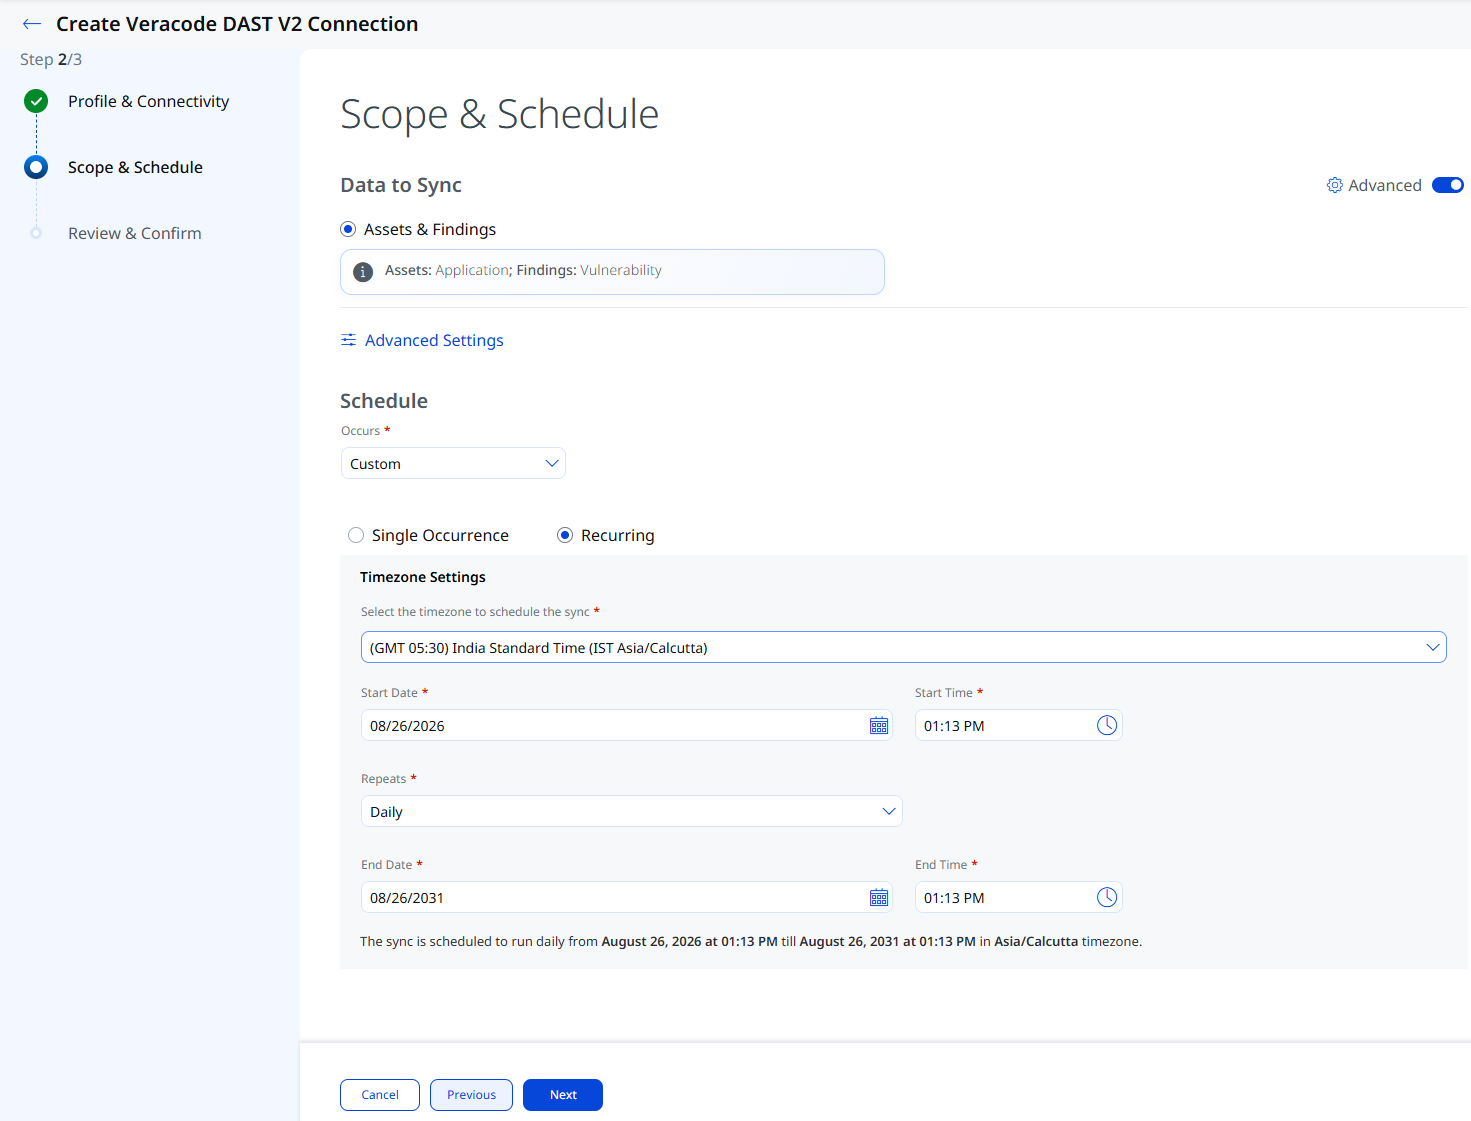
Schedule times are in UTC. Only vulnerability and asset data from the last 6 months is imported per Veracode API limitations, regardless of the schedule frequency configured.
- Advanced Settings (optional) - Turn on the Advanced Settings toggle to see the Filters, and Transform Mapping.
- Click Next to proceed to the review step.
- Review your changes and click Create.
Advanced Settings
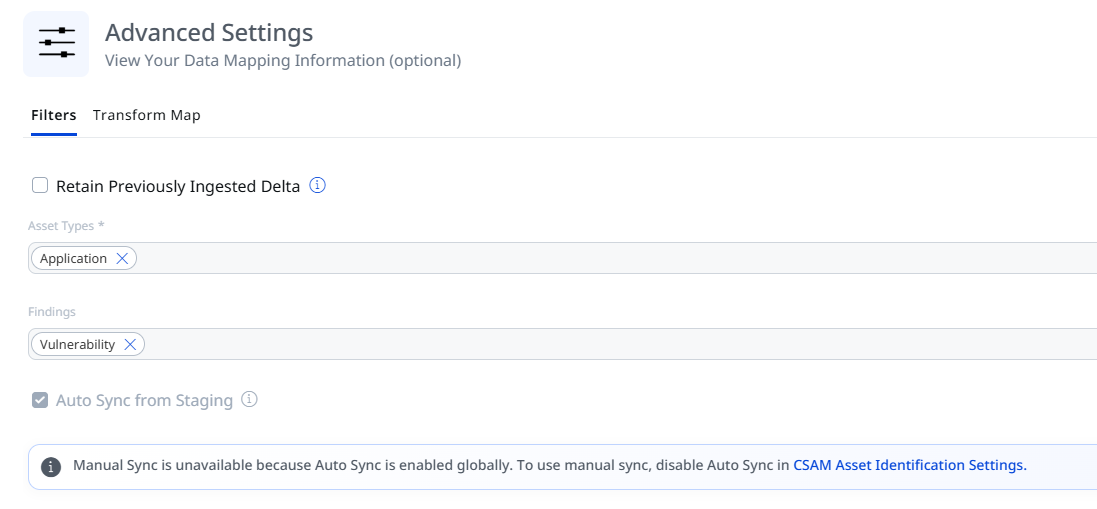
Clicking the Advanced Settings link opens a panel with three tabs: Filters, and Transform Map.
Filters Tab
| Filter | Options | Description |
|---|---|---|
| Retain Previously Ingested Delta | - | If enabled, the connector supports delta synchronization for incremental data retrieval. |
Transform Map
The Transform Map tab displays the default field mappings from Veracode DAST V2 source fields to Qualys ETM target fields for each asset class. Map the fields from Veracode DAST V2 to the corresponding fields in your target system. Transform Maps ensure that the data is transformed correctly during import or export.
The Veracode DAST V2 Connector offers an out-of-box transform map for you to proceed without further configuration.
Review and ConfirmReview and Confirm
Review all configured settings before creating the connection and then click Create.
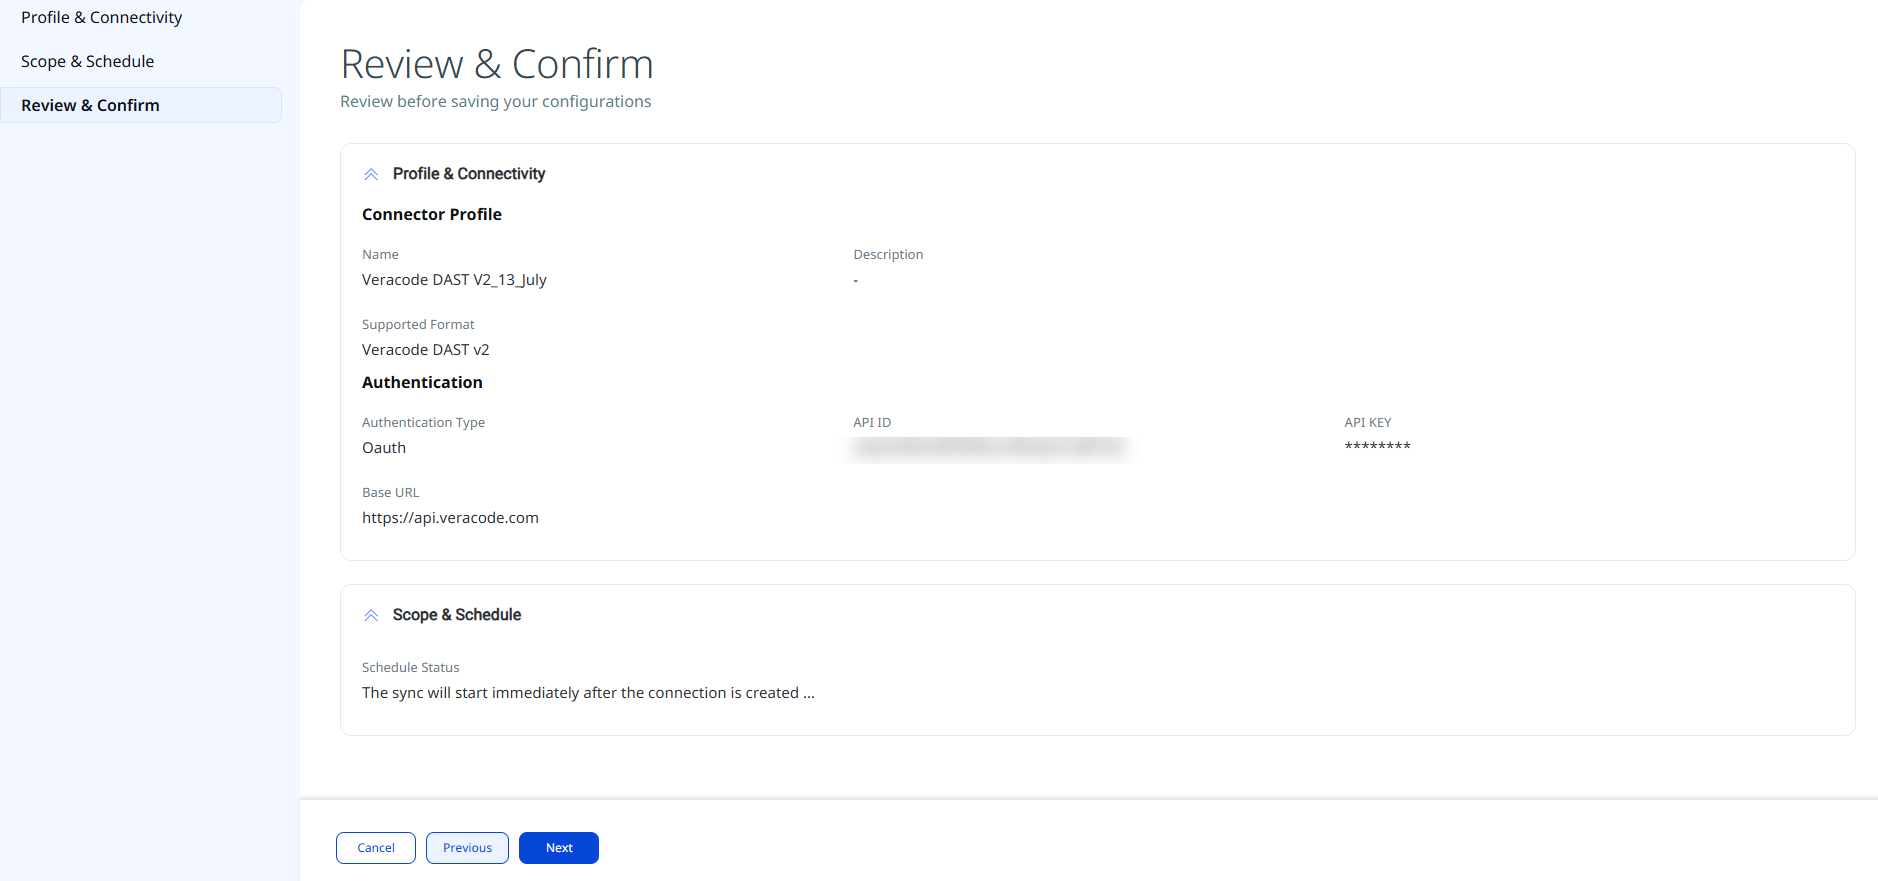
The new connection is displayed in the Connections list with a Registered state and an Active status.
How the Connection Works
The Veracode DAST V2 connector retrieves Web Application asset records and associated DAST vulnerability findings from Veracode and imports them into Qualys ETM. Only data from the last 6 months is ingested due to Veracode API limitations. Each scheduled or on-demand run performs a complete data pull; incremental (delta) synchronization is not available for this connector.
Connector States
A successfully configured connector progresses through the following states:
- Registered – The connector has been successfully created and registered to fetch data from Veracode.
- Scheduled – The connector is queued to execute a connection with Veracode according to its configured schedule.
- Processing – The connection is executing and the connector is actively fetching asset and findings data.
- Processed – The connector has successfully fetched assets. Findings may still be importing in the background; allow additional time before verifying findings in ETM.
The first run after connector creation may take up to 2 hours to complete. The Processed state confirms that asset data has been fetched, but findings ingestion may still be in progress. Wait for findings to appear in ETM before assuming the run is incomplete.
Viewing Assets and Findings in ETM
You can view the assets and findings in ETM in the following way.
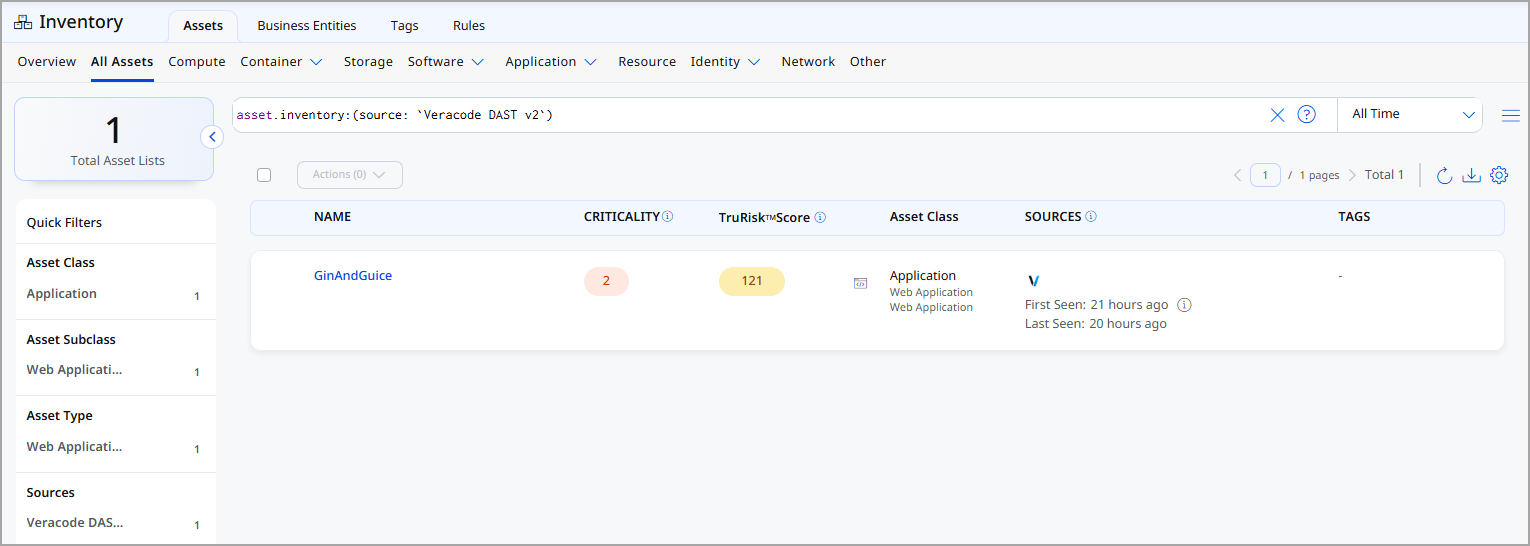
View Assets
Navigate to Enterprise TruRisk Management > Inventory > Assets. Use the following inventory filter to display Veracode-sourced assets:
inventory:(source:"Veracode")
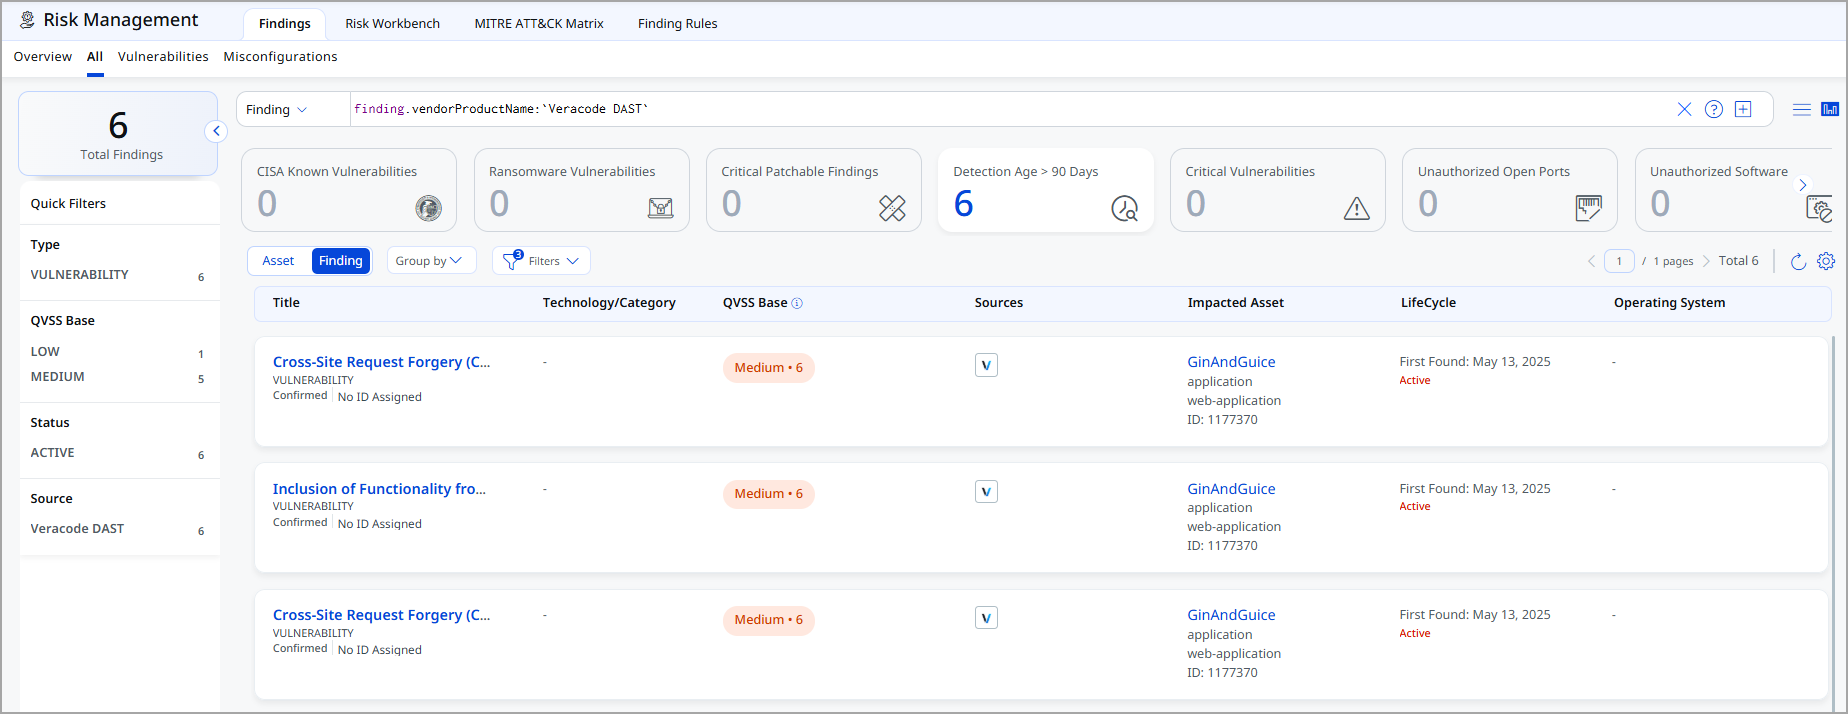
View Findings
Navigate to Enterprise TruRisk Management > Risk Management > Findings > Vulnerability. Use the following filter to list Veracode DAST findings:
findings.vendorProductname:"Veracode DAST"
Troubleshooting
| Issue | Resolution |
|---|---|
| Authentication failure on connector run | Verify that the API ID and API Key entered in Qualys ETM match the currently active credentials in Veracode. Generating new API credentials in Veracode automatically revokes the previous set. If credentials were recently regenerated, update the connector configuration with the new values via Edit Connector. |
| No assets or findings imported after first run | The connector transitions through Registered, Scheduled, Processing, and Processed states. The entire process may take up to 2 hours to complete. Verify that Veracode has DAST scan results available within the last 6 months, as older data is not imported due to Veracode API limitations. Confirm the connector has reached the Processed state before investigating further. |
| Connection test fails | Verify Qualys cloud can reach api.veracode.com over HTTPS (port 443). Confirm the API credentials have not been revoked or regenerated since they were entered in the connector configuration. |
| Assets appear in ETM but findings are missing | Findings ingestion continues after the connector reaches the Processed state. Allow additional processing time. Also confirm that the Veracode user account associated with the API credentials has the read:vulnerabilities permission and that scan results exist within the last 6 months. |
Additional Information
API Reference
The following Veracode REST API endpoints are called during each connector execution.
| Function | Endpoint |
Notes |
|---|---|---|
| Get Applications | https://api.veracode.com/appsec/v1/applications |
Returns all applications accessible to the authenticated user. |
| Get Application Findings | https://api.veracode.com/appsec/v1/analytics/report |
Returns SCA findings for the specified application. Example GUID: |
Only vulnerability and asset data from the last 6 months is imported due to Veracode API limitations.
Transformation Maps
Veracode DAST Transformation MappingVeracode DAST Transformation Mapping
| Source field | Target field |
|---|---|
application[0].oid |
asset.assetHeader.vendorAssetId |
filename |
asset.assetDetail.applicationAssetClass.baseUrl |
app_name |
asset.assetDetail.name |
application[0].guid |
asset.assetHeader.externalAssetId |
application[0].created |
asset.assetDetail.sourceCreatedAt |
application[0].modified |
asset.assetDetail.sourceUpdatedAt |
finding_id |
findingGroup.findings[].externalFindingId |
attack_vector |
findingGroup.findings[].name |
severity |
findingGroup.findings[].severity |
description |
findingGroup.findings[].description |
cwe_id |
findingGroup.findings[].findingType.vulnerability.cweId |
status |
findingGroup.findings[].findingStatus |
last_found_date |
findingGroup.findings[].lastFoundOn |
found_date |
findingGroup.findings[].firstFoundOn |
filename |
findingGroup.findings[].findingDetectionURL |
cwe_description |
findingGroup.findings[].impact |
assetTypeName |
asset.assetHeader.assetTypeName |