Wiz (Cloud Security) Connector
The Wiz CNAPP Connector retrieves cloud asset records and associated vulnerability findings from Wiz's cloud security platform via its GraphQL API and imports them into Qualys ETM for unified risk analysis and prioritization. The connector supports storage, compute, container instances, and container image asset types. Qualys ETM processes the incoming data by de-duplicating, normalizing, enriching, and calculating risk scores using TruRisk.
The connector supports incremental (delta) synchronization, allowing it to fetch only the changes since the last successful run rather than performing a full data pull each time.
Connector Details
The following table provides a comprehensive overview of what the Wiz (Cloud Security) connector supports.
| Vendor | Wiz |
| Product Name | Wiz CWP |
| Connector Category | Wiz CNAPP |
| Asset Types Supported | Storage, Compute, Container Instances, Container Images |
| Findings Support | Supported |
| Supported Version & Type | SaaS |
| Integration Method | API Integration (REST / GraphQL) |
| Direction | Unidirectional (Wiz to Qualys) |
| Incremental Sync (Delta) | Supported |
Supportability MatrixSupportability Matrix
| Asset Class | Finding Type | AWS | Azure | GCP | OCI |
|---|---|---|---|---|---|
| Compute | Resource Type | EC2 Instance | Azure Virtual Machine | Compute Engine VM | OCI Compute Instance |
| Inventory | ✓ | ✓ | ✓ | ✓ | |
| Vulnerabilities | ✓ | ✓ | ✓ | ✓ | |
| Misconfigurations | ✓ | ✓ | ✓ | ✓ | |
| Serverless | Resource Type | AWS Lambda Function | Azure Function App | GCP Cloud Functions | OCI Functions |
| Inventory | ✓ | — | ✓ | — | |
| Vulnerabilities | ✓ | — | ✓ | — | |
| Misconfigurations | ✓ | — | ✓ | — | |
| Container Image | Resource Type | Amazon ECR (Container Image) |
Azure Container Registry (ACR Image) |
Google Artifact Registry (Container Image) |
OCI Container Registry (OCIR Image) |
| Inventory | ✓ | ✓ | ✓ | — | |
| Vulnerabilities | ✓ | ✓ | ✓ | — | |
| Misconfigurations | ✓ | ✓ | ✓ | — | |
| Container Instance | Resource Type | Amazon ECS Task / AWS Fargate Container |
Azure Container Instance (ACI) |
GKE Pod / Cloud Run Container |
OCI Container Instances |
| Inventory | ✓ | ✓ | — | ✓ | |
| Vulnerabilities | ✓ | ✓ | — | ✓ | |
| Misconfigurations | ✓ | ✓ | — | ✓ | |
| Identity - User | Resource Type | AWS - IAM User | Azure - User | GCP - User | OCI - IAM User |
| Inventory | ✓ | ✓ | — | — | |
| Vulnerabilities | NA | NA | NA | NA | |
| Misconfigurations | ✓ | ✓ | — | — | |
| Identity - Role | Resource Type | AWS - IAM Role | Azure - Role Definition | GCP - Role | OCI - Role |
| Inventory | — | ✓ | ✓ | — | |
| Vulnerabilities | NA | NA | NA | NA | |
| Misconfigurations | — | ✓ | ✓ | — | |
| Identity - Group | Resource Type | AWS - IAM Group | Azure - Group | GCP - Group | OCI - IAM Group |
| Inventory | ✓ | — | ✓ | — | |
| Vulnerabilities | NA | NA | NA | NA | |
| Misconfigurations | — | — | ✓ | — |
"—" entries indicate the asset class/finding type combination is not yet available for this connector. NA indicates that CNAPP vendor is currently not supporting this asset class/finding type combination.
Configure the Connector
The configuration wizard consists of three steps.
Before You Begin - AuthenticationBefore You Begin - Authentication
Have the following ready before starting the connector configuration:
- Ensure you have access to the Wiz portal with permissions to create service accounts.
- Create a service account in Wiz with the Project Admin role and configure it as a Custom Integration – GraphQL type. Note the Client ID and Client Secret immediately upon creation.
- Obtain your Tenant Data Center from the Wiz portal: click the User icon, select Tenant Info, and note the Data Center and Regions values. You will need these to construct your API endpoint URL.
- Contact your Technical Account Manager (TAM) or Qualys Support to activate the connector for your subscription.
Permissions Required
The Wiz service account must have the following minimum permissions:
read:vulnerabilities— Required to retrieve vulnerability findings.read:resources— Required to retrieve asset data.-
read:cloud_configuration— Required to retrieve misconfiguration data. -
read:inventory— Required to retrieve inventory data.
These permissions are necessary for a successful test connection.
The built-in Project Admin role in Wiz provides both of these permissions. If you prefer to use a custom role, ensure both permissions are explicitly granted.
Key rotation: When rotating credentials, regenerate the Client Secret in the Wiz service account settings. Then update the credentials in Qualys ETM using the Edit Connector option.
Create a Profile and ConnectionCreate a Profile and Connection
This step establishes the connector's identity and authenticates it with Wiz.
- Log in to Qualys ETM.
- Navigate to Connectors > Integration.
- Locate the Wiz (Cloud Security) Connector on the Connector Marketplace and click Add. This is a one-time task.
Note: If the connector is already added, navigate to My Connectors, search for the Wiz (Cloud Security) connector, and click Manage Connections.
- From the connector tile, click Manage Connections.
- Click Create Connection. The Setup Guide opens, displaying the Before You Begin checklist alongside four reference tabs: Overview, Auth Setup, Permissions, and Troubleshooting. Review these before proceeding.
- Click Proceed to Setup.
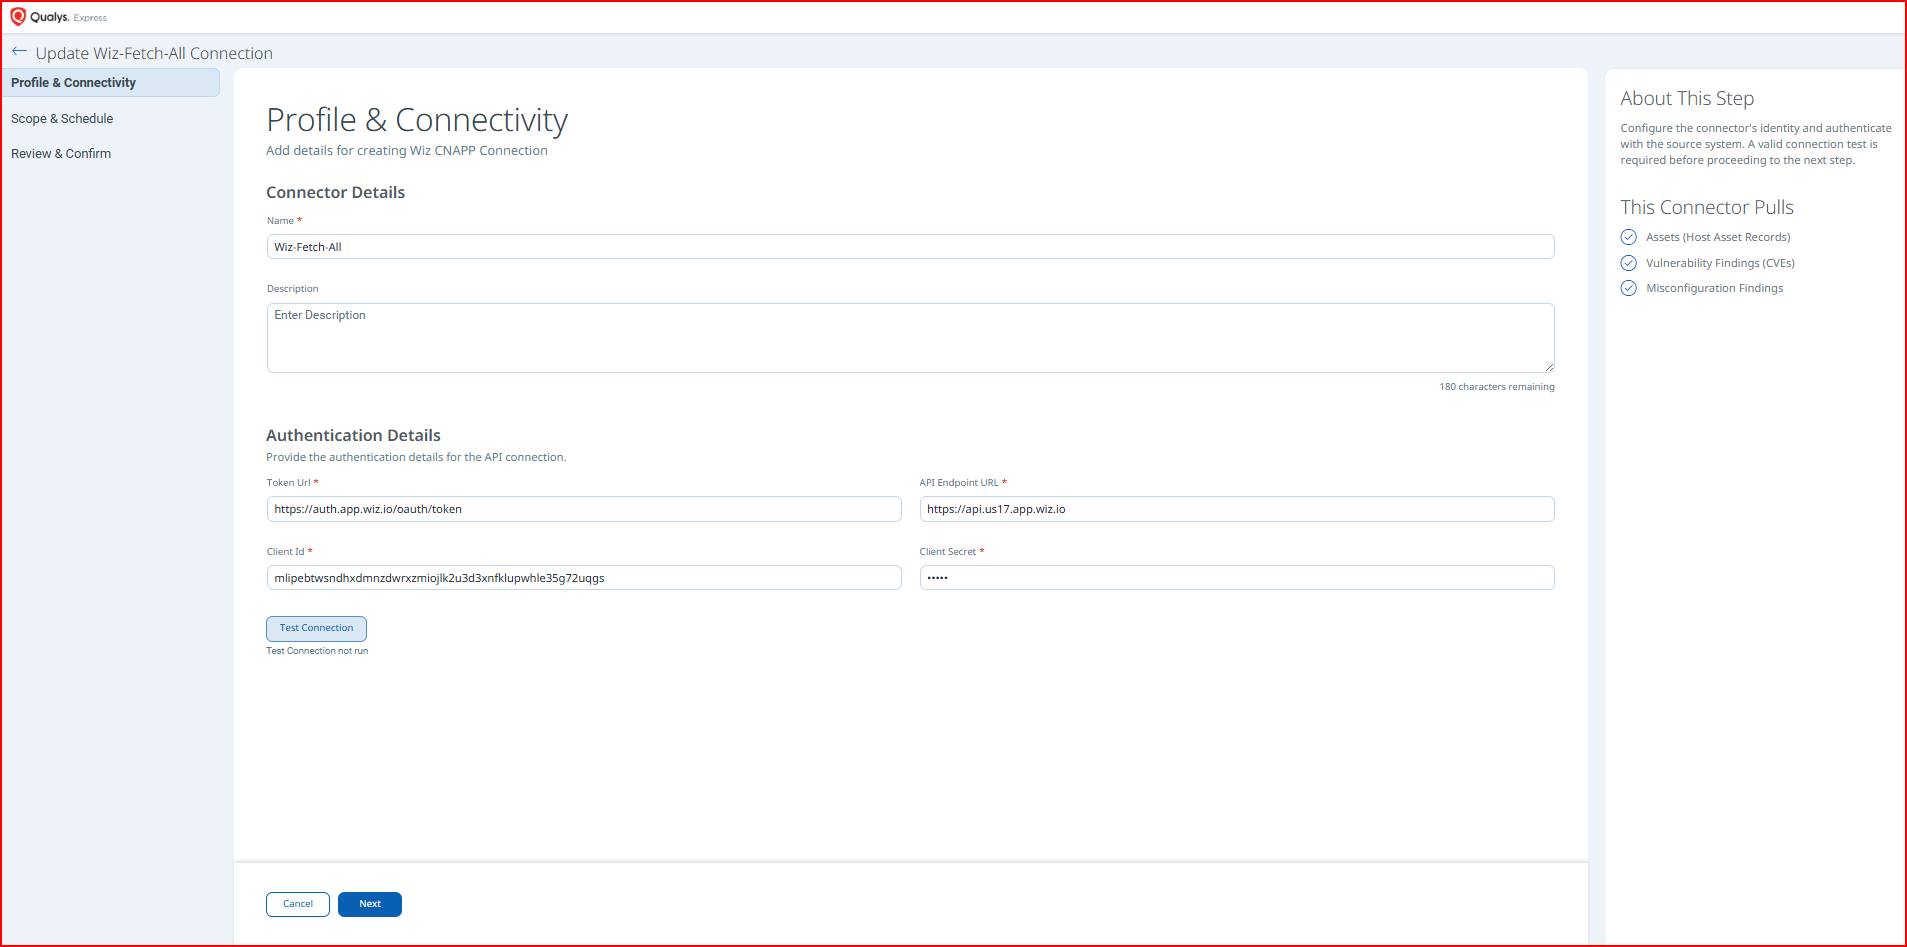
- On the Profile & Connectivity page, complete the following fields:
Connector Details
Field Description Name (required) A unique display name for this connector connection. Description An optional description of the connection's purpose. Authentication Details
Provide the following values to authenticate the connector with your Wiz environment.
Field Type Description Token URL (required) String The OAuth 2.0 token endpoint for your Wiz environment. Example: https://auth.app.wiz.io/oauth/tokenAPI Endpoint URL (required) String Your Wiz GraphQL API endpoint. Follows the format https://api.<TENANT_DATA_CENTER>.<ENVIRONMENT>. Example:https://api.us17.app.wiz.io/Client ID (required) String The Client ID from the Wiz service account created with the Custom Integration – GraphQL type. Client Secret (required) Encrypted String The Client Secret from the Wiz service account. Copy this immediately upon service account creation — it is not shown again. Finding your API Endpoint URL: In the Wiz portal, click the User icon and select Tenant Info. Use the Data Center and Region values to construct the URL in the format above.
- Click Test Connection. A modal will appear showing the status of five sequential checks:
- Network Reachability — Verifies that the connector endpoint is reachable over HTTPS (port 443).
- TLS Handshake — Confirms that a secure TLS connection can be established with the remote endpoint.
- Authentication Credential Check — Validates the configured credentials against the source system's authentication endpoint.
- Authorization Scope Check — Confirms that the provided credentials have the required permissions to access the configured data scope.
- Data Fetch — Verifies that data can be successfully retrieved from the source system using the configured connection.
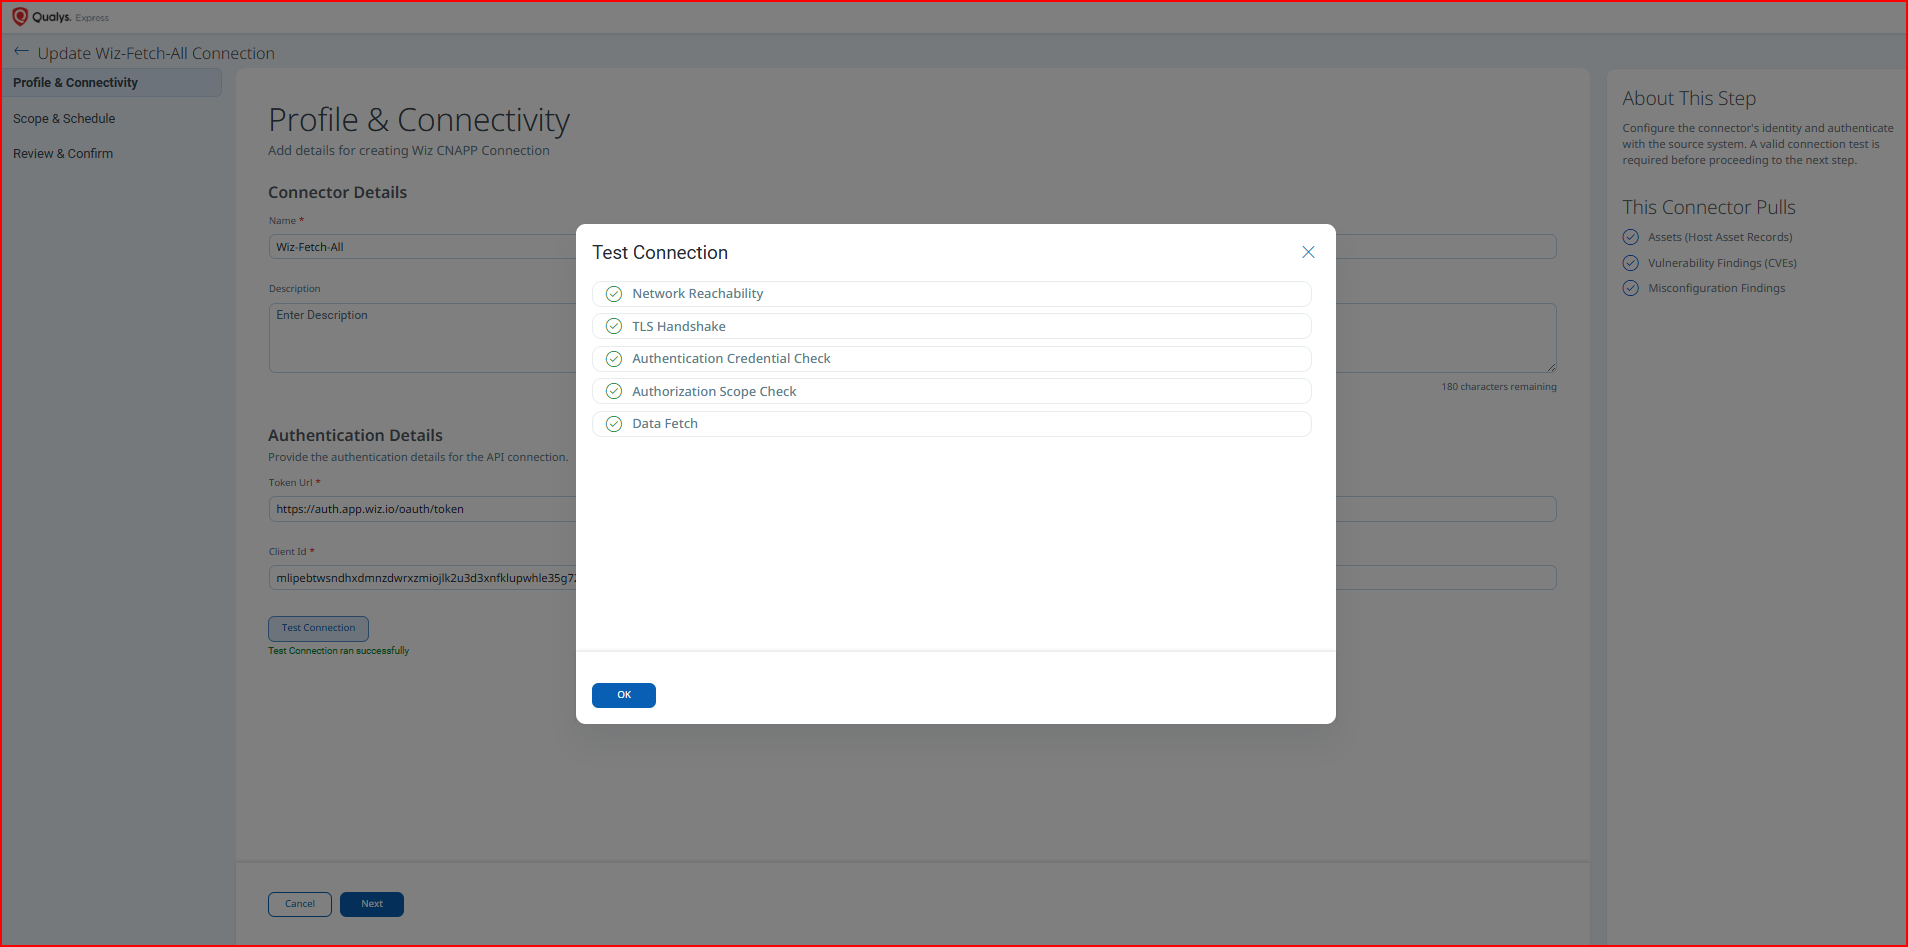
Important: All five checks must pass before you can proceed. If the Authentication Credential Check fails with an Unauthorized error, verify that the Client ID, Client Secret, and Token URL are correct, and that the service account has not been disabled or revoked in Wiz.
- Click OK to dismiss the test result modal, then click Next.
Set the Scope & ScheduleSet the Scope & Schedule
This step defines what data is ingested and when the connector runs.
- Data to Sync — Select one of the following options:
- Assets & Findings — Ingests both asset records and associated vulnerability and misconfiguration findings (recommended).
- Assets — Ingests asset records only, without findings.
- Advanced Settings (optional) — Click Advanced Settings to open a panel where you can further refine what is ingested. See Advanced Settings below.
- Schedule — Under the Schedule section, select an execution frequency from the Occurs dropdown (for example, Daily). The system will display the calculated start date, end date, and timezone for the scheduled run.
Note: The schedule timezone is determined by your Qualys account settings. The connector will run from the configured start date for a default period of 5 years.
- Click Next to proceed to the final step.
Step 3: Review & Confirm
Review all configured settings before creating the connection.
The new connection will appear in the Connections list with a state of Registered and a status of Active.
Advanced Settings
Enabling the Advanced toggle on the Scope & Schedule page or clicking the Advanced Settings link opens a panel with two tabs: Filters and Transform Map.
Filters Tab
Use the Filters tab to restrict which asset types and findings are ingested.
| Filter | Options | Description |
|---|---|---|
| Asset Types | Identity, Storage, Container Image, Compute, Network, Container Instance, Serverless | Select the specific asset types to ingest. By default, all supported types are selected. Remove any types you do not want to sync. |
| Findings | Select option(s) | Optionally filter findings by type. If left empty, all finding types (Vulnerabilities and Misconfigurations) are ingested when Assets & Findings is selected on the Scope & Schedule page. |
Note: Click Save after making changes in the Advanced Settings panel. Closing without saving discards any modifications.
Transform Map Tab
The Transform Map tab displays the default field mappings from Wiz source fields to Qualys ETM target fields for each asset class. These mappings are predefined by Qualys and applied automatically during connector execution. No configuration is required — this tab is provided for reference only.
How the Connection Works
On schedule (or on demand), the Wiz connector retrieves cloud asset records and associated vulnerability and misconfiguration findings from the Wiz GraphQL API and imports them into ETM. The connector supports incremental (delta) synchronization, meaning each run after the initial sync fetches only data that has changed since the last successful execution.
On each scheduled or on-demand run, the Wiz connector fetches the following data from the Wiz GraphQL API and imports it into ETM:
- Assets (Host Asset Records) — Cloud resource inventory across storage, compute, container instances, container images, identity, network, and serverless asset types.
- Vulnerability Findings (CVEs) — CVE-based vulnerability findings associated with the ingested assets.
- Misconfiguration Findings — Security misconfigurations detected by Wiz across the supported asset classes.
Connector States
After creation, a connector connection moves through the following states:
- Registered — The connection is created and registered; data fetching has not yet begun.
- Scheduled — The connection is queued for its next execution.
- Processing — Assets and findings are actively being fetched from Wiz.
- Processed — Assets have been imported; findings may continue processing in the background.
Note: The initial sync may take up to 2 hours depending on data volume. Subsequent delta syncs are typically faster.
Viewing Assets and Findings in ETM
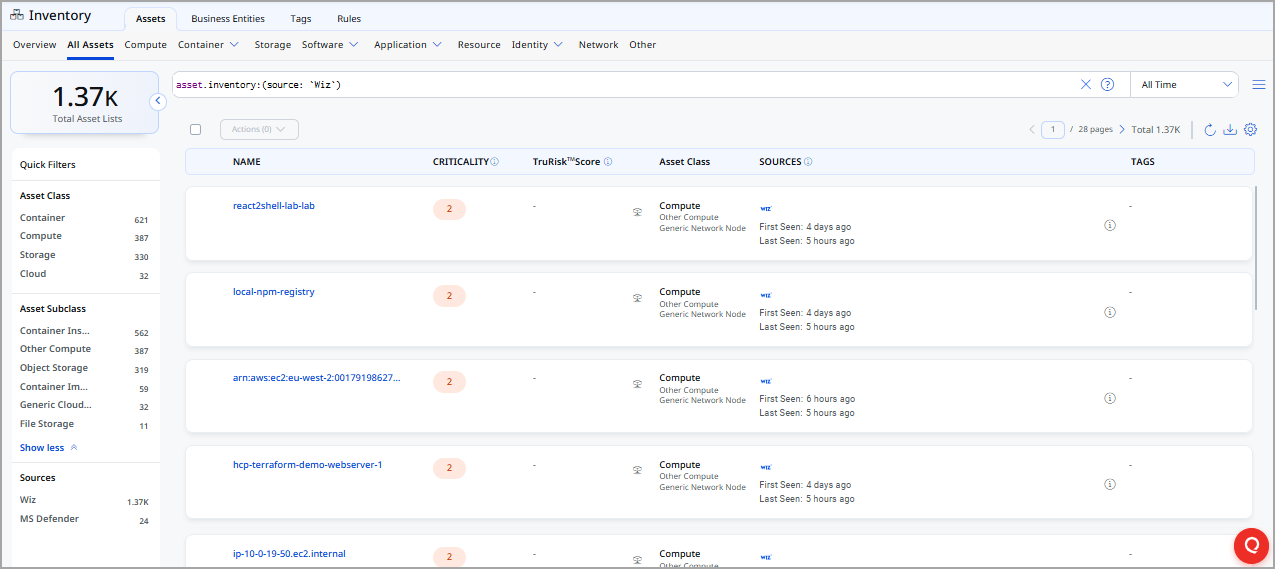
After ingestion, Wiz cloud assets and findings are available in ETM.
- Assets: Navigate to Enterprise TruRisk Management > Inventory > Assets > All Assets.
Use the tag or asset filter:tags.name:"Wiz"orasset.inventory:"Wiz Cloud Security".
- Findings (Vulnerabilities): Navigate to Enterprise TruRisk Management > Risk Management > Findings > Vulnerability.
Use the vendor filter:findings.vendorProductname:"Wiz Cloud Security".
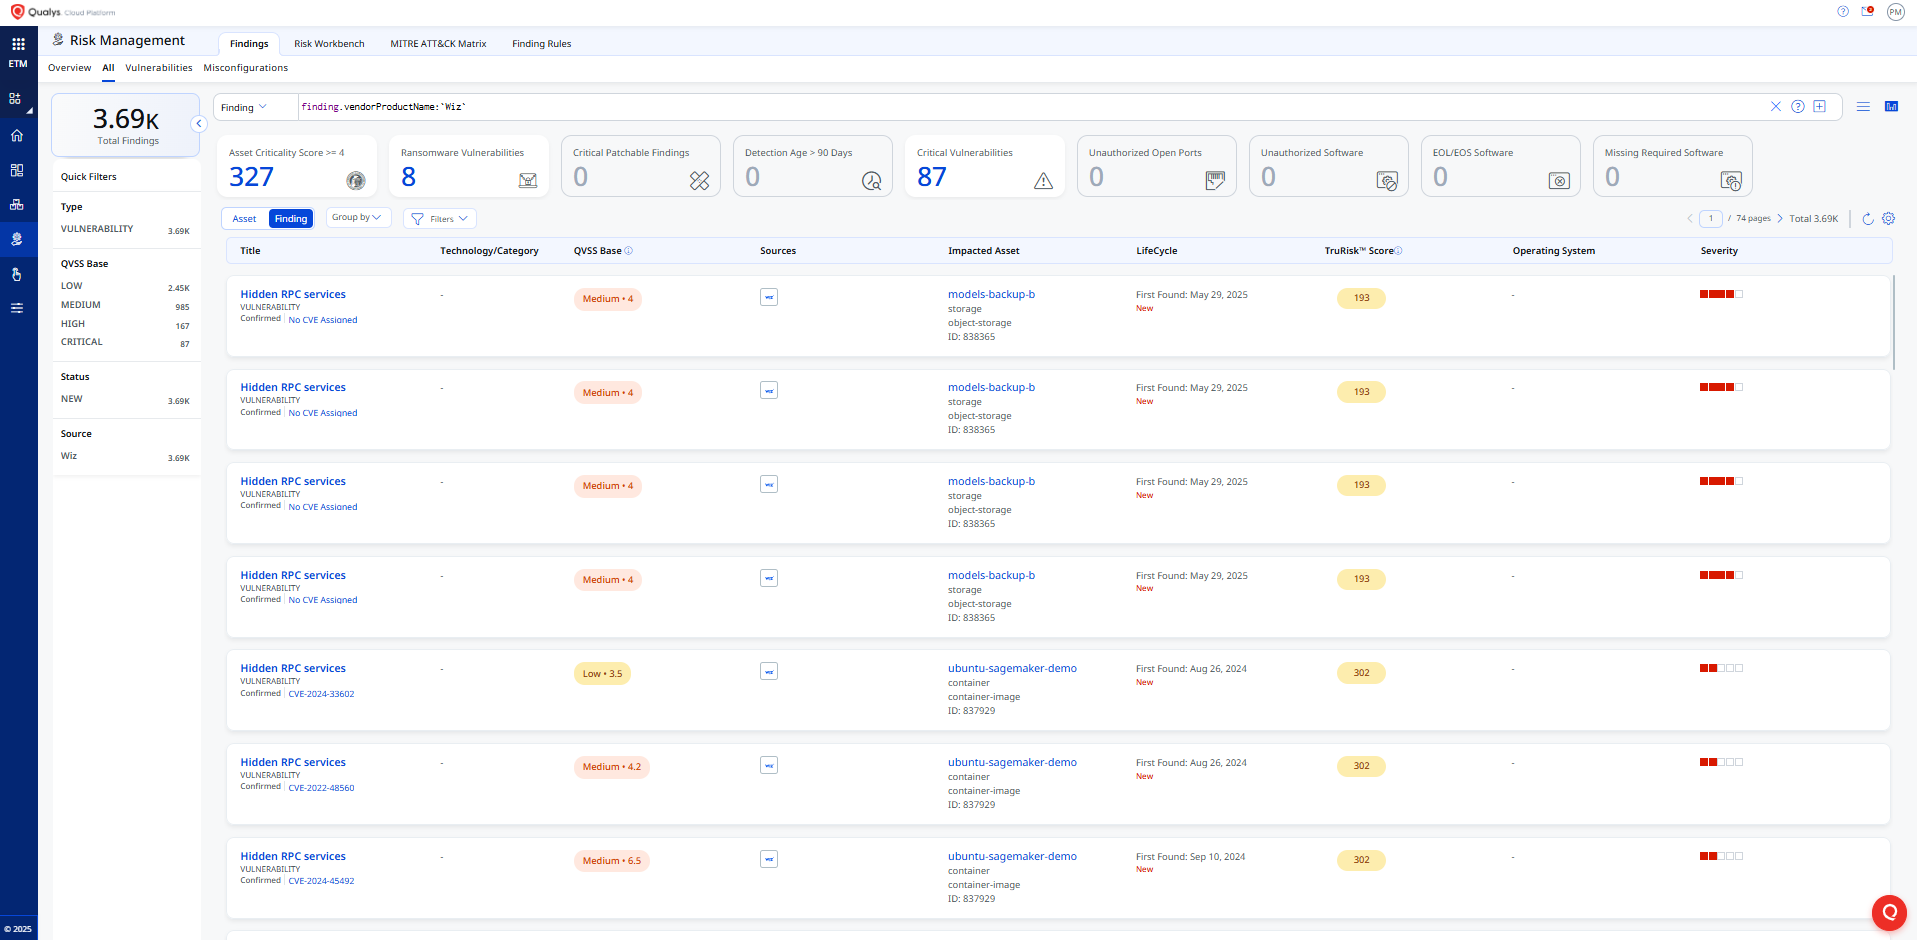
- Findings (Misconfigurations):
Click any asset or finding row to open a detailed view.
Troubleshooting
The following table covers the most common issues encountered when configuring or running the Wiz connector.
| Issue | Resolution |
|---|---|
| Authentication failure on connector run | Verify the API Endpoint URL, Client ID, Client Secret, and Token URL entered in Qualys ETM are correct. Confirm the service account has not been disabled or revoked in Wiz. |
| No assets imported after the first run | The initial sync may take up to 2 hours. Verify the service account has the Project Admin role. Check the connector state in Qualys ETM — it should progress through Registered → Scheduled → Processing → Processed. |
| Connector not available in the integrations list | The connector requires activation. Contact your TAM or Qualys Support to activate it for your subscription. |
| Test Connection fails at Authorization Scope Check | Ensure the Wiz service account role includes read:vulnerabilities and read:resources permissions. The Project Admin role provides both by default. |
| Test Connection fails at Data Fetch | Confirm the API Endpoint URL is correct for your Wiz tenant and region. Check that the service account's scope includes access to the relevant Wiz projects or resource groups. |
WIZ CNAPP Transformation Map
The default transformation map configured for the WIZ CNAPP connector is fetched from the database and utilized during the execution of the connector profile to perform data transformation.
Compute Transformation Map
| graphEntity.properties.deployment Coverage_sensor_deploymentStatus |
asset.assetDetail.typedAttributes.& |
| graphEntity.properties.deployment Coverage_sensor_recommendedSensorType |
asset.assetDetail.typedAttributes.& |
| graphEntity.properties.deployment Coverage_sensor_workloadScanner_deploymentStatus |
asset.assetDetail.typedAttributes.& |
| graphEntity.properties.deployment Coverage_sensor_installed |
asset.assetDetail.typedAttributes.& |
| graphEntity.properties.name | asset.assetDetail.hostname |
| graphEntity.properties.name | asset.assetDetail.hostIdentity.hostname |
| graphEntity.properties.fullResourceName | asset.assetDetail.typedAttributes.& |
| graphEntity.properties.instanceType | asset.assetDetail.typedAttributes.& |
| graphEntity.properties.isContainerHost | asset.assetDetail.typedAttributes.& |
| graphEntity.properties.isEphemeral | asset.assetDetail.typedAttributes.& |
| graphEntity.properties.isManaged | asset.assetDetail.typedAttributes.& |
| isOpenToAllInternet | asset.assetDetail.typedAttributes.& |
| isAccessibleFromInternet | asset.assetDetail.typedAttributes.& |
| hasAccessToSensitiveData | asset.assetDetail.typedAttributes.& |
| hasAdminPrivileges | asset.assetDetail.typedAttributes.& |
| hasHighPrivileges | asset.assetDetail.typedAttributes.& |
| hasSensitiveData | asset.assetDetail.typedAttributes.& |
| graphEntity.properties.externalId | asset.assetHeader.externalAssetId |
| FUNCTION_PICKER | asset.assetHeader.status |
| graphEntity.properties._vertexID | asset.assetHeader.vendorAssetId |
| graphEntity.properties.name | asset.assetDetail.name |
| graphEntity.properties.name | asset.assetDetail.computeAssetClass. cloudInstance.hostname |
| graphEntity.properties.name | asset.assetDetail.network[].hostname |
| graphEntity.properties.vCPUs | asset.assetDetail.processor.numberOfCpu |
| graphEntity.properties.creationDate | asset.assetDetail.sourceCreatedAt |
| graphEntity.properties.updatedAt | asset.assetDetail.sourceUpdatedAt |
| deletedAt | asset.assetDetail.sourceDeletedAt |
| graphEntity.properties.cloudPlatform | asset.assetDetail.cloudInfo.provider |
| cloudAccount.id | asset.assetDetail.cloudInfo.accountId |
| cloudAccount.name | asset.assetDetail.cloudInfo.accountName |
| graphEntity.properties.zone | asset.assetDetail.cloudInfo.availabilityZone |
| region | asset.assetDetail.cloudInfo.region |
| graphEntity.properties.cloudProviderURL | asset.assetDetail.cloudInfo.providerUrl |
| tags[].key | asset.assetDetail.externalTags[].key |
| tags[].value | asset.assetDetail.externalTags[].value |
| graphEntity.properties.validatedOpenPorts[] | asset.assetDetail.computeAssetClass.openPorts[].port |
| graphEntity.properties.deployment Coverage_sensor_apiSecurity_deploymentStatus |
asset.assetDetail.computeAssetClass.services[].status |
| id | asset.assetDetail.computeAssetClass.cloudInstance.id |
| typeFields.instanceType | asset.assetDetail.computeAssetClass.cloudInstance.type |
| typeFields.ipAddresses[] | asset.assetDetail.network[].ipv4Addresses[] |
| typeFields.operatingSystem | asset.assetDetail.operatingSystem.name |
| graphEntity.properties.deployment Coverage_sensor_deploymentStatus |
asset.assetDetail.typedAttributes.& |
| typeFields.ipAddresses[] | asset.assetDetail.network[].ipv4Addresses[] |
| graphEntity.properties.deployment Coverage_sensor_recommendedSensorType |
asset.assetDetail.typedAttributes.& |
| graphEntity.properties.deployment Coverage_sensor_workloadScanner_deploymentStatus |
asset.assetDetail.typedAttributes.& |
| graphEntity.properties.deployment Coverage_sensor_installed |
asset.assetDetail.typedAttributes.& |
| graphEntity.properties.fullResourceName | asset.assetDetail.typedAttributes.& |
| graphEntity.properties.instanceType | asset.assetDetail.typedAttributes.& |
| graphEntity.properties.isContainerHost | asset.assetDetail.typedAttributes.& |
| graphEntity.properties.isEphemeral | asset.assetDetail.typedAttributes.& |
| graphEntity.properties.isManaged | asset.assetDetail.typedAttributes.& |
| isOpenToAllInternet | asset.assetDetail.typedAttributes.& |
| isAccessibleFromInternet | asset.assetDetail.typedAttributes.& |
| hasAccessToSensitiveData | asset.assetDetail.typedAttributes.& |
| hasAdminPrivileges | asset.assetDetail.typedAttributes.& |
| hasHighPrivileges | asset.assetDetail.typedAttributes.& |
| hasSensitiveData | asset.assetDetail.typedAttributes.& |
| graphEntity.properties.externalId | asset.assetHeader.externalAssetId |
| FUNCTION_PICKER | asset.assetHeader.status |
| graphEntity.properties.providerUniqueId | asset.assetHeader.vendorAssetId |
| graphEntity.properties.name | asset.assetDetail.name |
| graphEntity.properties.name | asset.assetDetail.hostIdentity.hostname |
| graphEntity.properties.name | asset.assetDetail.network[].hostname |
| graphEntity.properties.name | asset.assetDetail.computeAssetClass. cloudInstance.hostname |
| graphEntity.properties.name | asset.assetDetail.hostname |
| graphEntity.properties.vCPUs | asset.assetDetail.processor.numberOfCpu |
| graphEntity.properties.creationDate | asset.assetDetail.sourceCreatedAt |
| graphEntity.properties.updatedAt | asset.assetDetail.sourceUpdatedAt |
| deletedAt | asset.assetDetail.sourceDeletedAt |
| graphEntity.properties.cloudPlatform | asset.assetDetail.cloudInfo.provider |
| cloudAccount.id | asset.assetDetail.cloudInfo.accountId |
| cloudAccount.name | asset.assetDetail.cloudInfo.accountName |
| graphEntity.properties.zone | asset.assetDetail.cloudInfo.availabilityZone |
| region | asset.assetDetail.cloudInfo.region |
| graphEntity.properties.cloudProviderURL | asset.assetDetail.cloudInfo.providerUrl |
| tags[].key | asset.assetDetail.externalTags[].key |
| tags[].value | asset.assetDetail.externalTags[].value |
| graphEntity.properties.validatedOpenPorts[] | asset.assetDetail.computeAssetClass.openPorts[].port |
| graphEntity.properties.deployment Coverage_sensor_apiSecurity_deploymentStatus |
asset.assetDetail.computeAssetClass.services[].status |
| id | asset.assetDetail.computeAssetClass.cloudInstance.id |
| typeFields.instanceType | asset.assetDetail.computeAssetClass.cloudInstance.type |
| typeFields.operatingSystem | asset.assetDetail.operatingSystem.name |
| graphEntity.properties.deploymentCoverage_sensor_deploymentStatus | asset.assetDetail.typedAttributes.& |
| typeFields.ipAddresses[] | asset.assetDetail.network[].ipv4Addresses[] |
| graphEntity.properties.deploymentCoverage_sensor_recommendedSensorType | asset.assetDetail.typedAttributes.& |
| graphEntity.properties.deploymentCoverage_sensor_workloadScanner_deploymentStatus | asset.assetDetail.typedAttributes.& |
| graphEntity.properties.deploymentCoverage_sensor_installed | asset.assetDetail.typedAttributes.& |
| graphEntity.properties.fullResourceName | asset.assetDetail.typedAttributes.& |
| graphEntity.properties.instanceType | asset.assetDetail.typedAttributes.& |
| graphEntity.properties.isContainerHost | asset.assetDetail.typedAttributes.& |
| graphEntity.properties.isEphemeral | asset.assetDetail.typedAttributes.& |
| graphEntity.properties.isManaged | asset.assetDetail.typedAttributes.& |
| isOpenToAllInternet | asset.assetDetail.typedAttributes.& |
| isAccessibleFromInternet | asset.assetDetail.typedAttributes.& |
| hasAccessToSensitiveData | asset.assetDetail.typedAttributes.& |
| hasAdminPrivileges | asset.assetDetail.typedAttributes.& |
| hasHighPrivileges | asset.assetDetail.typedAttributes.& |
| hasSensitiveData | asset.assetDetail.typedAttributes.& |
| graphEntity.properties.name | asset.assetDetail.hostname |
| graphEntity.properties.externalId | asset.assetHeader.externalAssetId |
| FUNCTION_PICKER | asset.assetHeader.status |
| graphEntity.properties.providerUniqueId | asset.assetHeader.vendorAssetId |
| graphEntity.properties.name | asset.assetDetail.name |
| graphEntity.properties.name | asset.assetDetail.hostIdentity.hostname |
| graphEntity.properties.name | asset.assetDetail.computeAssetClass.cloudInstance.hostname |
| graphEntity.properties.name | asset.assetDetail.network[].hostname |
| graphEntity.properties.vCPUs | asset.assetDetail.processor.numberOfCpu |
| graphEntity.properties.creationDate | asset.assetDetail.sourceCreatedAt |
| graphEntity.properties.updatedAt | asset.assetDetail.sourceUpdatedAt |
| deletedAt | asset.assetDetail.sourceDeletedAt |
| graphEntity.properties.cloudPlatform | asset.assetDetail.cloudInfo.provider |
| cloudAccount.id | asset.assetDetail.cloudInfo.accountId |
| cloudAccount.name | asset.assetDetail.cloudInfo.accountName |
| graphEntity.properties.zone | asset.assetDetail.cloudInfo.availabilityZone |
| region | asset.assetDetail.cloudInfo.region |
| graphEntity.properties.cloudProviderURL | asset.assetDetail.cloudInfo.providerUrl |
| tags[].key | asset.assetDetail.externalTags[].key |
| tags[].value | asset.assetDetail.externalTags[].value |
| graphEntity.properties.validatedOpenPorts[] | asset.assetDetail.computeAssetClass.openPorts[].port |
| graphEntity.properties.deploymentCoverage_sensor_apiSecurity_deploymentStatus | asset.assetDetail.computeAssetClass.services[].status |
| id | asset.assetDetail.computeAssetClass.cloudInstance.id |
| typeFields.instanceType | asset.assetDetail.computeAssetClass.cloudInstance.type |
| typeFields.operatingSystem | asset.assetDetail.operatingSystem.name |
| graphEntity.properties.deployment Coverage_sensor_deploymentStatus |
asset.assetDetail.typedAttributes.& |
| typeFields.ipAddresses[] | asset.assetDetail.network[].ipv4Addresses[] |
| graphEntity.properties.deployment Coverage_sensor_recommendedSensorType |
asset.assetDetail.typedAttributes.& |
| graphEntity.properties.deployment Coverage_sensor_workloadScanner_deploymentStatus |
asset.assetDetail.typedAttributes.& |
| graphEntity.properties.deployment Coverage_sensor_installed |
asset.assetDetail.typedAttributes.& |
| graphEntity.properties.fullResourceName | asset.assetDetail.typedAttributes.& |
| graphEntity.properties.instanceType | asset.assetDetail.typedAttributes.& |
| graphEntity.properties.isContainerHost | asset.assetDetail.typedAttributes.& |
| graphEntity.properties.isEphemeral | asset.assetDetail.typedAttributes.& |
| graphEntity.properties.isManaged | asset.assetDetail.typedAttributes.& |
| isOpenToAllInternet | asset.assetDetail.typedAttributes.& |
| isAccessibleFromInternet | asset.assetDetail.typedAttributes.& |
| hasAccessToSensitiveData | asset.assetDetail.typedAttributes.& |
| hasAdminPrivileges | asset.assetDetail.typedAttributes.& |
| hasHighPrivileges | asset.assetDetail.typedAttributes.& |
| hasSensitiveData | asset.assetDetail.typedAttributes.& |
| graphEntity.properties.externalId | asset.assetHeader.externalAssetId |
| FUNCTION_PICKER | asset.assetHeader.status |
| graphEntity.properties.providerUniqueId | asset.assetHeader.vendorAssetId |
| graphEntity.properties.name | asset.assetDetail.name |
| graphEntity.properties.name | asset.assetDetail.hostIdentity.hostname |
| graphEntity.properties.name | asset.assetDetail.network[].hostname |
| graphEntity.properties.name | asset.assetDetail.computeAssetClass.cloudInstance.hostname |
| graphEntity.properties.name | asset.assetDetail.hostname |
| graphEntity.properties.vCPUs | asset.assetDetail.processor.numberOfCpu |
| graphEntity.properties.creationDate | asset.assetDetail.sourceCreatedAt |
| graphEntity.properties.updatedAt | asset.assetDetail.sourceUpdatedAt |
| deletedAt | asset.assetDetail.sourceDeletedAt |
| graphEntity.properties.cloudPlatform | asset.assetDetail.cloudInfo.provider |
| cloudAccount.id | asset.assetDetail.cloudInfo.accountId |
| cloudAccount.name | asset.assetDetail.cloudInfo.accountName |
| graphEntity.properties.zone | asset.assetDetail.cloudInfo.availabilityZone |
| region | asset.assetDetail.cloudInfo.region |
| graphEntity.properties.cloudProviderURL | asset.assetDetail.cloudInfo.providerUrl |
| tags[].key | asset.assetDetail.externalTags[].key |
| tags[].value | asset.assetDetail.externalTags[].value |
| graphEntity.properties.validatedOpenPorts[] | asset.assetDetail.computeAssetClass.openPorts[].port |
| graphEntity.properties.deploymentCoverage_sensor_apiSecurity_deploymentStatus | asset.assetDetail.computeAssetClass.services[].status |
| id | asset.assetDetail.computeAssetClass.cloudInstance.id |
| typeFields.instanceType | asset.assetDetail.computeAssetClass.cloudInstance.type |
| typeFields.operatingSystem | asset.assetDetail.operatingSystem.name |
AWS.VIRTUAL_MACHINE_IMAGEAWS.VIRTUAL_MACHINE_IMAGE
| isOpenToAllInternet | asset.assetDetail.typedAttributes.& |
| isAccessibleFromInternet | asset.assetDetail.typedAttributes.& |
| hasAccessToSensitiveData | asset.assetDetail.typedAttributes.& |
| hasAdminPrivileges | asset.assetDetail.typedAttributes.& |
| hasHighPrivileges | asset.assetDetail.typedAttributes.& |
| hasSensitiveData | asset.assetDetail.typedAttributes.& |
| graphEntity.properties.name | asset.assetDetail.hostname |
| graphEntity.properties.externalId | asset.assetHeader.externalAssetId |
| FUNCTION_PICKER | asset.assetHeader.status |
| graphEntity.properties._vertexID | asset.assetHeader.vendorAssetId |
| graphEntity.properties.name | asset.assetDetail.name |
| graphEntity.properties.name | asset.assetDetail.computeAssetClass.cloudInstance.hostname |
| graphEntity.properties.name | asset.assetDetail.network[].hostname |
| graphEntity.properties.creationDate | asset.assetDetail.sourceCreatedAt |
| graphEntity.properties.updatedAt | asset.assetDetail.sourceUpdatedAt |
| graphEntity.properties.cloudPlatform | asset.assetDetail.cloudInfo.provider |
| graphEntity.properties.subscriptionExternalId | asset.assetDetail.cloudInfo.accountId |
| graphEntity.properties.zone | asset.assetDetail.cloudInfo.availabilityZone |
| region | asset.assetDetail.cloudInfo.region |
| graphEntity.properties.cloudProviderURL | asset.assetDetail.cloudInfo.providerUrl |
| tags[].key | asset.assetDetail.externalTags[].key |
| tags[].value | asset.assetDetail.externalTags[].value |
| deletedAt | asset.assetDetail.sourceDeletedAt |
GCP.VIRTUAL_MACHINE_IMAGEGCP.VIRTUAL_MACHINE_IMAGE
| isOpenToAllInternet | asset.assetDetail.typedAttributes.& |
| isAccessibleFromInternet | asset.assetDetail.typedAttributes.& |
| hasAccessToSensitiveData | asset.assetDetail.typedAttributes.& |
| hasAdminPrivileges | asset.assetDetail.typedAttributes.& |
| hasHighPrivileges | asset.assetDetail.typedAttributes.& |
| hasSensitiveData | asset.assetDetail.typedAttributes.& |
| graphEntity.properties.name | asset.assetDetail.hostname |
| graphEntity.properties.externalId | asset.assetHeader.externalAssetId |
| FUNCTION_PICKER | asset.assetHeader.status |
| graphEntity.properties._vertexID | asset.assetHeader.vendorAssetId |
| graphEntity.properties.name | asset.assetDetail.name |
| graphEntity.properties.name | asset.assetDetail.computeAssetClass.cloudInstance.hostname |
| graphEntity.properties.name | asset.assetDetail.network[].hostname |
| graphEntity.properties.creationDate | asset.assetDetail.sourceCreatedAt |
| graphEntity.properties.updatedAt | asset.assetDetail.sourceUpdatedAt |
| graphEntity.properties.cloudPlatform | asset.assetDetail.cloudInfo.provider |
| graphEntity.properties.projectId | asset.assetDetail.cloudInfo.accountId |
| graphEntity.properties.zone | asset.assetDetail.cloudInfo.availabilityZone |
| region | asset.assetDetail.cloudInfo.region |
| graphEntity.properties.cloudProviderURL | asset.assetDetail.cloudInfo.providerUrl |
| tags[].key | asset.assetDetail.externalTags[].key |
| tags[].value | asset.assetDetail.externalTags[].value |
| deletedAt | asset.assetDetail.sourceDeletedAt |
AZURE.VIRTUAL_MACHINE_IMAGEAZURE.VIRTUAL_MACHINE_IMAGE
| isOpenToAllInternet | asset.assetDetail.typedAttributes.& |
| isAccessibleFromInternet | asset.assetDetail.typedAttributes.& |
| hasAccessToSensitiveData | asset.assetDetail.typedAttributes.& |
| hasAdminPrivileges | asset.assetDetail.typedAttributes.& |
| hasHighPrivileges | asset.assetDetail.typedAttributes.& |
| hasSensitiveData | asset.assetDetail.typedAttributes.& |
| graphEntity.properties.name | asset.assetDetail.hostname |
| graphEntity.properties.externalId | asset.assetHeader.externalAssetId |
| FUNCTION_PICKER | asset.assetHeader.status |
| graphEntity.properties._vertexID | asset.assetHeader.vendorAssetId |
| graphEntity.properties.name | asset.assetDetail.name |
| graphEntity.properties.name | asset.assetDetail.computeAssetClass.cloudInstance.hostname |
| graphEntity.properties.name | asset.assetDetail.network[].hostname |
| graphEntity.properties.creationDate | asset.assetDetail.sourceCreatedAt |
| graphEntity.properties.updatedAt | asset.assetDetail.sourceUpdatedAt |
| graphEntity.properties.cloudPlatform | asset.assetDetail.cloudInfo.provider |
| graphEntity.properties.subscriptionExternalId | asset.assetDetail.cloudInfo.accountId |
| graphEntity.properties.zone | asset.assetDetail.cloudInfo.availabilityZone |
| region | asset.assetDetail.cloudInfo.region |
| graphEntity.properties.cloudProviderURL | asset.assetDetail.cloudInfo.providerUrl |
| tags[].key | asset.assetDetail.externalTags[].key |
| tags[].value | asset.assetDetail.externalTags[].value |
| deletedAt | asset.assetDetail.sourceDeletedAt |
OCI.VIRTUAL_MACHINE_IMAGEOCI.VIRTUAL_MACHINE_IMAGE
| isOpenToAllInternet | asset.assetDetail.typedAttributes.& |
| isAccessibleFromInternet | asset.assetDetail.typedAttributes.& |
| hasAccessToSensitiveData | asset.assetDetail.typedAttributes.& |
| hasAdminPrivileges | asset.assetDetail.typedAttributes.& |
| hasHighPrivileges | asset.assetDetail.typedAttributes.& |
| hasSensitiveData | asset.assetDetail.typedAttributes.& |
| graphEntity.properties.name | asset.assetDetail.hostname |
| graphEntity.properties.externalId | asset.assetHeader.externalAssetId |
| FUNCTION_PICKER | asset.assetHeader.status |
| graphEntity.properties._vertexID | asset.assetHeader.vendorAssetId |
| graphEntity.properties.name | asset.assetDetail.name |
| graphEntity.properties.name | asset.assetDetail.computeAssetClass.cloudInstance.hostname |
| graphEntity.properties.name | asset.assetDetail.network[].hostname |
| graphEntity.properties.creationDate | asset.assetDetail.sourceCreatedAt |
| graphEntity.properties.updatedAt | asset.assetDetail.sourceUpdatedAt |
| graphEntity.properties.cloudPlatform | asset.assetDetail.cloudInfo.provider |
| graphEntity.properties.tenantId | asset.assetDetail.cloudInfo.accountId |
| graphEntity.properties.zone | asset.assetDetail.cloudInfo.availabilityZone |
| region | asset.assetDetail.cloudInfo.region |
| graphEntity.properties.cloudProviderURL | asset.assetDetail.cloudInfo.providerUrl |
| tags[].key | asset.assetDetail.externalTags[].key |
| tags[].value | asset.assetDetail.externalTags[].value |
| deletedAt | asset.assetDetail.sourceDeletedAt |
AWS.FILE_SYSTEM_SERVICE.ELASTICFILESYSTEMAWS.FILE_SYSTEM_SERVICE.ELASTICFILESYSTEM
| graphEntity.properties.accessibleFrom.internet | asset.assetDetail.typedAttributes.& |
| graphEntity.properties.atRestEncryption | asset.assetDetail.typedAttributes.& |
| graphEntity.properties.cloudPlatform | asset.assetDetail.cloudInfo.provider |
| graphEntity.properties.cloudProviderURL | asset.assetDetail.cloudInfo.providerUrl |
| graphEntity.properties.creationDate | asset.assetDetail.sourceCreatedAt |
| graphEntity.properties.encryptedAtRest | asset.assetDetail.typedAttributes.& |
| graphEntity.properties.providerUniqueId | asset.assetHeader.externalAssetId |
| graphEntity.properties._vertexID | asset.assetHeader.vendorAssetId |
| graphEntity.properties.name | asset.assetDetail.hostname |
| graphEntity.properties.name | asset.assetDetail.name |
| graphEntity.properties.publicAccessTypes | asset.assetDetail.typedAttributes.& |
| graphEntity.properties.region | asset.assetDetail.cloudInfo.region |
| FUNCTION_PICKER | asset.assetHeader.status |
| graphEntity.properties.updatedAt | asset.assetDetail.sourceUpdatedAt |
| graphEntity.properties.zone | asset.assetDetail.cloudInfo.availabilityZone |
| cloudAccount.id | asset.assetDetail.cloudInfo.accountId |
| cloudAccount.name | asset.assetDetail.cloudInfo.accountName |
| tags[].key | asset.assetDetail.externalTags[].key |
| tags[].value | asset.assetDetail.externalTags[].value |
| deletedAt | asset.assetDetail.sourceDeletedAt |
| isOpenToAllInternet | asset.assetDetail.typedAttributes.& |
| isAccessibleFromInternet | asset.assetDetail.typedAttributes.& |
| hasAccessToSensitiveData | asset.assetDetail.typedAttributes.& |
| hasAdminPrivileges | asset.assetDetail.typedAttributes.& |
| hasHighPrivileges | asset.assetDetail.typedAttributes.& |
| hasSensitiveData | asset.assetDetail.typedAttributes.& |
AWS.BUCKET.BUCKETAWS.BUCKET.BUCKET
| graphEntity.properties.accessibleFrom.internet | asset.assetDetail.typedAttributes.& |
| graphEntity.properties.atRestEncryption | asset.assetDetail.typedAttributes.& |
| graphEntity.properties.cloudPlatform | asset.assetDetail.cloudInfo.provider |
| graphEntity.properties.cloudProviderURL | asset.assetDetail.cloudInfo.providerUrl |
| graphEntity.properties.creationDate | asset.assetDetail.sourceCreatedAt |
| graphEntity.properties.encrypted | asset.assetDetail.storageAssetClass.encryption.enabled |
| graphEntity.properties.encryptedAtRest | asset.assetDetail.typedAttributes.& |
| graphEntity.properties.encryptionInTransit | asset.assetDetail.typedAttributes.& |
| graphEntity.properties.providerUniqueId | asset.assetHeader.externalAssetId |
| graphEntity.properties._vertexID | asset.assetHeader.vendorAssetId |
| graphEntity.properties.isPublic | asset.assetDetail.typedAttributes.& |
| graphEntity.properties.loggingEnabled | asset.assetDetail.typedAttributes.& |
| graphEntity.properties.name | asset.assetDetail.name |
| graphEntity.properties.publicExposure | asset.assetDetail.typedAttributes.& |
| graphEntity.properties.region | asset.assetDetail.cloudInfo.region |
| graphEntity.properties.retentionPeriod | asset.assetDetail.typedAttributes.& |
| FUNCTION_PICKER | asset.assetHeader.status |
| graphEntity.properties.updatedAt | asset.assetDetail.sourceUpdatedAt |
| graphEntity.properties.versioningEnabled | asset.assetDetail.typedAttributes.& |
| graphEntity.properties.webHostingEnabled | asset.assetDetail.typedAttributes.& |
| graphEntity.properties.zone | asset.assetDetail.cloudInfo.availabilityZone |
| cloudAccount.id | asset.assetDetail.cloudInfo.accountId |
| cloudAccount.name | asset.assetDetail.cloudInfo.accountName |
| tags[].key | asset.assetDetail.externalTags[].key |
| tags[].value | asset.assetDetail.externalTags[].value |
| deletedAt | asset.assetDetail.sourceDeletedAt |
| isOpenToAllInternet | asset.assetDetail.typedAttributes.& |
| isAccessibleFromInternet | asset.assetDetail.typedAttributes.& |
| hasAccessToSensitiveData | asset.assetDetail.typedAttributes.& |
| hasAdminPrivileges | asset.assetDetail.typedAttributes.& |
| hasHighPrivileges | asset.assetDetail.typedAttributes.& |
| hasSensitiveData | asset.assetDetail.typedAttributes.& |
| graphEntity.properties.accessibleFrom.internet | asset.assetDetail.typedAttributes.& |
| graphEntity.properties.atRestEncryption | asset.assetDetail.typedAttributes.& |
| graphEntity.properties.cloudPlatform | asset.assetDetail.cloudInfo.provider |
| graphEntity.properties.cloudProviderURL | asset.assetDetail.cloudInfo.providerUrl |
| graphEntity.properties.creationDate | asset.assetDetail.sourceCreatedAt |
| graphEntity.properties.encryptedAtRest | asset.assetDetail.typedAttributes.& |
| graphEntity.properties.encryptionInTransit | asset.assetDetail.typedAttributes.& |
| graphEntity.properties.externalId | asset.assetHeader.externalAssetId |
| graphEntity.properties._vertexID | asset.assetHeader.vendorAssetId |
| graphEntity.properties.inTransitEncryption | asset.assetDetail.typedAttributes.& |
| graphEntity.properties.name | asset.assetDetail.name |
| graphEntity.properties.region | asset.assetDetail.cloudInfo.region |
| FUNCTION_PICKER | asset.assetHeader.status |
| graphEntity.properties.updatedAt | asset.assetDetail.sourceUpdatedAt |
| graphEntity.properties.zone | asset.assetDetail.cloudInfo.availabilityZone |
| cloudAccount.id | asset.assetDetail.cloudInfo.accountId |
| cloudAccount.name | asset.assetDetail.cloudInfo.accountName |
| tags[].key | asset.assetDetail.externalTags[].key |
| tags[].value | asset.assetDetail.externalTags[].value |
| deletedAt | asset.assetDetail.sourceDeletedAt |
| isOpenToAllInternet | asset.assetDetail.typedAttributes.& |
| isAccessibleFromInternet | asset.assetDetail.typedAttributes.& |
| hasAccessToSensitiveData | asset.assetDetail.typedAttributes.& |
| hasAdminPrivileges | asset.assetDetail.typedAttributes.& |
| hasHighPrivileges | asset.assetDetail.typedAttributes.& |
| hasSensitiveData | asset.assetDetail.typedAttributes.& |
OCI.FILE_SYSTEM_SERVICE.OCIFILESYSTEMOCI.FILE_SYSTEM_SERVICE.OCIFILESYSTEM
| graphEntity.properties.accessibleFrom.internet | asset.assetDetail.typedAttributes.& |
| graphEntity.properties.atRestEncryption | asset.assetDetail.typedAttributes.& |
| graphEntity.properties.cloudPlatform | asset.assetDetail.cloudInfo.provider |
| graphEntity.properties.cloudProviderURL | asset.assetDetail.cloudInfo.providerUrl |
| graphEntity.properties.creationDate | asset.assetDetail.sourceCreatedAt |
| graphEntity.properties.encryptedAtRest | asset.assetDetail.typedAttributes.& |
| graphEntity.properties.externalId | asset.assetHeader.externalAssetId |
| graphEntity.properties._vertexID | asset.assetHeader.vendorAssetId |
| graphEntity.properties.name | asset.assetDetail.name |
| graphEntity.properties.region | asset.assetDetail.cloudInfo.region |
| FUNCTION_PICKER | asset.assetHeader.status |
| graphEntity.properties.updatedAt | asset.assetDetail.sourceUpdatedAt |
| graphEntity.properties.zone | asset.assetDetail.cloudInfo.availabilityZone |
| cloudAccount.id | asset.assetDetail.cloudInfo.accountId |
| cloudAccount.name | asset.assetDetail.cloudInfo.accountName |
| tags[].key | asset.assetDetail.externalTags[].key |
| tags[].value | asset.assetDetail.externalTags[].value |
| deletedAt | asset.assetDetail.sourceDeletedAt |
| isOpenToAllInternet | asset.assetDetail.typedAttributes.& |
| isAccessibleFromInternet | asset.assetDetail.typedAttributes.& |
| hasAccessToSensitiveData | asset.assetDetail.typedAttributes.& |
| hasAdminPrivileges | asset.assetDetail.typedAttributes.& |
| hasHighPrivileges | asset.assetDetail.typedAttributes.& |
| hasSensitiveData | asset.assetDetail.typedAttributes.& |
AWS.FILE_SYSTEM_SERVICE.FSXFILESYSTEMNETAPPAWS.FILE_SYSTEM_SERVICE.FSXFILESYSTEMNETAPP
| graphEntity.properties.accessibleFrom.internet | asset.assetDetail.typedAttributes.& |
| graphEntity.properties.atRestEncryption | asset.assetDetail.typedAttributes.& |
| graphEntity.properties.cloudPlatform | asset.assetDetail.cloudInfo.provider |
| graphEntity.properties.cloudProviderURL | asset.assetDetail.cloudInfo.providerUrl |
| graphEntity.properties.creationDate | asset.assetDetail.sourceCreatedAt |
| graphEntity.properties.encryptedAtRest | asset.assetDetail.typedAttributes.& |
| graphEntity.properties.encryptionInTransit | asset.assetDetail.typedAttributes.& |
| graphEntity.properties.providerUniqueId | asset.assetHeader.externalAssetId |
| graphEntity.properties._vertexID | asset.assetHeader.vendorAssetId |
| graphEntity.properties.name | asset.assetDetail.name |
| graphEntity.properties.publicAccessTypes | asset.assetDetail.typedAttributes.& |
| graphEntity.properties.region | asset.assetDetail.cloudInfo.region |
| FUNCTION_PICKER | asset.assetHeader.status |
| graphEntity.properties.updatedAt | asset.assetDetail.sourceUpdatedAt |
| graphEntity.properties.zone | asset.assetDetail.cloudInfo.availabilityZone |
| cloudAccount.id | asset.assetDetail.cloudInfo.accountId |
| cloudAccount.name | asset.assetDetail.cloudInfo.accountName |
| tags[].key | asset.assetDetail.externalTags[].key |
| tags[].value | asset.assetDetail.externalTags[].value |
| deletedAt | asset.assetDetail.sourceDeletedAt |
| isOpenToAllInternet | asset.assetDetail.typedAttributes.& |
| isAccessibleFromInternet | asset.assetDetail.typedAttributes.& |
| hasAccessToSensitiveData | asset.assetDetail.typedAttributes.& |
| hasAdminPrivileges | asset.assetDetail.typedAttributes.& |
| hasHighPrivileges | asset.assetDetail.typedAttributes.& |
| hasSensitiveData | asset.assetDetail.typedAttributes.& |
GCP.BUCKET.STORAGEBUCKETGCP.BUCKET.STORAGEBUCKET
| graphEntity.properties.accessibleFrom.internet | asset.assetDetail.typedAttributes.& |
| graphEntity.properties.atRestEncryption | asset.assetDetail.typedAttributes.& |
| graphEntity.properties.cloudPlatform | asset.assetDetail.cloudInfo.provider |
| graphEntity.properties.cloudProviderURL | asset.assetDetail.cloudInfo.providerUrl |
| graphEntity.properties.creationDate | asset.assetDetail.sourceCreatedAt |
| graphEntity.properties.encryptedAtRest | asset.assetDetail.typedAttributes.& |
| graphEntity.properties.encryptionInTransit | asset.assetDetail.typedAttributes.& |
| graphEntity.properties.externalId | asset.assetHeader.externalAssetId |
| graphEntity.properties._vertexID | asset.assetHeader.vendorAssetId |
| graphEntity.properties.isPublic | asset.assetDetail.typedAttributes.& |
| graphEntity.properties.loggingEnabled | asset.assetDetail.typedAttributes.& |
| graphEntity.properties.name | asset.assetDetail.name |
| graphEntity.properties.publicExposure | asset.assetDetail.typedAttributes.& |
| graphEntity.properties.region | asset.assetDetail.cloudInfo.region |
| graphEntity.properties.retentionPeriod | asset.assetDetail.typedAttributes.& |
| FUNCTION_PICKER | asset.assetHeader.status |
| graphEntity.properties.updatedAt | asset.assetDetail.sourceUpdatedAt |
| graphEntity.properties.versioningEnabled | asset.assetDetail.typedAttributes.& |
| graphEntity.properties.webHostingEnabled | asset.assetDetail.typedAttributes.& |
| graphEntity.properties.zone | asset.assetDetail.cloudInfo.availabilityZone |
| cloudAccount.id | asset.assetDetail.cloudInfo.accountId |
| cloudAccount.name | asset.assetDetail.cloudInfo.accountName |
| tags[].key | asset.assetDetail.externalTags[].key |
| tags[].value | asset.assetDetail.externalTags[].value |
| deletedAt | asset.assetDetail.sourceDeletedAt |
| isOpenToAllInternet | asset.assetDetail.typedAttributes.& |
| isAccessibleFromInternet | asset.assetDetail.typedAttributes.& |
| hasAccessToSensitiveData | asset.assetDetail.typedAttributes.& |
| hasAdminPrivileges | asset.assetDetail.typedAttributes.& |
| hasHighPrivileges | asset.assetDetail.typedAttributes.& |
| hasSensitiveData | asset.assetDetail.typedAttributes.& |
AZURE.BUCKET.STORAGEACCOUNTSBLOBSERVICESCONTAINERSAZURE.BUCKET.STORAGEACCOUNTSBLOBSERVICESCONTAINERS
| graphEntity.properties.accessibleFrom.internet | asset.assetDetail.typedAttributes.& |
| graphEntity.properties.atRestEncryption | asset.assetDetail.typedAttributes.& |
| graphEntity.properties.cloudPlatform | asset.assetDetail.cloudInfo.provider |
| graphEntity.properties.cloudProviderURL | asset.assetDetail.cloudInfo.providerUrl |
| graphEntity.properties.creationDate | asset.assetDetail.sourceCreatedAt |
| graphEntity.properties.encryptedAtRest | asset.assetDetail.typedAttributes.& |
| graphEntity.properties.encryptionInTransit | asset.assetDetail.typedAttributes.& |
| graphEntity.properties.externalId | asset.assetHeader.externalAssetId |
| graphEntity.properties._vertexID | asset.assetHeader.vendorAssetId |
| graphEntity.properties.isPublic | asset.assetDetail.typedAttributes.& |
| graphEntity.properties.loggingEnabled | asset.assetDetail.typedAttributes.& |
| graphEntity.properties.name | asset.assetDetail.name |
| graphEntity.properties.publicExposure | asset.assetDetail.typedAttributes.& |
| graphEntity.properties.region | asset.assetDetail.cloudInfo.region |
| graphEntity.properties.retentionPeriod | asset.assetDetail.typedAttributes.& |
| FUNCTION_PICKER | asset.assetHeader.status |
| graphEntity.properties.updatedAt | asset.assetDetail.sourceUpdatedAt |
| graphEntity.properties.versioningEnabled | asset.assetDetail.typedAttributes.& |
| graphEntity.properties.webHostingEnabled | asset.assetDetail.typedAttributes.& |
| graphEntity.properties.zone | asset.assetDetail.cloudInfo.availabilityZone |
| cloudAccount.id | asset.assetDetail.cloudInfo.accountId |
| cloudAccount.name | asset.assetDetail.cloudInfo.accountName |
| tags[].key | asset.assetDetail.externalTags[].key |
| tags[].value | asset.assetDetail.externalTags[].value |
| deletedAt | asset.assetDetail.sourceDeletedAt |
| isOpenToAllInternet | asset.assetDetail.typedAttributes.& |
| isAccessibleFromInternet | asset.assetDetail.typedAttributes.& |
| hasAccessToSensitiveData | asset.assetDetail.typedAttributes.& |
| hasAdminPrivileges | asset.assetDetail.typedAttributes.& |
| hasHighPrivileges | asset.assetDetail.typedAttributes.& |
| hasSensitiveData | asset.assetDetail.typedAttributes.& |
OCI.BUCKET.OBJECTSTORAGEBUCKETOCI.BUCKET.OBJECTSTORAGEBUCKET
| graphEntity.properties.accessibleFrom.internet | asset.assetDetail.typedAttributes.& |
| graphEntity.properties.atRestEncryption | asset.assetDetail.typedAttributes.& |
| graphEntity.properties.cloudPlatform | asset.assetDetail.cloudInfo.provider |
| graphEntity.properties.cloudProviderURL | asset.assetDetail.cloudInfo.providerUrl |
| graphEntity.properties.creationDate | asset.assetDetail.sourceCreatedAt |
| graphEntity.properties.encryptedAtRest | asset.assetDetail.typedAttributes.& |
| graphEntity.properties.encryptionInTransit | asset.assetDetail.typedAttributes.& |
| graphEntity.properties.externalId | asset.assetHeader.externalAssetId |
| graphEntity.properties._vertexID | asset.assetHeader.vendorAssetId |
| graphEntity.properties.isPublic | asset.assetDetail.typedAttributes.& |
| graphEntity.properties.loggingEnabled | asset.assetDetail.typedAttributes.& |
| graphEntity.properties.name | asset.assetDetail.name |
| graphEntity.properties.publicExposure | asset.assetDetail.typedAttributes.& |
| graphEntity.properties.region | asset.assetDetail.cloudInfo.region |
| graphEntity.properties.retentionPeriod | asset.assetDetail.typedAttributes.& |
| FUNCTION_PICKER | asset.assetHeader.status |
| graphEntity.properties.updatedAt | asset.assetDetail.sourceUpdatedAt |
| graphEntity.properties.versioningEnabled | asset.assetDetail.typedAttributes.& |
| graphEntity.properties.webHostingEnabled | asset.assetDetail.typedAttributes.& |
| graphEntity.properties.zone | asset.assetDetail.cloudInfo.availabilityZone |
| cloudAccount.id | asset.assetDetail.cloudInfo.accountId |
| cloudAccount.name | asset.assetDetail.cloudInfo.accountName |
| tags[].key | asset.assetDetail.externalTags[].key |
| tags[].value | asset.assetDetail.externalTags[].value |
| deletedAt | asset.assetDetail.sourceDeletedAt |
| isOpenToAllInternet | asset.assetDetail.typedAttributes.& |
| isAccessibleFromInternet | asset.assetDetail.typedAttributes.& |
| hasAccessToSensitiveData | asset.assetDetail.typedAttributes.& |
| hasAdminPrivileges | asset.assetDetail.typedAttributes.& |
| hasHighPrivileges | asset.assetDetail.typedAttributes.& |
| hasSensitiveData | asset.assetDetail.typedAttributes.& |
AZURE.STORAGEACCOUNT.STORAGEACCOUNTSAZURE.STORAGEACCOUNT.STORAGEACCOUNTS
| graphEntity.properties.accessibleFrom.internet | asset.assetDetail.typedAttributes.& |
| graphEntity.properties.atRestEncryption | asset.assetDetail.typedAttributes.& |
| graphEntity.properties.cloudPlatform | asset.assetDetail.cloudInfo.provider |
| graphEntity.properties.cloudProviderURL | asset.assetDetail.cloudInfo.providerUrl |
| graphEntity.properties.creationDate | asset.assetDetail.sourceCreatedAt |
| graphEntity.properties.encryptedAtRest | asset.assetDetail.typedAttributes.& |
| graphEntity.properties.encryptionInTransit | asset.assetDetail.typedAttributes.& |
| graphEntity.properties.externalId | asset.assetHeader.externalAssetId |
| graphEntity.properties._vertexID | asset.assetHeader.vendorAssetId |
| graphEntity.properties.isPublic | asset.assetDetail.typedAttributes.& |
| graphEntity.properties.loggingEnabled | asset.assetDetail.typedAttributes.& |
| graphEntity.properties.name | asset.assetDetail.name |
| graphEntity.properties.publicExposure | asset.assetDetail.typedAttributes.& |
| graphEntity.properties.region | asset.assetDetail.cloudInfo.region |
| graphEntity.properties.retentionPeriod | asset.assetDetail.typedAttributes.& |
| FUNCTION_PICKER | asset.assetHeader.status |
| graphEntity.properties.updatedAt | asset.assetDetail.sourceUpdatedAt |
| graphEntity.properties.versioningEnabled | asset.assetDetail.typedAttributes.& |
| graphEntity.properties.webHostingEnabled | asset.assetDetail.typedAttributes.& |
| graphEntity.properties.zone | asset.assetDetail.cloudInfo.availabilityZone |
| cloudAccount.id | asset.assetDetail.cloudInfo.accountId |
| cloudAccount.name | asset.assetDetail.cloudInfo.accountName |
| tags[].key | asset.assetDetail.externalTags[].key |
| tags[].value | asset.assetDetail.externalTags[].value |
| deletedAt | asset.assetDetail.sourceDeletedAt |
| isOpenToAllInternet | asset.assetDetail.typedAttributes.& |
| isAccessibleFromInternet | asset.assetDetail.typedAttributes.& |
| hasAccessToSensitiveData | asset.assetDetail.typedAttributes.& |
| hasAdminPrivileges | asset.assetDetail.typedAttributes.& |
| hasHighPrivileges | asset.assetDetail.typedAttributes.& |
| hasSensitiveData | asset.assetDetail.typedAttributes.& |
| graphEntity.properties._vertexID | asset.assetHeader.vendorAssetId |
| graphEntity.properties.architecture | asset.assetDetail.containerImageAssetClass.architecture |
| graphEntity.properties.cloudPlatform | asset.assetDetail.cloudInfo.provider |
| graphEntity.properties.cloudProviderURL | asset.assetDetail.cloudInfo.providerUrl |
| graphEntity.properties.imageTags | asset.assetDetail.containerImageAssetClass.tag |
| graphEntity.properties.containerImageLayers[].layerID | asset.assetDetail.containerImageAssetClass.layer[].digest |
| image.registry | asset.assetDetail.containerImageAssetClass.registry |
| imageRepository | asset.assetDetail.containerImageAssetClass.repository |
| imageName | asset.assetDetail.containerImageAssetClass.name |
| graphEntity.properties.digest | asset.assetDetail.containerImageAssetClass.digest |
| evalExternalId | asset.assetHeader.externalAssetId |
| imageName | asset.assetDetail.name |
| graphEntity.properties.region | asset.assetDetail.cloudInfo.region |
| FUNCTION_PICKER | asset.assetHeader.status |
| createdAt | asset.assetDetail.sourceCreatedAt |
| graphEntity.properties.updatedAt | asset.assetDetail.sourceUpdatedAt |
| graphEntity.properties.zone | asset.assetDetail.cloudInfo.availabilityZone |
| cloudAccount.id | asset.assetDetail.cloudInfo.accountId |
| cloudAccount.name | asset.assetDetail.cloudInfo.accountName |
| tags[].key | asset.assetDetail.externalTags[].key |
| tags[].value | asset.assetDetail.externalTags[].value |
| deletedAt | asset.assetDetail.sourceDeletedAt |
| isOpenToAllInternet | asset.assetDetail.typedAttributes.& |
| isAccessibleFromInternet | asset.assetDetail.typedAttributes.& |
| hasAccessToSensitiveData | asset.assetDetail.typedAttributes.& |
| hasAdminPrivileges | asset.assetDetail.typedAttributes.& |
| hasHighPrivileges | asset.assetDetail.typedAttributes.& |
| hasSensitiveData | asset.assetDetail.typedAttributes.& |
GCP.ARTIFACTREGISTRYDOCKERIMAGEGCP.ARTIFACTREGISTRYDOCKERIMAGE
| graphEntity.properties._vertexID | asset.assetHeader.vendorAssetId |
| graphEntity.properties.architecture | asset.assetDetail.containerImageAssetClass.architecture |
| graphEntity.properties.cloudPlatform | asset.assetDetail.cloudInfo.provider |
| graphEntity.properties.cloudProviderURL | asset.assetDetail.cloudInfo.providerUrl |
| graphEntity.properties.imageTags | asset.assetDetail.containerImageAssetClass.tag |
| graphEntity.properties.containerImageLayers[].layerID | asset.assetDetail.containerImageAssetClass.layer[].digest |
| image.registry | asset.assetDetail.containerImageAssetClass.registry |
| imageRepository | asset.assetDetail.containerImageAssetClass.repository |
| imageName | asset.assetDetail.containerImageAssetClass.name |
| graphEntity.properties.digest | asset.assetDetail.containerImageAssetClass.digest |
| evalExternalId | asset.assetHeader.externalAssetId |
| imageName | asset.assetDetail.name |
| graphEntity.properties.region | asset.assetDetail.cloudInfo.region |
| FUNCTION_PICKER | asset.assetHeader.status |
| createdAt | asset.assetDetail.sourceCreatedAt |
| graphEntity.properties.updatedAt | asset.assetDetail.sourceUpdatedAt |
| graphEntity.properties.zone | asset.assetDetail.cloudInfo.availabilityZone |
| cloudAccount.id | asset.assetDetail.cloudInfo.accountId |
| cloudAccount.name | asset.assetDetail.cloudInfo.accountName |
| tags[].key | asset.assetDetail.externalTags[].key |
| tags[].value | asset.assetDetail.externalTags[].value |
| deletedAt | asset.assetDetail.sourceDeletedAt |
| isOpenToAllInternet | asset.assetDetail.typedAttributes.& |
| isAccessibleFromInternet | asset.assetDetail.typedAttributes.& |
| hasAccessToSensitiveData | asset.assetDetail.typedAttributes.& |
| hasAdminPrivileges | asset.assetDetail.typedAttributes.& |
| hasHighPrivileges | asset.assetDetail.typedAttributes.& |
| hasSensitiveData | asset.assetDetail.typedAttributes.& |
AZURE.CONTAINERREGISTRYIMAGEAZURE.CONTAINERREGISTRYIMAGE
| graphEntity.properties._vertexID | asset.assetHeader.vendorAssetId |
| graphEntity.properties.architecture | asset.assetDetail.containerImageAssetClass.architecture |
| graphEntity.properties.cloudPlatform | asset.assetDetail.cloudInfo.provider |
| graphEntity.properties.cloudProviderURL | asset.assetDetail.cloudInfo.providerUrl |
| graphEntity.properties.imageTags | asset.assetDetail.containerImageAssetClass.tag |
| graphEntity.properties.containerImageLayers[].layerID | asset.assetDetail.containerImageAssetClass.layer[].digest |
| image.registry | asset.assetDetail.containerImageAssetClass.registry |
| imageRepository | asset.assetDetail.containerImageAssetClass.repository |
| imageName | asset.assetDetail.containerImageAssetClass.name |
| graphEntity.properties.digest | asset.assetDetail.containerImageAssetClass.digest |
| evalExternalId | asset.assetHeader.externalAssetId |
| imageName | asset.assetDetail.name |
| graphEntity.properties.region | asset.assetDetail.cloudInfo.region |
| FUNCTION_PICKER | asset.assetHeader.status |
| createdAt | asset.assetDetail.sourceCreatedAt |
| graphEntity.properties.updatedAt | asset.assetDetail.sourceUpdatedAt |
| graphEntity.properties.zone | asset.assetDetail.cloudInfo.availabilityZone |
| cloudAccount.id | asset.assetDetail.cloudInfo.accountId |
| cloudAccount.name | asset.assetDetail.cloudInfo.accountName |
| tags[].key | asset.assetDetail.externalTags[].key |
| tags[].value | asset.assetDetail.externalTags[].value |
| deletedAt | asset.assetDetail.sourceDeletedAt |
| isOpenToAllInternet | asset.assetDetail.typedAttributes.& |
| isAccessibleFromInternet | asset.assetDetail.typedAttributes.& |
| hasAccessToSensitiveData | asset.assetDetail.typedAttributes.& |
| hasAdminPrivileges | asset.assetDetail.typedAttributes.& |
| hasHighPrivileges | asset.assetDetail.typedAttributes.& |
| hasSensitiveData | asset.assetDetail.typedAttributes.& |
NULL.HOSTEDCONTAINERIMAGENULL.HOSTEDCONTAINERIMAGE
| graphEntity.properties._vertexID | asset.assetHeader.vendorAssetId |
| graphEntity.properties.architecture | asset.assetDetail.containerImageAssetClass.architecture |
| graphEntity.properties.cloudPlatform | asset.assetDetail.cloudInfo.provider |
| graphEntity.properties.cloudProviderURL | asset.assetDetail.cloudInfo.providerUrl |
| graphEntity.properties.imageTags | asset.assetDetail.containerImageAssetClass.tag |
| graphEntity.properties.containerImageLayers[].layerID | asset.assetDetail.containerImageAssetClass.layer[].digest |
| image.registry | asset.assetDetail.containerImageAssetClass.registry |
| imageRepository | asset.assetDetail.containerImageAssetClass.repository |
| imageName | asset.assetDetail.containerImageAssetClass.name |
| graphEntity.properties.digest | asset.assetDetail.containerImageAssetClass.digest |
| evalExternalId | asset.assetHeader.externalAssetId |
| imageName | asset.assetDetail.name |
| graphEntity.properties.region | asset.assetDetail.cloudInfo.region |
| FUNCTION_PICKER | asset.assetHeader.status |
| createdAt | asset.assetDetail.sourceCreatedAt |
| graphEntity.properties.updatedAt | asset.assetDetail.sourceUpdatedAt |
| graphEntity.properties.zone | asset.assetDetail.cloudInfo.availabilityZone |
| cloudAccount.id | asset.assetDetail.cloudInfo.accountId |
| cloudAccount.name | asset.assetDetail.cloudInfo.accountName |
| tags[].key | asset.assetDetail.externalTags[].key |
| tags[].value | asset.assetDetail.externalTags[].value |
| deletedAt | asset.assetDetail.sourceDeletedAt |
| isOpenToAllInternet | asset.assetDetail.typedAttributes.& |
| isAccessibleFromInternet | asset.assetDetail.typedAttributes.& |
| hasAccessToSensitiveData | asset.assetDetail.typedAttributes.& |
| hasAdminPrivileges | asset.assetDetail.typedAttributes.& |
| hasHighPrivileges | asset.assetDetail.typedAttributes.& |
| hasSensitiveData | asset.assetDetail.typedAttributes.& |
CONTAINER_IMAGECONTAINER_IMAGE
| graphEntity.properties._vertexID | asset.assetHeader.vendorAssetId |
| graphEntity.properties.architecture | asset.assetDetail.containerImageAssetClass.architecture |
| graphEntity.properties.cloudPlatform | asset.assetDetail.cloudInfo.provider |
| graphEntity.properties.cloudProviderURL | asset.assetDetail.cloudInfo.providerUrl |
| graphEntity.properties.imageTags | asset.assetDetail.containerImageAssetClass.tag |
| graphEntity.properties.containerImageLayers[].layerID | asset.assetDetail.containerImageAssetClass.layer[].digest |
| image.registry | asset.assetDetail.containerImageAssetClass.registry |
| imageRepository | asset.assetDetail.containerImageAssetClass.repository |
| imageName | asset.assetDetail.containerImageAssetClass.name |
| graphEntity.properties.digest | asset.assetDetail.containerImageAssetClass.digest |
| evalExternalId | asset.assetHeader.externalAssetId |
| imageName | asset.assetDetail.name |
| graphEntity.properties.region | asset.assetDetail.cloudInfo.region |
| FUNCTION_PICKER | asset.assetHeader.status |
| createdAt | asset.assetDetail.sourceCreatedAt |
| graphEntity.properties.updatedAt | asset.assetDetail.sourceUpdatedAt |
| graphEntity.properties.zone | asset.assetDetail.cloudInfo.availabilityZone |
| cloudAccount.id | asset.assetDetail.cloudInfo.accountId |
| cloudAccount.name | asset.assetDetail.cloudInfo.accountName |
| tags[].key | asset.assetDetail.externalTags[].key |
| tags[].value | asset.assetDetail.externalTags[].value |
| deletedAt | asset.assetDetail.sourceDeletedAt |
| isOpenToAllInternet | asset.assetDetail.typedAttributes.& |
| isAccessibleFromInternet | asset.assetDetail.typedAttributes.& |
| hasAccessToSensitiveData | asset.assetDetail.typedAttributes.& |
| hasAdminPrivileges | asset.assetDetail.typedAttributes.& |
| hasHighPrivileges | asset.assetDetail.typedAttributes.& |
| hasSensitiveData | asset.assetDetail.typedAttributes.& |
AWS.ECSCONTAINERINSTANCEAWS.ECSCONTAINERINSTANCE
| graphEntity.properties._vertexID | asset.assetHeader.vendorAssetId |
| graphEntity.properties.boundPorts[].number | asset.assetDetail.containerInstanceAssetClass.ports[].containerPort |
| graphEntity.properties.boundPorts[].kubernetes.hostPort | asset.assetDetail.containerInstanceAssetClass.ports[].hostPort |
| graphEntity.properties.boundPorts[].networkProtocol | asset.assetDetail.containerInstanceAssetClass.ports[].protocol |
| graphEntity.properties.accessibleFrom.internet | asset.assetDetail.typedAttributes.& |
| graphEntity.properties.cloudPlatform | asset.assetDetail.cloudInfo.provider |
| graphEntity.properties.cloudProviderURL | asset.assetDetail.cloudInfo.providerUrl |
| graphEntity.properties.creationDate | asset.assetDetail.sourceCreatedAt |
| graphEntity.properties.env.* | asset.assetDetail.containerInstanceAssetClass.environmentVariables.& |
| image.name | asset.assetDetail.containerInstanceAssetClass.image.name |
| image.tag | asset.assetDetail.containerInstanceAssetClass.image.tag |
| image.registry | asset.assetDetail.containerInstanceAssetClass.image.registry |
| graphEntity.properties.externalId | asset.assetHeader.externalAssetId |
| graphEntity.properties.name | asset.assetDetail.name |
| graphEntity.properties.region | asset.assetDetail.cloudInfo.region |
| FUNCTION_PICKER | asset.assetHeader.status |
| graphEntity.properties.status | asset.assetDetail.containerInstanceAssetClass.status |
| graphEntity.properties.updatedAt | asset.assetDetail.sourceUpdatedAt |
| graphEntity.properties.zone | asset.assetDetail.cloudInfo.availabilityZone |
| externalId | asset.assetDetail.containerInstanceAssetClass.id |
| cloudAccount.id | asset.assetDetail.cloudInfo.accountId |
| cloudAccount.name | asset.assetDetail.cloudInfo.accountName |
| tags[].key | asset.assetDetail.externalTags[].key |
| tags[].value | asset.assetDetail.externalTags[].value |
| deletedAt | asset.assetDetail.sourceDeletedAt |
| isOpenToAllInternet | asset.assetDetail.typedAttributes.& |
| isAccessibleFromInternet | asset.assetDetail.typedAttributes.& |
| hasAccessToSensitiveData | asset.assetDetail.typedAttributes.& |
| hasAdminPrivileges | asset.assetDetail.typedAttributes.& |
| hasHighPrivileges | asset.assetDetail.typedAttributes.& |
| hasSensitiveData | asset.assetDetail.typedAttributes.& |
OCI.HOSTEDCONTAINEROCI.HOSTEDCONTAINER
| graphEntity.properties._vertexID | asset.assetHeader.vendorAssetId |
| graphEntity.properties.boundPorts[].number | asset.assetDetail.containerInstanceAssetClass.ports[].containerPort |
| graphEntity.properties.boundPorts[].kubernetes.hostPort | asset.assetDetail.containerInstanceAssetClass.ports[].hostPort |
| graphEntity.properties.boundPorts[].networkProtocol | asset.assetDetail.containerInstanceAssetClass.ports[].protocol |
| graphEntity.properties.cloudPlatform | asset.assetDetail.cloudInfo.provider |
| graphEntity.properties.cloudProviderURL | asset.assetDetail.cloudInfo.providerUrl |
| graphEntity.properties.creationDate | asset.assetDetail.sourceCreatedAt |
| image.name | asset.assetDetail.containerInstanceAssetClass.image.name |
| image.tag | asset.assetDetail.containerInstanceAssetClass.image.tag |
| image.registry | asset.assetDetail.containerInstanceAssetClass.image.registry |
| graphEntity.properties.externalId | asset.assetHeader.externalAssetId |
| graphEntity.properties.name | asset.assetDetail.name |
| graphEntity.properties.region | asset.assetDetail.cloudInfo.region |
| FUNCTION_PICKER | asset.assetHeader.status |
| graphEntity.properties.status | asset.assetDetail.containerInstanceAssetClass.status |
| graphEntity.properties.updatedAt | asset.assetDetail.sourceUpdatedAt |
| graphEntity.properties.zone | asset.assetDetail.cloudInfo.availabilityZone |
| externalId | asset.assetDetail.containerInstanceAssetClass.id |
| cloudAccount.externalId | asset.assetDetail.cloudInfo.accountId |
| cloudAccount.name | asset.assetDetail.cloudInfo.accountName |
| tags[].key | asset.assetDetail.externalTags[].key |
| tags[].value | asset.assetDetail.externalTags[].value |
| deletedAt | asset.assetDetail.sourceDeletedAt |
| isOpenToAllInternet | asset.assetDetail.typedAttributes.& |
| isAccessibleFromInternet | asset.assetDetail.typedAttributes.& |
| hasAccessToSensitiveData | asset.assetDetail.typedAttributes.& |
| hasAdminPrivileges | asset.assetDetail.typedAttributes.& |
| hasHighPrivileges | asset.assetDetail.typedAttributes.& |
| hasSensitiveData | asset.assetDetail.typedAttributes.& |
| graphEntity.properties.env.* | asset.assetDetail.containerInstanceAssetClass.environmentVariables.& |
AZURE.CONTAINERAPPSAZURE.CONTAINERAPPS
| graphEntity.properties._vertexID | asset.assetHeader.vendorAssetId |
| graphEntity.properties.boundPorts[].number | asset.assetDetail.containerInstanceAssetClass.ports[].containerPort |
| graphEntity.properties.boundPorts[].kubernetes.hostPort | asset.assetDetail.containerInstanceAssetClass.ports[].hostPort |
| graphEntity.properties.boundPorts[].networkProtocol | asset.assetDetail.containerInstanceAssetClass.ports[].protocol |
| graphEntity.properties.accessibleFrom.internet | asset.assetDetail.typedAttributes.& |
| graphEntity.properties.cloudPlatform | asset.assetDetail.cloudInfo.provider |
| graphEntity.properties.cloudProviderURL | asset.assetDetail.cloudInfo.providerUrl |
| graphEntity.properties.creationDate | asset.assetDetail.sourceCreatedAt |
| graphEntity.properties.env.* | asset.assetDetail.containerInstanceAssetClass.environmentVariables.& |
| image.name | asset.assetDetail.containerInstanceAssetClass.image.name |
| image.tag | asset.assetDetail.containerInstanceAssetClass.image.tag |
| image.registry | asset.assetDetail.containerInstanceAssetClass.image.registry |
| graphEntity.properties.externalId | asset.assetHeader.externalAssetId |
| graphEntity.properties.name | asset.assetDetail.name |
| graphEntity.properties.region | asset.assetDetail.cloudInfo.region |
| graphEntity.properties.status | asset.assetHeader.status |
AWS.HOSTEDCONTAINERAWS.HOSTEDCONTAINER
| graphEntity.properties._vertexID | asset.assetHeader.vendorAssetId |
| graphEntity.properties.boundPorts[].number | asset.assetDetail.containerInstanceAssetClass.ports[].containerPort |
| graphEntity.properties.boundPorts[].kubernetes.hostPort | asset.assetDetail.containerInstanceAssetClass.ports[].hostPort |
| graphEntity.properties.boundPorts[].networkProtocol | asset.assetDetail.containerInstanceAssetClass.ports[].protocol |
| graphEntity.properties.cloudPlatform | asset.assetDetail.cloudInfo.provider |
| graphEntity.properties.cloudProviderURL | asset.assetDetail.cloudInfo.providerUrl |
| graphEntity.properties.creationDate | asset.assetDetail.sourceCreatedAt |
| graphEntity.properties.env.* | asset.assetDetail.containerInstanceAssetClass.environmentVariables.& |
| image.name | asset.assetDetail.containerInstanceAssetClass.image.name |
| image.tag | asset.assetDetail.containerInstanceAssetClass.image.tag |
| image.registry | asset.assetDetail.containerInstanceAssetClass.image.registry |
| graphEntity.properties.externalId | asset.assetHeader.externalAssetId |
| graphEntity.properties.name | asset.assetDetail.name |
| graphEntity.properties.region | asset.assetDetail.cloudInfo.region |
KUBERNETES.CONTAINERRESOURCEKUBERNETES.CONTAINERRESOURCE
| graphEntity.properties._vertexID | asset.assetHeader.vendorAssetId |
| graphEntity.properties.accessibleFrom.internet | asset.assetDetail.typedAttributes.& |
| graphEntity.properties.cloudPlatform | asset.assetDetail.cloudInfo.provider |
| graphEntity.properties.cloudProviderURL | asset.assetDetail.cloudInfo.providerUrl |
| graphEntity.properties.creationDate | asset.assetDetail.sourceCreatedAt |
| graphEntity.properties.env.* | asset.assetDetail.containerInstanceAssetClass.environmentVariables.& |
| graphEntity.properties.boundPorts[].number | asset.assetDetail.containerInstanceAssetClass.ports[].containerPort |
| graphEntity.properties.boundPorts[].kubernetes.hostPort | asset.assetDetail.containerInstanceAssetClass.ports[].hostPort |
| graphEntity.properties.boundPorts[].networkProtocol | asset.assetDetail.containerInstanceAssetClass.ports[].protocol |
| image.name | asset.assetDetail.containerInstanceAssetClass.image.name |
| image.tag | asset.assetDetail.containerInstanceAssetClass.image.tag |
| image.registry | asset.assetDetail.containerInstanceAssetClass.image.registry |
| graphEntity.properties.externalId | asset.assetHeader.externalAssetId |
VIRTUAL_MACHINEVIRTUAL_MACHINE
| vulnerableAsset.name | asset.assetDetail.computeAssetClass.cloudInstance.hostname |
| vulnerableAsset.name | asset.assetDetail.network[].hostname |
| vulnerableAsset.ipAddresses[] | asset.assetDetail.network[].ipv4Addresses[] |
| vulnerableAsset.externalId | asset.assetHeader.externalAssetId |
| vulnerableAsset.status | asset.assetHeader.status |
| vulnerableAsset.id | asset.assetHeader.vendorAssetId |
| vulnerableAsset.name | asset.assetDetail.name |
| vulnerableAsset.name | asset.assetDetail.hostIdentity.hostname |
| id | findingGroup.findings[].externalFindingId |
| portalUrl | findingGroup.findings[].findingURL |
| name | findingGroup.findings[].findingType.vulnerability.cveId |
| CVEDescription | findingGroup.findings[].description |
| status | findingGroup.findings[].findingStatus |
| severity | findingGroup.findings[].severity |
| firstDetectedAt | findingGroup.findings[].firstFoundOn |
| lastDetectedAt | findingGroup.findings[].lastFoundOn |
| resolvedAt | findingGroup.findings[].lastFixedOn |
| remediation | findingGroup.findings[].remediation.remediationStrategy |
| name | findingGroup.findings[].name |
| detailedName | findingGroup.findings[].product.name |
| version | findingGroup.findings[].product.version |
| detectionMethod | findingGroup.findings[].detectionMethod |
| hasExploit | findingGroup.findings[].findingType.vulnerability.isExploitAvailable |
| link | findingGroup.findings[].findingDetectionURL |
| cvssv3.attackVector | findingGroup.findings[].findingType.vulnerability.cvss.vector |
AWS.VIRTUAL_MACHINEAWS.VIRTUAL_MACHINE
| vulnerableAsset.name | asset.assetDetail.computeAssetClass.cloudInstance.hostname |
| vulnerableAsset.name | asset.assetDetail.network[].hostname |
| vulnerableAsset.ipAddresses[] | asset.assetDetail.network[].ipv4Addresses[] |
| vulnerableAsset.providerUniqueId | asset.assetHeader.externalAssetId |
| vulnerableAsset.status | asset.assetHeader.status |
| vulnerableAsset.id | asset.assetHeader.vendorAssetId |
| vulnerableAsset.name | asset.assetDetail.name |
| vulnerableAsset.name | asset.assetDetail.hostIdentity.hostname |
| id | findingGroup.findings[].externalFindingId |
| portalUrl | findingGroup.findings[].findingURL |
| name | findingGroup.findings[].findingType.vulnerability.cveId |
| CVEDescription | findingGroup.findings[].description |
| status | findingGroup.findings[].findingStatus |
| severity | findingGroup.findings[].severity |
| firstDetectedAt | findingGroup.findings[].firstFoundOn |
| lastDetectedAt | findingGroup.findings[].lastFoundOn |
| resolvedAt | findingGroup.findings[].lastFixedOn |
| remediation | findingGroup.findings[].remediation.remediationStrategy |
| name | findingGroup.findings[].name |
| detailedName | findingGroup.findings[].product.name |
| version | findingGroup.findings[].product.version |
| detectionMethod | findingGroup.findings[].detectionMethod |
| hasExploit | findingGroup.findings[].findingType.vulnerability.isExploitAvailable |
| link | findingGroup.findings[].findingDetectionURL |
| cvssv3.attackVector | findingGroup.findings[].findingType.vulnerability.cvss.vector |
| vulnerableAsset.providerUniqueId | asset.assetHeader.externalAssetId |
| vulnerableAsset.status | asset.assetHeader.status |
| vulnerableAsset.id | asset.assetHeader.vendorAssetId |
| vulnerableAsset.name | asset.assetDetail.name |
| vulnerableAsset.name | asset.assetDetail.hostIdentity.hostname |
| id | findingGroup.findings[].externalFindingId |
| portalUrl | findingGroup.findings[].findingURL |
| name | findingGroup.findings[].findingType.vulnerability.cweId |
| CVEDescription | findingGroup.findings[].description |
| status | findingGroup.findings[].findingStatus |
| severity | findingGroup.findings[].severity |
| firstDetectedAt | findingGroup.findings[].firstFoundOn |
| lastDetectedAt | findingGroup.findings[].lastFoundOn |
| resolvedAt | findingGroup.findings[].lastFixedOn |
| remediation | findingGroup.findings[].remediation.remediationStrategy |
| name | findingGroup.findings[].name |
| detailedName | findingGroup.findings[].product.name |
| version | findingGroup.findings[].product.version |
| detectionMethod | findingGroup.findings[].detectionMethod |
| hasExploit | findingGroup.findings[].findingType.vulnerability.isExploitAvailable |
| link | findingGroup.findings[].findingDetectionURL |
| cvssv3.attackVector | findingGroup.findings[].findingType.vulnerability.cvss.vector |
| vulnerableAsset.providerUniqueId | asset.assetHeader.externalAssetId |
| vulnerableAsset.status | asset.assetHeader.status |
| vulnerableAsset.id | asset.assetHeader.vendorAssetId |
| vulnerableAsset.name | asset.assetDetail.name |
| vulnerableAsset.name | asset.assetDetail.hostIdentity.hostname |
| id | findingGroup.findings[].externalFindingId |
| portalUrl | findingGroup.findings[].findingURL |
| name | findingGroup.findings[].findingType.vulnerability.cveId |
| CVEDescription | findingGroup.findings[].description |
| status | findingGroup.findings[].findingStatus |
| severity | findingGroup.findings[].severity |
| firstDetectedAt | findingGroup.findings[].firstFoundOn |
| lastDetectedAt | findingGroup.findings[].lastFoundOn |
| resolvedAt | findingGroup.findings[].lastFixedOn |
| remediation | findingGroup.findings[].remediation.remediationStrategy |
| name | findingGroup.findings[].name |
| detailedName | findingGroup.findings[].product.name |
| version | findingGroup.findings[].product.version |
| detectionMethod | findingGroup.findings[].detectionMethod |
| hasExploit | findingGroup.findings[].findingType.vulnerability.isExploitAvailable |
| link | findingGroup.findings[].findingDetectionURL |
| cvssv3.attackVector | findingGroup.findings[].findingType.vulnerability.cvss.vector |
| vulnerableAsset.externalId | asset.assetHeader.externalAssetId |
| vulnerableAsset.status | asset.assetHeader.status |
| vulnerableAsset.id | asset.assetHeader.vendorAssetId |
| vulnerableAsset.name | asset.assetDetail.name |
| vulnerableAsset.name | asset.assetDetail.hostIdentity.hostname |
| id | findingGroup.findings[].externalFindingId |
| portalUrl | findingGroup.findings[].findingURL |
| name | findingGroup.findings[].findingType.vulnerability.cveId |
| CVEDescription | findingGroup.findings[].description |
| status | findingGroup.findings[].findingStatus |
| severity | findingGroup.findings[].severity |
| firstDetectedAt | findingGroup.findings[].firstFoundOn |
| lastDetectedAt | findingGroup.findings[].lastFoundOn |
| resolvedAt | findingGroup.findings[].lastFixedOn |
| remediation | findingGroup.findings[].remediation.remediationStrategy |
| name | findingGroup.findings[].name |
| detailedName | findingGroup.findings[].product.name |
| version | findingGroup.findings[].product.version |
| detectionMethod | findingGroup.findings[].detectionMethod |
| hasExploit | findingGroup.findings[].findingType.vulnerability.isExploitAvailable |
| link | findingGroup.findings[].findingDetectionURL |
| cvssv3.attackVector | findingGroup.findings[].findingType.vulnerability.cvss.vector |
CONTAINER_IMAGECONTAINER_IMAGE
| vulnerableAsset.name | asset.assetDetail.computeAssetClass.containerImage.name |
| vulnerableAsset.name | asset.assetDetail.computeAssetClass.containerImage.repository |
| vulnerableAsset.name | asset.assetDetail.computeAssetClass.containerImage.tag |
| vulnerableAsset.id | asset.assetDetail.computeAssetClass.containerImage.id |
| vulnerableAsset.name | asset.assetDetail.computeAssetClass.containerImage.fullPath |
| vulnerableAsset.externalId | asset.assetDetail.computeAssetClass.containerImage.externalId |
| vulnerableAsset.externalId | asset.assetHeader.externalAssetId |
| vulnerableAsset.status | asset.assetHeader.status |
| vulnerableAsset.id | asset.assetHeader.vendorAssetId |
| vulnerableAsset.name | asset.assetDetail.name |
| vulnerableAsset.name | asset.assetDetail.hostIdentity.hostname |
| id | findingGroup.findings[].externalFindingId |
| portalUrl | findingGroup.findings[].findingURL |
| name | findingGroup.findings[].findingType.vulnerability.cveId |
| CVEDescription | findingGroup.findings[].description |
| status | findingGroup.findings[].findingStatus |
| severity | findingGroup.findings[].severity |
| firstDetectedAt | findingGroup.findings[].firstFoundOn |
| lastDetectedAt | findingGroup.findings[].lastFoundOn |
| resolvedAt | findingGroup.findings[].lastFixedOn |
| remediation | findingGroup.findings[].remediation.remediationStrategy |
| name | findingGroup.findings[].name |
| detailedName | findingGroup.findings[].product.name |
| version | findingGroup.findings[].product.version |
| detectionMethod | findingGroup.findings[].detectionMethod |
| hasExploit | findingGroup.findings[].findingType.vulnerability.isExploitAvailable |
| link | findingGroup.findings[].findingDetectionURL |
| cvssv3.attackVector | findingGroup.findings[].findingType.vulnerability.cvss.vector |
MISCONFIGURATION - ALL MISCONFIGURATION - ALL
| asset_root (assetType) | asset.assetHeader.assetTypeName |
| resource.id | asset.assetHeader.externalAssetId |
| resource.id | asset.assetHeader.vendorAssetId |
| resource.name | asset.assetDetail.name |
| id | findingGroup.findings[].externalFindingId |
| rule.name | findingGroup.findings[].name |
| rule.description | findingGroup.findings[].description |
| result | findingGroup.findings[].findingStatus |
| severity | findingGroup.findings[].severity |
| resource.subscription.cloudProvider | findingGroup.findings[].vendorName |
| firstSeenAt | findingGroup.findings[].firstFoundOn |
| result | findingGroup.findings[].detectionResult |
| remediation | findingGroup.findings[].solutionRecommendation |
| rule.remediationInstructions | findingGroup.findings[].remediation.description |
| rule.name | findingGroup.findings[].findingType.misconfiguration.rule.ruleName |
| rule.description | findingGroup.findings[].findingType.misconfiguration.rule.ruleDescription |
| rule.shortId | findingGroup.findings[].findingType.misconfiguration.control.id |
MISCONFIGURATION - VIRTUAL_MACHINEMISCONFIGURATION - VIRTUAL_MACHINE
| asset_root (assetType) | asset.assetHeader.assetTypeName |
| resource.name | asset.assetDetail.hostIdentity.hostname |
| resource.id | asset.assetHeader.externalAssetId |
| resource.id | asset.assetHeader.vendorAssetId |
| resource.name | asset.assetDetail.name |
| id | findingGroup.findings[].externalFindingId |
| rule.name | findingGroup.findings[].name |
| rule.description | findingGroup.findings[].description |
| result | findingGroup.findings[].findingStatus |
| severity | findingGroup.findings[].severity |
| resource.subscription.cloudProvider | findingGroup.findings[].vendorName |
| firstSeenAt | findingGroup.findings[].firstFoundOn |
| result | findingGroup.findings[].detectionResult |
| remediation | findingGroup.findings[].solutionRecommendation |
| rule.remediationInstructions | findingGroup.findings[].remediation.remediationStrategy |
| rule.functionAsControl | findingGroup.findings[].remediation.description |
| rule.name | findingGroup.findings[].findingType.misconfiguration.rule.ruleName |
|
rule.description |
findingGroup.findings[].findingType.misconfiguration.rule.ruleDescription |
| rule.shortId | findingGroup.findings[].findingType.misconfiguration.control.id |
AWS Lambda FunctionAWS Lambda Function
| graphEntity.properties.externalId | asset.assetHeader.externalAssetId |
| graphEntity.properties._vertexID | asset.assetHeader.vendorAssetId |
| graphEntity.properties.name | asset.assetDetail.name |
| cloudAccount.id | asset.assetDetail.cloudInfo.accountId |
| cloudAccount.name | asset.assetDetail.cloudInfo.accountName |
| graphEntity.properties.cloudPlatform | asset.assetDetail.cloudInfo.provider |
| graphEntity.properties.cloudProviderURL | asset.assetDetail.cloudInfo.providerUrl |
| graphEntity.properties.region | asset.assetDetail.cloudInfo.region |
| graphEntity.properties.zone | asset.assetDetail.cloudInfo.availabilityZone |
| graphEntity.properties.nativeType | asset.assetDetail.serverlessAssetClass.serviceName |
| graphEntity.properties.name | asset.assetDetail.serverlessAssetClass.functionName |
| graphEntity.properties.runtime | asset.assetDetail.serverlessAssetClass.runtime |
| graphEntity.properties.awsLambda_codeSha256 | asset.assetDetail.serverlessAssetClass.codeSha256 |
| graphEntity.properties.awsLambda_version | asset.assetDetail.serverlessAssetClass.version |
| graphEntity.properties.awsLambda_isLatestVersion | asset.assetDetail.typedAttributes.& |
| graphEntity.properties.status | asset.assetHeader.status |
| graphEntity.properties.creationDate | asset.assetDetail.sourceCreatedAt |
| graphEntity.properties.updatedAt | asset.assetDetail.sourceUpdatedAt |
| graphEntity.properties.deletedAt | asset.assetDetail.sourceDeletedAt |
| isOpenToAllInternet | asset.assetDetail.typedAttributes.& |
| isAccessibleFromInternet | asset.assetDetail.typedAttributes.& |
| hasSensitiveData | asset.assetDetail.typedAttributes.& |
| hasAdminPrivileges | asset.assetDetail.typedAttributes.& |
| hasHighPrivileges | asset.assetDetail.typedAttributes.& |
| hasAccessToSensitiveData | asset.assetDetail.typedAttributes.& |
| tags[].key | asset.assetDetail.externalTags[].key |
| tags[].value | asset.assetDetail.externalTags[].value |
| CONSTANT: "aws-lambda-function" | asset.assetHeader.assetTypeName |
| graphEntity.properties.externalId | asset.assetHeader.externalAssetId |
| graphEntity.properties._vertexID | asset.assetHeader.vendorAssetId |
| graphEntity.properties.name | asset.assetDetail.name |
| graphEntity.properties.creationDate | asset.assetDetail.sourceCreatedAt |
| graphEntity.properties.deletedAt | asset.assetDetail.sourceDeletedAt |
| cloudAccount.id | asset.assetDetail.cloudInfo.accountId |
| cloudAccount.name | asset.assetDetail.cloudInfo.accountName |
| graphEntity.properties.cloudPlatform | asset.assetDetail.cloudInfo.provider |
| graphEntity.properties.cloudProviderURL | asset.assetDetail.cloudInfo.providerUrl |
| graphEntity.properties.region | asset.assetDetail.cloudInfo.region |
| graphEntity.properties.zone | asset.assetDetail.cloudInfo.availabilityZone |
| graphEntity.properties.nativeType | asset.assetDetail.serverlessAssetClass.serviceName |
| graphEntity.properties.name | asset.assetDetail.serverlessAssetClass.functionName |
| graphEntity.properties.runtime | asset.assetDetail.serverlessAssetClass.runtime |
| graphEntity.properties.status | asset.assetHeader.status |
| graphEntity.properties.updatedAt | asset.assetDetail.sourceUpdatedAt |
| isOpenToAllInternet | asset.assetDetail.typedAttributes.& |
| isAccessibleFromInternet | asset.assetDetail.typedAttributes.& |
| hasSensitiveData | asset.assetDetail.typedAttributes.& |
| hasAdminPrivileges | asset.assetDetail.typedAttributes.& |
| hasHighPrivileges | asset.assetDetail.typedAttributes.& |
| hasAccessToSensitiveData | asset.assetDetail.typedAttributes.& |
| tags[].key | asset.assetDetail.externalTags[].key |
| tags[].value | asset.assetDetail.externalTags[].value |
| CONSTANT: "azure-function" | asset.assetHeader.assetTypeName |
GCP Cloud FunctionGCP Cloud Function
| graphEntity.properties.externalId | asset.assetHeader.externalAssetId |
| graphEntity.properties._vertexID | asset.assetHeader.vendorAssetId |
| graphEntity.properties.name | asset.assetDetail.name |
| graphEntity.properties.creationDate | asset.assetDetail.sourceCreatedAt |
| graphEntity.properties.deletedAt | asset.assetDetail.sourceDeletedAt |
| cloudAccount.id | asset.assetDetail.cloudInfo.accountId |
| cloudAccount.name | asset.assetDetail.cloudInfo.accountName |
| graphEntity.properties.cloudPlatform | asset.assetDetail.cloudInfo.provider |
| graphEntity.properties.cloudProviderURL | asset.assetDetail.cloudInfo.providerUrl |
| graphEntity.properties.region | asset.assetDetail.cloudInfo.region |
| graphEntity.properties.zone | asset.assetDetail.cloudInfo.availabilityZone |
| graphEntity.properties.nativeType | asset.assetDetail.serverlessAssetClass.serviceName |
| graphEntity.properties.name | asset.assetDetail.serverlessAssetClass.functionName |
| graphEntity.properties.runtime | asset.assetDetail.serverlessAssetClass.runtime |
| graphEntity.properties.status | asset.assetHeader.status |
| graphEntity.properties.updatedAt | asset.assetDetail.sourceUpdatedAt |
| isOpenToAllInternet | asset.assetDetail.typedAttributes.& |
| isAccessibleFromInternet | asset.assetDetail.typedAttributes.& |
| hasSensitiveData | asset.assetDetail.typedAttributes.& |
| hasAdminPrivileges | asset.assetDetail.typedAttributes.& |
| hasHighPrivileges | asset.assetDetail.typedAttributes.& |
| hasAccessToSensitiveData | asset.assetDetail.typedAttributes.& |
| tags[].key | asset.assetDetail.externalTags[].key |
| tags[].value | asset.assetDetail.externalTags[].value |
| CONSTANT: "gcp-cloud-function" | asset.assetHeader.assetTypeName |
| graphEntity.properties.externalId | asset.assetHeader.externalAssetId |
| graphEntity.properties._vertexID | asset.assetHeader.vendorAssetId |
| graphEntity.properties.accessibleFrom.internet | asset.assetDetail.typedAttributes.& |
| graphEntity.properties.name | asset.assetDetail.name |
| cloudAccount.id | asset.assetDetail.cloudInfo.accountId |
| cloudAccount.name | asset.assetDetail.cloudInfo.accountName |
| graphEntity.properties.cloudPlatform | asset.assetDetail.cloudInfo.provider |
| graphEntity.properties.cloudProviderURL | asset.assetDetail.cloudInfo.providerUrl |
| graphEntity.properties.region | asset.assetDetail.cloudInfo.region |
| graphEntity.properties.zone | asset.assetDetail.cloudInfo.availabilityZone |
| graphEntity.properties.nativeType | asset.assetDetail.serverlessAssetClass.serviceName |
| graphEntity.properties.name | asset.assetDetail.serverlessAssetClass.functionName |
| graphEntity.properties.runtime | asset.assetDetail.serverlessAssetClass.runtime |
| graphEntity.properties.creationDate | asset.assetDetail.sourceCreatedAt |
| graphEntity.properties.updatedAt | asset.assetDetail.sourceUpdatedAt |
| graphEntity.properties.deletedAt | asset.assetDetail.sourceDeletedAt |
| graphEntity.properties.status | asset.assetHeader.status |
| isOpenToAllInternet | asset.assetDetail.typedAttributes.& |
| isAccessibleFromInternet | asset.assetDetail.typedAttributes.& |
| hasAccessToSensitiveData | asset.assetDetail.typedAttributes.& |
| hasSensitiveData | asset.assetDetail.typedAttributes.& |
| hasAdminPrivileges | asset.assetDetail.typedAttributes.& |
| hasHighPrivileges | asset.assetDetail.typedAttributes.& |
| tags[].key | asset.assetDetail.externalTags[].key |
| tags[].value | asset.assetDetail.externalTags[].value |
| CONSTANT: "oci-function" | asset.assetHeader.assetTypeName |
Wiz Vulnerability Field Mapping
VULNERABILITY - VIRTUAL_MACHINEVULNERABILITY - VIRTUAL_MACHINE
| asset_root (assetType) | asset.assetHeader.assetTypeName |
| vulnerableAsset.name | asset.assetDetail.computeAssetClass.cloudInstance.hostname |
| vulnerableAsset.name | asset.assetDetail.network[].hostname |
| vulnerableAsset.ipAddresses[] | asset.assetDetail.network[].ipv4Addresses[] |
| vulnerableAsset.externalId | asset.assetHeader.externalAssetId |
| vulnerableAsset.status | asset.assetHeader.status |
| vulnerableAsset.id | asset.assetHeader.vendorAssetId |
| vulnerableAsset.name | asset.assetDetail.name |
| vulnerableAsset.name | asset.assetDetail.hostIdentity.hostname |
| id | findingGroup.findings[].externalFindingId |
| portalUrl | findingGroup.findings[].findingURL |
| name | findingGroup.findings[].findingType.vulnerability.cveId |
| CVEDescription | findingGroup.findings[].description |
| status | findingGroup.findings[].findingStatus |
| severity | findingGroup.findings[].severity |
| firstDetectedAt | findingGroup.findings[].firstFoundOn |
| lastDetectedAt | findingGroup.findings[].lastFoundOn |
| resolvedAt | findingGroup.findings[].lastFixedOn |
| remediation | findingGroup.findings[].remediation.remediationStrategy |
| name | findingGroup.findings[].name |
| detailedName | findingGroup.findings[].product.name |
| version | findingGroup.findings[].product.version |
| detectionMethod | findingGroup.findings[].detectionMethod |
| hasExploit | findingGroup.findings[].findingType.vulnerability.isExploitAvailable |
| link | findingGroup.findings[].findingDetectionURL |
| cvssv3.attackVector | findingGroup.findings[].findingType.vulnerability.cvss.vector |
VULNERABILITY - AWS.VIRTUAL_MACHINEVULNERABILITY - AWS.VIRTUAL_MACHINE
| asset_root (assetType) | asset.assetHeader.assetTypeName |
| vulnerableAsset.name | asset.assetDetail.computeAssetClass.cloudInstance.hostname |
| vulnerableAsset.name | asset.assetDetail.network[].hostname |
| vulnerableAsset.ipAddresses[] | asset.assetDetail.network[].ipv4Addresses[] |
| vulnerableAsset.providerUniqueId | asset.assetHeader.externalAssetId |
| vulnerableAsset.status | asset.assetHeader.status |
| vulnerableAsset.id | asset.assetHeader.vendorAssetId |
| vulnerableAsset.name | asset.assetDetail.name |
| vulnerableAsset.name | asset.assetDetail.hostIdentity.hostname |
| id | findingGroup.findings[].externalFindingId |
| portalUrl | findingGroup.findings[].findingURL |
| name | findingGroup.findings[].findingType.vulnerability.cveId |
| CVEDescription | findingGroup.findings[].description |
| status | findingGroup.findings[].findingStatus |
| severity | findingGroup.findings[].severity |
| firstDetectedAt | findingGroup.findings[].firstFoundOn |
| lastDetectedAt | findingGroup.findings[].lastFoundOn |
| resolvedAt | findingGroup.findings[].lastFixedOn |
| remediation | findingGroup.findings[].remediation.remediationStrategy |
| name | findingGroup.findings[].name |
| detailedName | findingGroup.findings[].product.name |
| version | findingGroup.findings[].product.version |
| detectionMethod | findingGroup.findings[].detectionMethod |
| hasExploit | findingGroup.findings[].findingType.vulnerability.isExploitAvailable |
| link | findingGroup.findings[].findingDetectionURL |
| cvssv3.attackVector | findingGroup.findings[].findingType.vulnerability.cvss.vector |
VULNERABILITY - AWS.BUCKETVULNERABILITY - AWS.BUCKET
| asset_root (assetType) | asset.assetHeader.assetTypeName |
| vulnerableAsset.providerUniqueId | asset.assetHeader.externalAssetId |
| vulnerableAsset.status | asset.assetHeader.status |
| vulnerableAsset.id | asset.assetHeader.vendorAssetId |
| vulnerableAsset.name | asset.assetDetail.name |
| vulnerableAsset.name | asset.assetDetail.hostIdentity.hostname |
| id | findingGroup.findings[].externalFindingId |
| portalUrl | findingGroup.findings[].findingURL |
| name | findingGroup.findings[].findingType.vulnerability.cweId |
| CVEDescription | findingGroup.findings[].description |
| status | findingGroup.findings[].findingStatus |
| severity | findingGroup.findings[].severity |
| firstDetectedAt | findingGroup.findings[].firstFoundOn |
| lastDetectedAt | findingGroup.findings[].lastFoundOn |
| resolvedAt | findingGroup.findings[].lastFixedOn |
| remediation | findingGroup.findings[].remediation.remediationStrategy |
| name | findingGroup.findings[].name |
| detailedName | findingGroup.findings[].product.name |
| version | findingGroup.findings[].product.version |
| detectionMethod | findingGroup.findings[].detectionMethod |
| hasExploit | findingGroup.findings[].findingType.vulnerability.isExploitAvailable |
| link | findingGroup.findings[].findingDetectionURL |
| cvssv3.attackVector | findingGroup.findings[].findingType.vulnerability.cvss.vector |
VULNERABILITY - ALL.AWSVULNERABILITY - ALL.AWS
| asset_root (assetType) | asset.assetHeader.assetTypeName |
| vulnerableAsset.providerUniqueId | asset.assetHeader.externalAssetId |
| vulnerableAsset.status | asset.assetHeader.status |
| vulnerableAsset.id | asset.assetHeader.vendorAssetId |
| vulnerableAsset.name |
asset.assetDetail.name |
| vulnerableAsset.name | asset.assetDetail.hostIdentity.hostname |
| id | findingGroup.findings[].externalFindingId |
| portalUrl | findingGroup.findings[].findingURL |
| name | findingGroup.findings[].findingType.vulnerability.cveId |
| CVEDescription | findingGroup.findings[].description |
| status | findingGroup.findings[].findingStatus |
| severity | findingGroup.findings[].severity |
| firstDetectedAt | findingGroup.findings[].firstFoundOn |
| lastDetectedAt | findingGroup.findings[].lastFoundOn |
| resolvedAt | findingGroup.findings[].lastFixedOn |
| remediation | findingGroup.findings[].remediation.remediationStrategy |
| name | findingGroup.findings[].name |
| detailedName | findingGroup.findings[].product.name |
| version | findingGroup.findings[].product.version |
| detectionMethod | findingGroup.findings[].detectionMethod |
| hasExploit | findingGroup.findings[].findingType.vulnerability.isExploitAvailable |
| link | findingGroup.findings[].findingDetectionURL |
| cvssv3.attackVector | findingGroup.findings[].findingType.vulnerability.cvss.vector |
VULNERABILITY - ALLVULNERABILITY - ALL
| asset_root (assetType) | asset.assetHeader.assetTypeName |
| vulnerableAsset.externalId | asset.assetHeader.externalAssetId |
| vulnerableAsset.status | asset.assetHeader.status |
| vulnerableAsset.id | asset.assetHeader.vendorAssetId |
| vulnerableAsset.name | asset.assetDetail.name |
| vulnerableAsset.name | asset.assetDetail.hostIdentity.hostname |
| id | findingGroup.findings[].externalFindingId |
| portalUrl | findingGroup.findings[].findingURL |
| name | findingGroup.findings[].findingType.vulnerability.cveId |
| CVEDescription | findingGroup.findings[].description |
| status | findingGroup.findings[].findingStatus |
| severity | findingGroup.findings[].severity |
| firstDetectedAt | findingGroup.findings[].firstFoundOn |
| lastDetectedAt | findingGroup.findings[].lastFoundOn |
| resolvedAt | findingGroup.findings[].lastFixedOn |
| remediation | findingGroup.findings[].remediation.remediationStrategy |
| name | findingGroup.findings[].name |
| detailedName | findingGroup.findings[].product.name |
| version | findingGroup.findings[].product.version |
| detectionMethod | findingGroup.findings[].detectionMethod |
| hasExploit | findingGroup.findings[].findingType.vulnerability.isExploitAvailable |
| link | findingGroup.findings[].findingDetectionURL |
| cvssv3.attackVector | findingGroup.findings[].findingType.vulnerability.cvss.vector |
VULNERABILITY - CONTAINER_IMAGEVULNERABILITY - CONTAINER_IMAGE
| asset_root (assetType) | asset.assetHeader.assetTypeName |
| vulnerableAsset.imageId | asset.assetHeader.externalAssetId |
| vulnerableAsset.status | asset.assetHeader.status |
| vulnerableAsset.id | asset.assetHeader.vendorAssetId |
| vulnerableAsset.name | asset.assetDetail.name |
| vulnerableAsset.name | asset.assetDetail.hostIdentity.hostname |
| id | findingGroup.findings[].externalFindingId |
| portalUrl | findingGroup.findings[].findingURL |
| detailedName | findingGroup.findings[].product.name |
| name | findingGroup.findings[].findingType.vulnerability.cveId |
| CVEDescription | findingGroup.findings[].description |
| status | findingGroup.findings[].findingStatus |
| severity | findingGroup.findings[].severity |
| firstDetectedAt | findingGroup.findings[].firstFoundOn |
| lastDetectedAt | findingGroup.findings[].lastFoundOn |
| resolvedAt | findingGroup.findings[].lastFixedOn |
| remediation | findingGroup.findings[].remediation.remediationStrategy |
| name | findingGroup.findings[].name |
| version | findingGroup.findings[].product.version |
| detectionMethod | findingGroup.findings[].detectionMethod |
| hasExploit | findingGroup.findings[].findingType.vulnerability.isExploitAvailable |
| link | findingGroup.findings[].findingDetectionURL |
| cvssv3.attackVector | findingGroup.findings[].findingType.vulnerability.cvss.vector |
VULNERABILITY - SERVERLESSVULNERABILITY - SERVERLESS
| asset_root (assetType) | asset.assetHeader.assetTypeName |
| vulnerableAsset.externalId | asset.assetHeader.externalAssetId |
| vulnerableAsset.status | asset.assetHeader.status |
| vulnerableAsset.id | asset.assetHeader.vendorAssetId |
| vulnerableAsset.name | asset.assetDetail.name |
| id | findingGroup.findings[].id |
| id | findingGroup.findings[].externalFindingId |
| portalUrl | findingGroup.findings[].findingURL |
| name | findingGroup.findings[].findingType.vulnerability.cveId |
| CVEDescription | findingGroup.findings[].description |
| status | findingGroup.findings[].findingStatus |
| severity | findingGroup.findings[].severity |
| firstDetectedAt | findingGroup.findings[].firstFoundOn |
| lastDetectedAt | findingGroup.findings[].lastFoundOn |
| resolvedAt | findingGroup.findings[].lastFixedOn |
| remediation | findingGroup.findings[].remediation.remediationStrategy |
| name | findingGroup.findings[].name |
| version | findingGroup.findings[].product.version |
| detectionMethod | findingGroup.findings[].detectionMethod |
| hasExploit | findingGroup.findings[].findingType.vulnerability.isExploitAvailable |
| link | findingGroup.findings[].findingDetectionURL |
| cvssv3.attackVector | findingGroup.findings[].findingType.vulnerability.cvss.vector |