Wiz (VM Assets) Connector
The Wiz API Connector bridges cloud security platform data with Qualys Enterprise TruRisk Management by automatically transferring asset inventory and vulnerability findings through scheduled API calls. It solves the visibility problem inherent in multi-cloud environments by enabling complete visibility into every technology running in the cloud without requiring agents.
The connector enriches raw vulnerability data through deduplication, normalization, and TruRisk scoring, allowing security teams to integrate cloud-native findings with their existing risk prioritization workflows and make more informed remediation decisions across their infrastructure.
Connector Details
The following table provides a comprehensive overview of what the Wiz (VM Assets) connector supports.
| Vendor | Wiz |
| Product Name | Wiz |
| Category | Cloud Security |
| Findings Support | Supported |
| Supported Assets | Host Assets |
| Version | 1.0.0 |
| Integration Type | API Integration (REST) |
| Direction | Unidirectional |
| Delta Support | Supported |
| Supported Version & Type | SaaS (Latest) |
| Import of Installed Software | Not Supported |
| Import of Source Tags | Not Supported |
| Filters/Filter Query | Yes |
Configure the Connector
Follow the steps below to create and configure your Wiz (VM Assets) connector in Qualys ETM.
Before You Begin - AuthenticationBefore You Begin - Authentication
Complete the following prerequisites before configuring the connector. Have the values below ready before proceeding to setup.
- Ensure you have a Wiz account with the Project Admin role or equivalent permissions to create service accounts.
- Create a service account in Wiz with the type set to Custom Integration (GraphQL) and the required API scopes. (See Locate and Create Wiz Service Account Credentials below.)
- Identify your Wiz API Endpoint URL and Token URL. The API Endpoint URL follows the format
https://api.<TENANT_DATA_CENTER>.<ENVIRONMENT>, and the Token URL depends on your tenant type. - Confirm network connectivity: Qualys cloud must be able to reach your Wiz API endpoint over HTTPS (port 443).
Locate and Create Wiz Service Account Credentials
Locate Your Wiz Tenant Data Center
- Log in to Wiz. Click the user icon in the top-right corner of the interface, then select Tenant Info.
- Note the Data Center and Regions value. This determines the regional component of your API Endpoint URL (for example,
us1,us2, oreu1).
Identify Your API Endpoint URL and Token URL
The API Endpoint URL follows the format https://api.<TENANT_DATA_CENTER>.<ENVIRONMENT>. Use the table below to determine the correct environment value and Token URL for your tenant type.
| Tenant Type | API Endpoint Environment | Example API Endpoint URL | Token URL |
|---|---|---|---|
| Wiz Commercial | app.wiz.io |
https://api.us17.app.wiz.io |
https://auth.app.wiz.io/oauth/token |
| Wiz for Gov (FedRAMP) | app.wiz.us |
https://api.us17.app.wiz.us |
https://auth.app.wiz.us/oauth/token |
| AWS GovCloud | gov.wiz.io |
https://api.us17.gov.wiz.io |
https://auth.gov.wiz.io/oauth/token |
Note: The example API Endpoint URLs above use us17 as a sample tenant data center value. Replace it with the actual value from your Wiz Tenant Info page.
Create a Service Account
- Log in to Wiz with the Project Admin role.
- Navigate to Settings > Service Accounts (or Settings > Access Management > Service Accounts, depending on your Wiz version).
- Click Add Service Account.
- Enter a descriptive name for the service account.
- Set the type to Custom Integration (GraphQL).
- Select the projects the service account should have access to, or leave the selection empty to allow access to all projects.
- In the API Scopes section, select the following scopes:
read:resources– required for host asset ingestion.read:vulnerabilities– required for vulnerability findings ingestion.read:inventory— Required to retrieve inventory data.
- Click Add Service Account.
- The page displays a Client ID and Client Secret. Copy and store these values securely.
Important: The Client Secret is shown only once. If you navigate away without saving it, you must create a new service account to obtain new credentials.
Permissions Required
The Wiz service account must be of type Custom Integration (GraphQL) with the read:resources and read:vulnerabilities API scopes. The account that creates the service account must have the Project Admin role or equivalent in Wiz.
Scope and Data Access
The connector supports GraphQL query-based filtering to scope which data is imported. Example filter formats include filtering by asset ID or by vendor severity, status, and detection method. These filters are configured during the profile setup step in Qualys ETM.
Key Rotation
When rotating the Client Secret, create a new service account in Wiz or regenerate the credentials for the existing one. Update the Qualys ETM connector configuration with the new Client ID and Client Secret values. Verify the connector reaches the Processed state after the next scheduled execution. Remove unused service accounts from Wiz as a security practice.
Create a Profile & ConnectionCreate a Profile & Connection
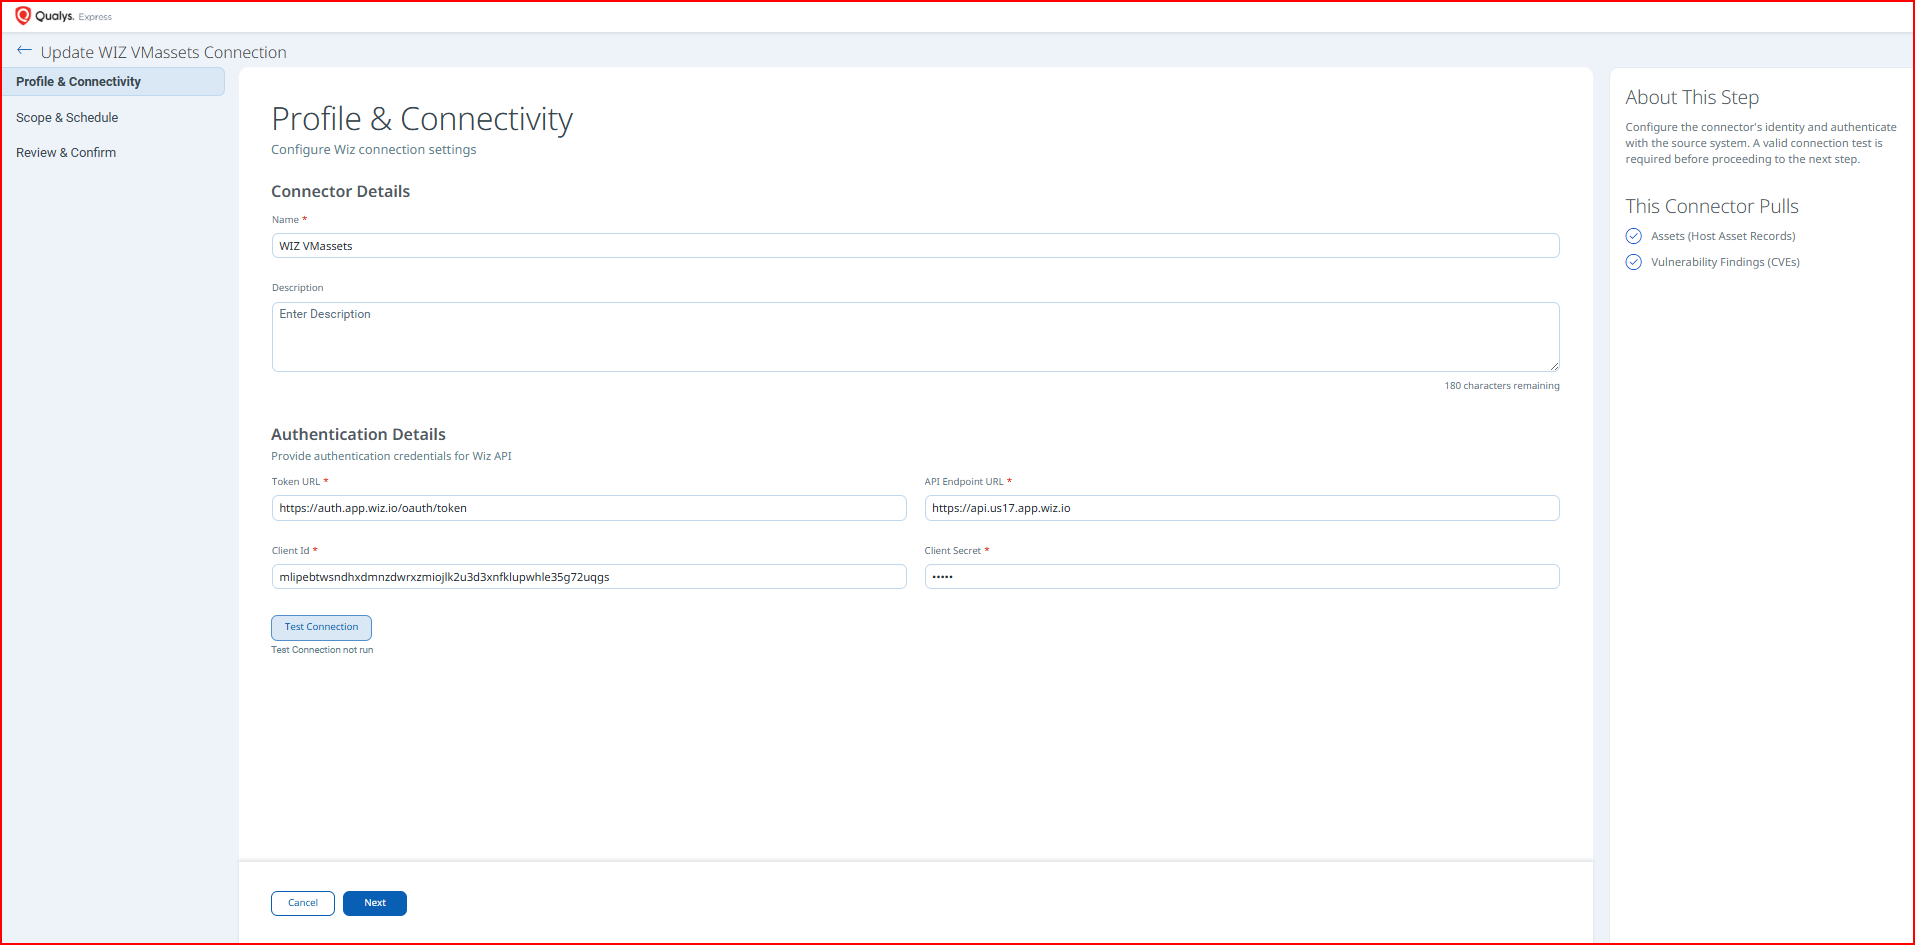
Connector Details
Provide a name and description to identify this connector, and select the asset and findings types to ingest.
| Field | Type | Description |
|---|---|---|
| Connector Name | String | A unique display name for this connector instance (for example, Wiz-Prod-VMAssets). |
| Description | String | Optional free-text description of the connector's purpose or scope. |
Authentication Details
Provide the OAuth 2.0 credentials obtained from your Wiz service account. These values are used to request an access token before each GraphQL query.
| Field | Type | Description |
|---|---|---|
| Token URL | String | The OAuth 2.0 token endpoint for your Wiz tenant type. Example for commercial tenants: https://auth.app.wiz.io/oauth/token. |
| API Endpoint URL | String | Your Wiz GraphQL API endpoint. Follows the format https://api.<TENANT_DATA_CENTER>.<ENVIRONMENT>. Example: https://api.us17.app.wiz.io. |
| Client ID | String | The Client ID generated when creating the Wiz service account. |
| Client Secret | Encrypted String | The Client Secret generated when creating the Wiz service account. This value is stored encrypted. |
Important: The Client Secret is displayed only once in Wiz at the time the service account is created. Ensure you have saved it before entering it here. If the secret is unavailable, generate a new service account in Wiz.
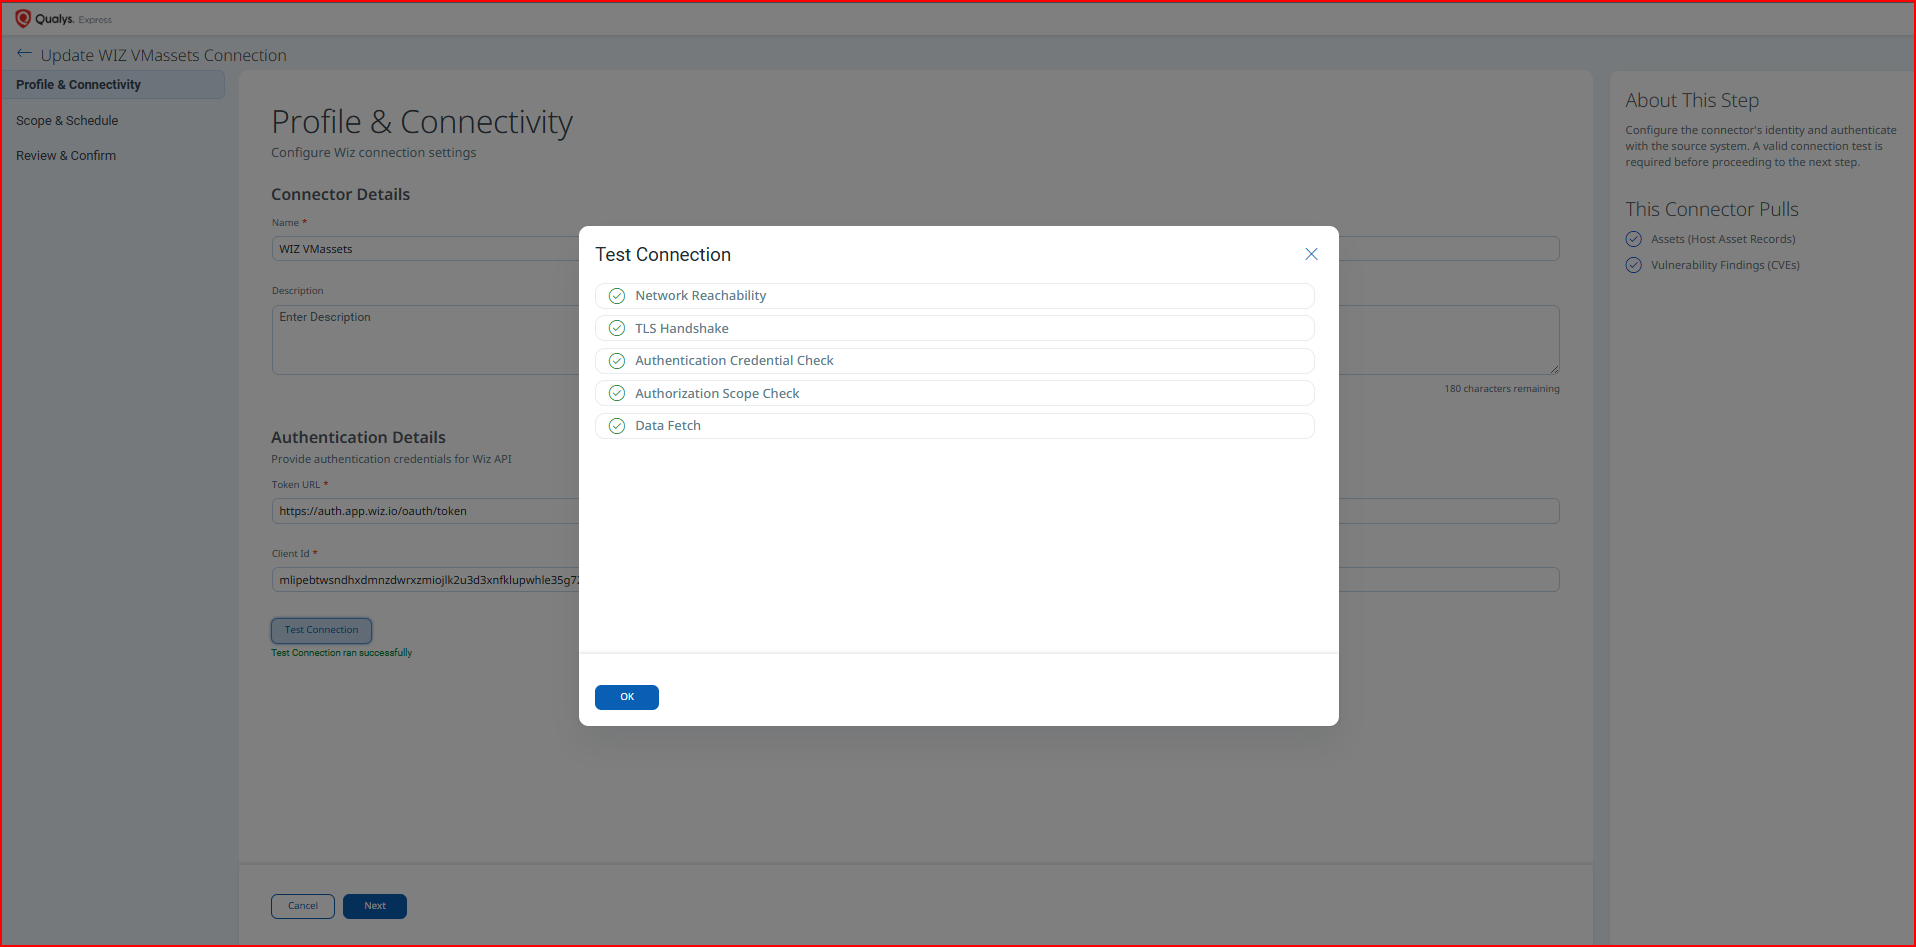
After entering all credentials, click Test Connection to validate connectivity. The following checks are performed:
- Network Reachability — Verifies that the connector endpoint is reachable over HTTPS (port 443).
- TLS Handshake — Confirms that a secure TLS connection can be established with the remote endpoint.
- Authentication Credential Check — Validates the configured credentials against the source system's authentication endpoint.
- Authorization Scope Check — Confirms that the provided credentials have the required permissions to access the configured data scope.
- Data Fetch — Verifies that data can be successfully retrieved from the source system using the configured connection.
Set the Scope & ScheduleSet the Scope & Schedule
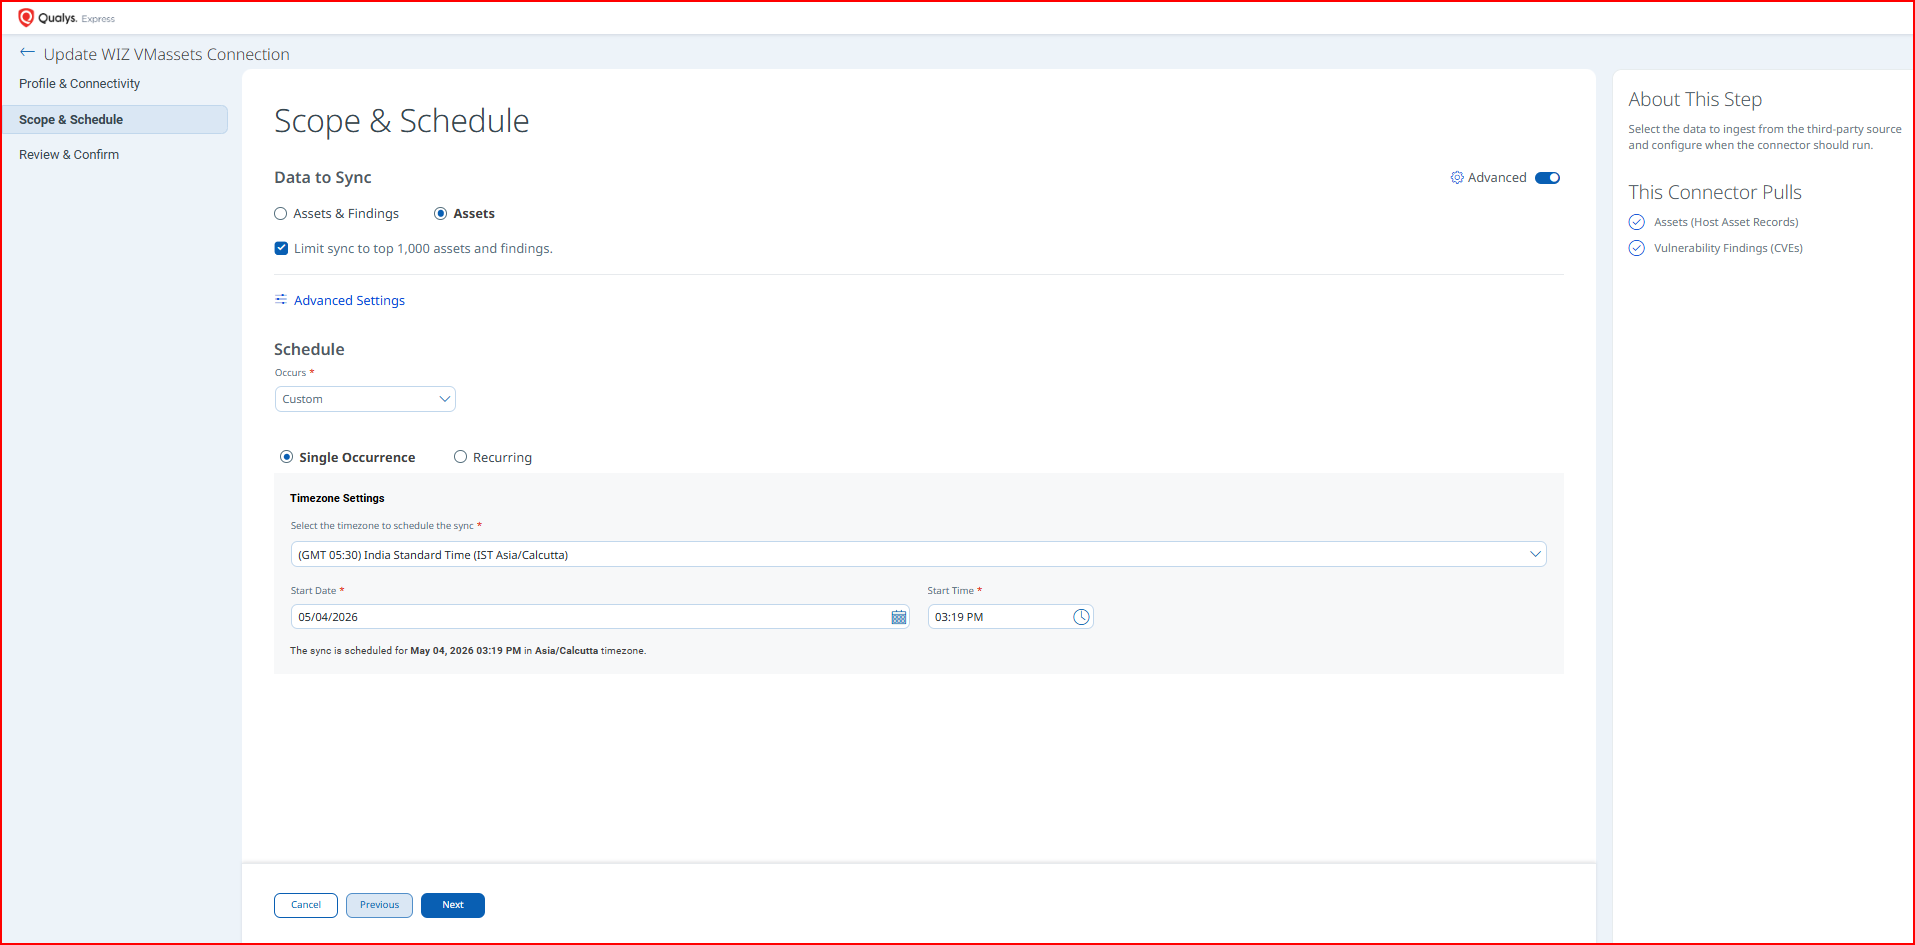
Select the data types to synchronize and configure the execution schedule for this connector.
- Under Data to Sync, select one or both of the following:
- Assets – ingests Host Asset records including cloud resource metadata.
- Vulnerabilities – ingests associated vulnerability findings when asset ingestion is enabled.
- Select the required Transform Map for data mapping (see Transformation Maps).
- Optionally, enter a Filter query to scope which records are retrieved. The filter field uses GraphQL query syntax. Sample filters:
- By asset ID:
{"assetId": ["xxxxxxx-xxxx-xxxx-xxxx-xxxxxxxxxxxx"]} - By severity, status, and detection method:
{"vendorSeverity": ["LOW"],"status": ["OPEN"],"detectionMethod": ["PACKAGE"]}
- By asset ID:
- Set the connector Status to Active or Inactive.
- Configure the Schedule:
- Single Occurrence – provide an exact date and time for a one-time execution.
- Recurring – provide a start date/time and end date/time for repeating executions.
Sampling Mode - Limit Sync to Top 1,000 Assets and Findings
Sampling Mode can restrict data ingestion to a targeted subset of up to 1,000 assets and their associated findings. You can quickly validate integration and review meaningful security data without a full environment sync.
You can select the Limit sync to top 1,000 assets and findings checkbox to limit the fetch 1000 assets using risk-based filter criteria. The assets, along with their associated findings, are discovered and shared with ETM. The connector applies risk-based filters during asset fetch to ensure the ingested subset represents the most relevant assets in your environment rather than a random or arbitrary sample.
The connector limits asset fetch to Virtual Machine resource types only. All findings associated with the fetched virtual machines are ingested alongside the asset data.
Click next to review your changes and create the connector.
Advanced Settings
Note: Changes made in the Advanced Settings tabs take effect only after clicking Save. Navigating away without saving will discard any changes.
Filters Tab
The Filters tab helps to refine which records are retrieved from Wiz using GraphQL query-based filter expressions. Enter filter criteria as a JSON object in the free-text filter field.
Supported filter fields include:
assetId– filter by one or more Wiz asset IDs.vendorSeverity– filter by vendor severity values such asNONE,LOW,MEDIUM,HIGH, orCRITICAL.status– filter by finding status:OPEN,RESOLVED, orREJECTED.detectionMethod– filter by detection method, for examplePACKAGE.
Sample filter expressions:
- Retrieve only open, high-severity findings detected via package scanning:
{"vendorSeverity": ["HIGH"],"status": ["OPEN"],"detectionMethod": ["PACKAGE"]} - Retrieve resolved findings only (for a second connector profile):
{"status": ["RESOLVED"]}
For the full list of supported filter parameters, see the Wiz API Reference (Wiz login required).
Transform Map Tab
The Transform Map tab displays the active out-of-box transform maps for this connector. The Wiz (VM Assets) connector provides two pre-configured maps:
- Wiz VM Assets – Asset Map – maps Wiz host asset records to Qualys ETM host asset attributes.
- Wiz VM Assets – Vulnerability Map – maps Wiz vulnerability findings to Qualys ETM finding attributes.
You can view an existing map to understand the field-level transformations, or clone a map to create a custom configuration. Click Create New to define a custom transform map with a unique name, source data model, and target data model. Use the Fields Mapping section to specify source field, data type, and target field for each mapped attribute.
Wiz Vulnerability Transformation MapWiz Vulnerability Transformation Map
| Wiz Source Attribute | Qualys Target Attribute |
|---|---|
vulnerableAsset.name |
assetName |
vulnerableAsset.id |
externalAssetId (Required) |
name |
findingName |
id |
sourceFindingId |
vendorSeverity |
findingSeverity |
CVEDescription |
findingDescription |
description |
detectionResult |
detectionMethod |
detectionMethod |
firstDetectedAt |
findingFirstFoundOn |
hasCisaKevExploit |
isExploitAvailable |
lastDetectedAt |
findingLastFoundOn |
link |
references |
name |
cveId |
portalUrl |
sourceFindingURL |
remediation |
recommendation |
score |
detectionScore |
statusAvailable values: Open | Resolved | Rejected |
findingStatusAvailable values: Active | Fixed | Ignored |
vulnerableAsset.ipAddresses[] |
ipAddress |
vulnerableAsset.operatingSystem |
OperatingSystem |
vulnerableAsset.cloudPlatformAvailable values: AWS | GCP | Azure | OCI | Alibaba |
cloudPlatformAvailable values: EC2 | GCP | AZURE | OCI | ALIBABA |
vulnerableAsset.providerUniqueId |
cloudInstanceId |
Wiz Asset Transformation MapWiz Asset Transformation Map
| Wiz Source Attribute | Qualys Target Attribute |
|---|---|
vertexID |
externalAssetId (Required) |
name |
assetName |
cloudAccount.cloudProviderAvailable values: AWS | GCP | Azure | OCI | Alibaba
|
cloudProviderAvailable values: EC2 | GCP | AZURE | OCI | ALIBABA
|
type |
systemType |
name |
dnsName |
operatingSystem |
operatingSystemName |
instanceType |
model |
CPUs |
numberOfCpu |
providerUniqueId |
cloudInstanceId |
How the Connection Works
The Wiz connector retrieves host asset records and vulnerability findings from the Wiz cloud security platform via its GraphQL API and imports them into Qualys ETM for unified risk analysis and prioritization. The connector supports delta (incremental) synchronization, retrieving only changes since the last execution. It also supports an asset-only ingestion mode in addition to assets with vulnerabilities.
Each run retrieves Host Asset records from Wiz, including cloud resource metadata. When vulnerability ingestion is enabled, associated vulnerability findings are also imported. Import of installed software and source tags is not supported.
Connector States
A successfully configured connector progresses through the following states:
- Registered – The connector is successfully created and registered to fetch data from Wiz.
- Scheduled – The connector is scheduled to execute a connection with Wiz according to the configured schedule.
- Processing – A connection is executing and the connector is actively fetching asset and findings data from the Wiz GraphQL API.
- Processed – The connector has successfully fetched the assets. Findings may still be processing in the background; allow additional time for all findings to appear in ETM.
Note: The initial full import may take up to 2 hours to complete. If no data appears after this period, verify the service account has access to the relevant Wiz projects and that the API scopes include read:resources.
Note: The Processed state indicates that asset ingestion is complete. Findings ingestion (specifically for vulnerabilities) may continue for some time after the state transitions. Wait for additional processing time before concluding that findings are missing.
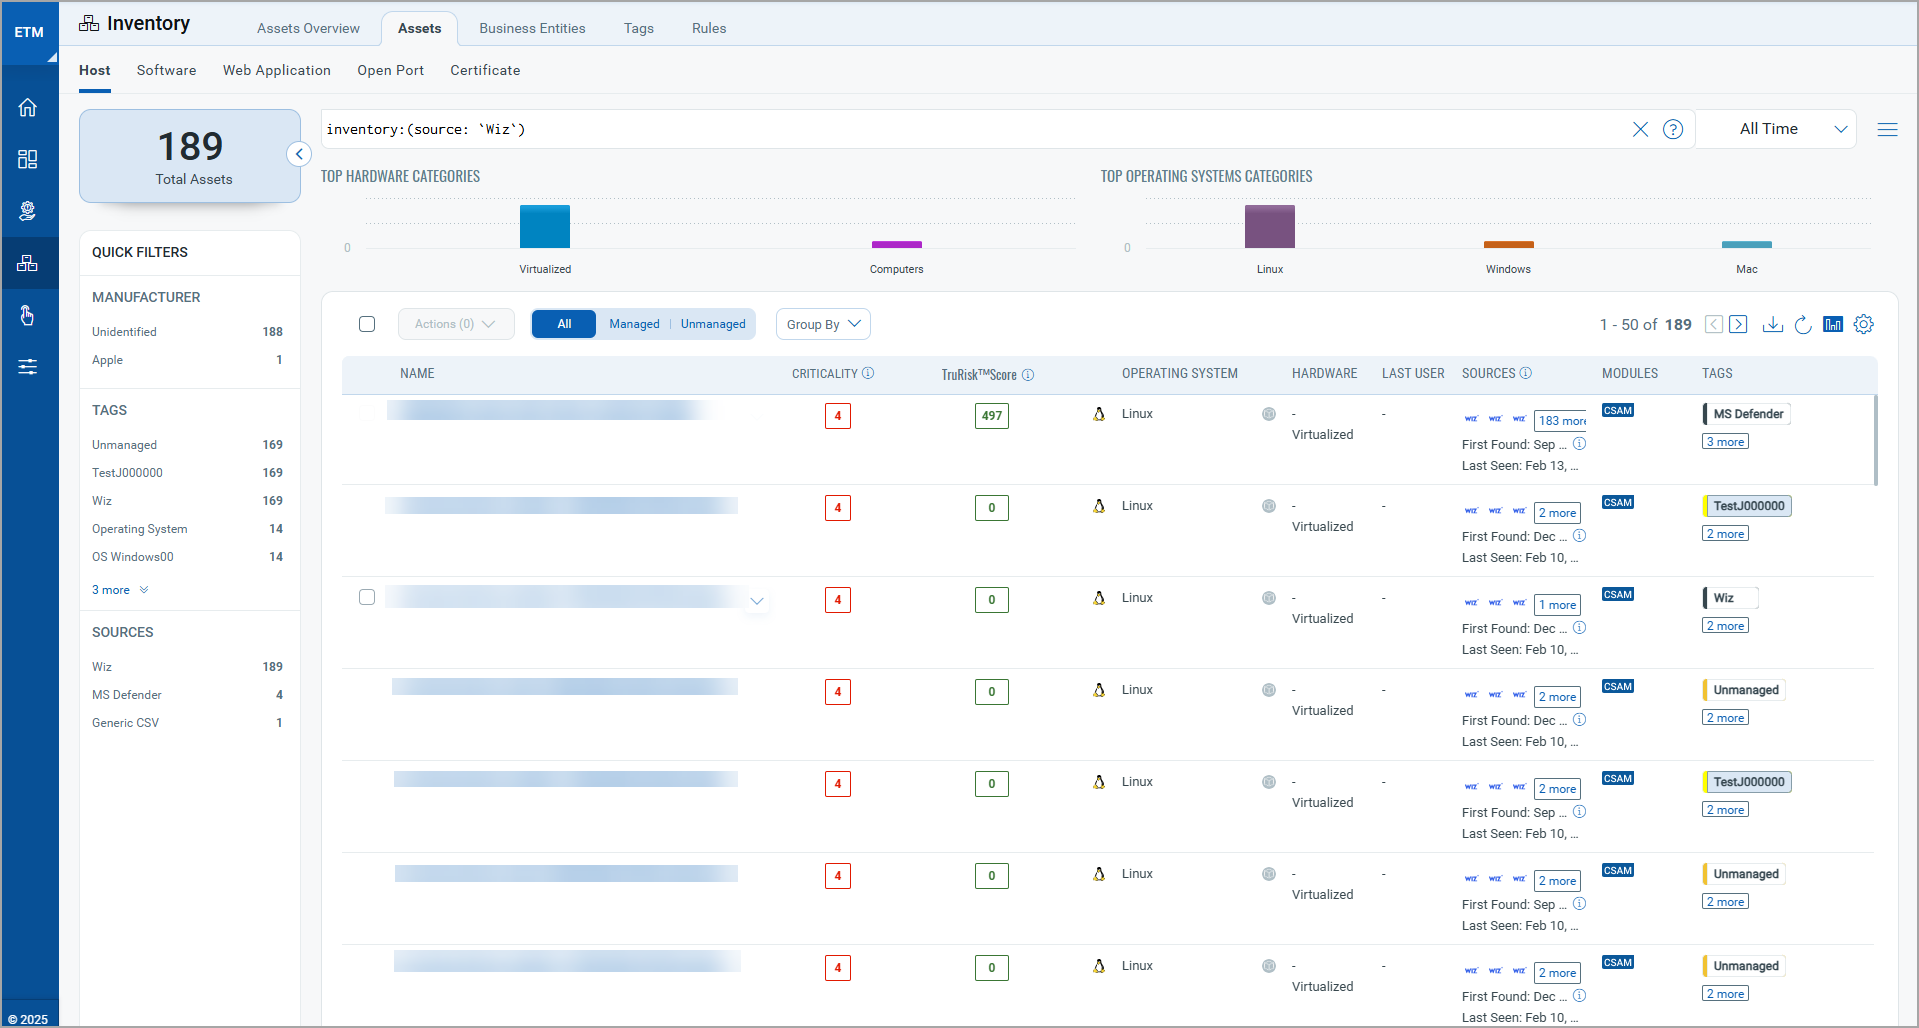
Viewing Assets and Findings in ETM
After the connector reaches the Processed state, navigate to Enterprise TruRisk Management to analyze the imported data.
To view imported host assets, go to Assets > Host in the ETM Inventory tab. Use the following filter token to scope the view to Wiz-sourced assets:
inventory:(source:"Wiz")
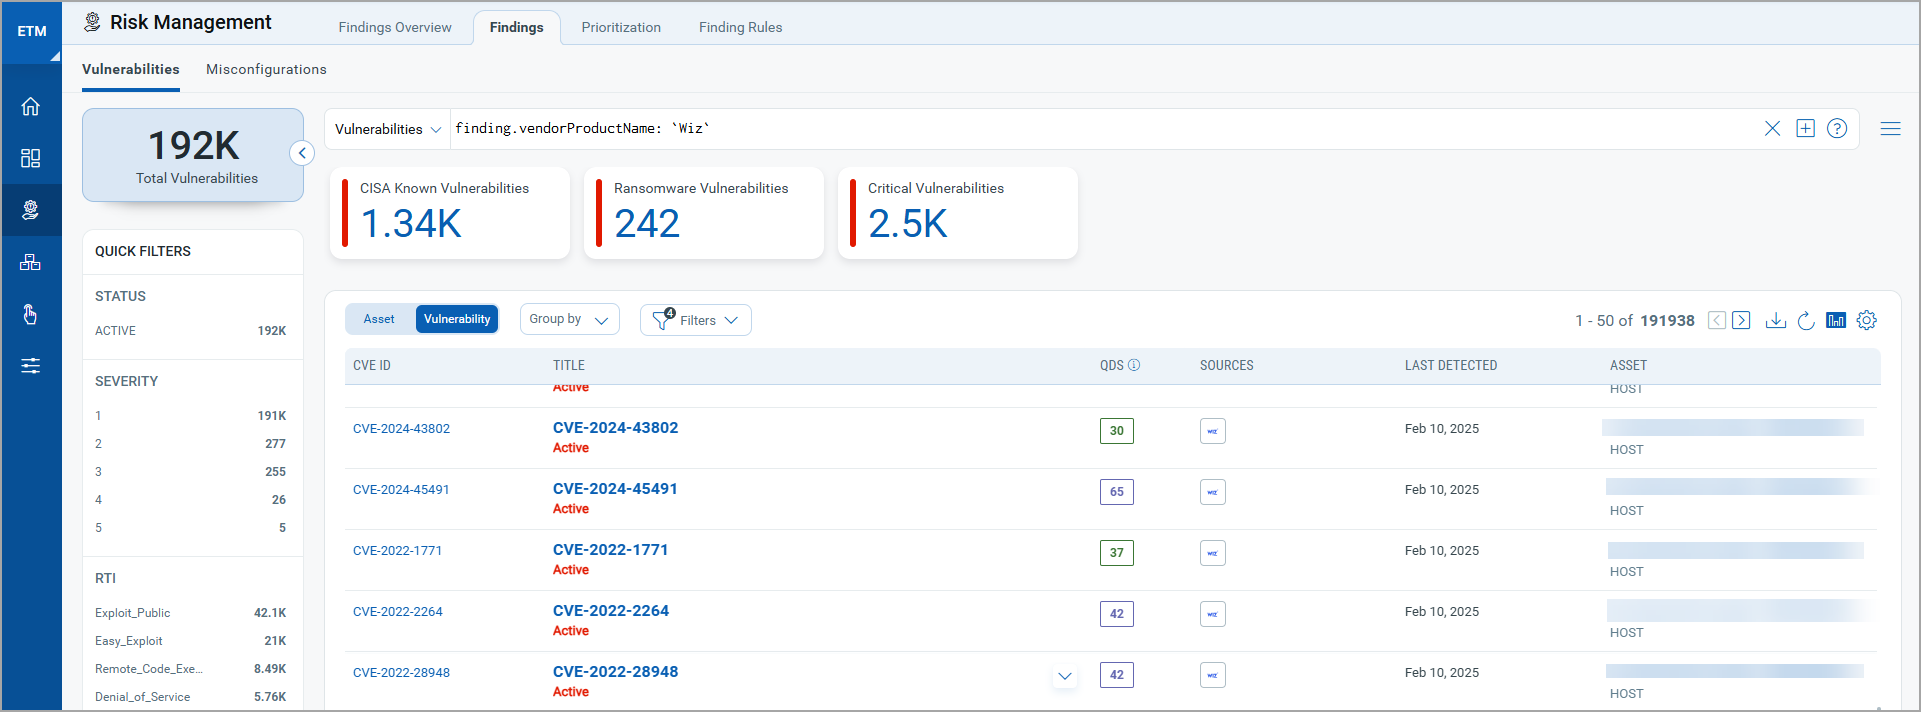
To view imported vulnerability findings, go to Findings > Vulnerability in the ETM Risk Management tab. Use the following filter token to scope the view to Wiz findings:
findings.vendorProductname:"Wiz"
The imported findings integrate seamlessly with Qualys' native TruRisk scoring system. Use these findings in ETM to enhance risk prioritization workflows and inform remediation decisions. For more information, refer to the Qualys ETM Documentation.
Troubleshooting
| Issue | Resolution |
|---|---|
| 401 Unauthorized | The Client ID or Client Secret is invalid, or the service account has been deleted. Verify the credentials in Wiz under Settings > Service Accounts. If the service account has an expiration date configured, confirm it has not expired. Generate new credentials if needed and update the connector configuration. |
| 403 Forbidden | The service account does not have the required API scopes. Verify that read:resources and read:vulnerabilities are assigned to the service account in Wiz. |
| Connection test fails | Verify the Token URL and API Endpoint URL are correctly entered and match your Wiz tenant type and data center region. Confirm the Qualys cloud can reach the Wiz API endpoint over HTTPS (port 443). Check that the environment portion of the URL matches your tenant type (app.wiz.io, app.wiz.us, or gov.wiz.io). |
| No assets imported after first run | The connector progresses through Registered, Scheduled, Processing, and Processed states. The full import process may take up to 2 hours to complete. If no data appears after this period, verify the service account has access to the relevant Wiz projects and that the API scopes include read:resources. |
Additional Information
API Reference
The following APIs are executed during each Wiz connector run.
| Name | Filters / Parameters | Endpoint |
|---|---|---|
| Auth API | N/A | https://auth.app.wiz.io/oauth/token |
| GraphQL – Vulnerabilities | Finding Type: VULNERABILITIESAsset Type: VIRTUAL_MACHINE |
https://api.<TENANT_DATA_CENTER>.<ENVIRONMENT>/graphql |
| GraphQL – Assets | Asset Type: VIRTUAL_MACHINE |
https://api.<TENANT_DATA_CENTER>.<ENVIRONMENT>/graphql |