Configure API-based Assessment
Supported Cloud Providers: 
TotalCloud FlexScan's API-based assessment uses the APIs of AWS to collect OS package inventory from the workloads for vulnerability analysis. This agentless scan is a quick way to catch vulnerabilities that may pop up between the intervals where the agents wait to perform the next automated scan. When combined with agent scans, API-based scans offer a complete security solution by ensuring your newly introduced assets are secure without waiting for the Qualys agent scan.
API-based scans are available for both CSPM and AssetView connectors.
The below AWS configurations are required from the customer to enable API-based assessment on TotalCloud. With cloud-native APIs, you can enable zero-touch API-based scans to perform vulnerability assessments on your new assets. The below configurations allow Qualys to listen to changes in the instance states and pass the running instance data to run scans.
Prerequisites for API-based Scan
• Qualys Cloud Platform subscription with full TotalCloud subscription.
• Enable Zero-touch API-based Scan to your subscription from Qualys Backoffice. Contact your Qualys technical account manager (TAM) to enable it.
• AWS EC2 instances that report the inventory to AWS SSM.
• AWS EventBridge configurations.
OS Compatibility
The following section lists the OS versions and supported platforms for Qualys Zero Touch API Based Assessment. Refer to API-based Scan OS Compatibility.
Configure AWS SSM Inventory
The SSM inventory must be configured to capture the instance data to perform scans. The SSM agent can be configured in selected regions or all regions. Follow the below steps to configure for either setting.
For Selected RegionsFor Selected Regions
- Login to AWS Console and navigate to AWS Systems Manager.
- Click Inventory > Setup Inventory.
- Keep the default settings and click Setup Inventory.
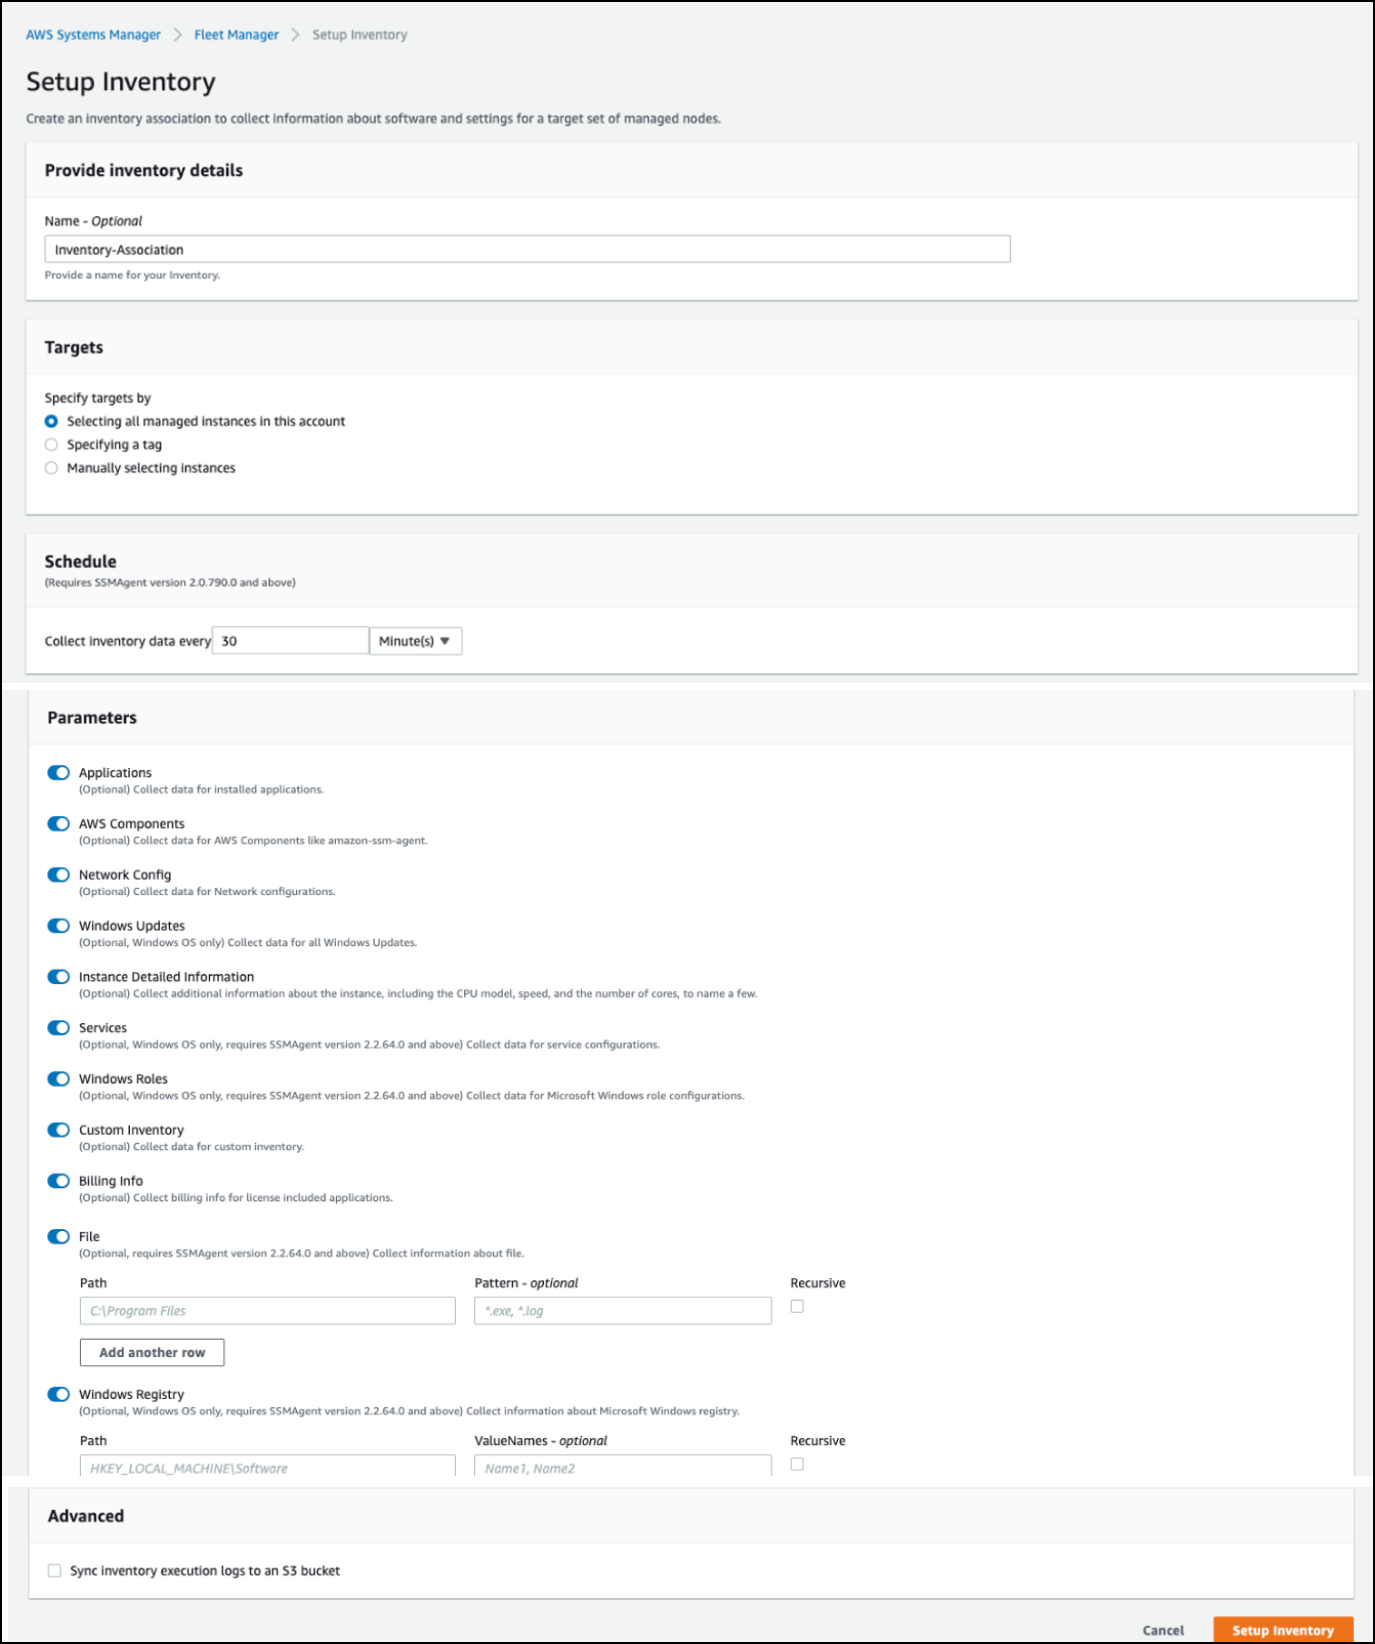
The region presently active in the AWS account will be selected as the region where all managed instances are fetched.
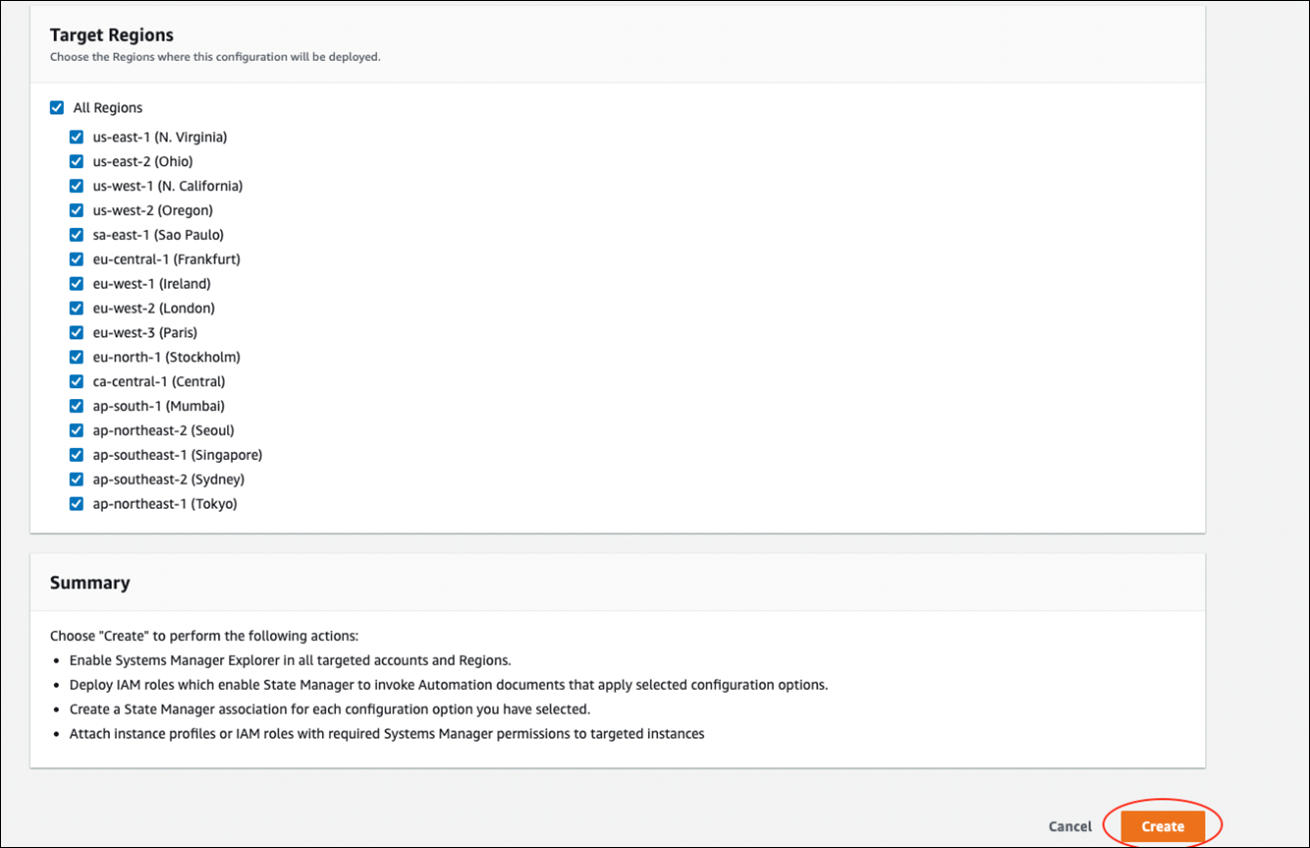
For All RegionsFor All Regions
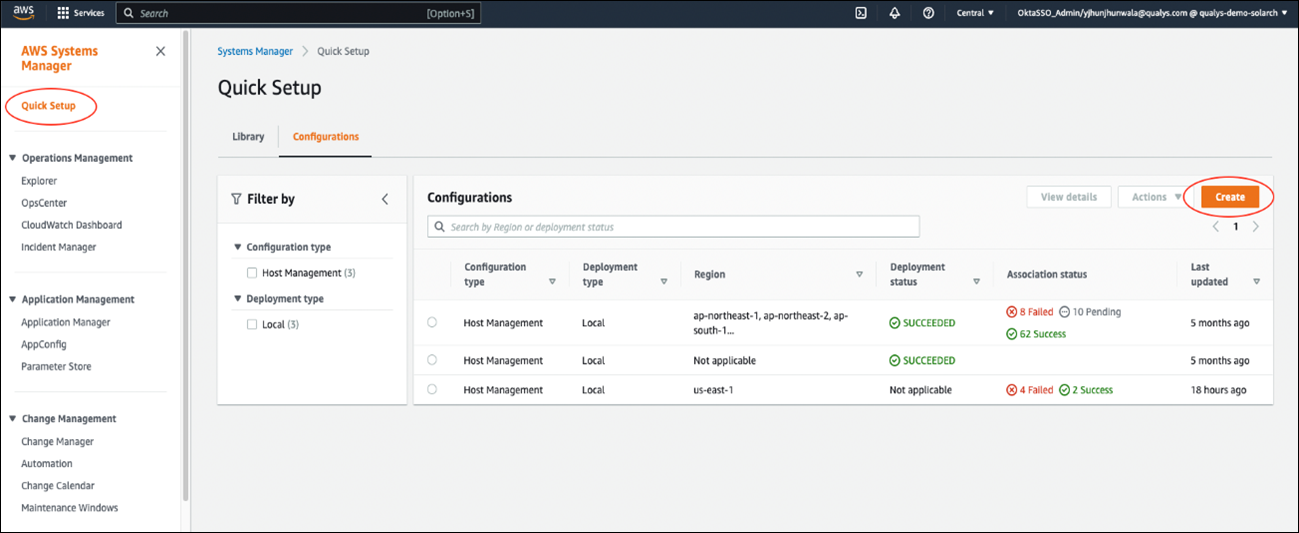
- Login to AWS console and navigate to AWS Systems Manager.
- Click Quick Setup > Create.
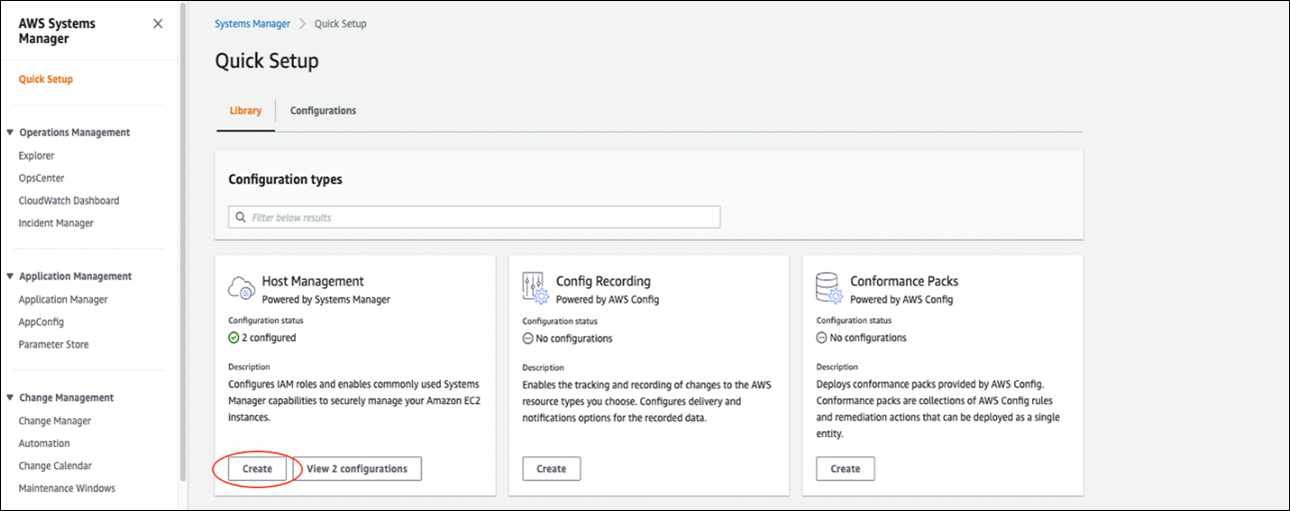
- In Host management > Click Create.
- Go to 'Configuration options'.
- Under Systems manager, select 'Collect inventory from your instances every 30 minutes'.
- Under Targets, you can either choose between deploying to the current Region or a custom set of regions.
- Choose regions.
- Choose how you want to target instances. Let's select 'All instances'.
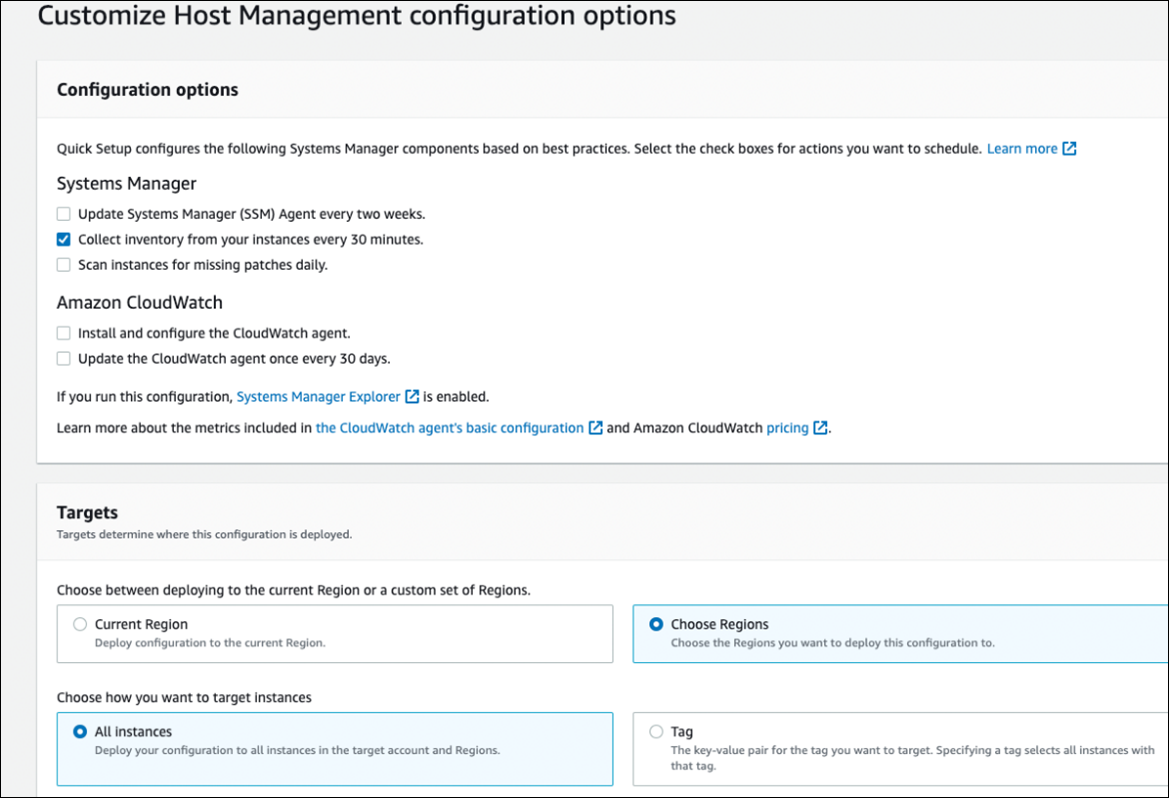
- Next, under Target Regions.
- Select 'All Regions'.
- Click Create.
Configure EventBridge
Once the SSM Agent is installed to collect instance data, we configure the EventBridge to listen to changes in the instance state.
Before configuring the event bridge, you must generate a subscription token, which is required to grant permission to deploy the scan.
Generate a Subscription Token
Follow the steps below to generate a Subscription Token
- Generate Auth token by running the below command.
curl --location --request POST 'https://< API Gateway URL >/auth' --header 'Content-Type: application/x-www-form-urlencoded' --data-urlencode 'username=<QualysUsername>' --data-urlencode 'password=<QualysPassword>' --data-urlencode 'token=true' - Generate Subscription token by running the below command.
curl --location --request POST 'https://< API Gateway URL >/qas/subscription-token' --header 'Content-Type: application/json' --header 'Authorization: Bearer <Auth Token>' --data-raw '{ "expiry": 500000}' -
Store the Subscription Token for later use.
Next, there are two ways of configuring EventBridge. Either manually from the AWS console or by uploading a CloudFormation template. Let us go through both methods below.
Manually via AWS Console
Follow the below steps to enable your cloud events to reach the Qualys platform.
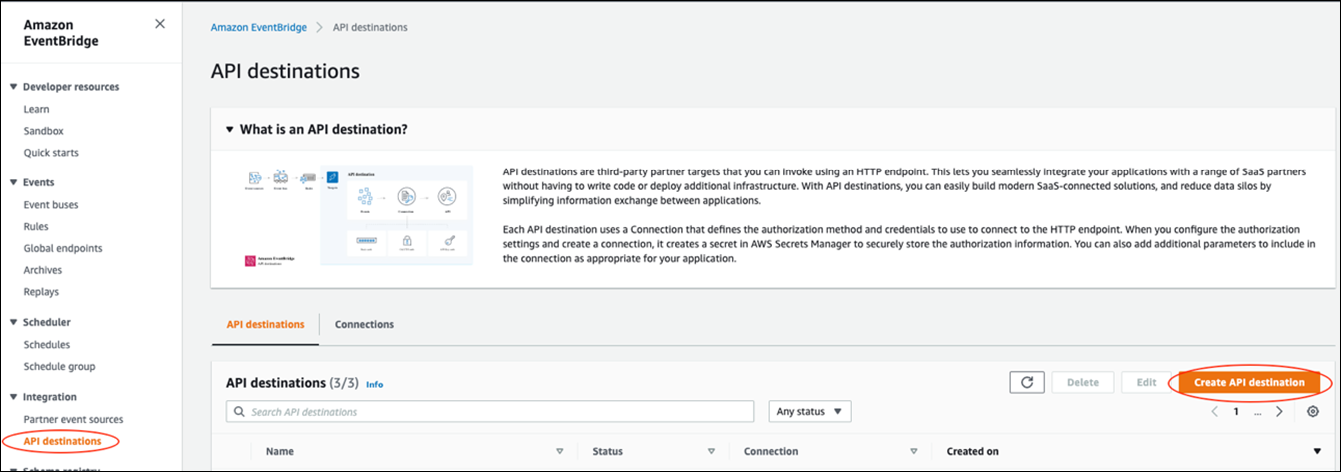
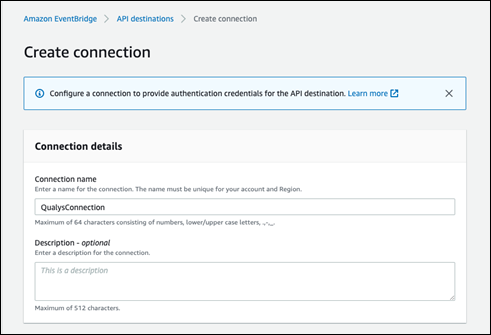
API Destination ConnectionAPI Destination Connection
-
Login to AWS Console and navigate to Amazon EventBridge.
-
Click Integrations > API destinations > Connections tabs > Create Connection.
-
Next, provide the connection name and Description.
-
Under 'Authorization,' select the Destination type as 'Others'.
-
Selection Authorization type as 'API Key.'
-
Enter the API Key name and Value.
-
Under 'Invocation Http Parameters', provide the parameter, key and value (refer to 'Generate a subscription token').
-
Click Create.
Now that the connection to the destination has been authorized, we must provide the Qualys API endpoint as the destination to establish the EventBridge connection.
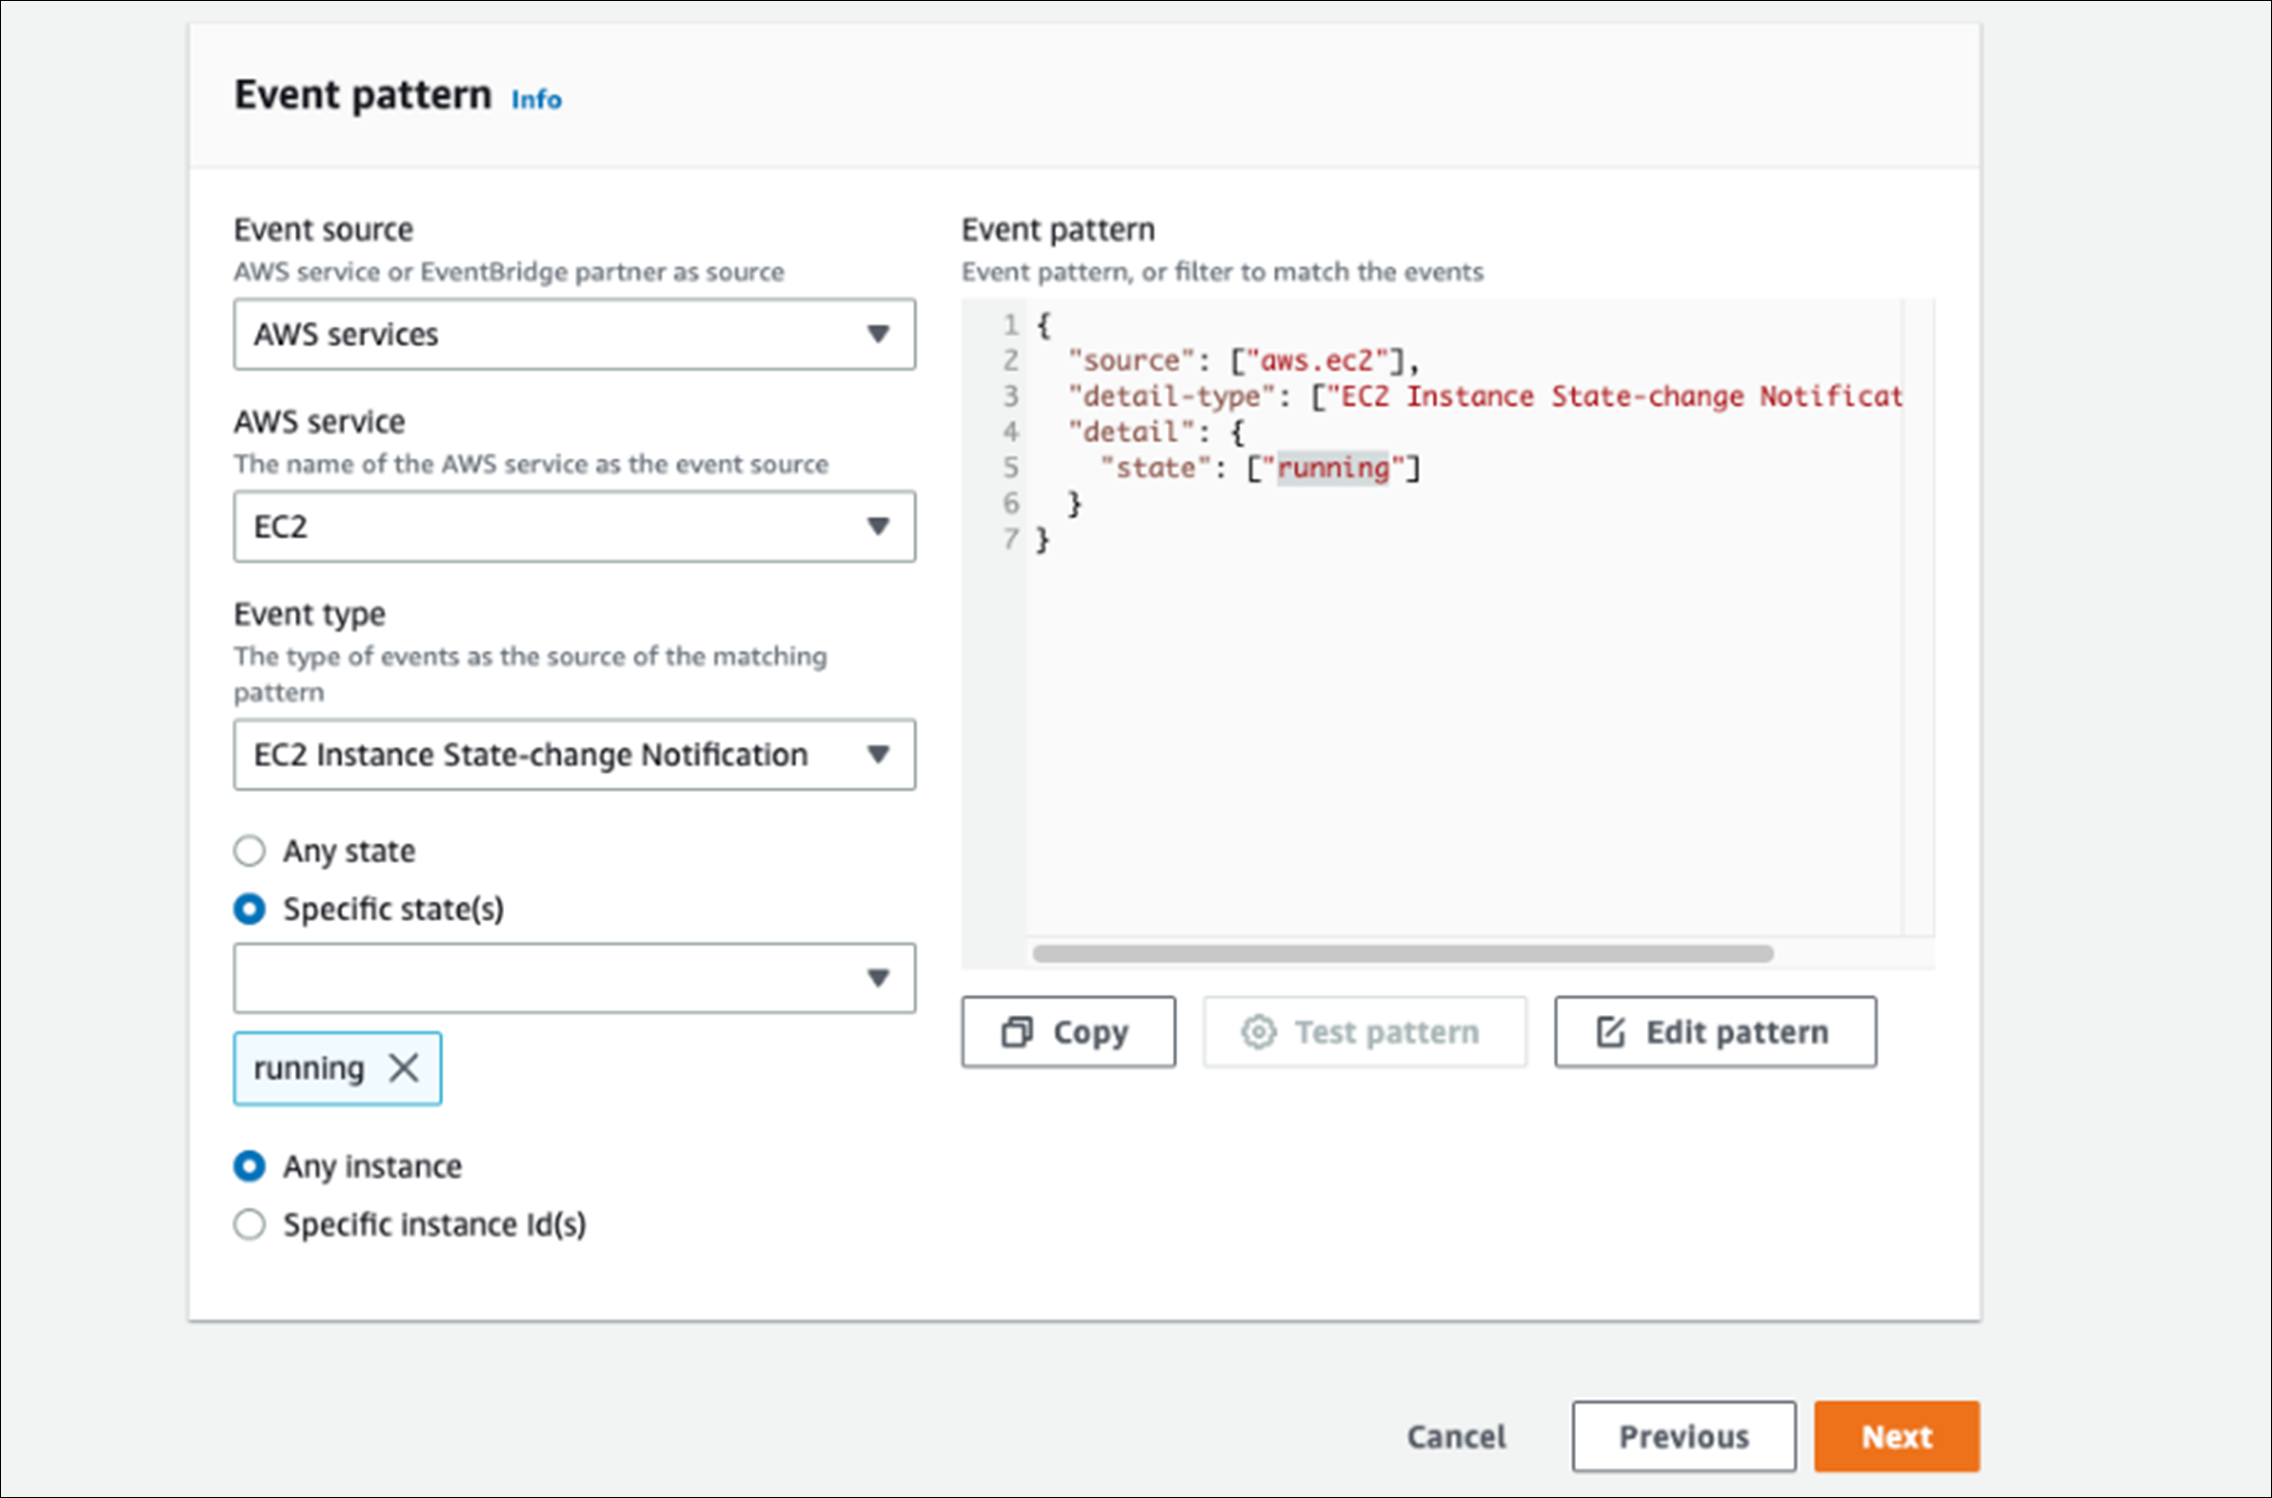
Now, we configure the Rules so that EventBridge knows what to listen to before passing the information to Qualys. In this case, we set the Rule to listen to changes in Instance states. Specifically, the event is alerted when instances are switched to running states.
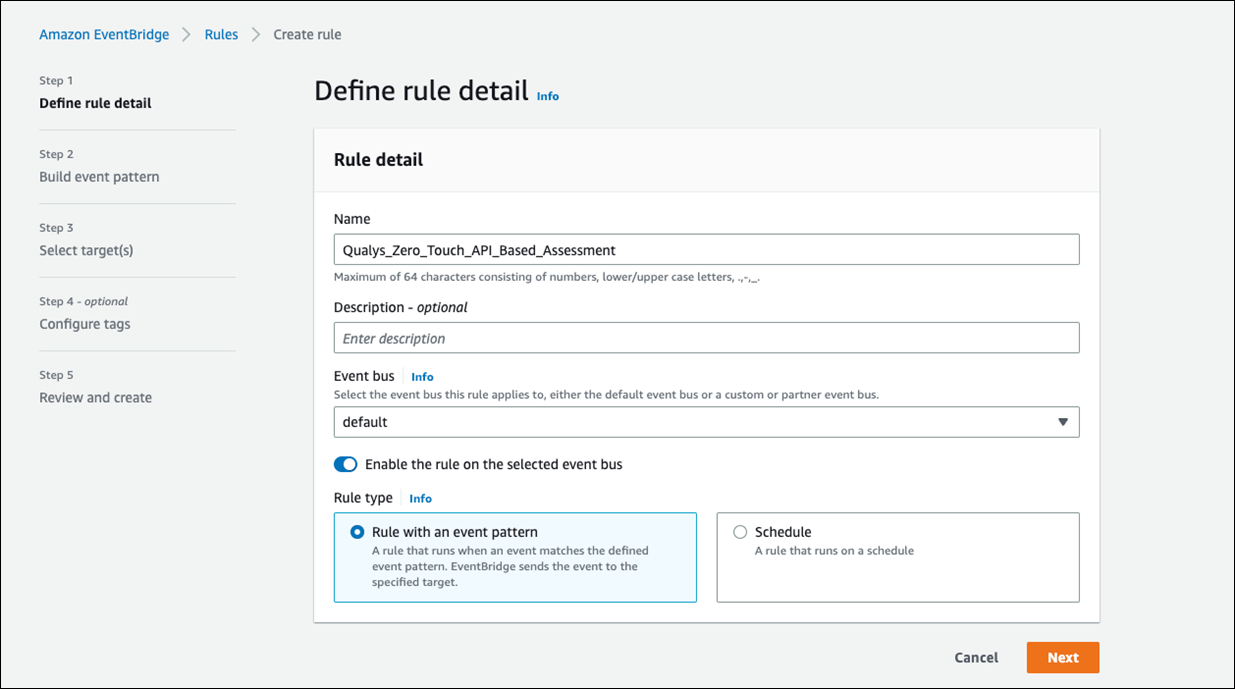
Define Rule detail
-
Click Events -> Rules -> Create Rule.
-
Under 'Define rule detail', provide Name and Description.
-
Select Event bus as 'Default'.
-
Select Rule Type as 'Rule with an event pattern'.
-
Click Next.
Build Event Pattern
-
Select Event Source as AWS Services.
-
Select AWS service as EC2.
-
Select Event type as EC2 Instance State-change Notification'.
-
Select the specific state(s) that are running.
-
Click Next.
Select target(s)
-
select Target types as EventBridge API destination.
-
Select API destination as Use an existing API destination (Refer to 'API Destination' above).
-
Select the Execution role as Create a new role for this specific resource.
-
Click Next.
Configure Tags
Configure tags if required and click Next.
Review and create.
Click Review and create.
Click Create Rule.
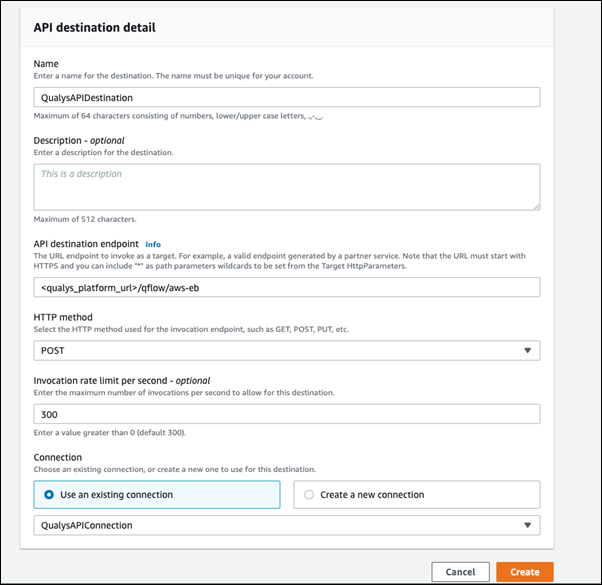
API Destination DetailAPI Destination Detail
-
Click Integrations -> API destinations -> API destinations tabs -> Create API Destination.
-
API Destination details.
-
Provide Name and Description.
-
Enter the API destination URL:<qualys_platform_url>/qflow/aws-eb
-
Select HTTP Method as POST.
-
Select Connection as 'Use an existing connection.'
-
Select the API Destination Connection created above.
Deploy AWS CloudFormation Template
Follow the below steps to enable API-based assessment by deploying a CloudFormation template. Create stackCreate stack
-
Log in to AWS Console and navigate to CloudFormation.
-
Stack > Create Stack > With new resources (standard).
-
In 'Specify template', upload the template file (Note: You can download the CloudFormation template file from here.).
-
Click Next.
Specify stack detailsSpecify stack details
-
Provide the Stack name.
-
Under Parameters, for APIGatewayURL parameter, provide the Qualys API Gateway URL. Find the Gateway URL at https://www.qualys.com/platform-identification/
-
Provide the Subscription token (refer to 'Generate a subscription token' above) and click Next.

-
Keep the default settings in step 3 and step 4.
-
Click Next > Submit.
Additional Information
Connector permissions are to be added for API-based Assessment. Provide these permissions in your AWS console.
Create a policy that includes the following permissions:
-
"ssm:ListInventoryEntries"
-
"ssm:DescribeInstanceInformation"
-
"ec2:DescribeInstances"
-
"ec2:DescribeAddresses"
-
"ec2:DescribeImages"
-
"ec2:DescribeRegions"
Refer to the following link to learn how to provide cross-account role access by creating an IAM role. Learn more.