Configure Zero-touch Snapshot-based Scan for Azure
Qualys Zero-touch Snapshot-based scanning is an agentless scanning technique that helps customers detect risk, vulnerabilities, and compliance posture for virtual machine/compute instances without affecting their current workload. The Azure Snapshot-based assessments support both OS-level and AKS cluster scans. The VMSS instances of the AKS clusters are also scanned for vulnerabilities and threats across regions and subscriptions.
Snapshot-based assessment provides enhanced security by utilizing a service account for running scans. The service account will be independent of the target Azure account, where most of your workload operates. The service account can perform scans on multiple target accounts, allowing for bulk scans. This ensures no disruptions and more cost-effective, faster, and reliable scans.
The below Qualys and Azure console configurations are required to activate Snapshot-based assessment on TotalCloud. With agentless scans, you can enable zero-touch Snapshot-based scans to assess vulnerability on your new assets.
With the release of Connector 2.15, we have updated the Binaries to Terraform Bicep. These changes have introduced significant updates to the configuration process.
Prerequisites for Snapshot-based Scan
- Qualys Cloud Platform subscription with full TotalCloud Subscription.
- Enable Zero-touch Snapshot-Based Scan to your subscription. Contact your Qualys Technical Account Manager (TAM) to enable it.
- The Azure user deploying the service subscription should have Owner access over the role boundary.
Feature Support Matrix
The following table outlines the types of scans supported based on the type of resource:
| Resource Type | OS Scan | Software Composition Analysis (SwCA) | Secrets Scan | On-Demand Scan |
|---|---|---|---|---|
| Linux-based instances | ✔ | ✖ | ✖ | ✔ |
| Windows-based instances | ✔ | ✖ | ✖ | ✔ |
| Linux-based AMI | ✖ | ✖ | ✖ | ✖ |
| Windows-based AMI | ✖ | ✖ | ✖ | ✖ |
OS Compatibility
The following section lists the OS versions and supported platforms for the Qualys Zero Touch Snapshot-based scan. Refer to Azure Snapshot-based Scan OS Compatibility Matrix.
Azure Services Created for Snapshot-based ScanAzure Services Created for Snapshot-based Scan
The following services are created as part of Snapshot-based scanning deployments.
azurerm_application_insightsazurerm_cosmosdb_accountazurerm_cosmosdb_sql_containerazurerm_cosmosdb_sql_databaseazurerm_cosmosdb_sql_role_assignmentazurerm_cosmosdb_sql_role_definitionazurerm_eventgrid_event_subscriptionazurerm_eventhubazurerm_eventhub_namespaceazurerm_eventhub_namespace_authorization_ruleazurerm_key_vault_secretazurerm_logic_app_action_customazurerm_logic_app_trigger_customazurerm_logic_app_workflowazurerm_monitor_diagnostic_settingazurerm_resource_groupazurerm_role_assignmentazurerm_role_definitionazurerm_service_planazurerm_servicebus_namespaceazurerm_servicebus_queueazurerm_storage_accountazurerm_storage_blobazurerm_storage_containerazurerm_user_assigned_identityazurerm_windows_function_appazurerm_virtual_network(depending on the number of target locations)-
azurerm_eventgrid_system_topics
(depending on the number of target subscriptions) -
azurerm_key_vault
(depending on the number of target locations) -
azurerm_key_vault_key
(depending on the number of target locations) -
azurerm_network_security_group
(depending on the number of target locations)
Enable Snapshot-based Scan for Your Account
This section explains the required configuration on the Qualys for enabling Snapshot-based scan on your account.
Navigate to the Connectors application > Create a new connector (or edit an existing one) > Navigate to the Tags and Activation step.
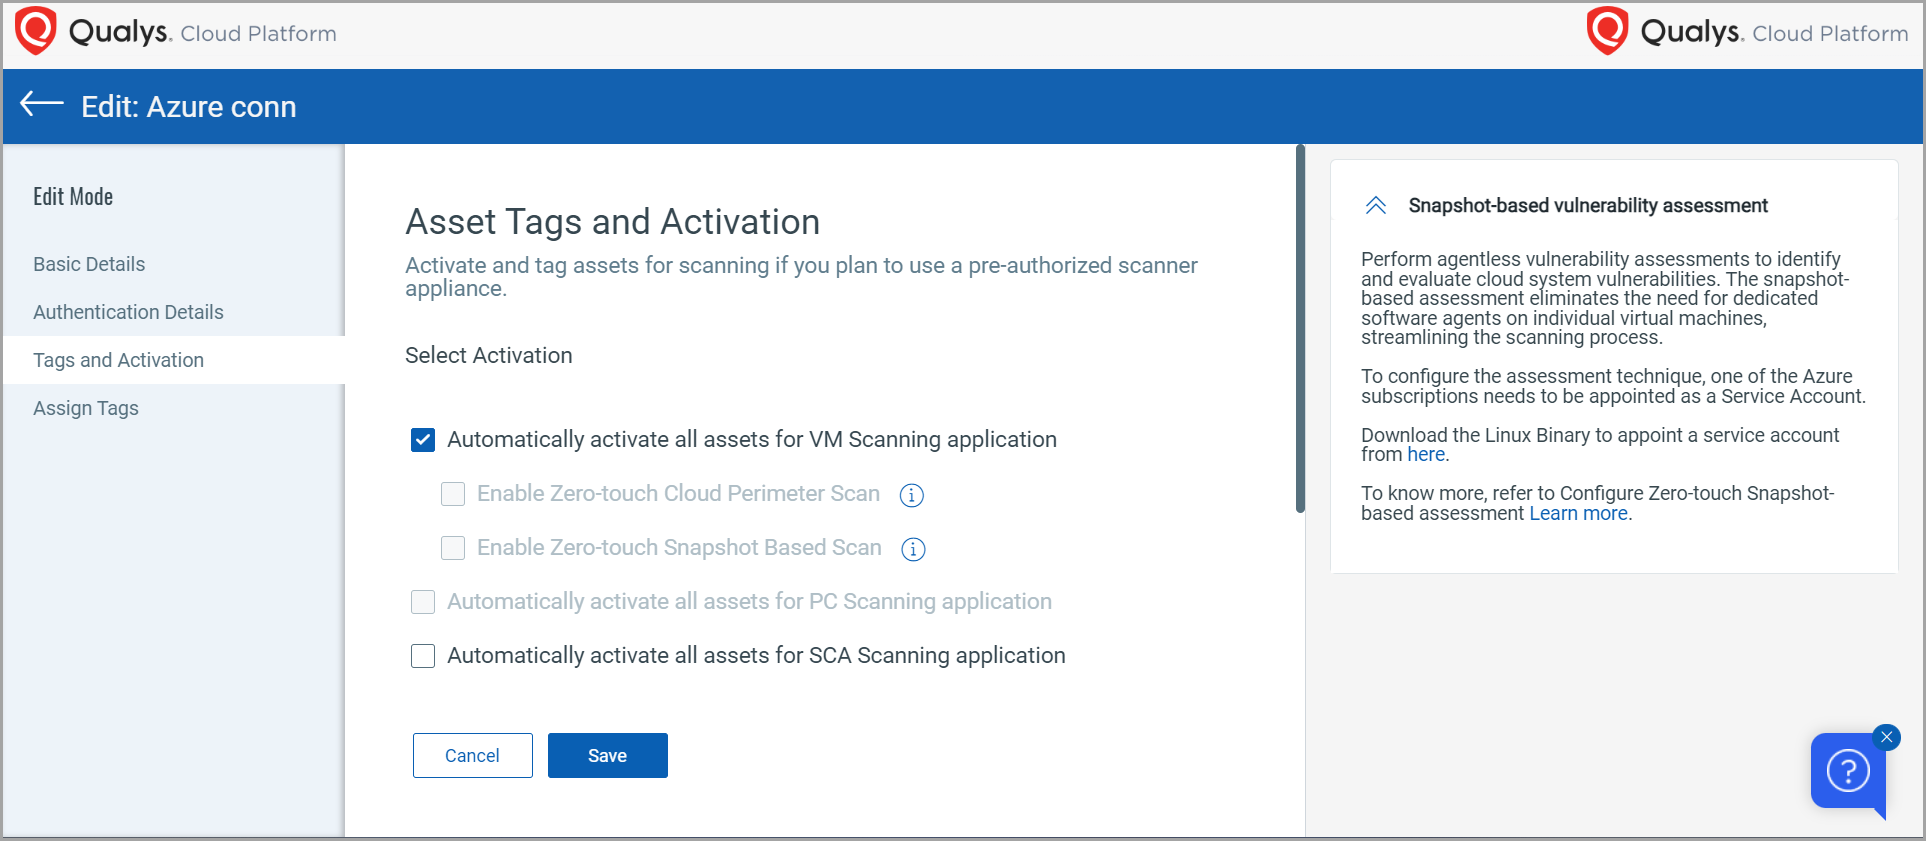
You can find the downloadable Bicep binary file in the "Snapshot-based Vulnerability Assessment" description box to the right.
You can see that when you select the "Automatically activate all assets for VM Scanning application" checkbox, the snapshot-based scan checkbox remains unresponsive. You will need to configure the downloaded binary on your Azure as a Service and Target subscription for this option to be responsive.
Let's see how to configure your binaries.
Configuration at Microsoft Azure
You will need one CSPM connector registered as a service account to activate the Snapshot scan functionality. Before we begin registering the service and target accounts, we will need to generate and store a subscription token for authorization.
Generate a Subscription Token
Follow the steps below to generate Subscription Token
- Generate AuthToken by running the below command
curl --location --request POST 'https://< API Gateway URL >/auth' --header 'Content-Type: application/x-www-form-urlencoded' --data-urlencode 'username=<QualysUsername>' --data-urlencode 'password=<QualysPassword>' --data-urlencode 'token=true' - Generate SubscriptionToken by running the below command
curl --location --request POST 'https://< API Gateway URL>/qas/subscription-token' --header 'Content-Type: application/json' --header 'Authorization: Bearer <Auth Token>' --data-raw '{ "expiry": 500000}' - Store the generated Subscription Token for later.
Configure the Snapshot-based Scan
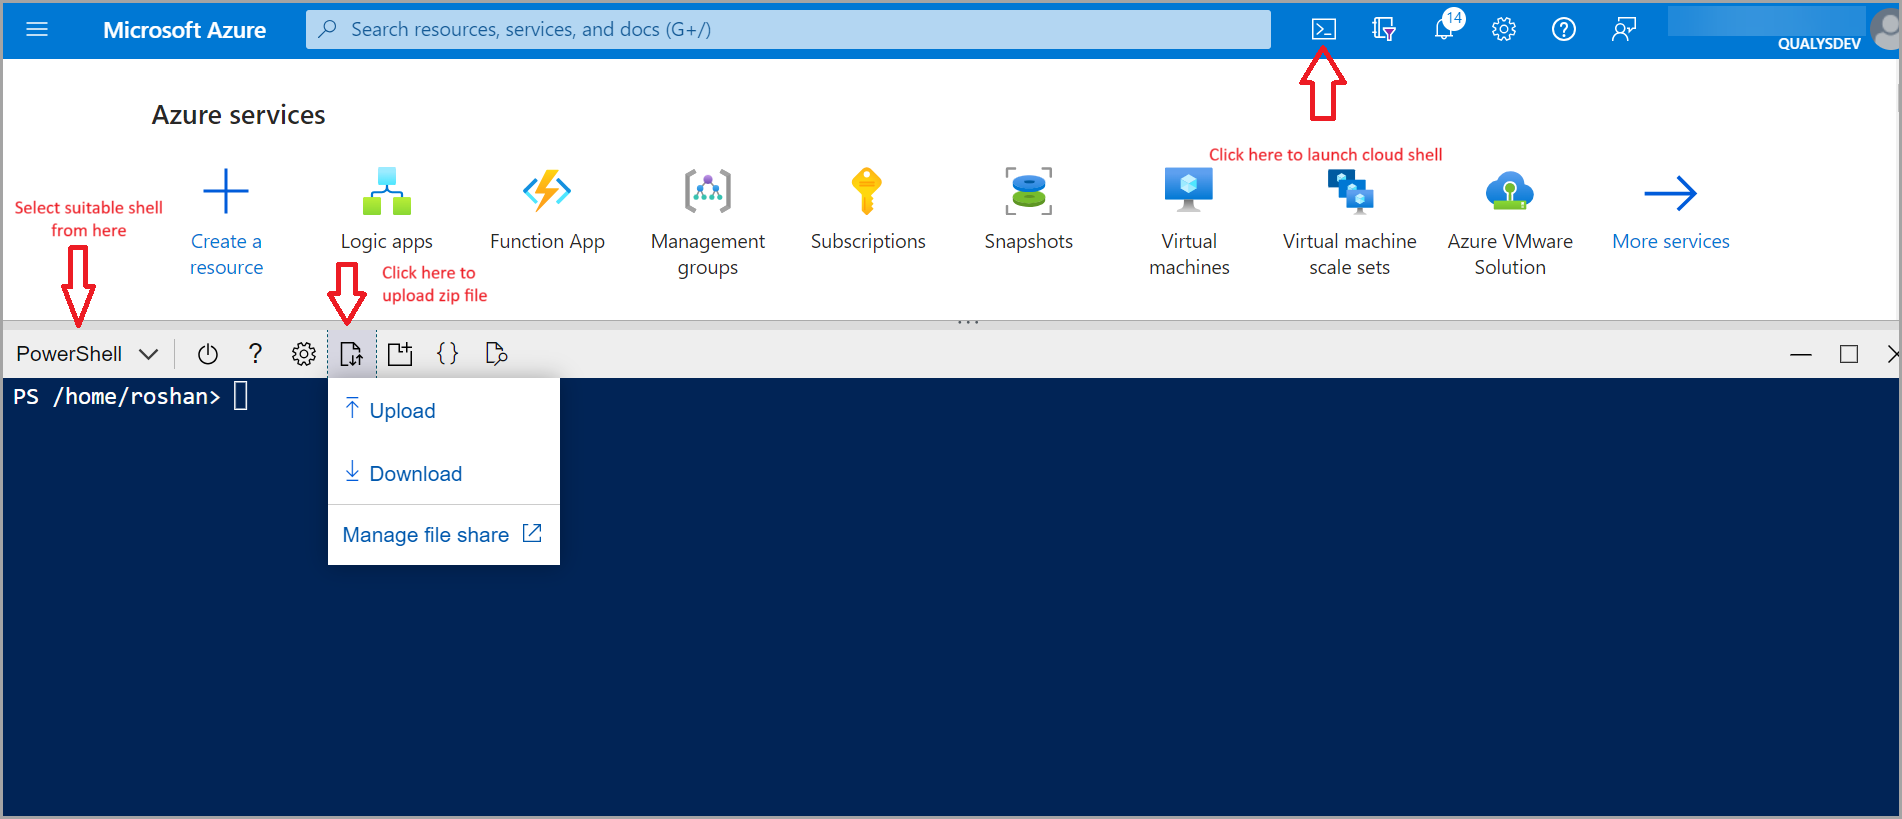
- Navigate to https://portal.azure.com, log in, and click the icon next to the search bar; this opens the cloud terminal.
- You need your own storage account to upload the required binaries. To provision your storage account, there are two methods -
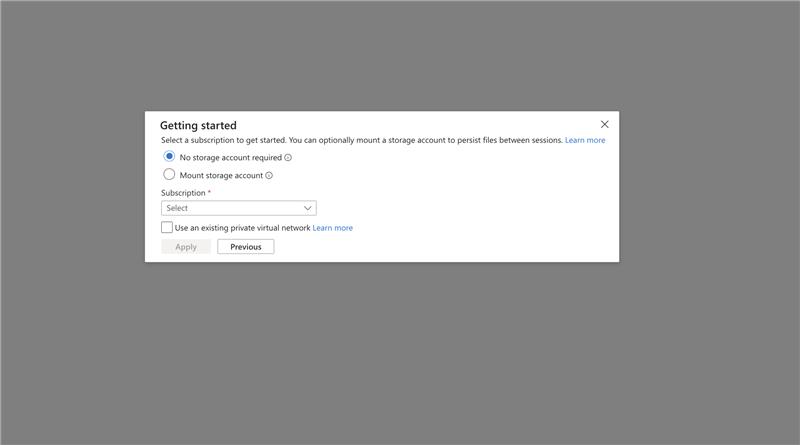
Temporary Session (No Persistent Storage) Persistent Storage via Azure File Share- In the Getting started pane, select No storage account required.
- Choose your Subscription from the dropdown (required).
- Click Apply to launch Cloud Shell.
This creates an ephemeral session. Files are not persisted and will be lost when the session ends.
- In the Getting started pane, select Mount storage account > Next.
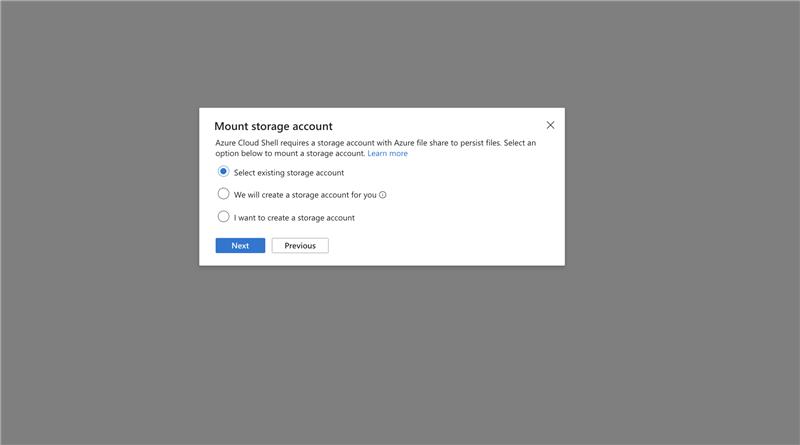
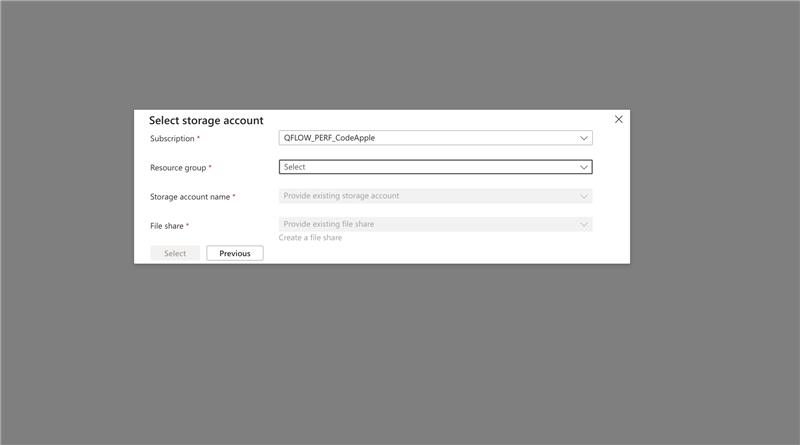
- Select existing storage account (or create one). > Next.
- Choose your Subscription from the dropdown (required).
- Choose Resource Group, Storage Account Name, and File Share.
- Click Select to confirm. This action mounts an Azure Files share as
cloud driveand enables file persistence across sessions.
- Upload your binary file to the Azure terminal.
- Unzip the binary file using the command:
unzip azure-snapshot-scanner-linux-x64.zip
The folder contains the following files.-
azure-snapshot-scanner-deploy
- Executable file containing the deployment script.
- azure-snapshot-scanner-destroy
Executable file containing the destroy script. - service.json
Bicep template for deploying service account resources. - target.json
Bicep template for deploying target account resources. - parameters.json
User-editable configuration file for deployment customization. - manifest.yaml
Contains the version information of the azure-snapshot-scanner. - target-role.json
To create target role with boundary
-
- Navigate to the configs folder and open parameters.json in the editor.
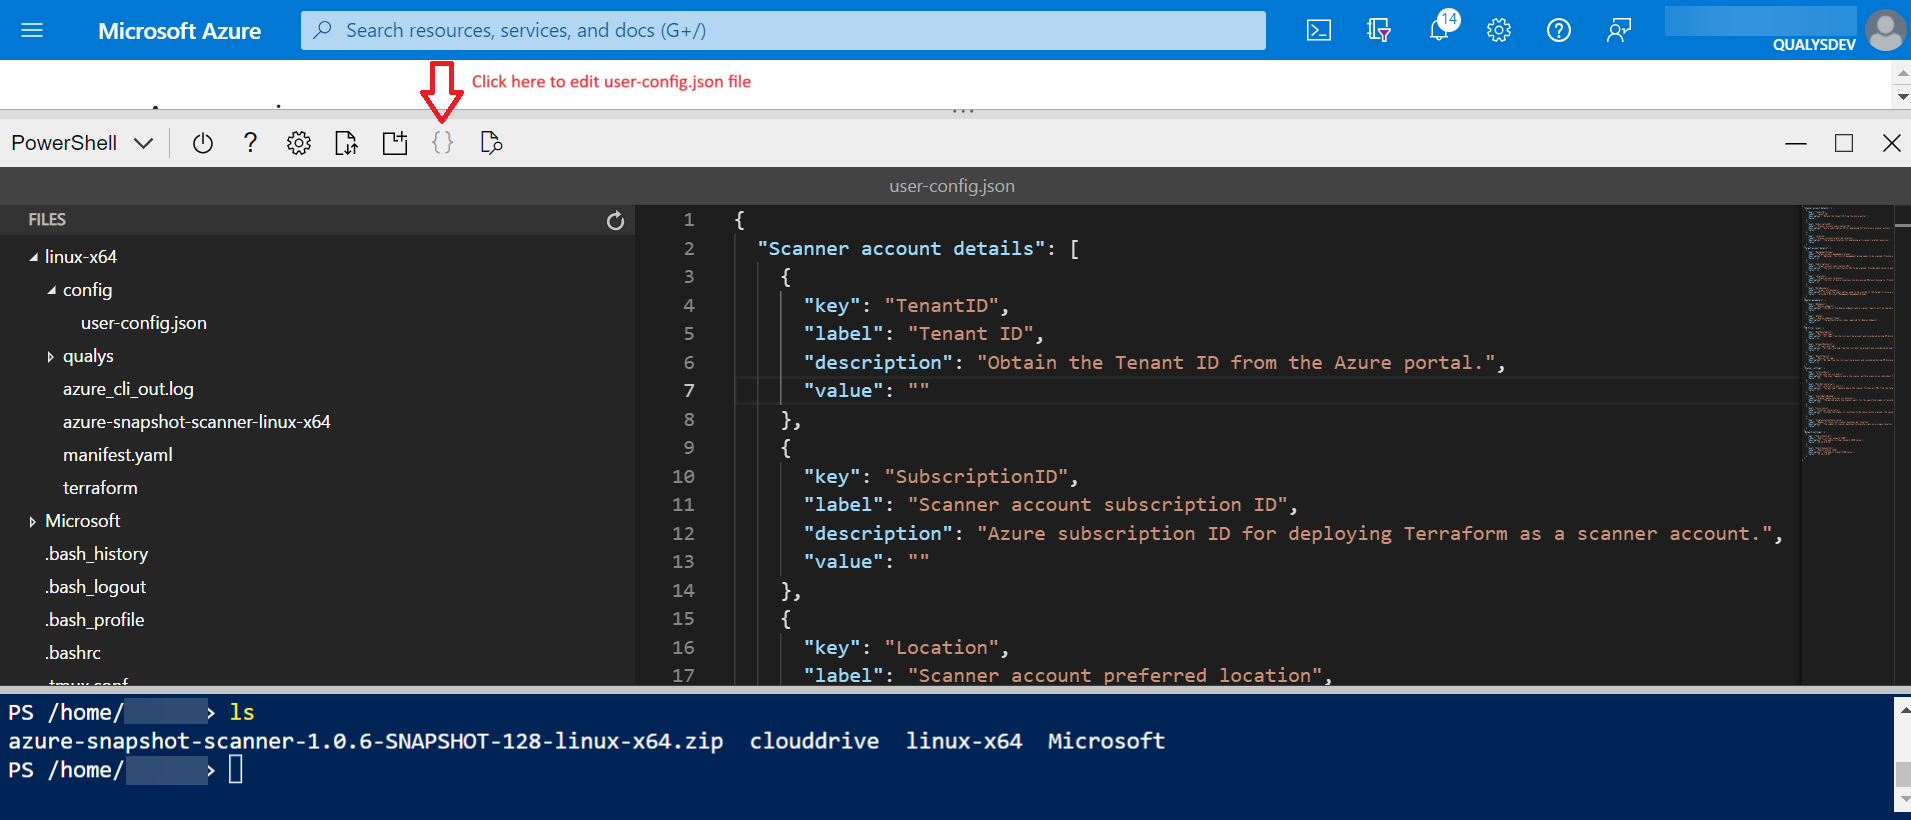
- The parameters JSON contains several parameters for which you must provide values. We can go through the parameters below.
- Scanner Account Details
- Scanner Account Subscription ID: The Azure subscription ID for deploying Terraform as a scanner account.
- Scanner Account Preferred Location: The primary location for deploying all scanner-related resources.
- Scanner Account Subscription ID
- Target Account Management Groups: "Optional. The list of management group names to be enabled for Event-based scanning. Provide each value in quotes and separate them by commas. For example, [\"QF-3\", \"QF-2\", \"QF-1\"]",
"value": ["Test-V2"].
When you provide this value, all the subscriptions under the given management groups are selected for Event-based scanning. - Target Account Subscriptions: The list of subscription IDs to be enabled for event-based scanning. Provide each value in quotes and separated by commas. For example,
[\"d408f97e-xxx-xxx-50bbff759a5d\", "\4f1f9d77-xxx-xxxx-1393d18aa43e\"]", "value": ["380a6ed2-xxxx-xxxxx", "52ab2b000acd-a243-xxxxx"].
When you provide this value, only the given subscription of a managementGroup is selected for Event-based scanning. - Target Account Locations: The list of Azure locations the discovered VMs must belong to. Provide each value in quotes and separate them by commas.
- Target Role Boundary: Specify the scope at which the scan should be performed. If scanning a single subscription, provide the full subscription resource ID (e.g., '/subscriptions/subscription_id'). For scanning across multiple subscriptions, provide the root Management Group resource ID (e.g., '/providers/Microsoft.Management/managementGroups/ManagementGroup_id'). This value is required for both event-based and poll-based scanning.
- Target Account Management Groups: "Optional. The list of management group names to be enabled for Event-based scanning. Provide each value in quotes and separate them by commas. For example, [\"QF-3\", \"QF-2\", \"QF-1\"]",
- Qualys Parameters
- Qualys Endpoint: The URL of the Qualys endpoint where scanner reports will be shared or uploaded.
- Qualys Endpoint Token: The Subscription Token required for Qualys Endpoint.
- VM Filter Rules
- Must-have Tags: All tags from the list must be present and considered during VM discovery. Add multiple values in a comma-separated format.
- At least One Tag: At least one tag from the list must be present and considered during VM discovery. Add multiple values in a comma-separated format.
- None of the Tag: No tag from the list must be present and considered during VM discovery. Add multiple values in a comma-separated format.
- Scanner Settings - You can keep the default value to proceed.
- Scan Interval: The scan frequency where the scanner performs scans on an individual VM at the specified interval. Provide a value between 1 day and 30 days.
- Poll Interval: The polling frequency where the scanner fetches all VMs from the target subscriptions to scan them at specified intervals. Provide a value between 1 hour to 24 hours.
- Scanner Pause Interval: The scanner waits a specified number of minutes before executing a scan on the discovered VMs. The scanner will be paused for a designated period to accommodate new VMs for scanning. Provide a value between 1 minute to 30 minutes.
- Number of Concurrent Scanner Machines Per Location: The number of scanner machines to execute scans on a single location. You can provide a value from 1 to 30 VMs. Consider the VMs to consume for scanning when allocating vCPU quotas in Azure storage. For Quotas allocations, refer to the Azure Quotas documentation.
- Concurrency: The number of locations to be concurrently scanned. The value must be between 1 and 25.
- Event Based Discovery: When selected, ephemeral VMs are automatically captured and scanned.
- Scan Sampling: When selected, you can select and analyze a subset of VMs from a larger population to make inferences about the VMSS.
- Sampling Group Scan Percentage: Provide the percentage to execute scans on the sampling group VMSS. The value must be between 1 and 50.
- Sampling Group Scan Percentage: Required (Default value can be used) - Sampling Group Scan Percentage - The percentage to execute scans on the sampling group VMSS. Value must be between 1 and 50.
- vnetAddressPrefix Required (Default value can be used) - Internal VNet address prefix - Address prefix for the internal VNet used by Function Apps and Private Endpoints. Subnets are calculated automatically using cidrSubnet().
- scannerVnetAddressPrefix Required (Default value can be used) - Scanner VNet address prefix - Address prefix for the scanner VNet used per target location. Subnets for scanner machines, proxy functions, and private storage are calculated automatically using cidrSubnet().
- Scanner Account Details
- Once all the above parameters are filled, you are ready to run the deployment. Run the following command from the root of the unzipped folder.
Deploy Command
This command deploys the config.json file.
To deploy resources./azure-snapshot-scanner-deployThis command deploys the entire stack.
You can find the snippets below in the outcome.
info: Validating configuration info: Following resources will be deployed. info: Total resources to be deployed: xxx info: Deploying using terraform ... info: This will take anywhere from 10 to 20 mins. info: Plan: xxx to add, 0 to change, 0 to destroy. info: Apply complete! Resources: xxx added, 0changed, 0 destroyed. info: Deploy completed. info: Running update-logic-apps. -
Deployment confirmation for unsupported locations
The script prompts for confirmation: If there are target locations that are unsupported, we are going to skip the deployment for those locations.
The locations and the reasons for skipping are:-
"westcentralus": insights are not supported, due to which regional function app creation fails to create.
-
"westindia": Private Endpoints cannot be created in a subnet where Private Endpoint Network Policies are enabled.West India enforces Private endpoint validation at deployment time, while other regions may still allow it due to backward compatibility.
-
'australiacentral': Flex consumption plan is not supported in this region, due to which regional function app creation fails to create.
-
'koreasouth': Flex consumption plan is not supported in this region, due to which regional function app creation fails to create.
-
'qatarcentral': Flex consumption plan is not supported in this region, due to which regional function app creation fails to create.
-
'canadaeast': Flex consumption plan is not supported in this region, due to which regional function app creation fails to create.
-
-
The script will prompt for confirmation:
-
Enter Yes to proceed with the deployment.
-
Enter No to cancel the deployment. No resources are created or modified.
-
- After confirmation, sore resources are deployed in the service account subscription. Deployment progress can be monitored in the Azure Portal:
-
Navigate to the selected subscription
-
Open Deployments from the left-hand panel
-
-
Once the core deployment completes successfully, the Deployment of target account resources starts automatically.
This includes resources such as Event Grid.
Note: Target deployment occurs only when event-based is enabled, and if eventBasedDiscovery is set to false, the target deployment does not happen. -
After deployment is complete, the deployment.log file contains logs related to the deployment. If deployment fails, the error log is added to the deployment-error.log file.
Configuration at Qualys Console
Once your stack is successfully deployed, the "Enable Snapshot-based scan" checkbox will be active on the connector app. Let's enable a Snapshot-based scan for your account.
- Navigate to the Connector app.
- Click Create Connector or edit an existing connector
- Navigate to the Tags and Activation step.
- Select the Automatically activate all assets for VM Scanning checkbox.
- Select the Enable Zero-touch Snapshot Based Scan checkbox.
Deregister the Service Account
To deregister the service account and remove all the resources and stack, run either of the following command.
To destroy resources.
./azure-snapshot-scanner-destroyLimitations
- A few regions are restricted from deployment - westcentralus, westindia, autraliacentral, koreasouth, qatarcentral.
- Updation from 3.2.0, 3.2.1, and 3.20.0 to 3.21.0 is not applicable. We need to destroy the earlier deployment and then redeploy it.
- Updation from Terraform to Bicep is not applicable, and vice versa. We need to destroy the earlier deployment and then redeploy it.
- In Bicep updation, if you have added or removed a new region and subscription, then the destruction of those resources will not happen unless you run the script to destroy those resources.
- The upgrade of the service account region is not applicable ( It's not recommended to change the service account region).
Frequently Asked Questions
1. How can we update from a Terraform deployment to a Bicep deployment?
Direct in-place updates from Terraform to Bicep are not supported.
If Terraform has already been deployed, follow these steps:
- Download the required Bicep binaries.
- Update the parameter.json file with values equivalent to the user-config.json file used in Terraform.
- Run the Bicep destroy command to remove the existing Terraform-managed resources.
- Proceed with the Bicep deployment.
The Terraform deployment must be destroyed before initiating the Bicep deployment.
2. Where can we provide configuration for deployment?
All deployment configuration must be provided in the: parameter.json
Ensure that all required parameters are correctly defined before initiating deployment.
3. Where can we find deployment logs?
Deployment logs are available in the following file: deployment.log
This file contains execution details of the deployment process.
4. Where can we find error logs?
Error logs are recorded in: deployment-error.log
This file contains detailed error messages in case of deployment failures.
5. Where can we find logs for deployment destruction?
Logs for resource destruction (destroy operation) are available in: destroy.log
6. How can we check deployment progress?
Core resources are deployed in the service account subscription. Deployment progress can be monitored through the Azure Portal: Microsoft Azure
Steps to Monitor Deployment:
- Navigate to the selected subscription.
- Open Deployments from the left-hand panel.
- Review the status of the active deployment.
7. What should be done if the destroy operation is stuck?
This issue may occur if the Azure Shell connection is lost during execution.
Resolution:
Rerun the destroy command to resume and complete the cleanup process.
8. In which case will the target deployment not occur?
Target deployment will occur only if event-based discovery is enabled.
If: eventBasedDiscovery = false
Then the target deployment will not happen.
9. What happens if a target location is not supported?
If one or more target locations are unsupported:
- Deployment for those specific locations will be skipped.
- Supported locations will proceed normally.
10. What steps should be followed if deployment fails with a "DeploymentNotFound" error?
This error may occur due to an Azure-side caching issue.
Microsoft Azure
Resolution:
- Rerun the deploy command to complete the deployment successfully.
11. How can a target subscription be removed during a deployment update?
If a target subscription must be removed during an update:
Step 1
- Remove the required target subscription from the parameter.json file.
- Run the Bicep deployment command.
Step 2
- After deployment completes, run the provided script to destroy resources from the removed target subscription.
12. Can reserved characters be used in the userDefinedTags field?
No. Reserved characters cannot be used in the userDefinedTags field. Ensure that only supported characters are used when defining tags.