Installing Admission Controller
After getting Admission Controller image, install it on your K8s cluster using the unified helm chart - 'qualys-tc' hosted on ArtifactHub - https://artifacthub.io/packages/helm/qualys-helm-chart/qualys-tc
'qualys-tc' is a unified helm chart that is used to install:
- Qualys Cluster Sensor (cluster-sensor)
- Qualys Container Security Sensor (qcs-sensor)
- Qualys Admission Controller (admission-controller)
- Container Runtime Sensor (runtime-sensor)
Qualys Admission Controller have a default configuration that caters to the most popular use cases. However, you can change this default configuration by modifying the unified Helm chart.
Before you install the helm chart, you need to add and update it in your repository by running the below commands.
helm repo add qualys-helm-chart https://qualys.github.io/Qualys-Helm-Charts/

helm repo update
To install Qualys Admission Controller in your Cloud Provider,
- You can quickly install the Admission Controller using the below command.
helm install qualys-helm-chart/qualys-tc \

	--set admissionController.enabled=true \

	-n qualys
For rest of the configuration parameters, refer to Step 3. - (Optional) You can also install Admission Controller by pulling the helm chart locally and installing it using the below commands.
helm pull qualys-helm-chart/qualys-tc --untar
Install the Admission Controller after updating values.yaml file by passing the below command.
helm install qualys-tc ./qualys-tc \

	--create-namespace \

-n qualys - Identify the environment in which your Admission Controller is present. Qualys currently supports Azure, AWS, GCP, Self-managed K8s, and Openshift environments.
- If you do not want to install Cluster Sensor, disable it using the below command.
--set clusterSensor.enabled="false" - Get the respective resource id of your environment and run the installation commands.
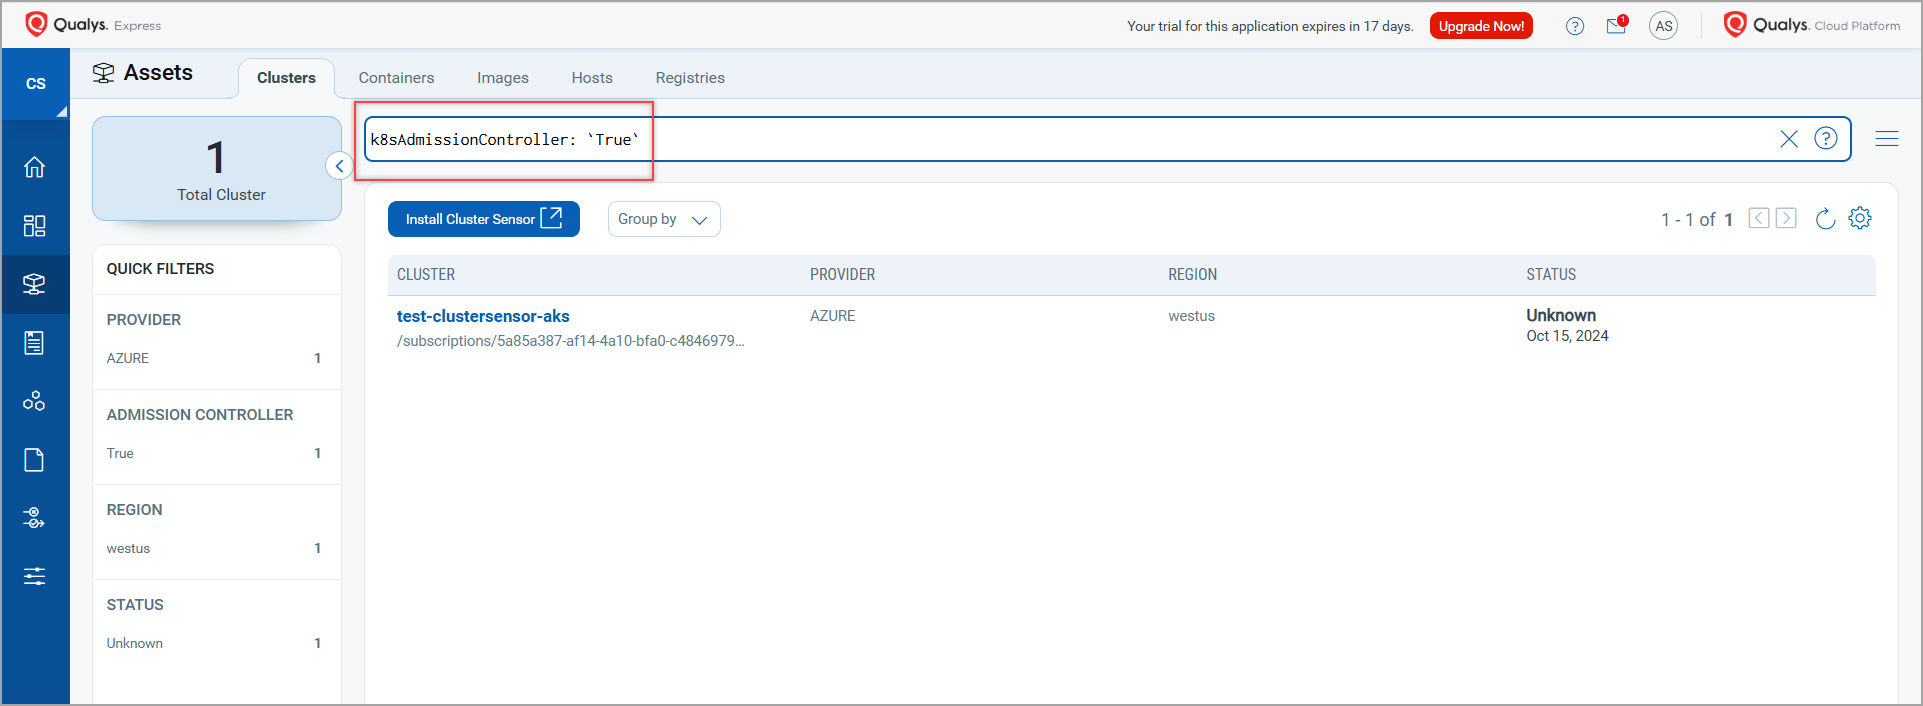
Once Admission Controller is installed and running in a cluster, it gets displayed on Qualys Enterprise TruRisk™ Platform under Container Security > ASSETS > Clusters. Use this below QQL to see the Clusters equipped with Admission Controller - k8sAdmissionController: `True`.
Installing Admission Controller in Azure
To install Cluster Sensor or Admission Controller in Azure environment,
- Get the '
global.clusterInfoArgs.AZURE.id' (Azure Resource ID) value from your Azure environment by running this command -
az resource list --name '<Name of your cluster>'Sample O/P
Search for the similar snippet shown below to get your Azure resource id ("id":xxxxxxxxxxxxxxxxxxxxxxxxxxxx).…
{ "id": "/subscriptions/00000000-0000-0000-0000-000000000000/resourcegroups/rg1/providers/Microsoft.ContainerService/managedClusters/clustername1",
"location": "<location>",
"name": "<cluster name>",
...}
- Run the following CLI commands.
helm install qualys-tcqualys-helm-chart/qualys-tc \
--set global.customerId="<customer id>" \
--set global.activationId="<activation id>" \
--set global.gatewayUrl="<pod_gateway_url>" \
--set global.clusterInfoArgs.cloudProvider="AZURE" \
--set global.clusterInfoArgs.AZURE.id="<azure_id>" \
--set global.clusterInfoArgs.AZURE.region="<azure_region>" \
--set admissionController.image="qualys/admission-controller:<tag>" \
--set admissionController.logging.level="<debug/info/error/warn/fatal>" \
--set admissionController.syncInterval="<sync interval in seconds>" \
--set admissionController.enabled=true \
--create-namespace \
-n qualys
Installing Admission Controller in AWS
To install Cluster Sensor in AWS environment,
- Get the '
global.clusterInfoArgs.AWS.arn' (AWS Resource ID) value from your AWS environment by running this command -
aws eks describe-cluster --name <cluster-name>
Sample O/P
Search for the similar snippet shown below to get your AWS arn
("arn":"arn:aws:eks:us-west-2:123456789012:cluster/aws-cluster-1" ).…
cluster": {
"name": "eks-cluster-1",
"arn": "arn:aws:eks:us-west-2:123456789012:cluster/eks-cluster-1",
...}
-
Run the following CLI commands.
helm install qualys-tc qualys-helm-chart/qualys-tc \

	--set global.customerId="<Customer ID>" \

	--set global.activationId="<activation id>" \

	--set global.gatewayUrl="<pod_gateway_url>" \

	--set global.clusterInfoArgs.cloudProvider="AWS" \

	--set global.clusterInfoArgs.AWS.arn="<AWS ARN>" \

	--set admissionController.enabled=true \

	--set admissionController.image="qualys/admission-controller:<tag>" \

	--set admissionController.resources.replicas="<number_of_replicas>" \

	--set admissionController.logging.level="<debug/info/error/warn/fatal>" \

	--set admissionController.syncInterval="<sync_interval_in_seconds>" \

	--create-namespace \

	-n qualys
Installing Admission Controller in GCP
To install Cluster Sensor in GCP environment,
- Get the '
global.clusterInfoArgs.GCP.krn'value from your GCP environment by running this command -gcloud container clusters describe <cluster-name> --zone <zone/region>.Sample O/P
Search for the 'selfLink' in the output (selfLink:<URL link><GCP Key Resource Name>).…
selfLink: https://container.googleapis.com/v1/projects/qualys-cms/zones/us-central1-c/clusters/cluster-zonal
...Example of GCP Key Resource Name (KRN) in the above self link - /projects/qualys-cms/zones/us-central1-c/clusters/cluster-zonal.
KRN is constructed based on your GCP project ID, GCP zone, and the cluster name. - To install the Admission Controller in your GCP environment, run the following commands.
-helm install qualys-tcqualys-helm-chart/qualys-tc
--set global.customerId="<Customer ID>" \
--set global.activationId="<activation id>" \
--set global.gatewayUrl="<pod_gateway_url>" \
--set global.clusterInfoArgs.cloudProvider="GCP" \
--set global.clusterInfoArgs.GCP.krn="<GCP KRN>" \
--set admissionController.image="qualys/admission-controller:<tag>" \
--set admissionController.resources.replicas=<number_of_replicas> \
--set admissionController.logging.level="<debug/info/error/warn/fatal>" \
--set admissionController.syncInterval=<sync_interval_in_seconds> \
--set admissionController.persistentStorage.enabled=<true/false> \
--set admissionController.enabled=true \
--create-namespace \
-n qualys
Installing Admission Controller in OCI
To install Cluster Sensor in OCI environment,
- Get the '
global.clusterInfoArgs.OCI.ocid' value from your OCI environment using the OCI console (Cluster Details > Cluster ID).Sample O/P
OCI.ocid=ocid1.cluster.oc1.phx.aaaaaaaa7bpfuy3ucll6ssvhfwpfcqrzx6j233evxcn6bkfincoayt6vcocq - To install the Admission Controller, run the following commands.
helm install qualys-tc qualys-helm-chart/qualys-tc \
--set global.customerId=<customer id> \

	--set global.activationId=<activation id> \

	--set global.gatewayUrl=<pod_gateway_url> \

	--set global.clusterInfoArgs.cloudProvider="OCI" \

	--set global.clusterInfoArgs.OCI.ocid=<cluster_OCID> \

	--set global.clusterInfoArgs.OCI.clusterName="<cluster_name>" \

	--set admissionController.image="qualys/admission-controller:<tag>" \

	--set admissionController.logging.level="<debug/info/error/warn/fatal>" \

	--set admissionController.syncInterval=<sync_interval_in_seconds> \
--create-namespace \

	-n qualys
Installing Admission Controller in Self-managed K8s
An environment is considered as 'Self-managed K8s' when the K8s cluster is not from cloud provider Azure, Aws, OCI, or GCP and it is created and managed by you.
To install Cluster Sensor in a self-managed K8s environment, run the following CLI commands.
- Get the '
global.clusterInfoArgs.name=<cluster name>' value from your Self-managed k8s environment. - To install the Admission Controller, run the following commands.
helm install qualys-tcqualys-helm-chart/qualys-tc
--set global.customerId=<customer_id> \
--set global.activationId=<activation_id> \
--set global.gatewayUrl="<gateway_url>" \
--set global.clusterInfoArgs.cloudProvider="SELF_MANAGED_K8S" /
--set global.clusterInfoArgs.SELF_MANAGED_K8S.clusterName="<cluster_name>" \
--set global.qcsSensor.enabled=false \
--set admissionController.image="qualys/admission-controller:<tag>" \
--set admissionController.logging.level="<debug/info/error/warn/fatal>" \
--set admissionController.syncInterval=<sync_interval_in_seconds> \
--set admissionController.enabled=true \
--create-namespace \
-n qualys
Installing Admission Controller in Openshift
To install Cluster Sensor in a Openshift environment, run the following CLI commands.
- Get the '
global.clusterInfoArgs.name=<cluster name>' value from your Openshift environment. - To install the Admission Controller, run the following commands.
helm install qualys-tc qualys-helm-chart/qualys-tc

	--set global.customerId=<customer_id> \

	--set global.activationId=<activation_id> \

	--set global.gatewayUrl="<gateway_url>" \

	--set global.openshift=true \

	--set global.clusterInfoArgs.cloudProvider="SELF_MANAGED_K8S" \

	--set global.clusterInfoArgs.SELF_MANAGED_K8S.clusterName="<openshift_cluster_name>" \

	--set global.qcsSensor.enabled=false \

	--set admissionController.image="qualys/admission-controller:<tag>" \

	--set admissionController.logging.level="<debug/info/error/warn/fatal>" \

	--set admissionController.syncInterval=<sync_interval_in_seconds> \

	--set admissionController.enabled=true \

	--create-namespace \

	-n qualys
To uninstall Admission Controller deployed in your environment, uninstall the unified helm chart by running the following command:
helm uninstall qualys-tc \

-n qualys
To know about Admission Controller parameters, refer to Command and Options.