Create and Assign Tags to Assets
You can create and add Static and Dynamic tags to images and containers to classify and organize them in your environment. You can also create a new tag on the fly and assign it to an asset. For detailed information about configuring asset tags, see Qualys CyberSecurity Asset Management: Tag Assets.
- Dynamic tags are supported only for new Assets.
- Dynamic tags do not support the Cascading Effect.
Create a Tag
You can create a Static or Dynamic tag for an Image or Container. To create a tag, follow the steps mentioned below.
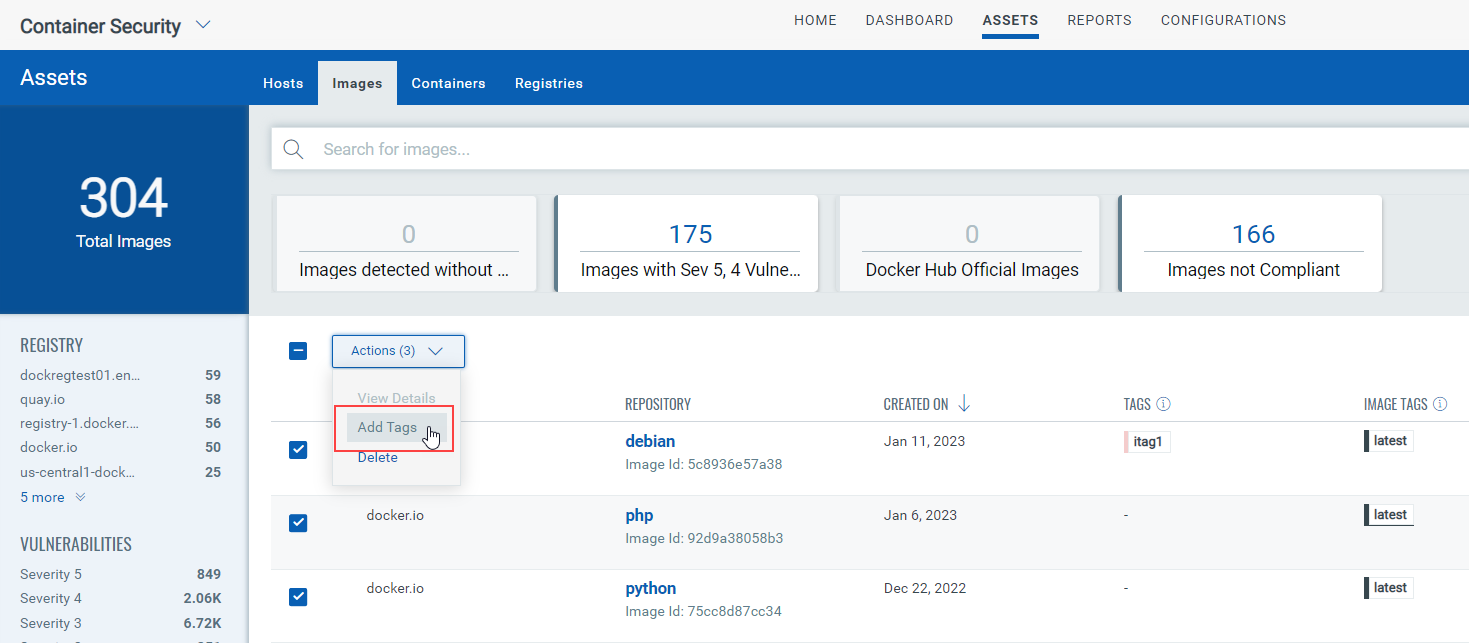
- Select an image or a container and from the Quick Actions menu, select Add Tags.
- In the Select Tags window, click Create New Tag.
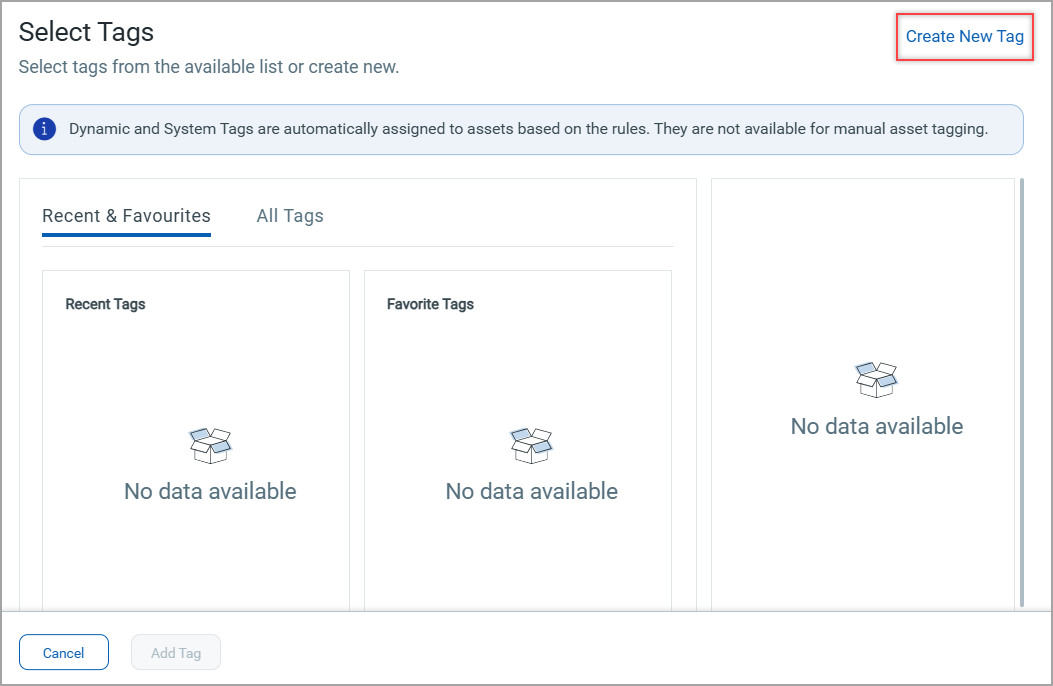
- Fill in tag details such as its name, brief description, asset criticality score (1 - 5). You can mark the tag as your favorite to make it appear in the Recent & Favourites tab on Select Tags window.
- Select the Set Tag Color checkbox to assign a color to the tag. Color coding helps you quickly differentiate the tags.
- You can add the new tag under an existing tag. In such case, the existing tag is considered as a Parent tag, whereas the new tag is considered as a Child tag. To make the new tag as a Child tag, under Select Parent Tag, click the
 icon and choose a parent tag from Select Tags window.
 - Under Tag Type, choose either Static or Dynamic.
Static - Marks the new tag as 'Static'. No rules are applied in this option.
Dynamic - Marks the new tag as 'Dynamic'. With the help of Rule drop-down, select a rule for the tag and fill-in the on-screen options and click Create.
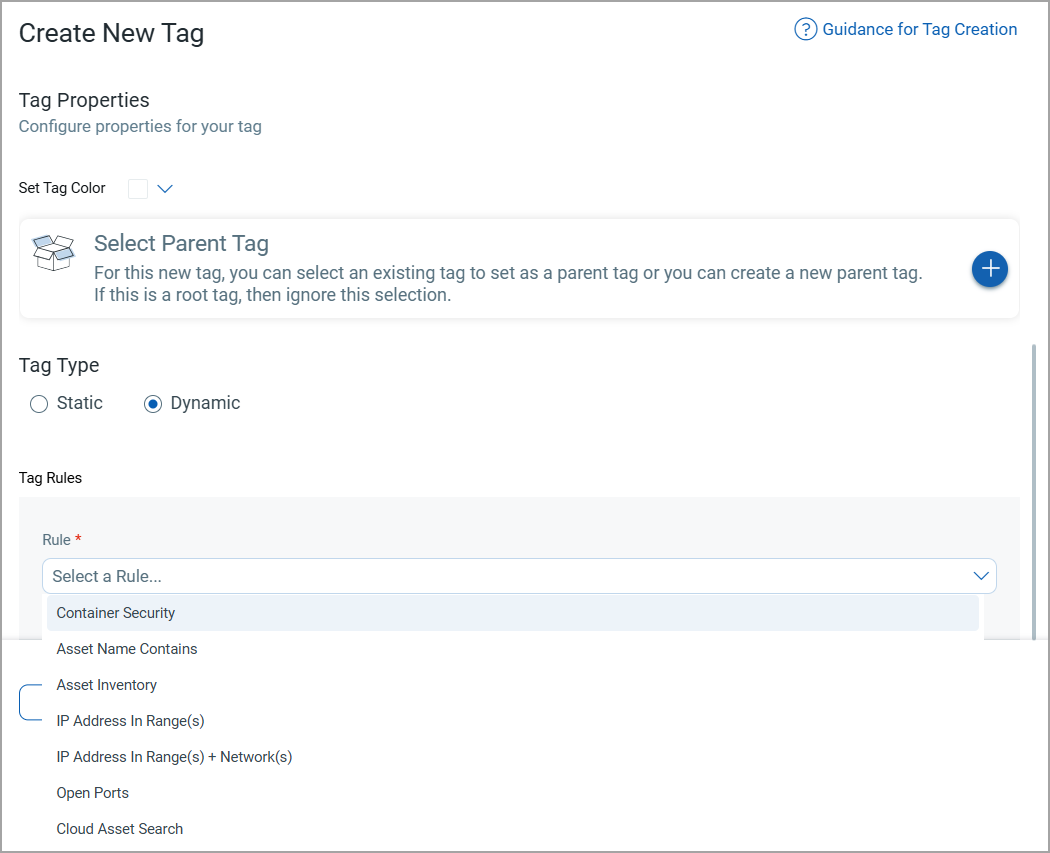
- If you choose Dynamic tag type, under Tag Rules, select a rule you want to apply to the new tag.
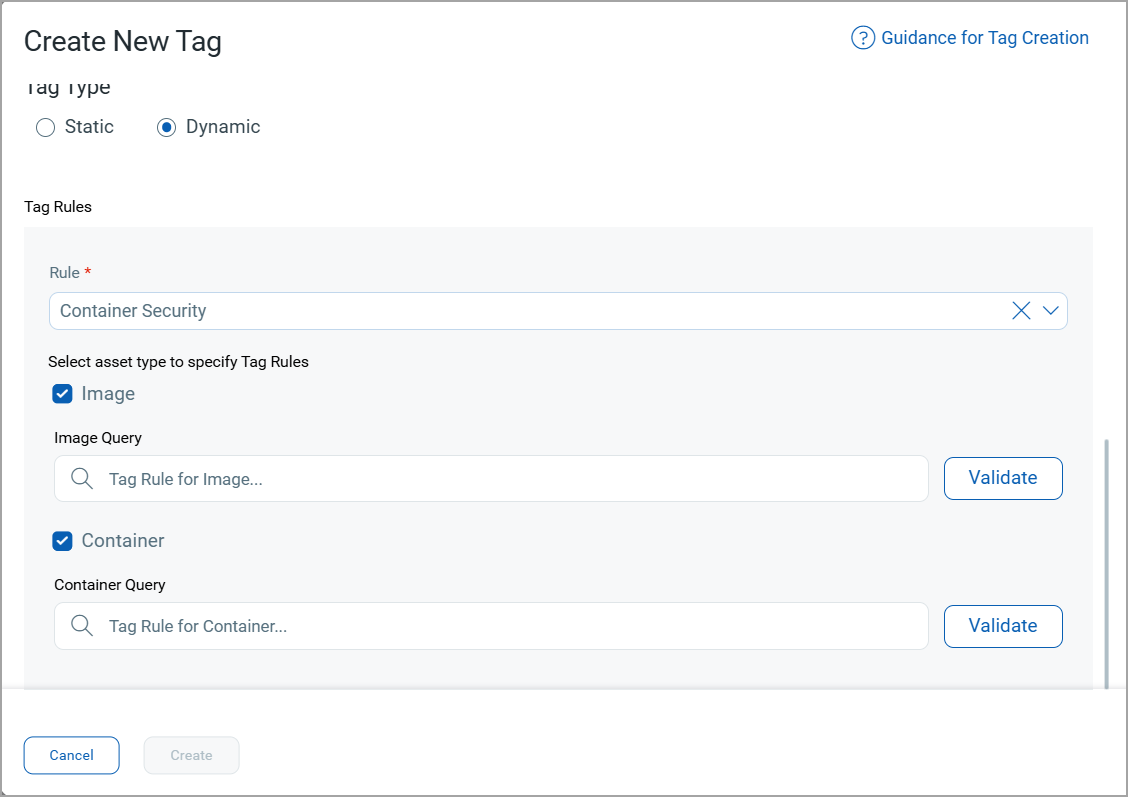
For example, if you choose the Container Security rule, you need to select the asset type - Image or Container, or both.
Under Image Query and/or Container Query, select a QQL and provide a valid value.
For example, image.label.key: <Provide a valid label value>
Click Validate to validate the query.
The following QQLs are supported under the Image and Container queries.
Image QQLsImage QQLs
The Image Query field supports only the following QQLs for the validation.
- image.uuid
- image.sha
- image.imageId
- image.customerUuid
- image.parentUuid
- image.repo.registry
- image.repo.repository
- image.repo.tag
- image.repoDigests.registry
- image.repoDigests.repository
- image.repoDigests.digest
- image.label.key
- image.label.value
- image.layersCount
- image.author
- image.dockerVersion
- image.size
- image.operatingSystem
- image.architecture
- image.hostArchitecture
- image.host.sensorUuid
- image.host.uuid
- image.host.hostname
- image.host.ipAddress
- image.vulnerabilityCount
- image.services.name
- image.services.description
- image.services.status
- image.users
- image.registryUuid
- image.source
- image.isDockerHubOfficial
- image.scanType
- image.scanTypes
- image.scanErrorCode
- image.scanStatus
- image.lastFoundOnHost.sensorUuid
- image.lastFoundOnHost.uuid
- image.lastFoundOnHost.hostname
- image.lastFoundOnHost.ipAddress
- image.maxQdsScore
- image.qdsSeverity
- image.riskScore
Container QQLsContainer QQLs
The Container Query field supports the following QQLs for the validation.
- container.uuid
- container.sha
- container.containerId
- container.imageUuid
- container.imageSha
- container.imageId
- container.customerUuid
- container.sensorUuid
- container.name
- container.state
- container.hostname
- container.privileged
- container.command
- container.environment
- container.label.key
- container.label.value
- container.path
- container.arguments
- container.ipv4
- container.ipv6
- container.macAddress
- container.host.sensorUuid
- container.host.uuid
- container.host.hostname
- container.host.ipAddress
- container.vulnerabilityCount
- container.isRogue
- container.services.name
- container.services.description
- container.services.status
- container.hostArchitecture
- container.users
- container.operatingSystem
- container.isRoot
- container.source
- container.cluster.version
- container.cluster.k8s.project
- container.cluster.k8s.pod.name
- container.cluster.k8s.pod.uuid
- container.cluster.k8s.pod.namespace
- container.cluster.k8s.pod.namespaceMetadata.labels
- container.cluster.k8s.pod.namespaceMetadata.annotations
- container.cluster.k8s.pod.label.key
- container.cluster.k8s.pod.label.value
- container.cluster.k8s.pod.controller.uuid
- container.cluster.k8s.pod.controller.name
- container.cluster.k8s.pod.controller.type
- container.cluster.k8s.node.name
- container.cluster.k8s.node.isMaster
- container.cluster.name
- container.cluster.uid
- container.cloudProvider.aws.ecs.accountId
- container.cloudProvider.aws.ecs.clusterName
- container.cloudProvider.aws.ecs.container.id
- container.cloudProvider.aws.ecs.container.macAddress
- container.cloudProvider.aws.ecs.container.subnetId
- container.cloudProvider.aws.ecs.region.code
- container.cloudProvider.aws.eks.accountId
- container.cloudProvider.aws.eks.arn
- container.cloudProvider.aws.eks.region
- container.cloudProvider.azure.aks.accountId
- container.cloudProvider.azure.aks.region
- container.cloudProvider.azure.aks.resourceId
- container.cloudProvider.gcp.gke.accountId
- container.cloudProvider.gcp.gke.krn
- container.cloudProvider.gcp.gke.region
- container.cloudProvider.oci.oke.accountId
- container.cloudProvider.oci.oke.ocid
- container.cloudProvider.oci.oke.region
- container.cloudProvider.selfManaged.accountId
- container.cloudProvider.selfManaged.clusterId
- container.cloudProvider.selfManaged.region
- container.maxQdsScore
- container.qdsSeverity
- container.riskScore
The newly created tag appears after some time under Select Tags > All Tags window.
How to assign tags to an asset?
You need to create a tag to assign it to an asset (See Create a Tag). You can assign tags to single or multiple images or containers at once. To assign tags to multiple images or containers, follow the steps mentioned below.
-
Select images or containers and from the Quick Actions menu, select Add Tags.
-
In the Select Tags dialog, search and select the tags you want to assign to the selected assets.
Tip: Click Create New Tag to create a new Static or Dynamic tag.
Optional: For images, in the Cascade Selected Tags dialog, select the tags that you want to pass on to the containers associated with the selected images. -
Click Apply.
The tags are assigned to the assets.
For more information on Tags, see Qualys CyberSecurity Asset Management: Configure Tags.
How can I view the assigned tags?
The tags are visible in the Tags column. To view the cascaded and non-cascaded tags for an asset, follow these steps:
-
Select an image or a container and from the Actions menu, select View Details.
-
Select Image Information or Container Information.
The cascaded and non-cascaded tags assigned to the image or container appear under Tags.
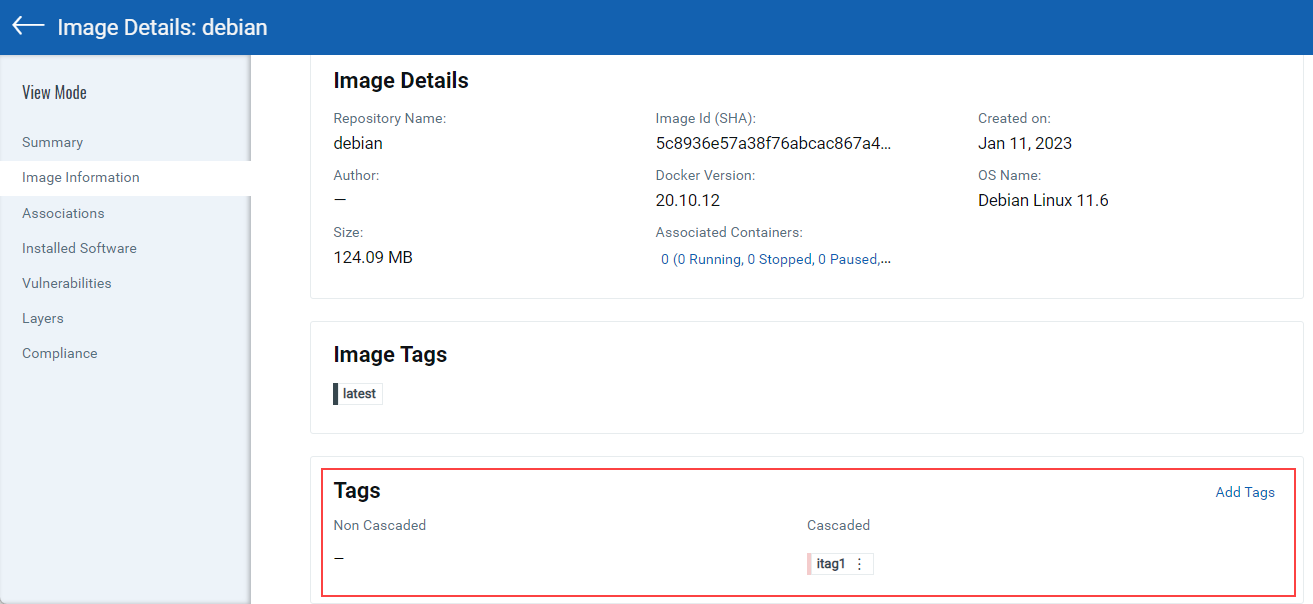
The following table explains the meaning of Cascaded and Non Cascaded tags when viewed in the image or container details:
Tags
Image
Container
Non Cascaded
These tags are assigned to the image and they are not inherited by the containers associated with the image.
These tags are directly assigned to the container.
Cascaded
These tags are assigned to the image and they are inherited by the containers associated with the image.
These tags are inherited from the parent image.
To remove a tag, select ![]() > Remove Tag.
> Remove Tag.