Activating Assets
Learn more about activating assets from CyberSecurity Asset Management (CSAM).
Activating an Individual Asset
Asset Activation Overview
The unmanaged assets from your environment can be brought into the CyberSecurity Asset Management (CSAM) inventory using various sources such as EASM, CAPS, PS, Third-Party, and so on. To convert these assets into managed assets, you must activate assets for the required applications or modules.
You can activate the assets for applications within your subscription, such as Vulnerability Management (VM), Policy Audit (PA), and Certificate View (CERT). When you activate the selected assets for the required applications, the license for those applications is used.
Policy Audit (PA) is an enhanced version of Policy Compliance (PC). Depending on your subscription, you may view Policy Audit (PA) or Policy Compliance (PC) in your application.
Important to Know!
-
Unit Managers and Scanner sub-users can now perform on-demand asset activation.
-
Activate Asset is supported only for specific asset tracking methods. For more information on the supported methods, refer to Asset Tracking Methods.
Assets Activation Limitations
In CSAM, not all discovered asset types can be activated for full inventory management and security assessment. Certain asset types are excluded from activation.
The following asset types are not supported for activation:
- Agent
- OCI
- Scanner
- The following category of asset discovered by the Passive Sensor:
- OT Device
- Controller
- Building Automation Device
- Network Device
The Network Device asset activation is not supported to prevent accidental activation and scanning of critical network infrastructure. You can manually activate these assets through VMDR.
Asset Tracking Methods
Refer to the following table to understand more about modules and asset tracking method details for the “Activate Asset” support.
| Asset Source | Asset Tracking Method (Before Activation) | Asset Tracking Method (After Activation) |
|---|---|---|
|
EASM |
EASM |
IP, NETBIOS, or DNS Note: The default asset tracking method is IP. |
|
Third-Party (ServiceNow, Webhook, or Active Directory) |
SERVICE_NOW, WEBHOOK, or ACTIVE_DIRECTORY |
IP, NETBIOS, or DNS Note: The default asset tracking method is IP. |
|
PS |
PASSIVE_SENSOR, PASSIVE_SCANNER |
IP, NETBIOS, DNS |
|
IP, NETBIOS, DNS |
IP, NETBIOS, DNS |
IP, NETBIOS, DNS |
|
Cloud Assets (AWS, Azure, and GCP) |
AWS, Azure, and GCP |
AWS, Azure, and GCP |
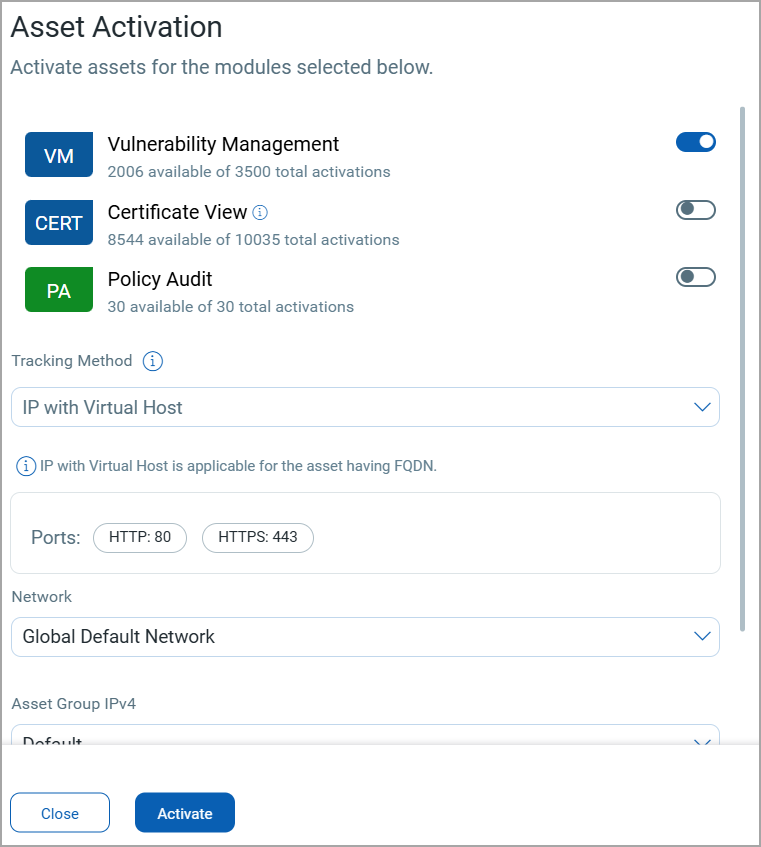
Activating an Individual Asset
- Go to Inventory > Assets tab and click Activate from an unmanaged asset’s “Quick Actions” menu to activate the asset for VM, PC, or CERT modules.
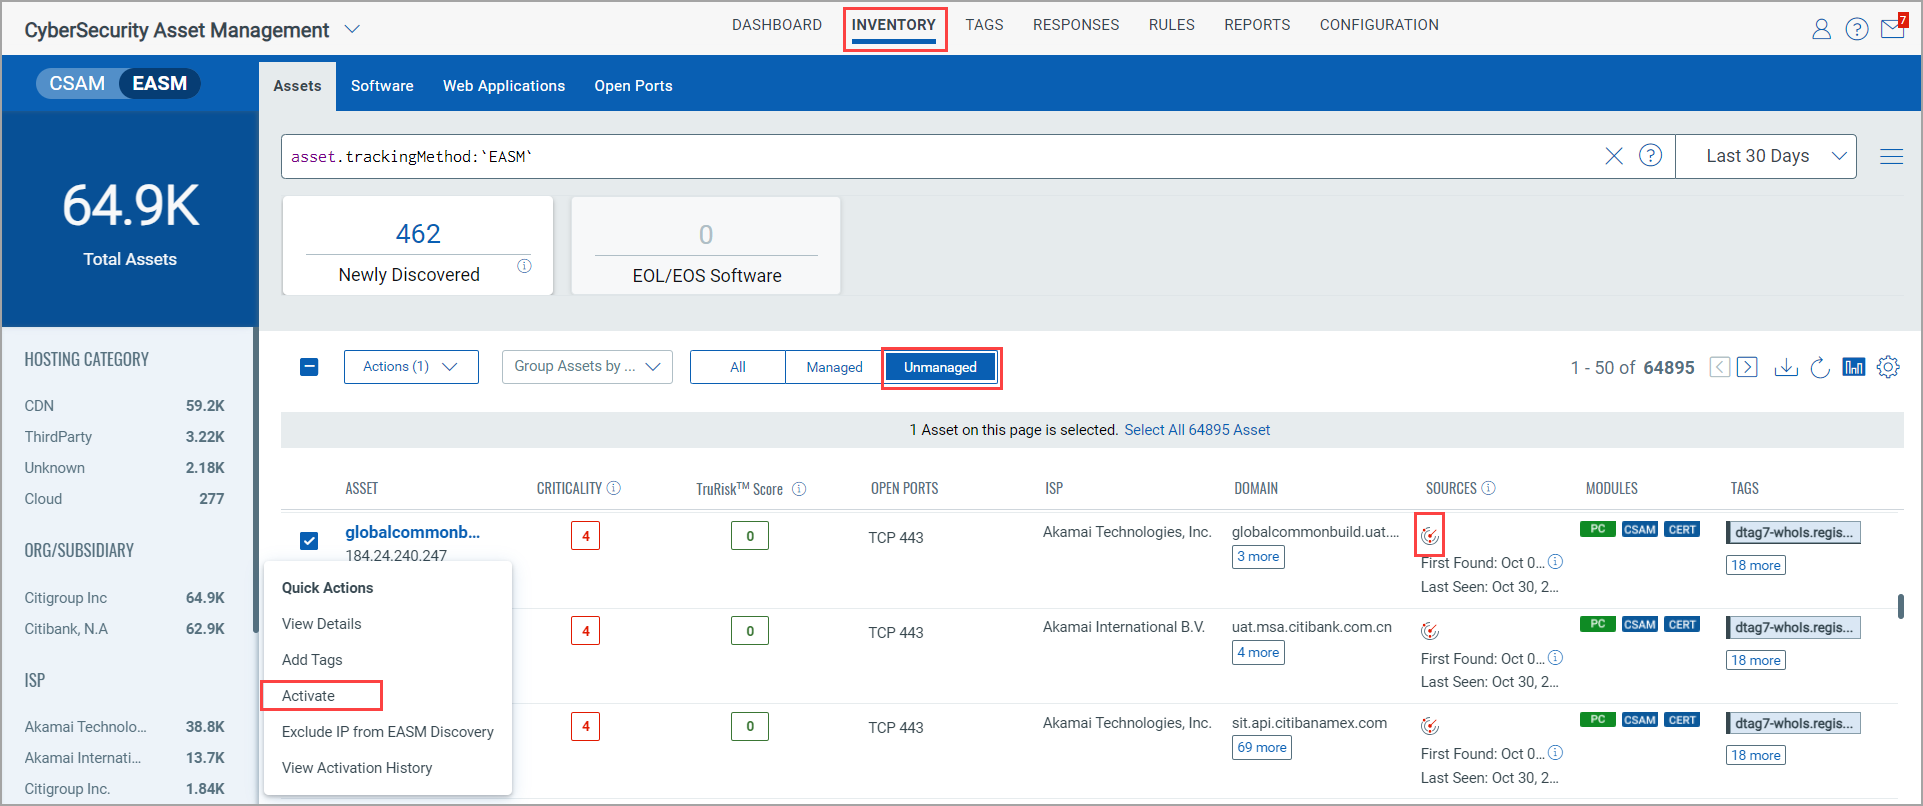
- Complete the following steps to activate the asset for the required modules:
- Turn on the toggles next to the modules to activate the asset for those modules.
The rest of the selection options are displayed.
- Choose the tracking method, network, and asset group to which you want to assign the asset.
This step is not applicable when you activate cloud assets.
The tracking methods available are as follows:
Tracking Method Description IP Use this to activate assets using their IPv4 and IPv6 addresses. DNS Use this to activate assets using the DNS hostname associated with the asset. NETBIOS Use this to activate assets using their NetBIOS name. IP with Virtual Host Use this when multiple websites or services are hosted on the same IP address. This enables the system to create virtual hosts for IP addresses that host multiple websites or services and make them available for scanning. As a result, Qualys scanners can scan both the IP address and its associated virtual hosts to detect more vulnerabilities on the EASM assets.
The configurable ports on which the virtual hosts are created are also displayed.
If you select this tracking method, you can select the domain for which you want to create or update virtual hosts.
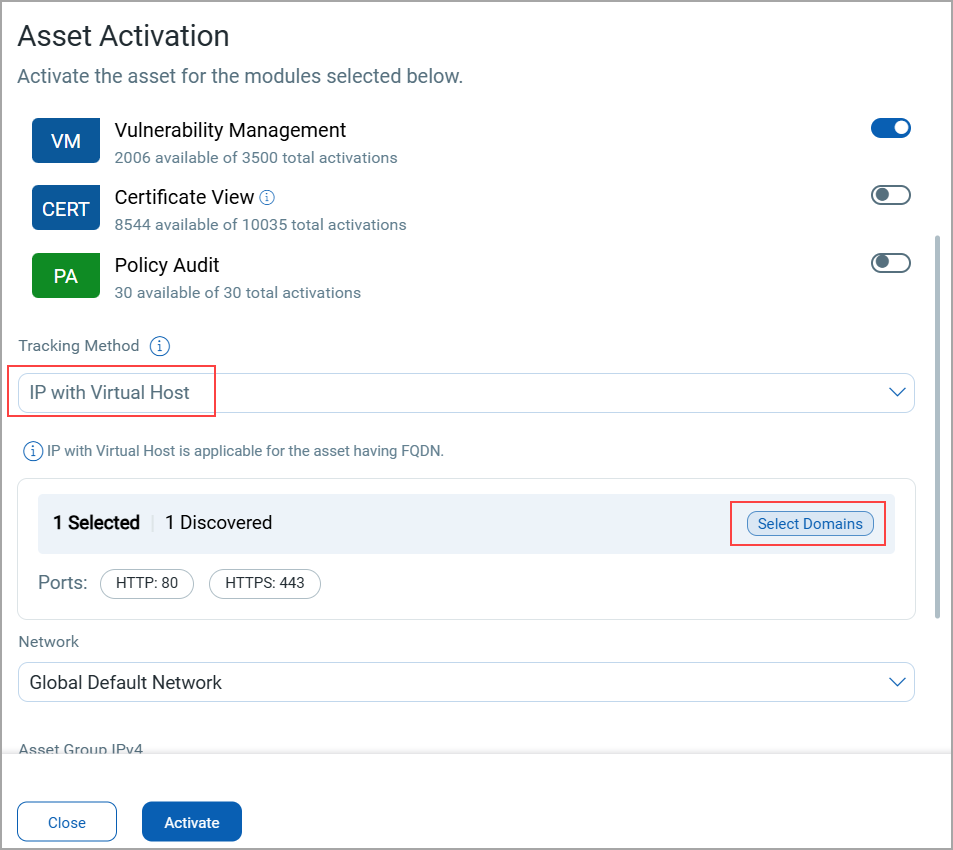
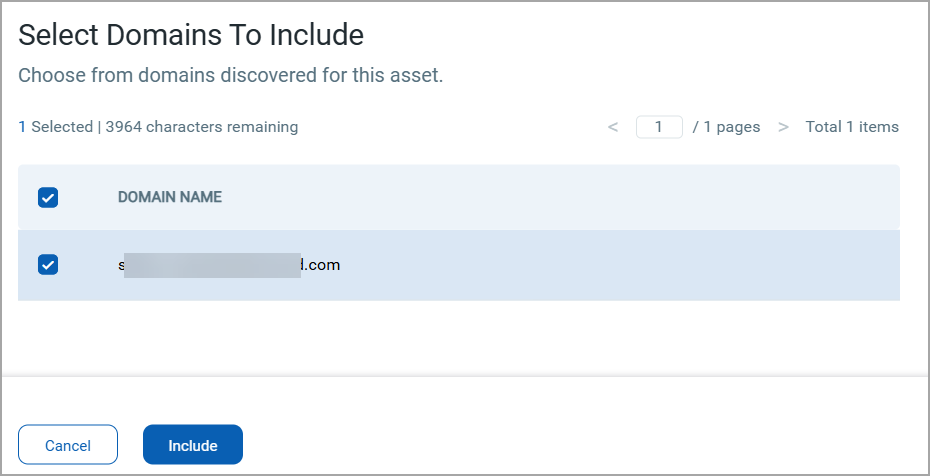
- Click Select Domains.
- Select the domains and click Include.
- Click the Add Tags checkbox to add a tag to the asset.
The Include tags for selected hosts section is shown.
-
Click the
 to add the required tags.
 - Click Activate.
- Turn on the toggles next to the modules to activate the asset for those modules.
Once you activate the asset for the required modules, the IP address of that asset is added for the respective module scan. The modules are shown under the Modules column of the asset inventory.
Activating Multiple Assets
- Navigate to Inventory > Assets tab.
- You can activate multiple assets at a time.
The maximum number of assets you can activate at a time is 10000. To activate multiple assets you want, select the check box next to the Actions list, and from the Actions list, select Activate Assets.
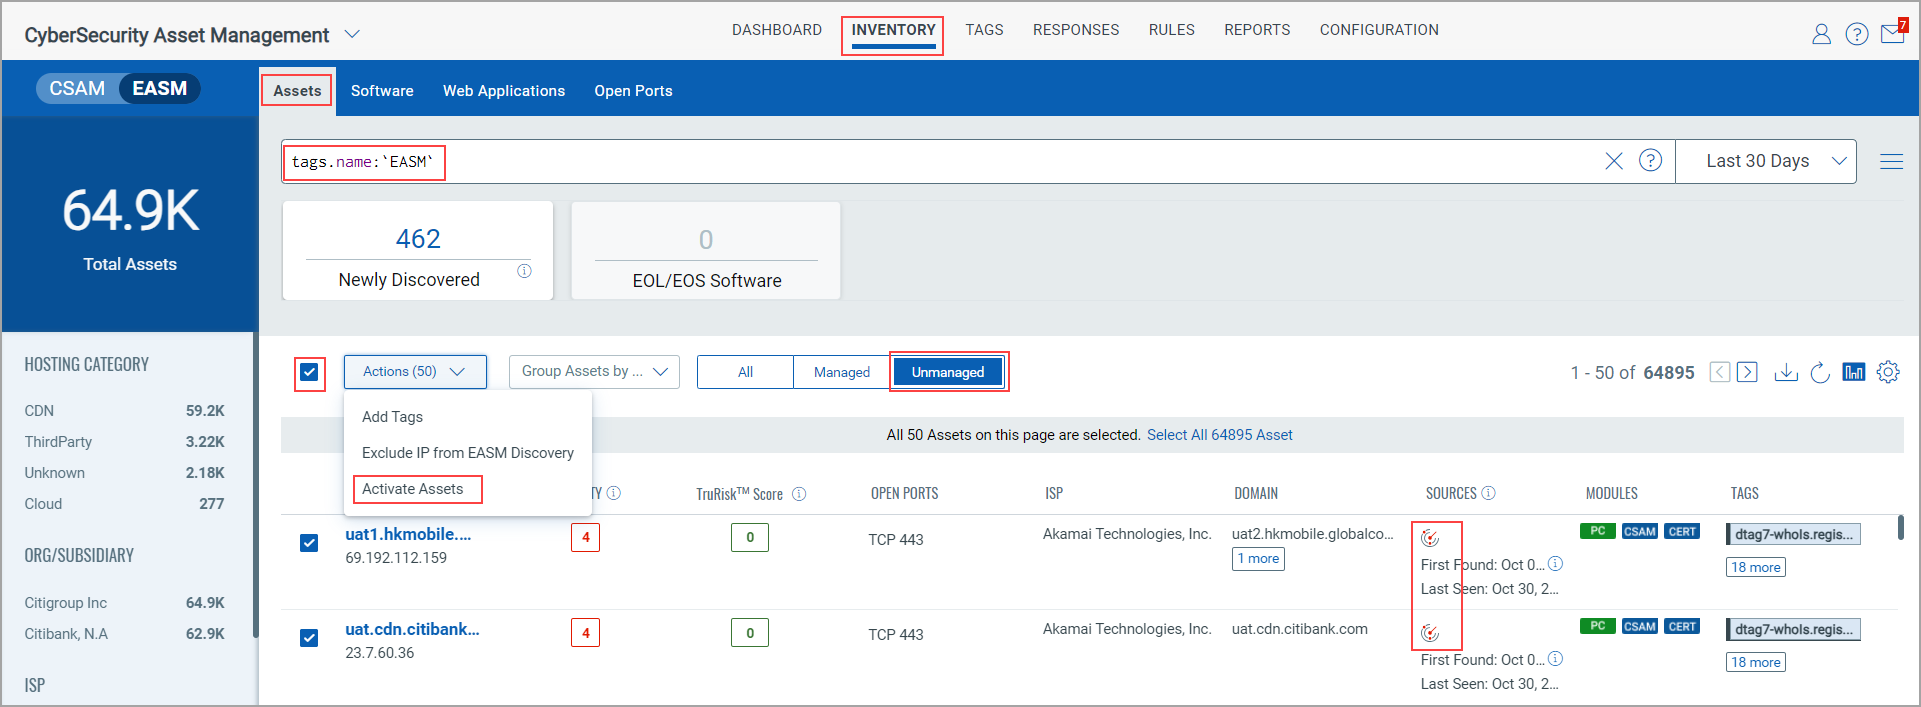
- Complete the following steps to activate the assets for the required modules:
- Turn on the toggles next to the modules to activate the asset for those modules.
The rest of the selection options are shown then.
- Select the tracking method, network, and asset group to which you want to assign the asset.
This step is not applicable when you activate cloud assets.
The tracking methods available are as follows:
Tracking Method Description IP Use this to activate assets using their IPv4 and IPv6 addresses. DNS Use this to activate assets using the DNS hostname associated with the asset. NETBIOS Use this to activate assets using their NetBIOS name. IP with Virtual Host Use this when multiple websites or services are hosted on the same IP address. This enables the system to create virtual hosts for IP addresses that host multiple websites or services and make them available for scanning. As a result, Qualys scanners can scan both the IP address and its associated virtual hosts to detect more vulnerabilities on the EASM assets. The configurable ports on which the virtual hosts are created are also displayed.
- Click Activate.
- Turn on the toggles next to the modules to activate the asset for those modules.
Once you activate the asset for the required modules, the IP address of that asset is added for the respective module scan. The modules are shown under the Modules column of the asset inventory.
What Happens Next!
In the case of single or multiple asset activation, you can see the respective module names under the Modules column after the asset activation is completed.
Related Links