Managing Reporting Schedule
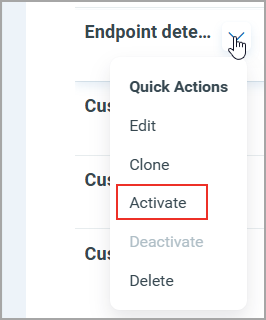
Once the dashboard report is listed on the Reporting Schedule page, you can perform Edit, Clone, and other options from the Quick Actions menu. Click any of the following to perform actions for the schedule:
- Edit Reporting Schedule
- Clone Reporting Schedule
- Activate or Deactivate Reporting Schedule
- Delete Reporting Schedule
- Download the Scheduled Report
Reporting Schedule Status
Once the dashboard report is listed on the Reporting Schedule page, the Status column displays in the Reporting Schedule.
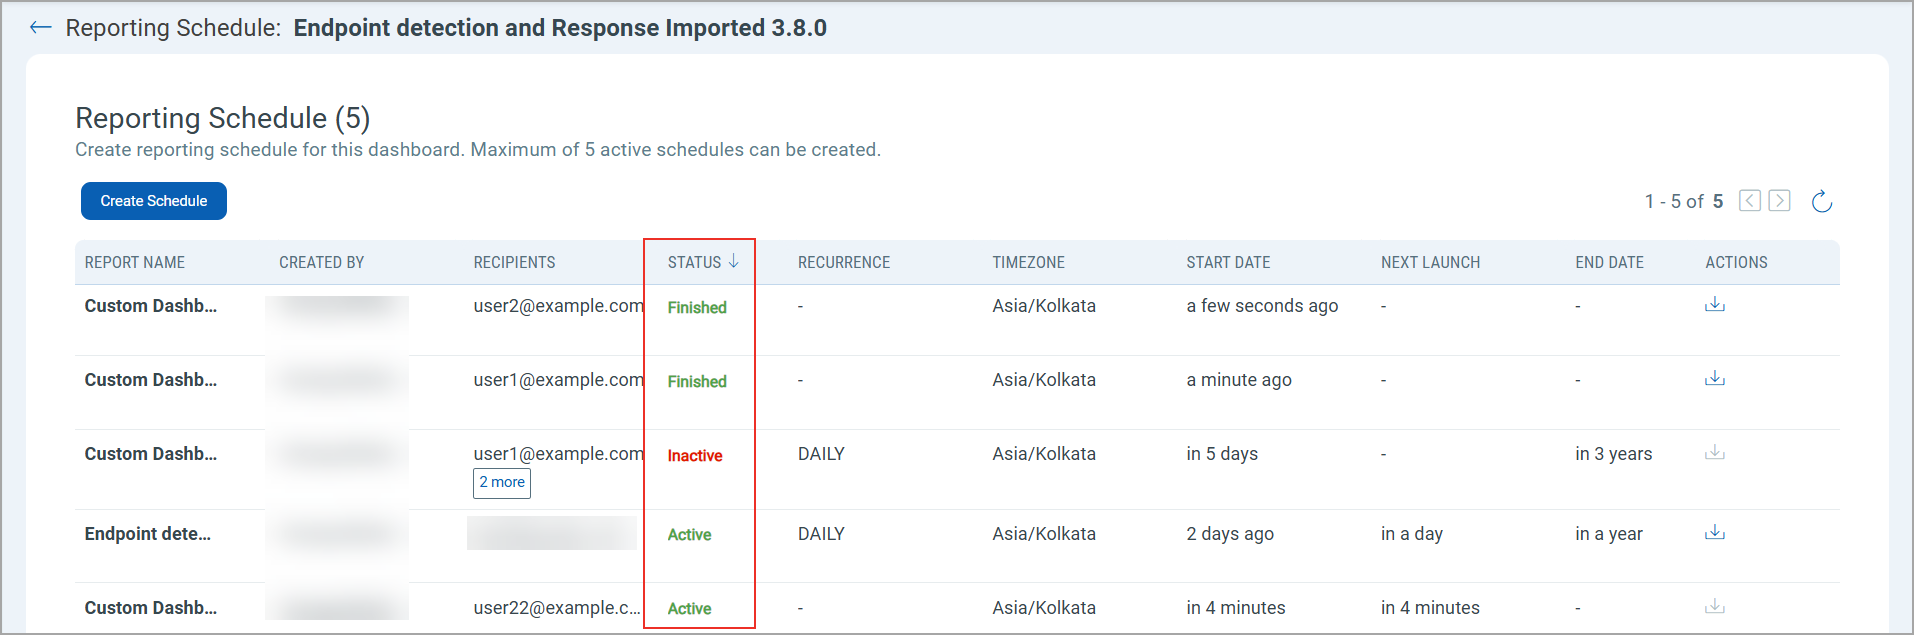
The Status column does not signify the email status sent to the recipient(s).
| Status | Description |
| Active | The report will be in Active Status once the scheduled report is created. You can edit, clone, deactivate, and delete an Active report. |
| Inactive | An Inactive status implies that the report generation is paused. However, this will not change the Daily, Weekly, or Monthly time frame. |
| Finished | The 'Finished' status indicates that report creation is complete. You can clone and delete a Finished report. |
Edit Reporting Schedule
You can edit an existing Reporting Schedule by making changes to the report name, recurrence, or the recipient's email address.
Perform the following steps to edit the scheduled report :
- Hover the mouse over the Report Name.
- From the Quick Actions menu, click Edit.
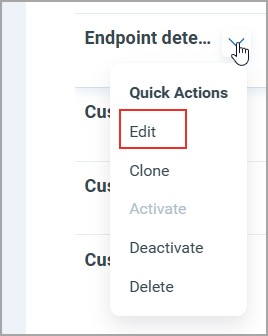
- Make required changes in the Edit Reporting Schedule window.
- Click Save.
Clone Reporting Schedule
You can clone the Reporting Schedule in case you want to create a schedule for the same report for different recipients and dates. The clone report's name should be different from the existing reports.
When you use this option, all the configurations from the selected schedule are copied, and a schedule is created.
Perform the following steps to clone the report schedule:
- Hover the mouse over the Report Name.
- From the Quick Actions menu, click Clone.
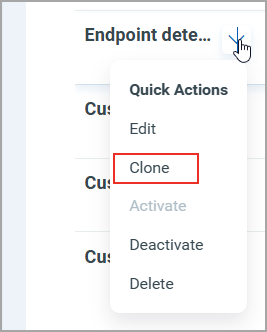
- Rename the cloned Report with the new name. Cloned reports cannot be saved with the same name as the original.
- Click Create to create a clone report schedule.
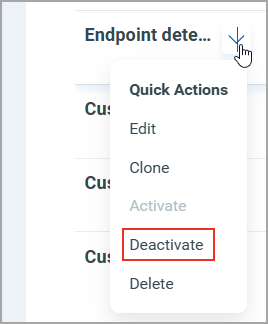
Activate or Deactivate Reporting Schedule
You can activate or deactivate the configured reporting schedule. An Inactive status implies the report creation is paused. However, the chosen time frame of the Schedule report is not paused.
Perform the following steps to activate the scheduled report :
- Hover the mouse over the Report Name.
- From the Quick Actions menu, click Activate.
Perform the following steps to deactivate the scheduled report :
- Hover the mouse over the Report Name.
- From the Quick Actions menu, click Deactivate.
Delete Reporting Schedule
You can delete a report schedule if it is no longer required. You can delete a Reporting Schedule with the Active, Inactive, or Finished status.
Perform the following steps to delete the report schedule:
- Hover the mouse over the Report Name.
- From the Quick Actions menu, click Delete.
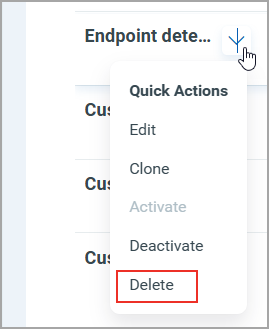
- In the Confirmation dialog box, click Yes.
The schedule will be permanently deleted from the dashboard report once confirmation is complete. All active schedules associated with the dashboard become inactive after deletion.
Download Scheduled Report
You can download and save the dashboard report that you have scheduled.
Perform the following steps to download the report schedule:
- From the Actions column, click the download
 icon.
icon. - Check the PDF Report in the downloads.
For recurring schedule reports, only the latest generated report can be downloaded.
The downloaded scheduled report includes all widgets present on the dashboard, displayed with the same colors as shown on the dashboard.