Qualys Endpoint Detection and Response
Limited Customer Release Notes
Version 3.7
April 15, 2025
What is Sandbox Analysis
Sandbox Analysis is a proactive cybersecurity practice designed to prevent threats by enabling detection, analyzing malware behavior in an isolated environment, and providing detailed reporting on verdict highlighting the risks. This enhances organizations' security posture and empowers them to protect against cyber-attacks. Most importantly, Sandbox Analysis is conducted in a safe, controlled environment, ensuring the safety of your operations, and providing a sense of security.
How Sandbox Analysis Works in Qualys EDR
Qualys EDR enhances threat detection by integrating Sandbox Analysis, which provides deep file inspection in a safe, isolated environment. Here's how it works:

Sandbox Analysis offers a secure environment to analyze potentially harmful files without compromising system security. Here are its main benefits.
- Identifies malware, ransomware, and zero-day threats by executing files in an isolated space.
- Observe how a file behaves in real-time, detecting hidden threats that traditional signature-based security might miss.
- Prevents infections by isolating suspicious files.
- Provides detailed reports (both interactive and PDF formats) on malicious activity, helping security teams investigate and mitigate threats.
What Roles are Supported in Sandbox Analysis
Sandbox Analysis supports multiple user roles, each with specific permissions to access, manage, and analyze files.
- Manager Role
- Analyst Role
- Reader Role (View-Only)
What are the Required Sandbox Analysis Permissions
Sandbox Analysis is an essential technique in cybersecurity operations. It aids in the detection, analysis, and mitigation of cyber threats.
- Sandbox View - Once the Manager user grants this permission, users will see the Forensic tab in their subscription. In the Forensics tab, users will see the Sandbox Analyzer tab.
- Sandbox Submit File - Once the Manager user grants this permission, users can submit sample files manually to the sandbox.
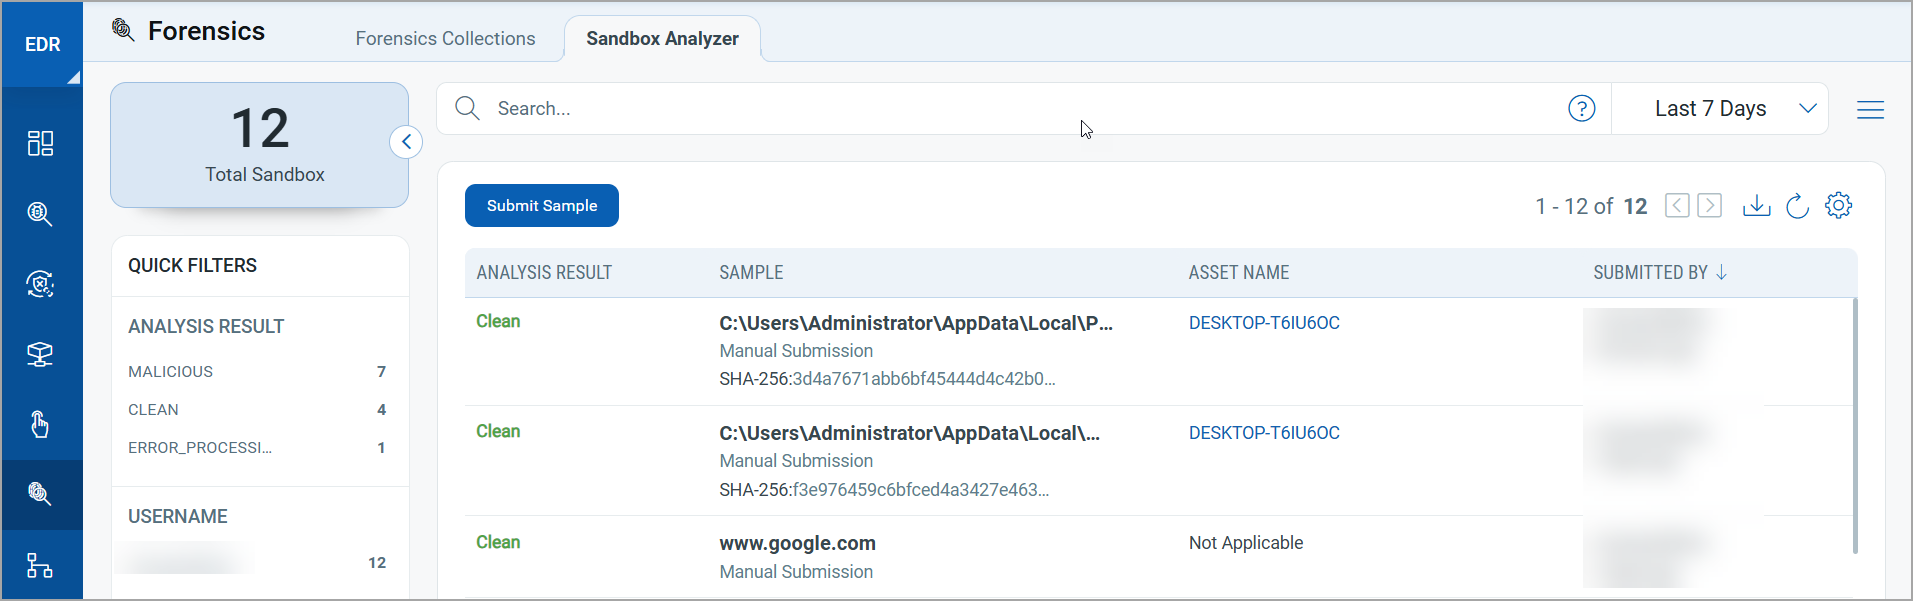
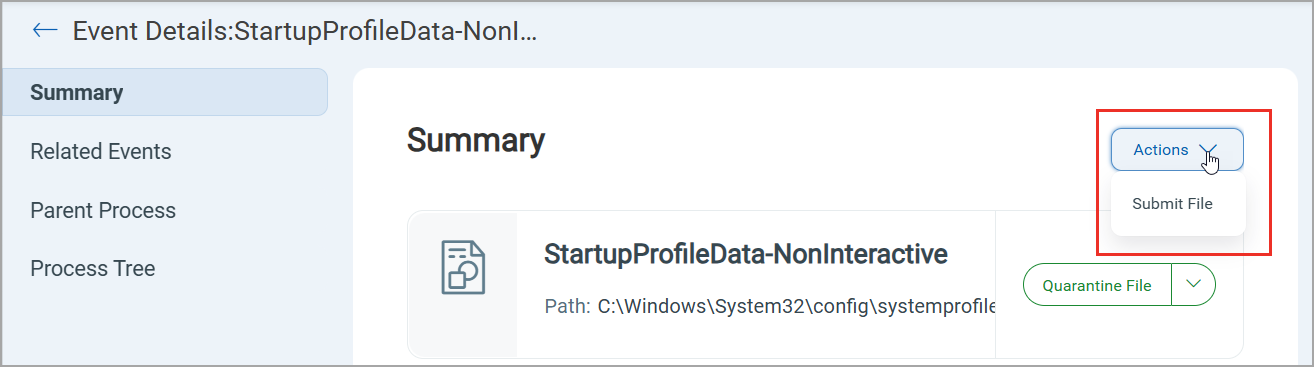
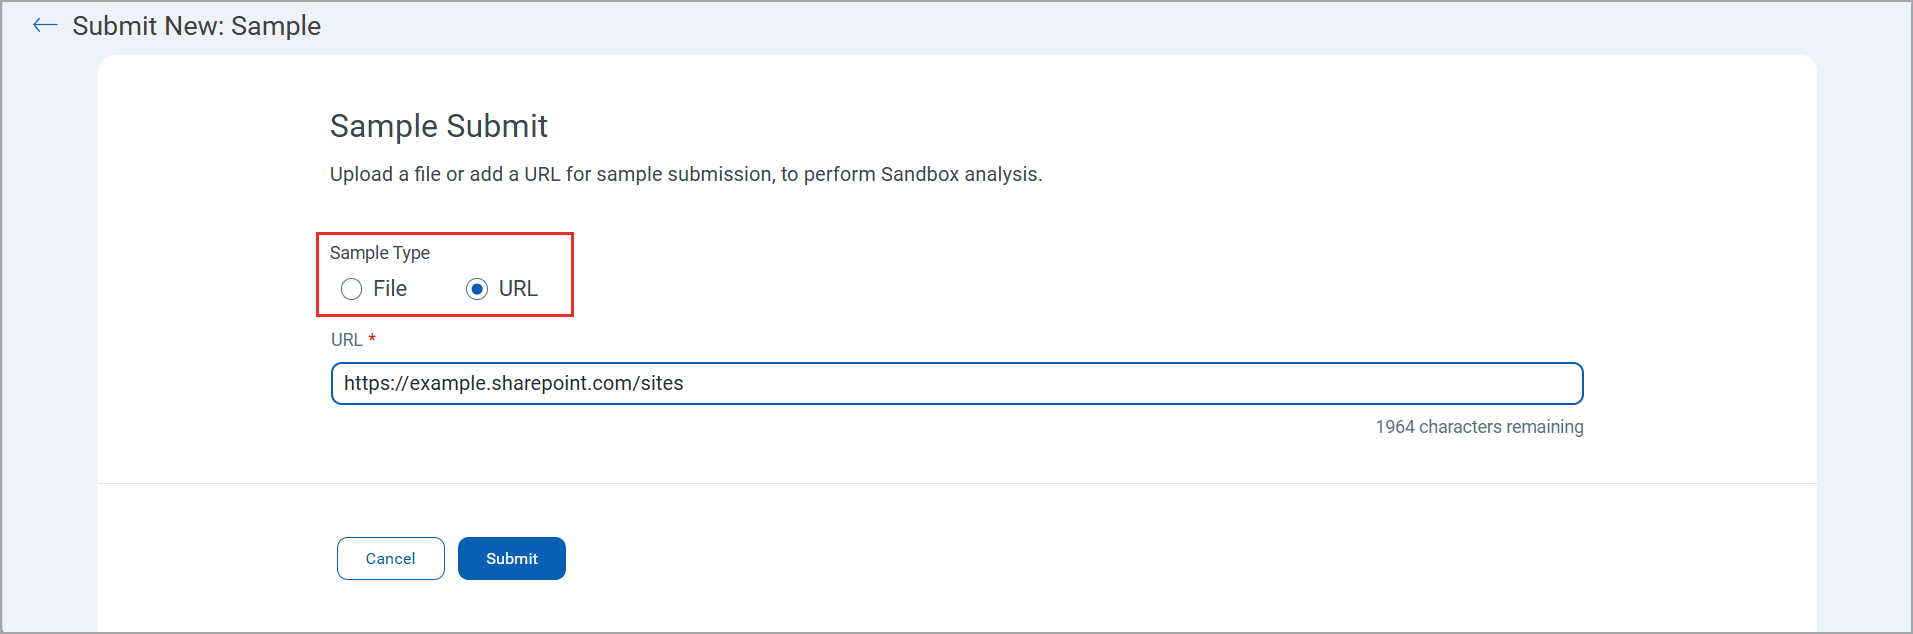
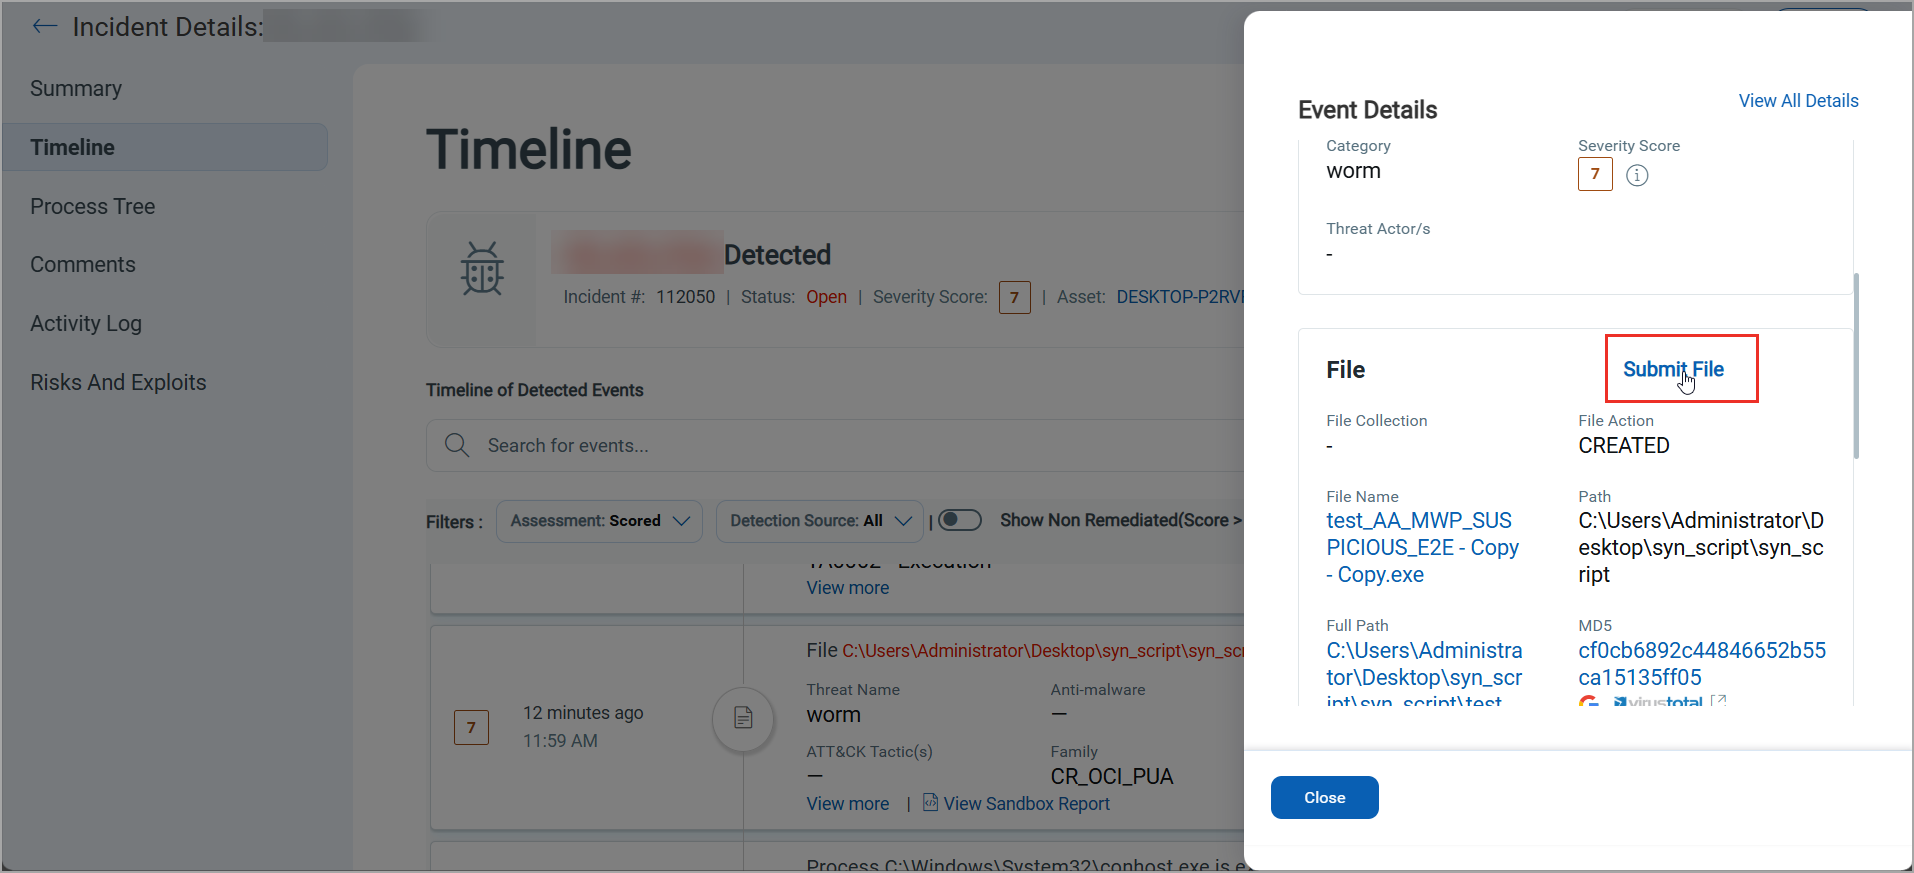
How do you Submit File for Sandbox Analysis?
You can submit a file for Sandbox Analysis or upload a zip file (up to 5 MB) from:
- the Event Details Summary page of the Hunting tab,
- or the Sandbox Analyzer page of the Forensics tab,
- or from the Timeline section of the Incident Details page.
Perform the following steps in the Hunting and Forensics tab to submit files for analysis:
| Location on the UI | Steps |
| Hunting |
|
| Forensics |
|
| Incident Details |
|
| View Analysis Report |
After you submit the sample, you can view the analysis report from the Sandbox Analyzer page under the Forensics tab.
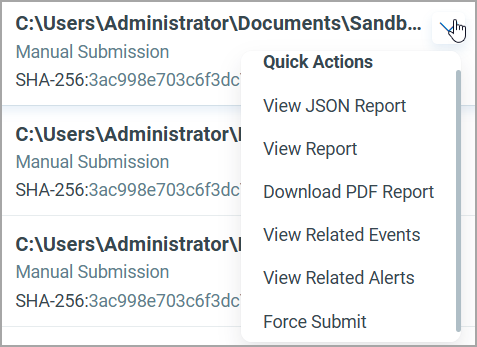
Click the tooltip next to Malicious results to view a message indicating that the report has been retrieved from the cache. This means the file or URL was previously analyzed, and its results are being reused instead of undergoing a fresh analysis.
Use the Force Submit option from the Quick Actions menu to view updated results. The Force Submit option ensures the file or URL is re-analyzed and the updated data is displayed.
|


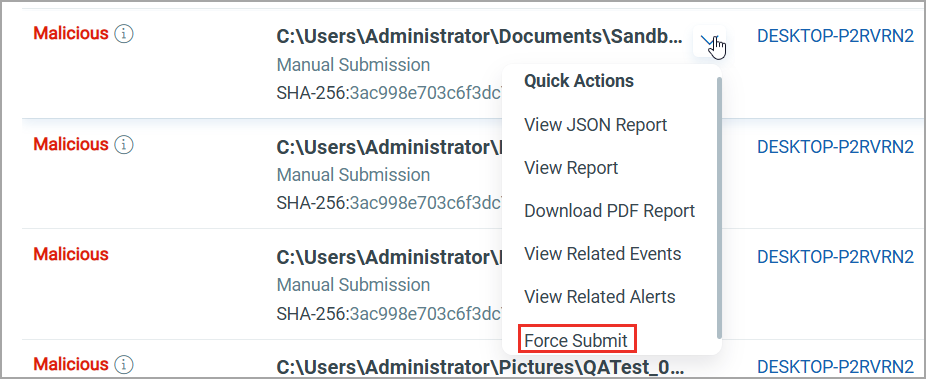
Quick Actions in Analysis Result
You can perform the following actions from the Quick Actions menu:
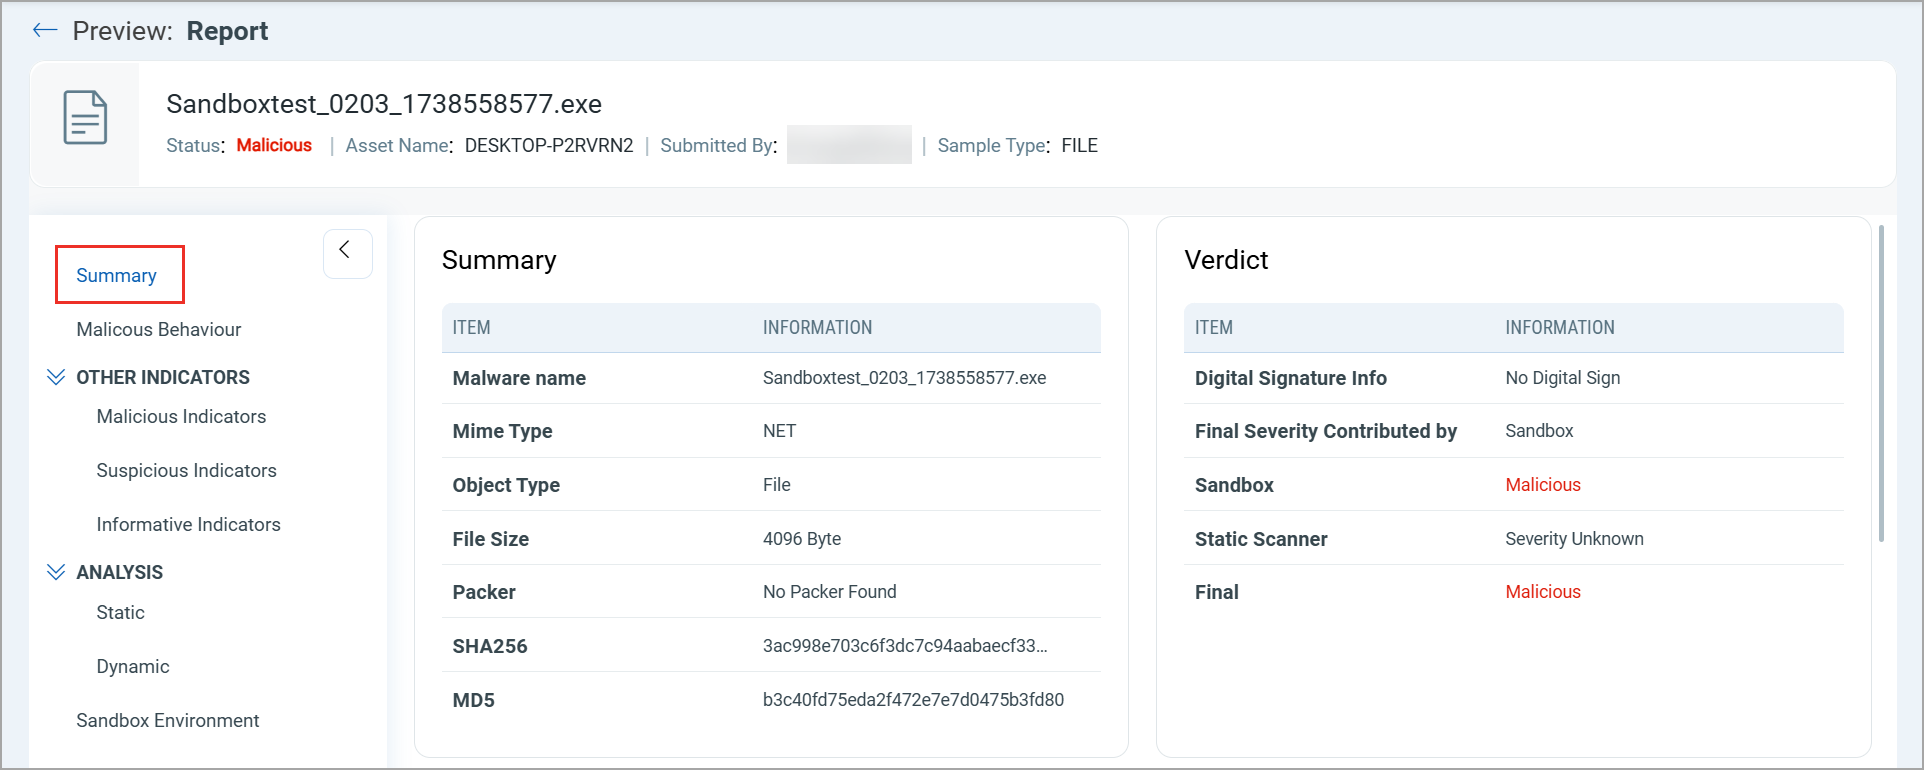
What is a Sandbox Report
A Sandbox Report is a detailed security analysis generated after executing a potentially malicious file or URL in an isolated environment (sandbox). This controlled setup allows security teams to observe the behavior of the sample without risking damage to real systems. Our Sandbox Reports are available in PDF format and an interactive UI, giving you more flexibility in analyzing security threats.
What is the Purpose of a Sandbox Report
Sandbox reports are used for:
- Malware Detection: Identifying viruses, ransomware, trojans, and other security threats.
- Threat Analysis: Analyzing file behavior, including system modifications and network activity.
- Incident Response: Investigating and addressing security breaches.
- Forensics: Collecting evidence on attack techniques and Indicators of Compromise (IoCs).
What Does a Sandbox Report Contain?
A sandbox report includes:
| Area | Description |
| Summary |
This section provides a high-level summary of the behavior observed during Sandbox Analysis.
|
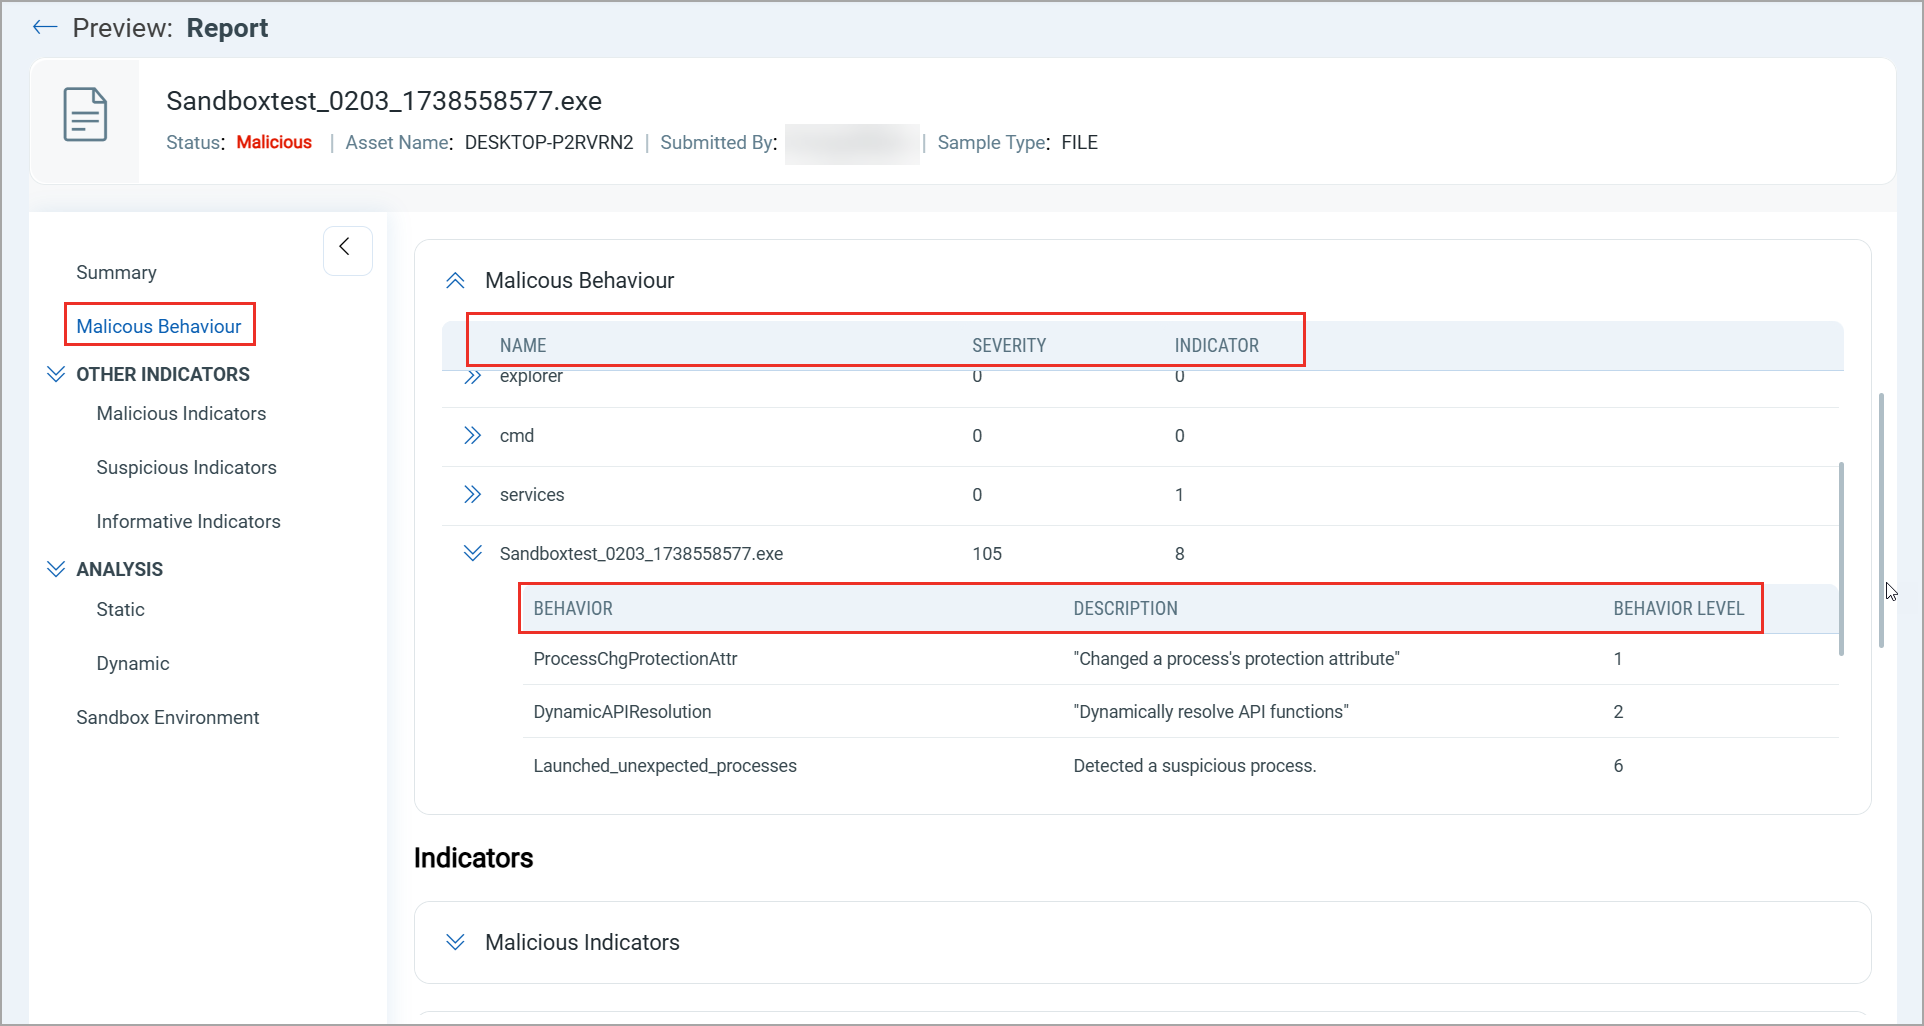
| Malicious Behavior |
This section provides structured threat insights:
Drill-Down Structure
Key Benefits of this Section
|
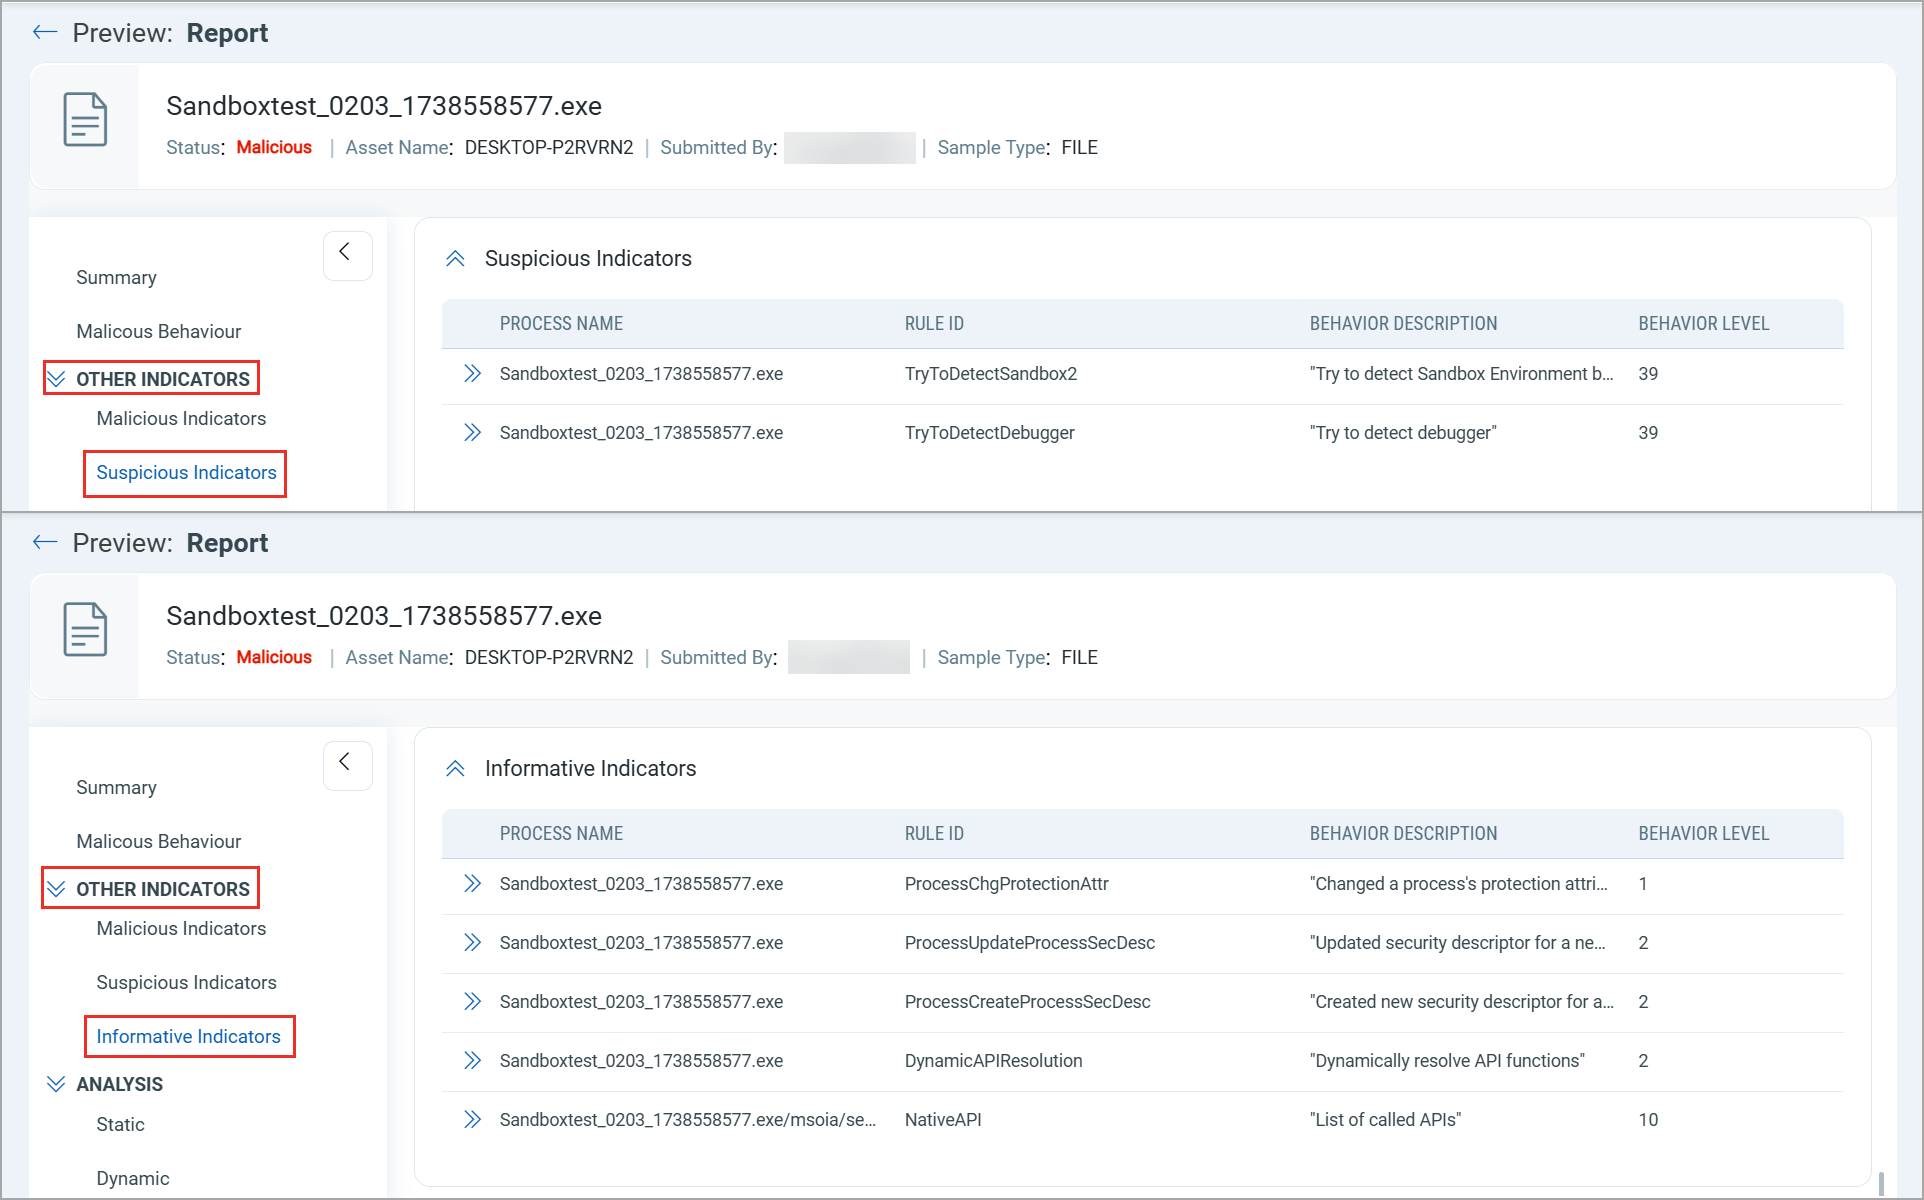
| Other Indicators |
This section breaks down the specific indicators that contributed to the report’s verdict.
|
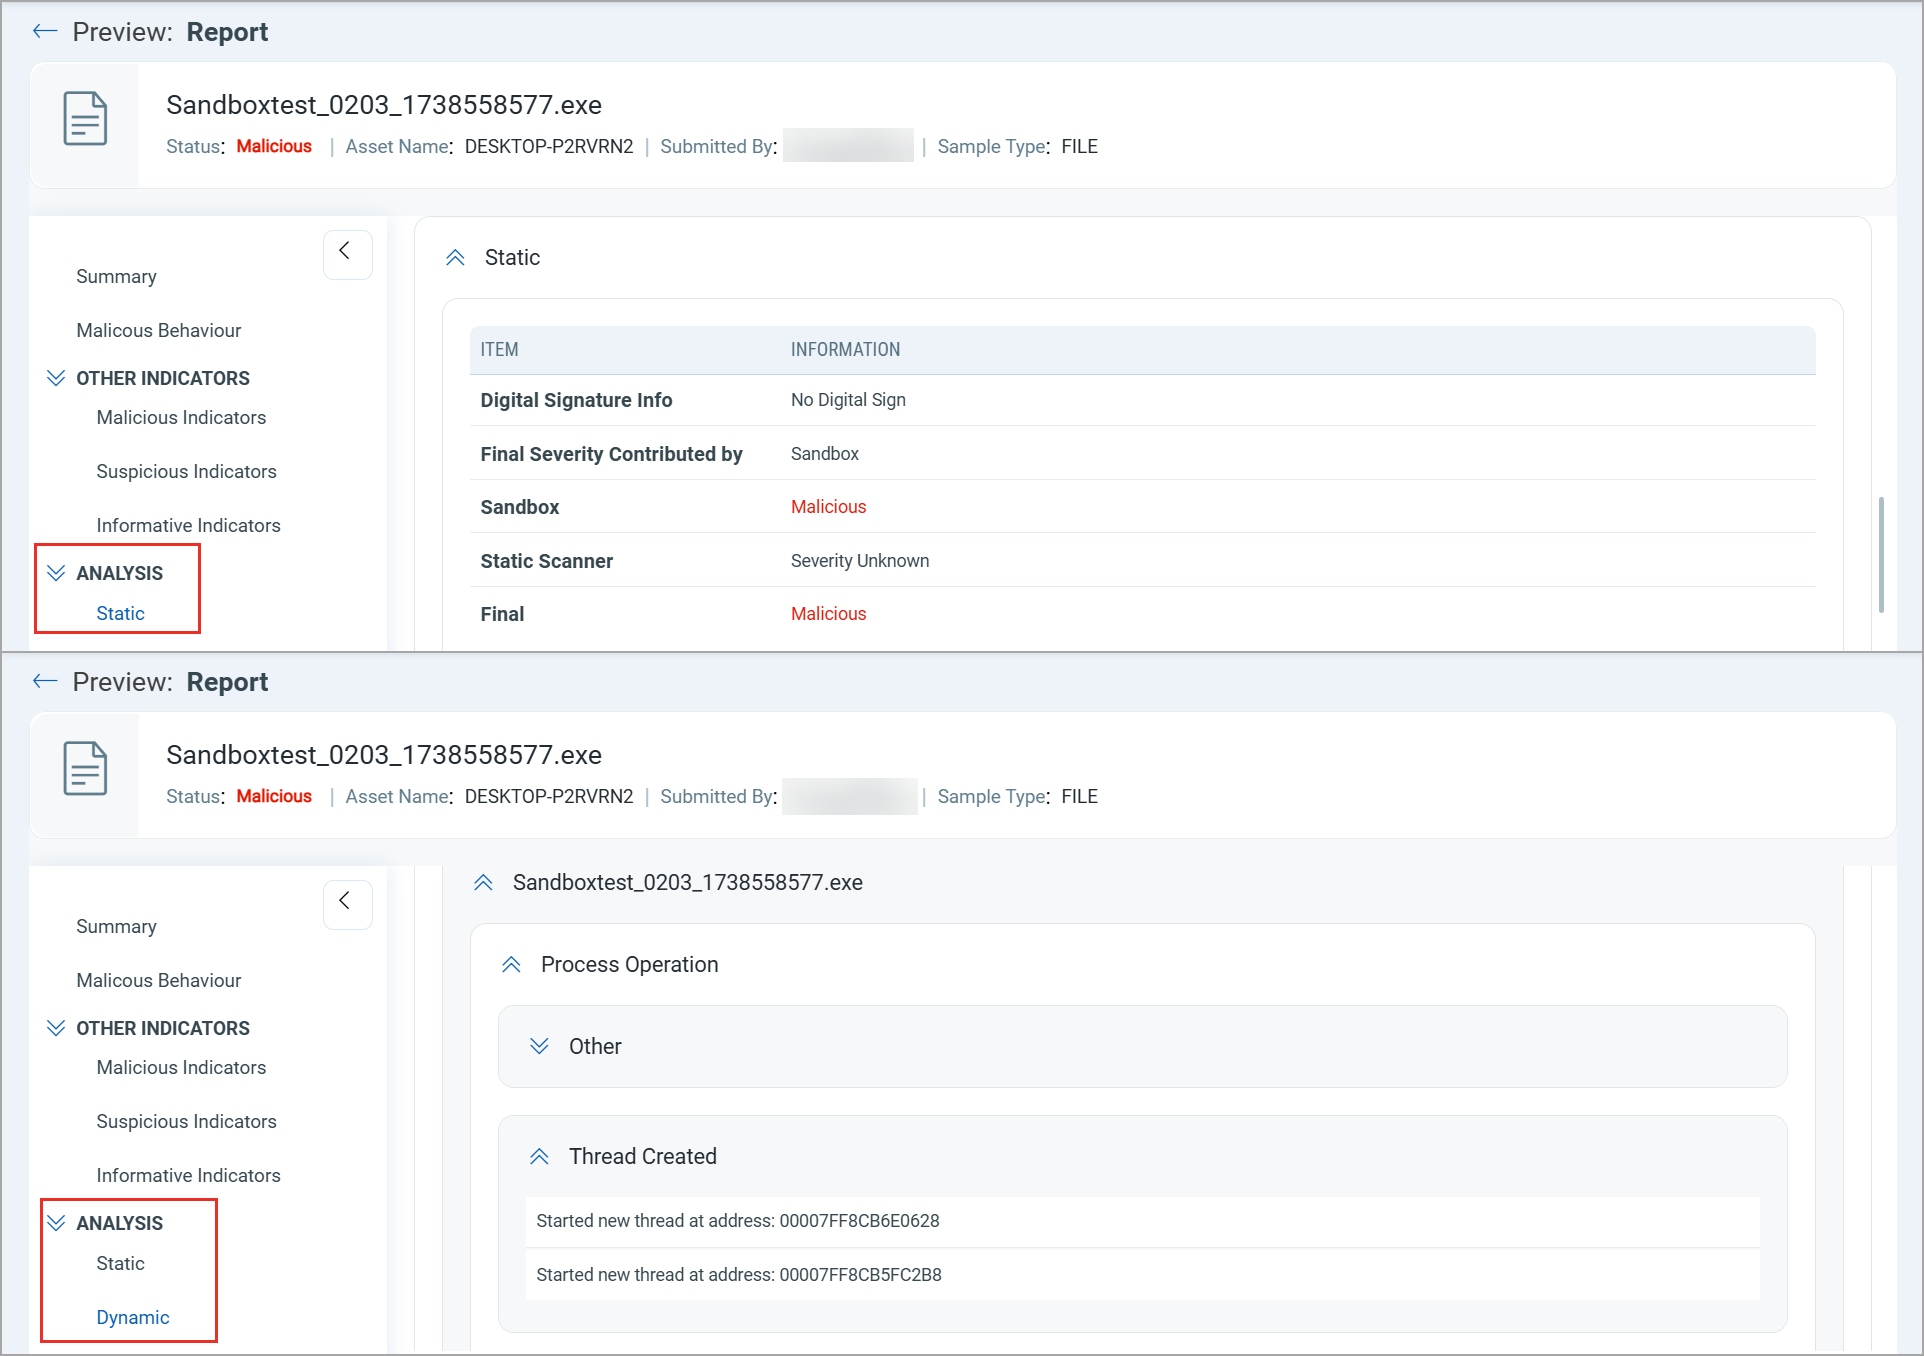
| Analysis |
This section covers the different methods used to evaluate the sample.
|
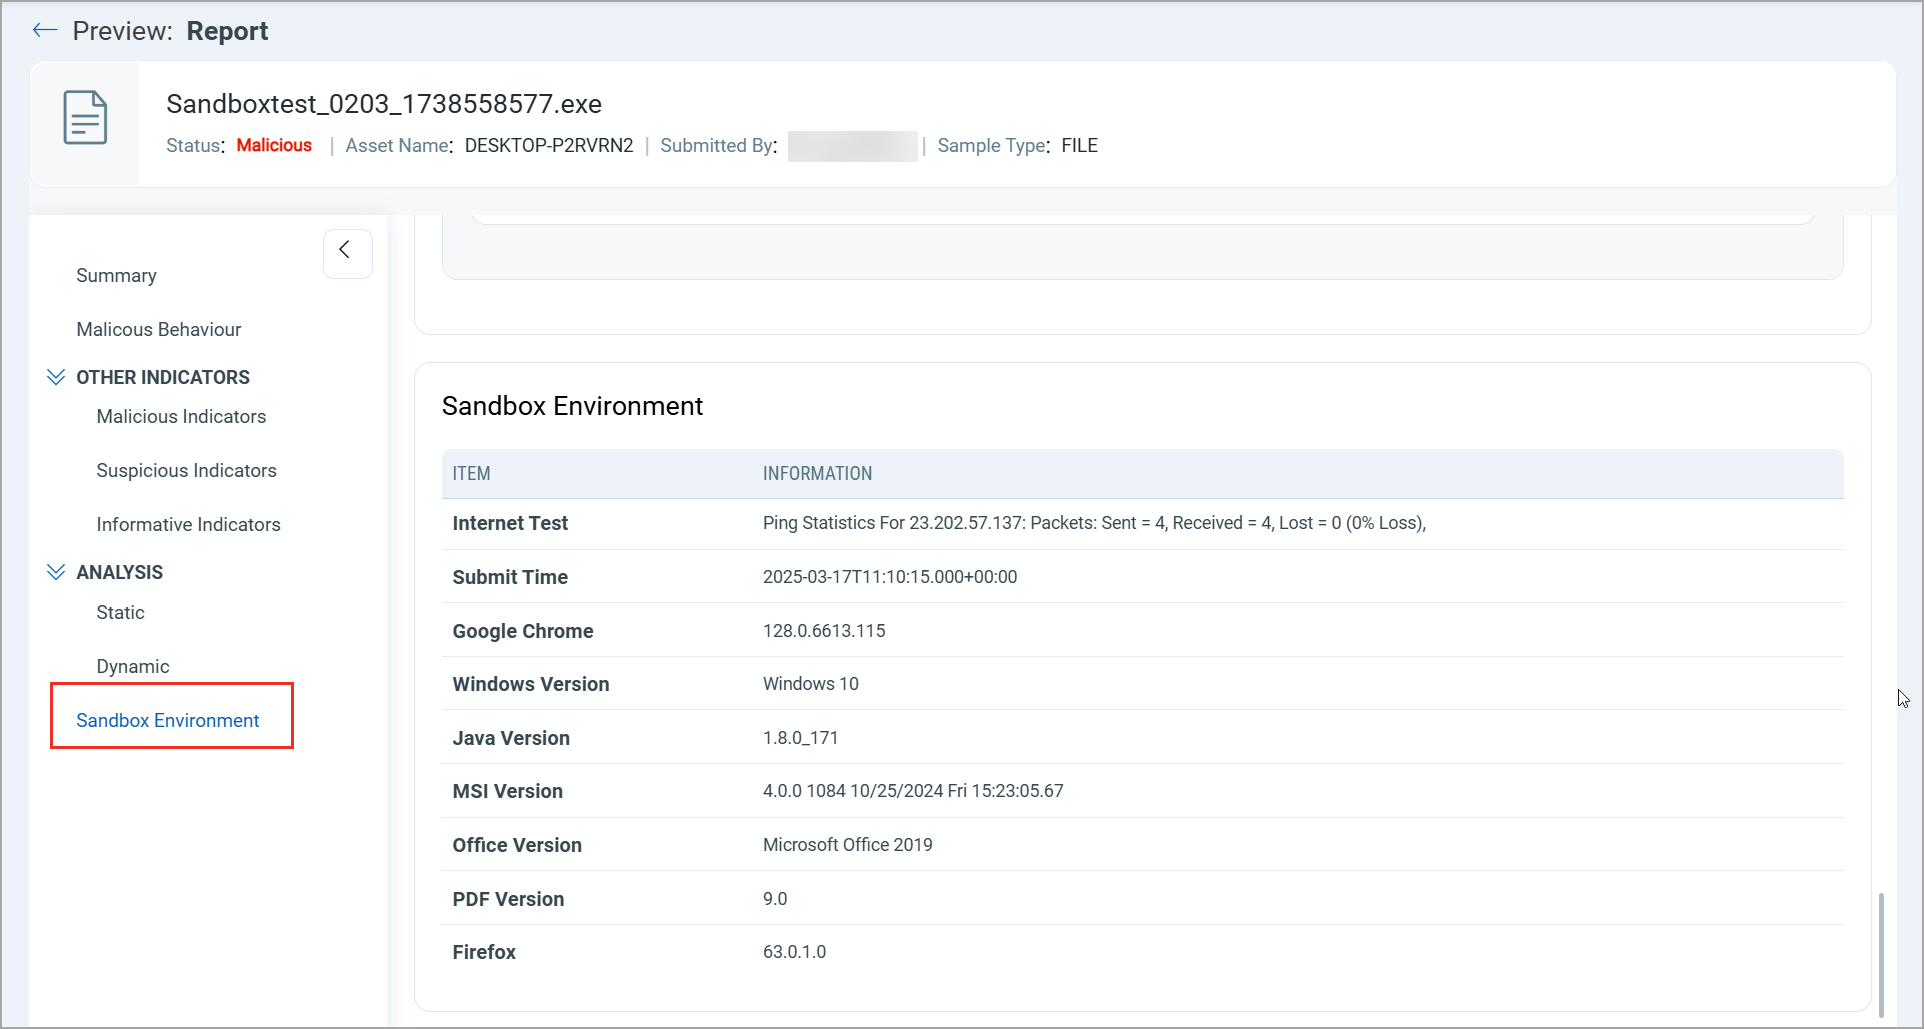
| Sandbox Environment |
This section provides information about the test setup for executing and analyzing the file. These details help security analysts in understanding the conditions under which the analysis was conducted, ensuring accurate interpretation of the results. Why this Information Matters
|
What Search Tokens are Supported
You can use the following search tokens in the Sandbox Analyzer tab:
| Token | Description |
| sandbox.analysis.result |
Use this token to retrieve the result of a Sandbox Analysis. Choose from: Analysing, Clean, Error_Processing_File, In Queue, In Progress, Malicious, Queued, Submitted_to_Sandbox Examples To see the Sandbox Analysis result in analysis, see the following example: |
| sandbox.assetname |
Use this token to identify the asset being analyzed in the sandbox environment. The asset could be a file, application, or other item under investigation. Example |
| sandbox.user |
Use this token to identify the user linked to the Sandbox Analysis. It helps track who initiated the analysis, owns the asset, or monitors operations, ensuring accountability and simplifying reporting in multi-user environments. Example |
| sandbox.analysis.remarks |
Use this token to capture remarks or additional details about the Sandbox Analysis. It provides insights not covered in the primary result, including special conditions, limitations, or analyst observations. Example |
| sandbox.filepath.sample |
Use this token to identify the sample file path for Sandbox Analysis, ensuring accurate tracking and association with the results. Example |
| sandbox.url.sample |
Use this token to specify the sample's URL (file, web page, or resource) being analyzed in the sandbox. It helps track the sample's location, ensuring accurate association with the analysis results. Example |
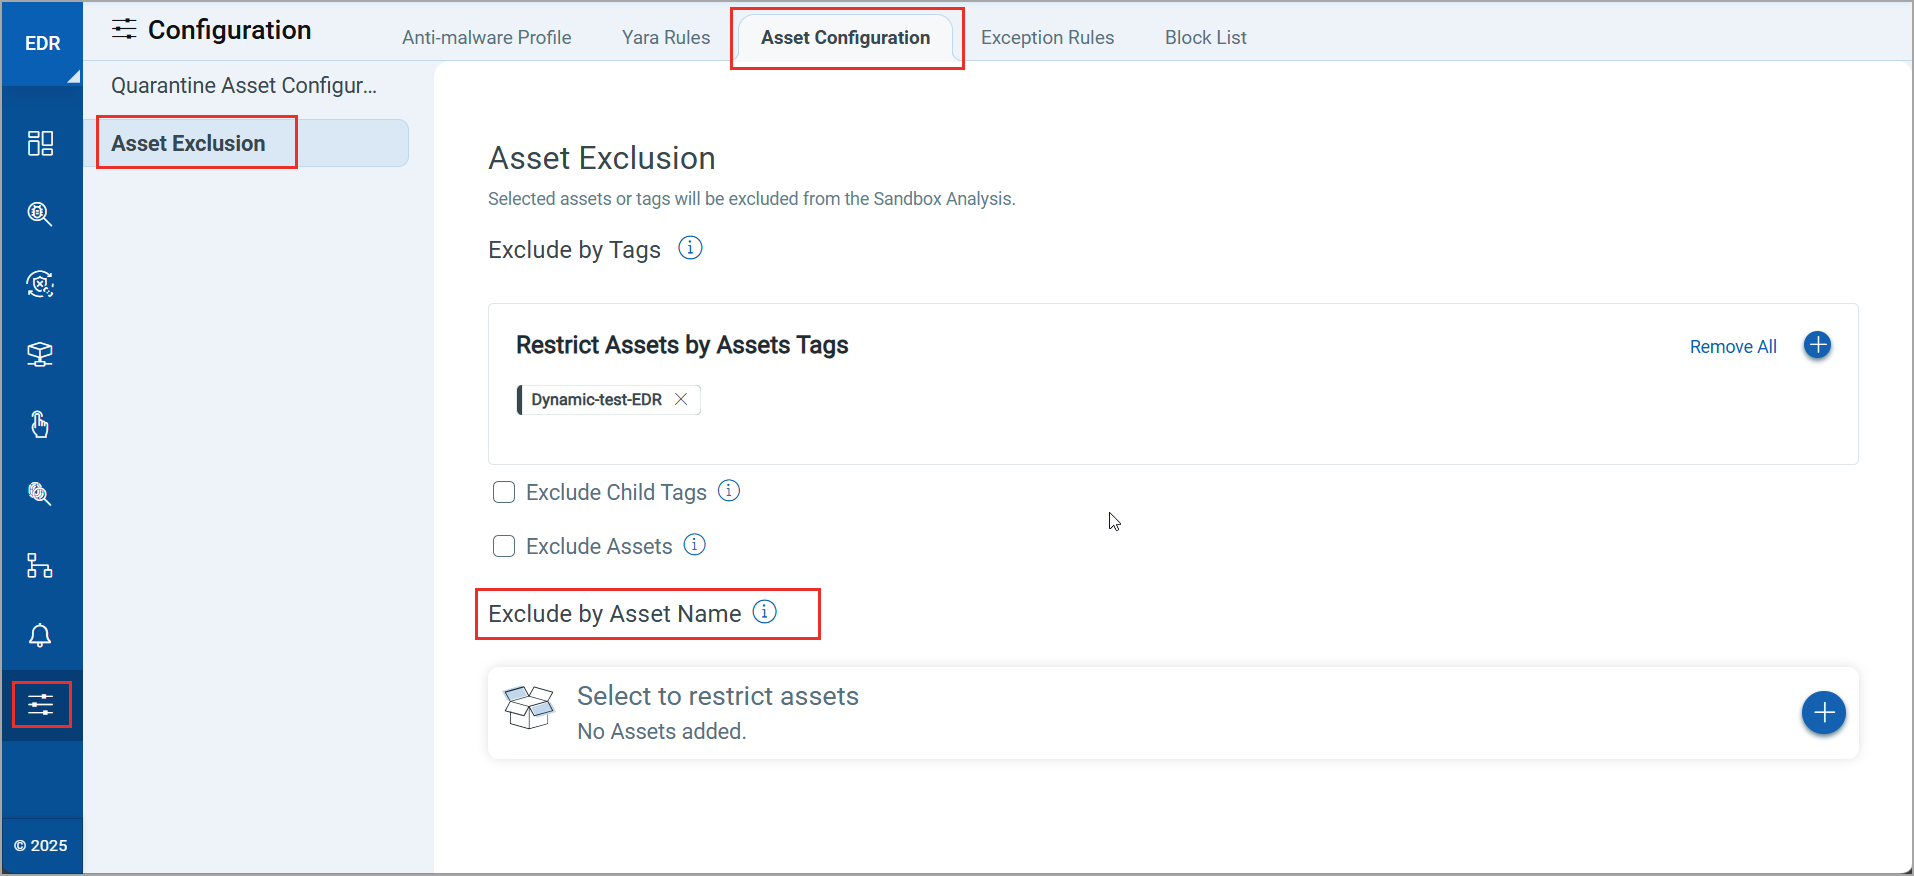
How do you Exclude Assets or Tags from Sandbox Analysis?
The Asset Exclusion option allows you to exclude assets or tags from Sandbox Analysis.
Restrict Assets Using Asset Tags
Perform the following steps from the Asset Configuration tab under the Configuration to restrict assets using the asset tags or the child tags:
- Go to Asset Exclusion and click the add icon
 to add asset tags.
The following screenshot is an example that highlights the Asset Exclusion and the Add icon:

- In the Select Tags window, select the tags and click Save.
The asset tags, which will restrict the assets from Sandbox Analysis are added. - (Optional) Click any of the options—Exclude Child Tags or Exclude Assets. These options will exclude the asset belonging to the child tags for sandbox submission.
The following screenshot is an example of the asset tags selected to restrict assets:

Exclude by Asset Name
Perform the following steps from the Asset Configuration tab under the Configuration to restrict assets by assets:
- Go to Asset Exclusion and click the add icon to add asset tags.
The following screenshot is an example that highlights the Asset Exclusion and the Add icon:
- In the Select Assets window, select the assets and click Save. The assets, which will restrict the assets from Sandbox Analysis are added.
The following screenshot is an example of the assets selected to restrict assets:
