EDR Release 3.2
April 05, 2024
What's New?
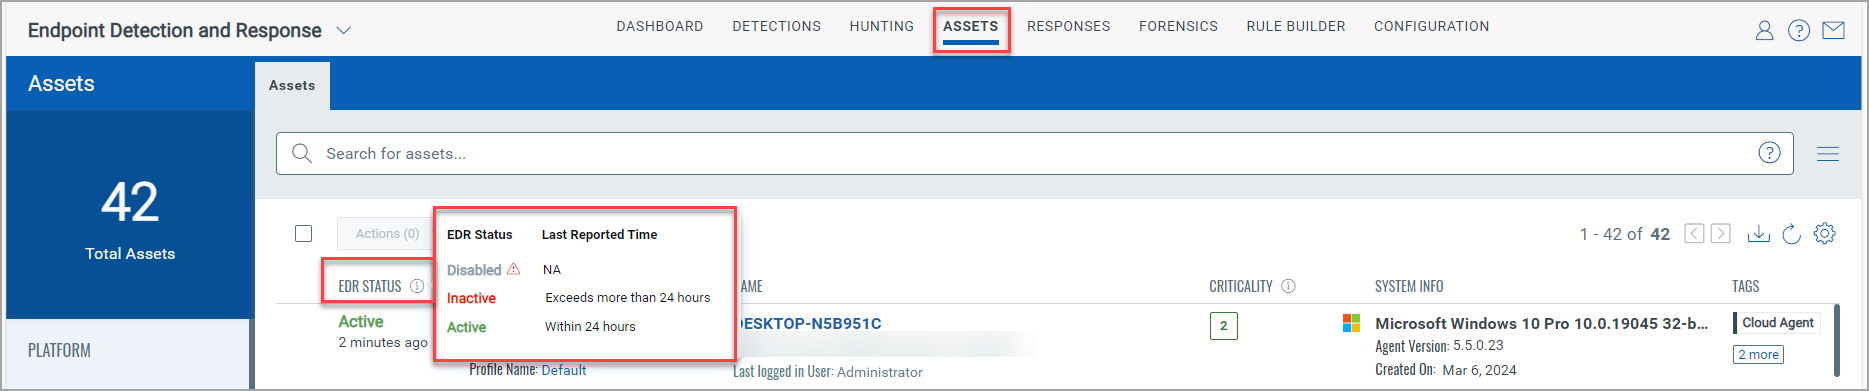
Added EDR Status in the Assets tab
New EDR Statuses Active, Inactive, and Disabled have been introduced that provides the enablement of the EDR status of each asset. Each status is represented with the Last Reported Time on the asset. If EDR is not enabled for an asset, it can be done from the Qualys Cloud Agent application.
For more information about the EDR status column or the assets page, refer to the EDR Online Help.
The following screenshot is an example of the Assets tab with the newly added EDR Status column:
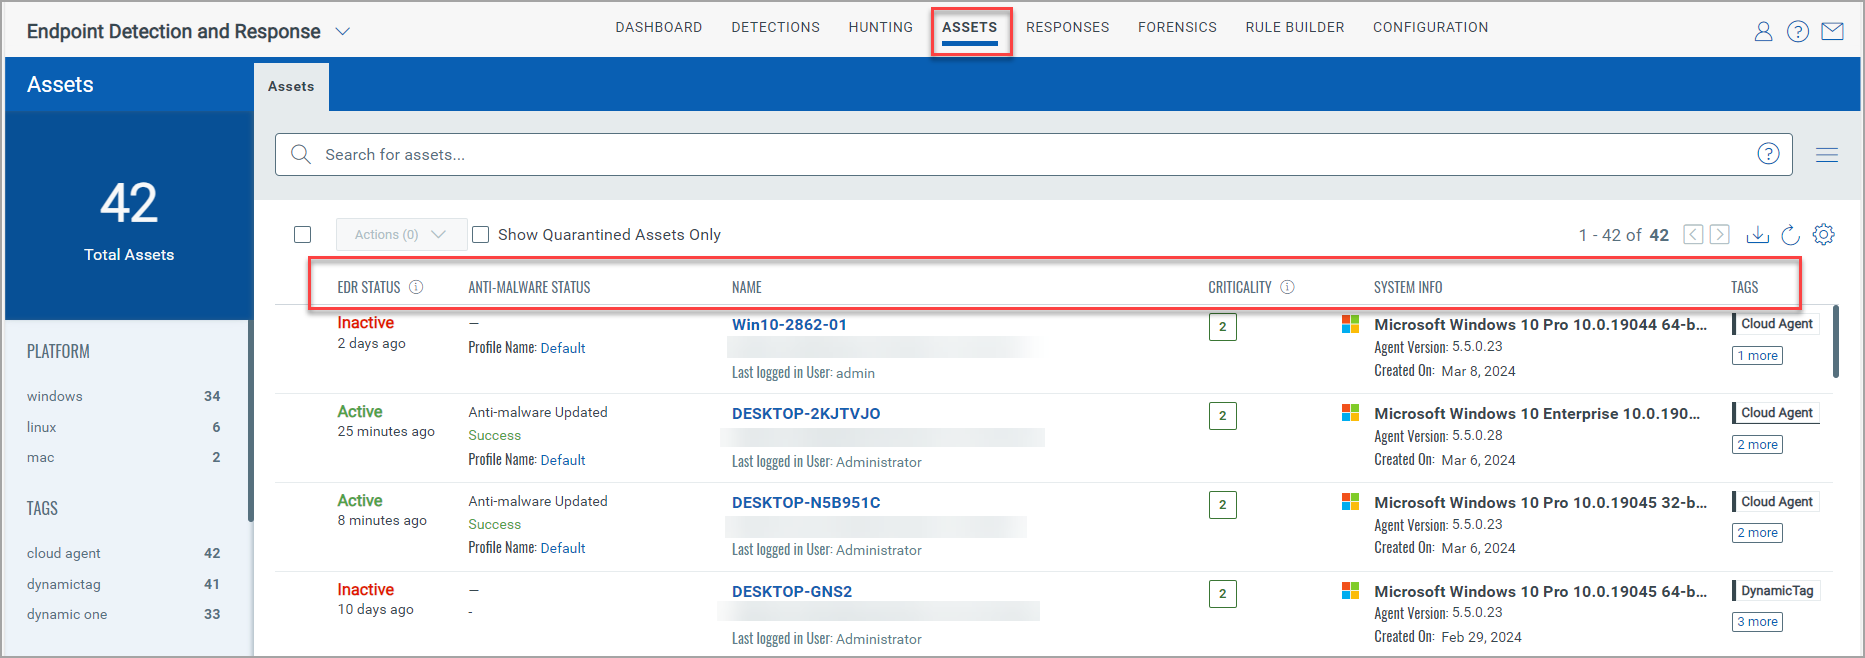
Columns Updated in the Assets tab
The columns in the Assets tab are updated. The following table lists the column names and the description of each column:
| Column Name | Description |
| EDR Status | Displays if EDR is enabled or not for the Asset. The EDR statuses are Active Inactive, and Disabled. |
| Anti-Malware Status | Displays the anti-malware status for each asset. If the anti-malware status is disabled, you can enable it from the Qualys Cloud Agent application. |
| Name | Displays the asset name, last logged-in user, and the asset hardware information. |
| Criticality | Lists the Criticality value of an asset. |
| System Info | Displays the agent information, including the agent OS, version, and the created date. |
| Tags | Lists the tags assigned to assets. |
The following screenshot displays the new Assets page and its columns:
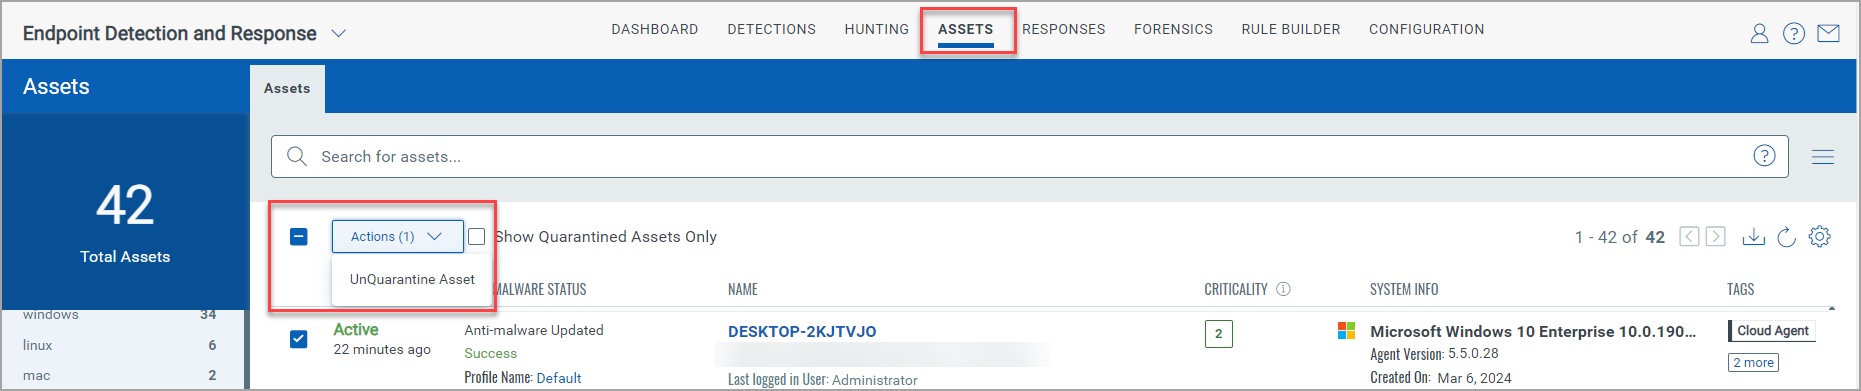
You can now Unquarantine an asset from the Actions menu of the Assets page. Refer to the following screenshot of the Unquarantine asset:
For more information about the Assets page or the Quick Actions that can be performed on this page, refer to the EDR Online Help.
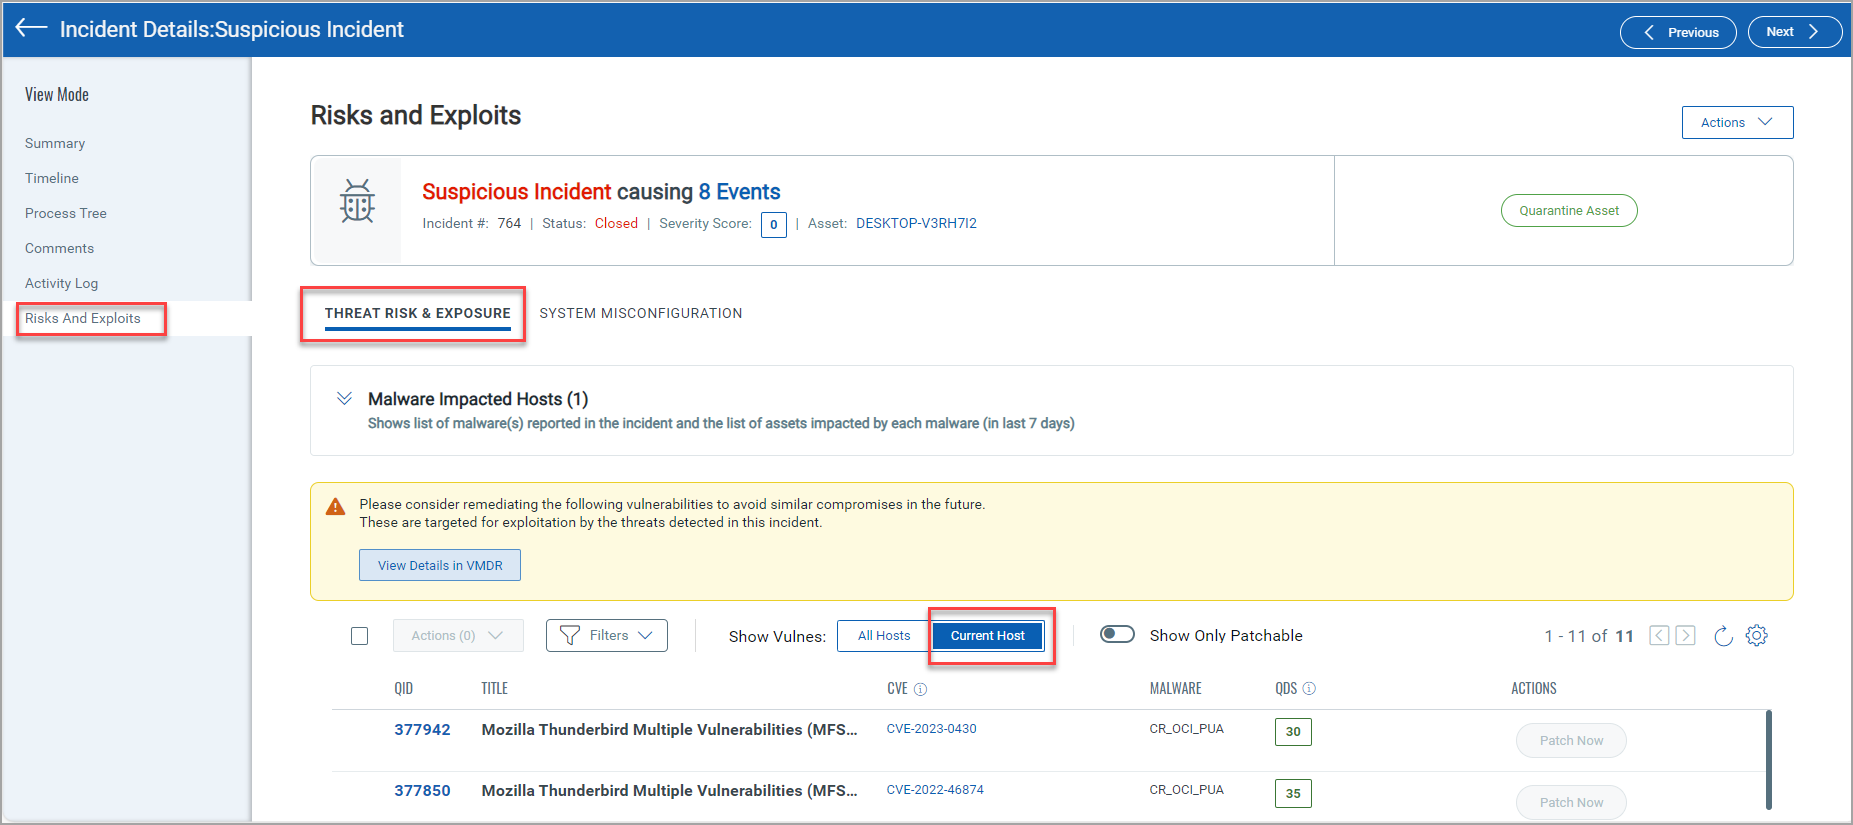
EDR-VMDR Integration: Added New Fields in Threat Risk & Exposure
To simplify the vulnerabilities findings amongst the hosts, we have added the option All Hosts and Current Host in the Threat Risk & Exposure page. The All Hosts option lists all the hosts that are impacted by vulnerabilities. The Total Host column in this option gives the number of hosts that are mapped to the QID. The following screenshot is an example if the All Hosts option is selected:

The Current Host option lists all the vulnerabilities that are impacted by the asset for which you are viewing its Incident Details. The following screenshot displays the columns if the Current Host is selected:
For more information about the EDR-VMDR Integration, refer to the EDR Online Help.
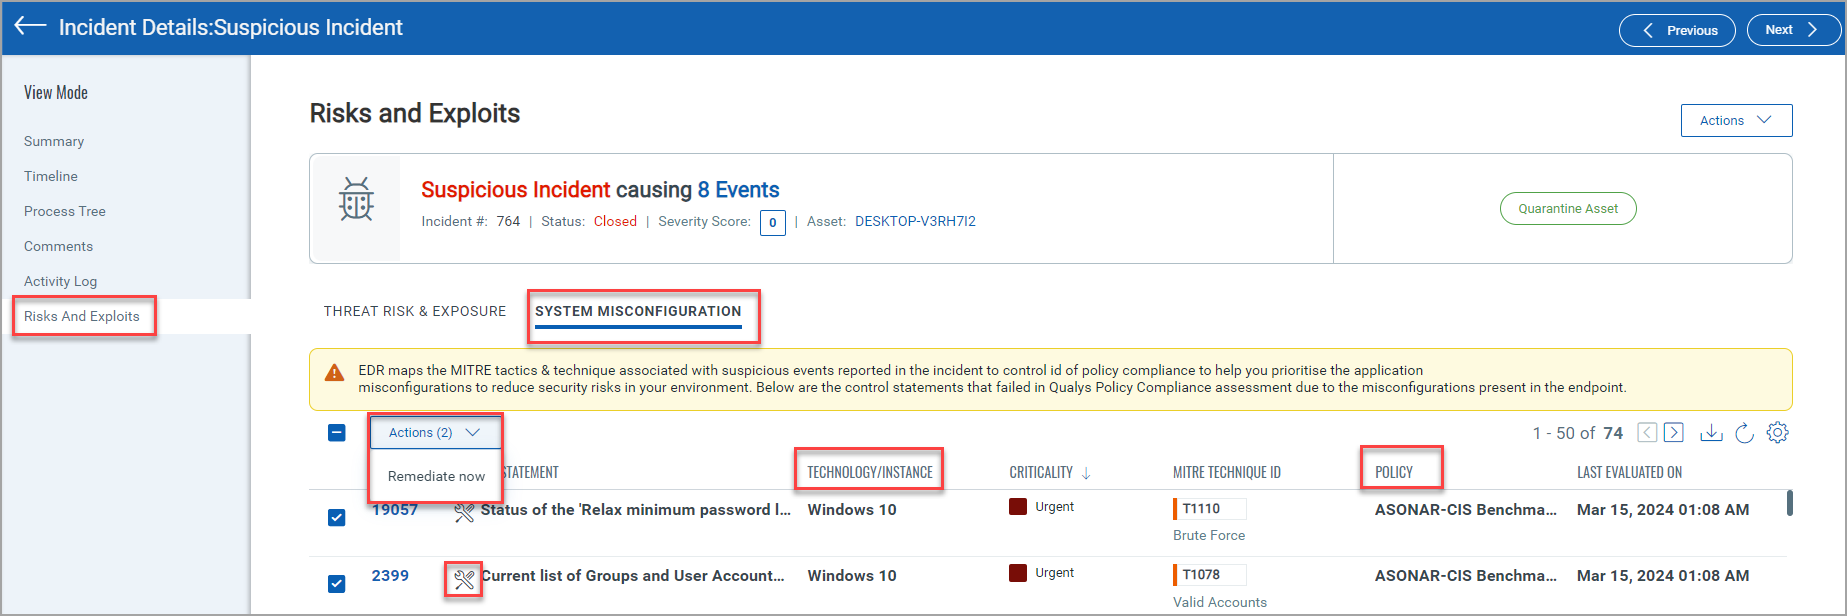
EDR-PC Integration: Added New Fields in System Misconfiguration
You can now remediate the CIDs listed in the System Misconfiguration page using the Remediate now button. The ![]() icon if prefix with the Control Statement represents that the CID can be remediated. The System Misconfiguraton page is also updated with new columns- Technology/Instance and Policy. With all the policy information at one place we have simplified the remediation process for you. You can remediate the CID one at a time or can perform bulk remediation. The following screenshot highlights the new additions in the System Miconfiguration page:
icon if prefix with the Control Statement represents that the CID can be remediated. The System Misconfiguraton page is also updated with new columns- Technology/Instance and Policy. With all the policy information at one place we have simplified the remediation process for you. You can remediate the CID one at a time or can perform bulk remediation. The following screenshot highlights the new additions in the System Miconfiguration page:
For more information about the EDR-PC Integration, refer to the EDR Online Help.
Support for Network Attack Defense
You can now implement Network Attack Defense (NAD) to your Linux operating system. NAD protects your Linux systems from attack types such as brute force, network exploits, password stealers, drive-by-download infection vectors, bots, and Trojans.
Before you implement NAD on your Linux systems consider the following points:
- Qualys EPP should be enabled
- Linux Agent 6.1.0 and above is required
- 64-bit Linux machines that use systemctl to manage services
- iptables package is installed
- Linux Versions not supported: CentOS Linux 6 and 9, Oracle Enterprise Linux (OEL) 6, and Red Hat Enterprise Linux (RHEL) 6 and 9
For more information about NAD workflow, refer to EDR Online Help.
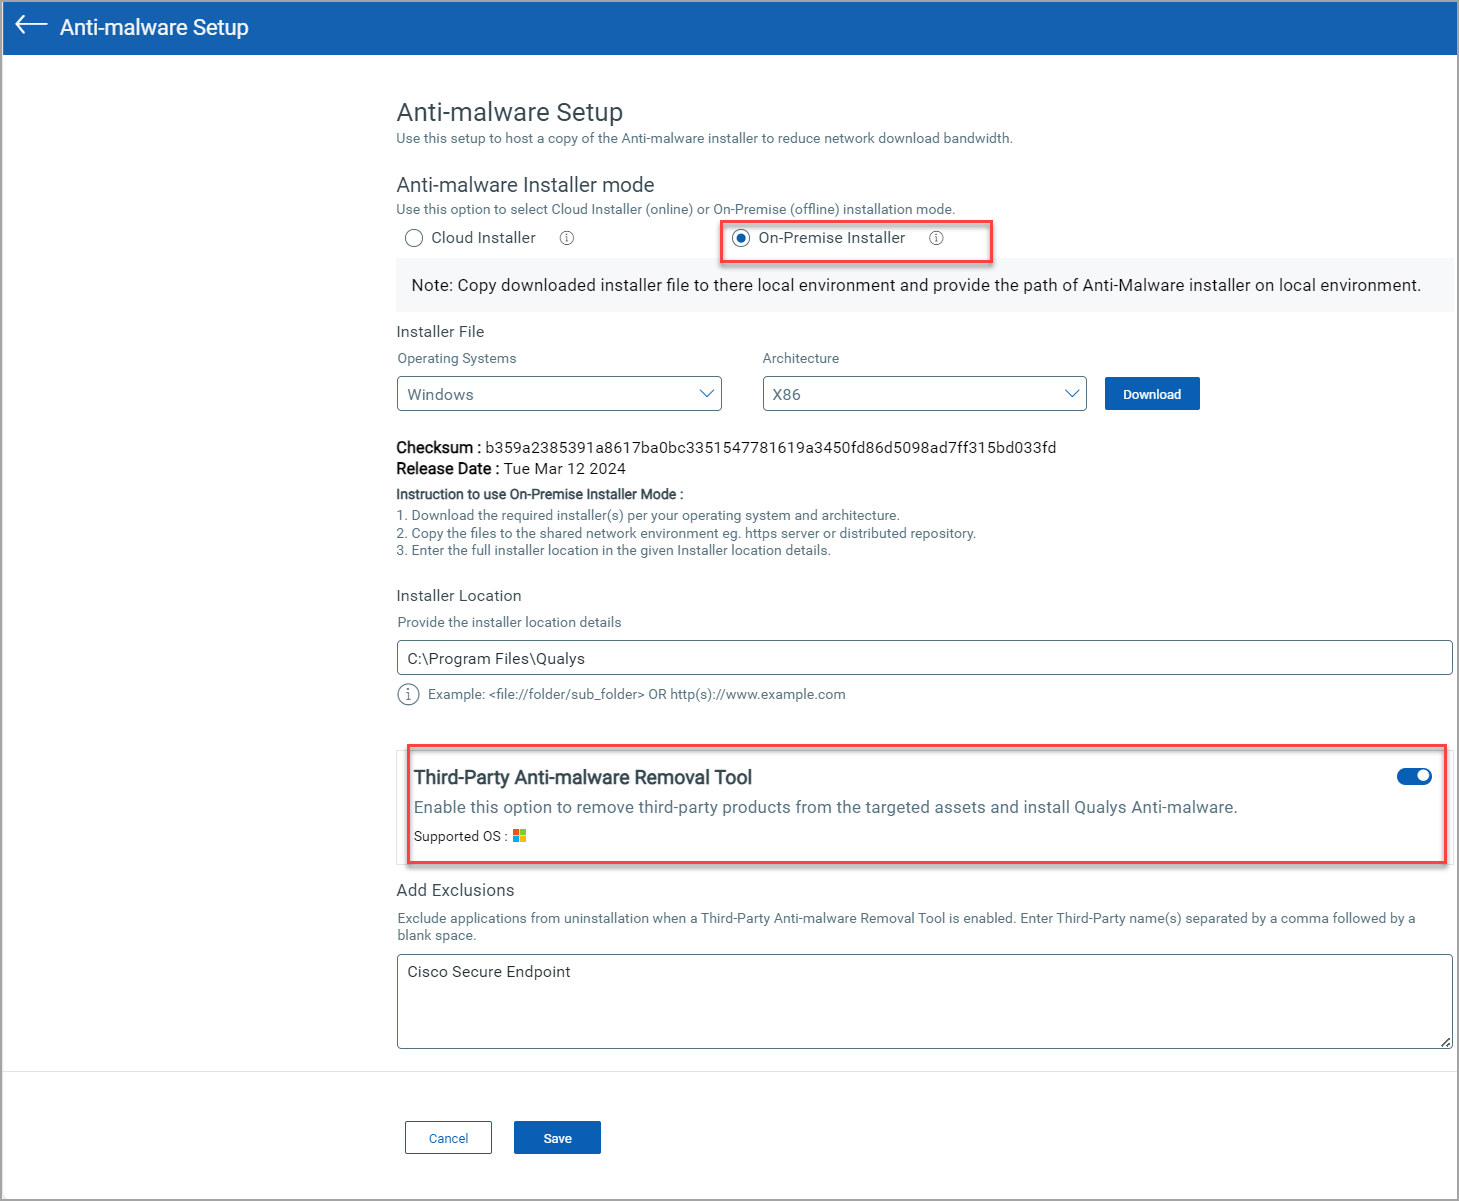
Introduced Anti-malware Setup in the Configuration tab
The Anti-malware Setup button under the Configuration tab helps to reduce the network bandwidth. The setup allows you to select an installer mode to host a copy of the Anti-malware installer. The type of modes are- Cloud Installer and On-Premise. The setup page also provides the option to enable the Third-Party Anti-malware removal tool toggle to remove any third-party products and install Quays Anti-malware.
The following screenshot is an example of the On-Premise Installer mode with Third-Party Anti-malware removal tool enabled:
For more information to configure Anti-malware Setup, refer to EDR Online Help.
Introduced Content Control in Configuring Anti-malware Profile
Content Control is the newly added step when you configure Anti-malware profile. In this step, you can block the websites and applications. Aggressive, Permissive, Normal, and Custom are the categories that can be opted to block the web sites.
The following Cloud Agent versions are compatible with Content Control:
- Windows 5.5.0 or above (with and without Proxy)
- Mac 1.0.2 or above (without Proxy)
The following screenshot is an example of the Content Control step that has Aggressive type of content control and `firefox.exe` application blocked:

For more information about Configuring Anti-malware, refer to EDR Online Help.
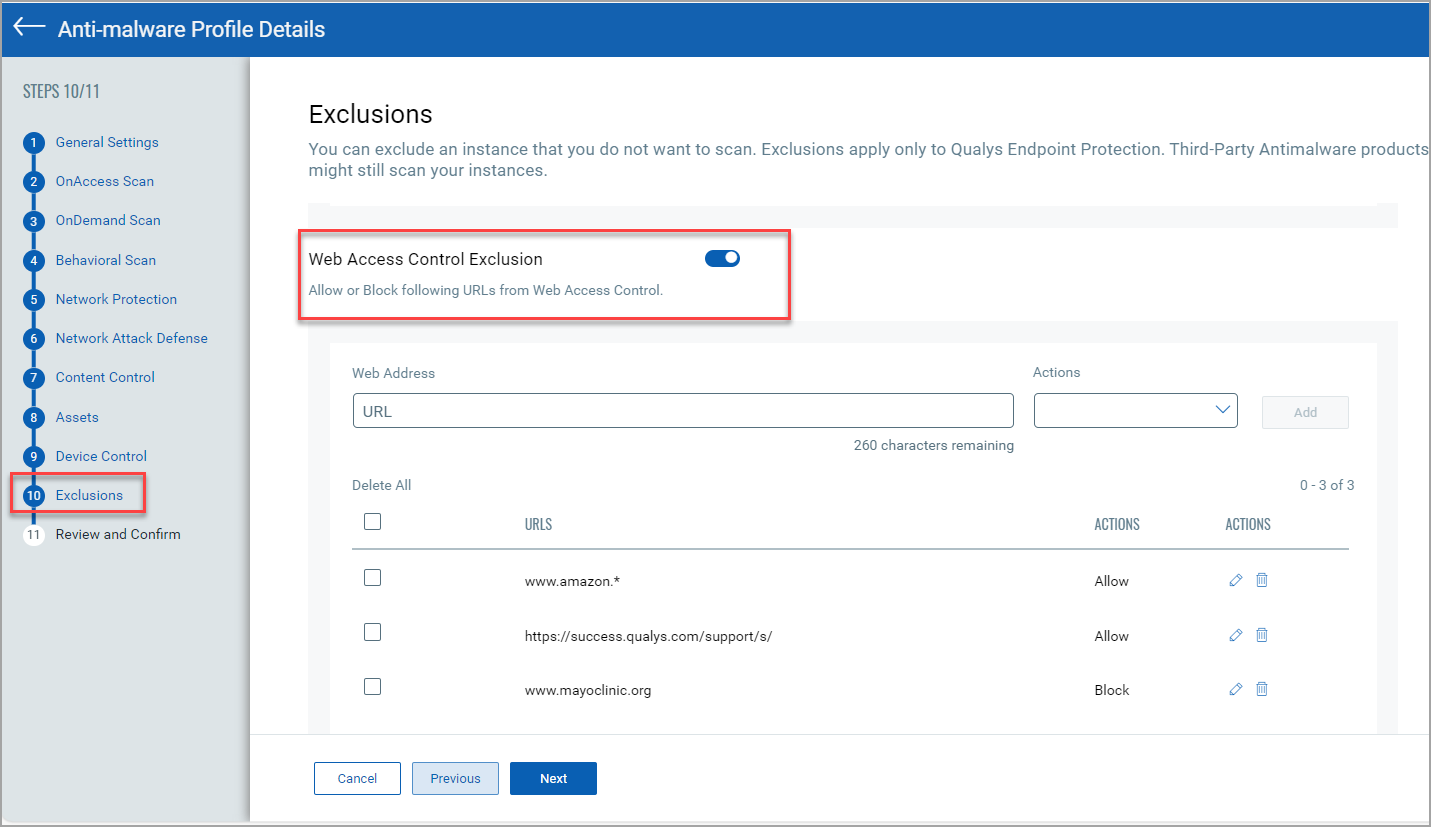
Web Access Control Exclusion in Configuring Anti-malware Profile
The Web Access Control Exclusion in the Exclusions step of the Configuring Anti-malware Profile helps you to allow or block websites. If you have blocked all the shopping websites from the Content Control option, but you want the users to access only Amazon website, you can use the Web Access Control Exclusion. Enable the Web Access Control Exclusion and type the URL www.amazon.*
The following screenshot is an example of the Web Access Control Exclusion that blocks a specific medical website and allows some websites:
Updated Event Details for Process and File Type
The Summary page for the Process type now provides information about the User Session. The User Session includes the following:
- Session Username:- Displays the name of the user or the server that is connected to the session.
- Session Name:- Displays the name assigned to the session.
- Session ID:- Displays the ID of the session.
To generate a list of events using Qualys Query Language (QQL) that have Session Username, Session Name, or Session Userid refer Events Search Token in EDR Online Help.
To view the User Session of the Process type, hover the mouse on a Process and select Event Details. The following screenshot is an example of the Summary page displaying User Session and its fields for Process type:

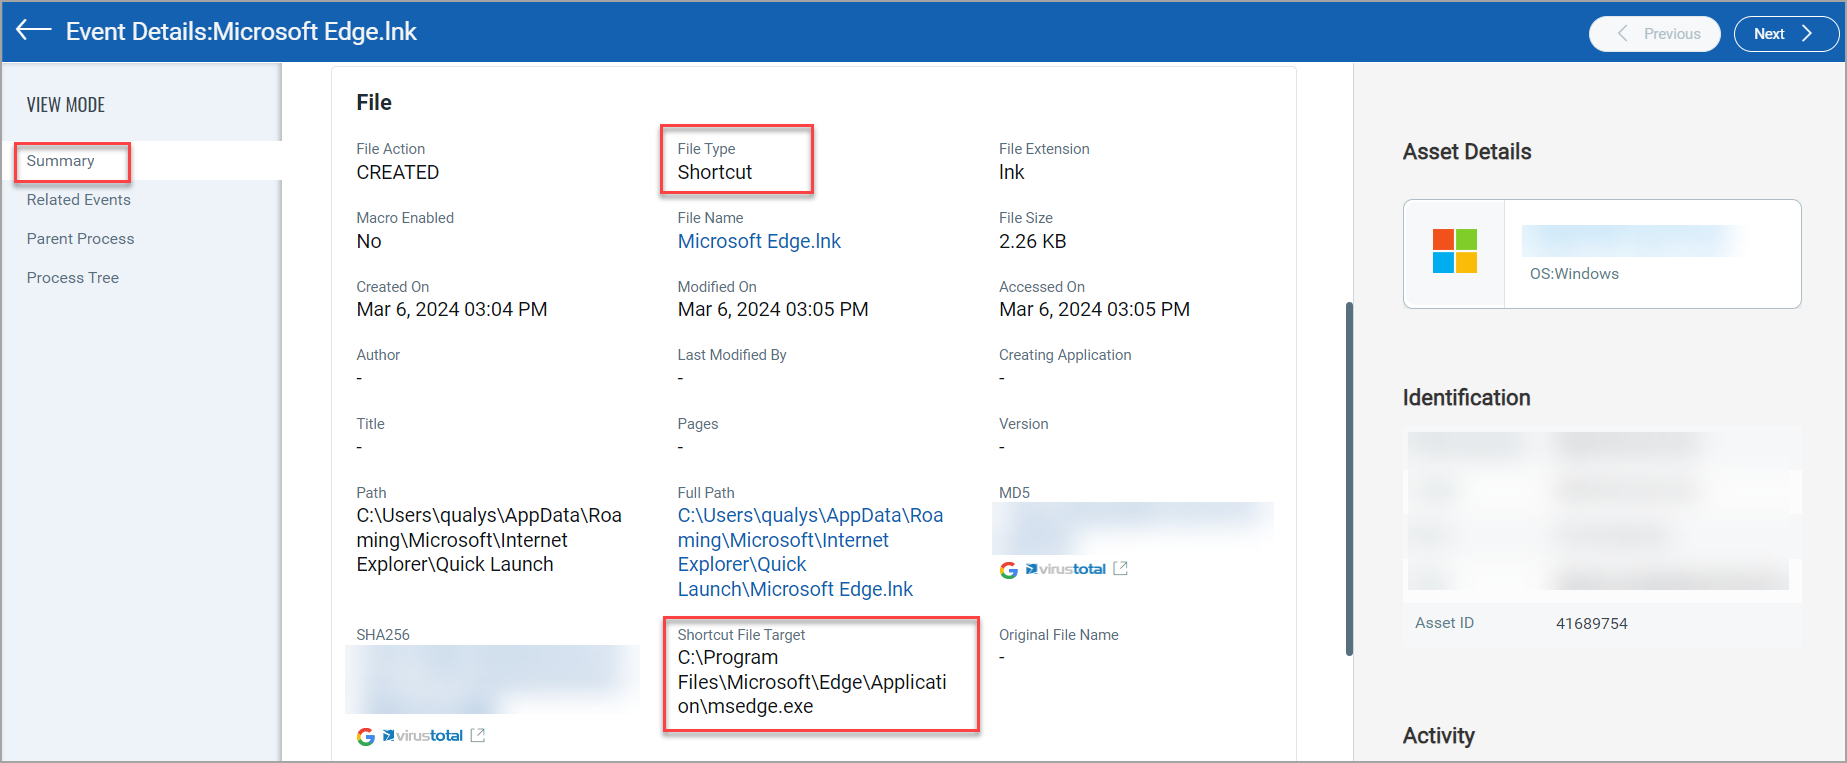
The Summary page for the File type provides information about Shortcut File Target. The Shortcut File Target is a reference file that contains information of the target application. The following screenshot is an example of the Summary page displaying Shortcut File Target for File type:
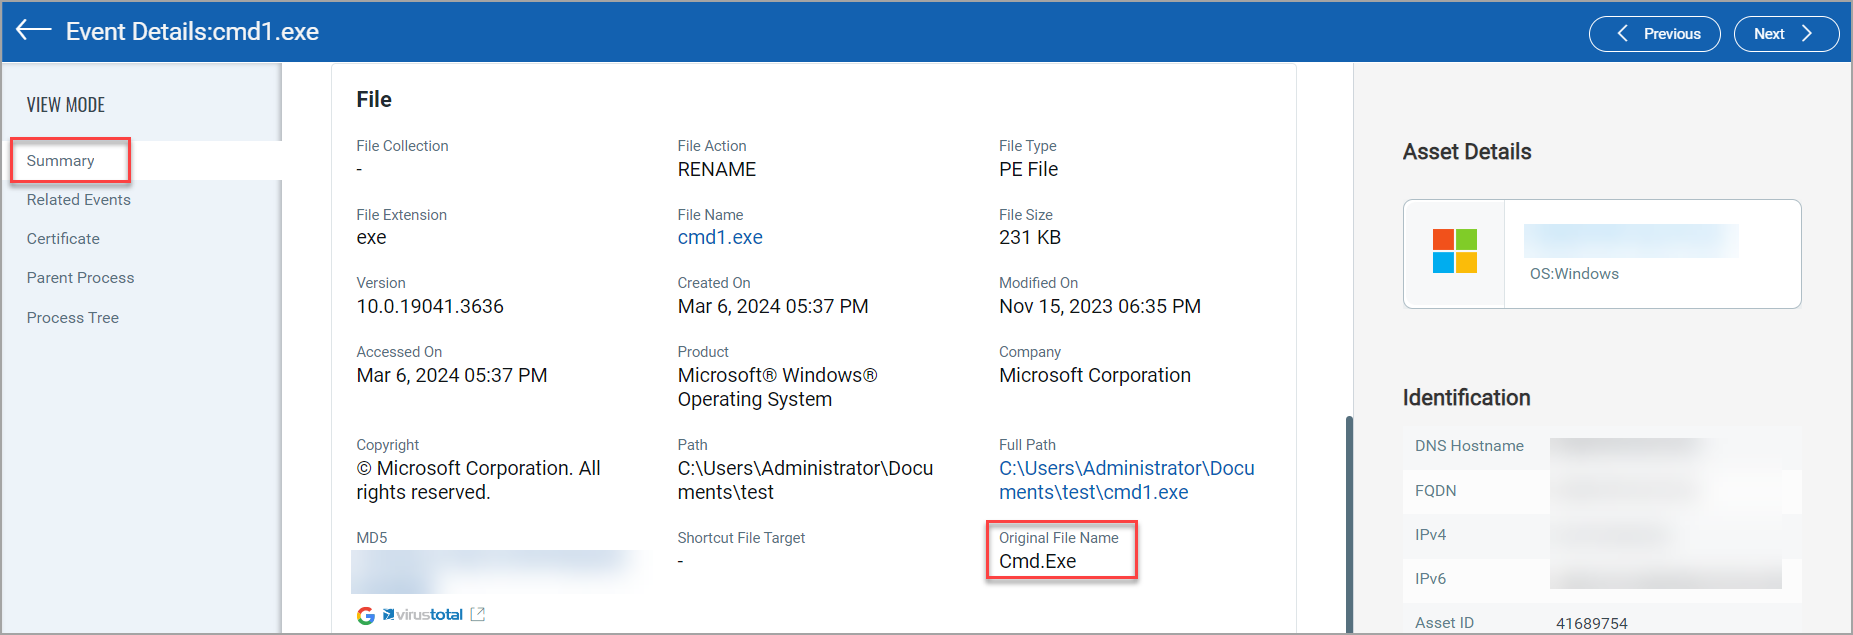
If you Create, Write, Delete, and Rename a file, the newly added Original File Name field in the Summary page for the File type displays the original name of the file. Refer the following screenshot of the Summary page displaying Original File Name for File type:
To generate a list of events using Qualys Query Language (QQL) that have Original File Name, Shortcut File Target refer Events Search Token in EDR Online Help
The User Session, Original File Name and Shortcut File Target is displayed for Windows Agent 5.5 and above.
Timeout changes for Quarantine Host and Event Remediation
The asset response timeout for Quarantine Host is now 10 minutes and for event remediation it is 5 minutes.
To know more about the Quarantine Asset, refer EDR Online Help.
New Tokens
| Token Name | Description |
| file.originalname | Use this token to list the event that have an original file name. |
| file.shortcutfiletarget | This token lists the events that have the shortcut which points to the target file application. |
| session.name | Provides the list of events by the session name assigned to the session. |
| session.userid | Lists the events by the session id assigned to the session. |
| session.username | Use this token to search events by the session username assigned to the session. |