Attack Path Analysis with Qualys ETM Identity
Qualys ETM Identity Attack Path Analysis provides a visual map of how vulnerabilities, misconfigurations, and relationships between assets can be leveraged. This allows security teams to focus on fixing the most important issues based on actual risk rather than just CVSS scores.
An attack path is a sequence of steps an attacker can exploit to move from a low-privilege account to a high-value target within an AD environment. The ETM Identity visualizes these paths to help administrators understand Misconfiguration and plan remediation.
Initiate Attack Path Analysis
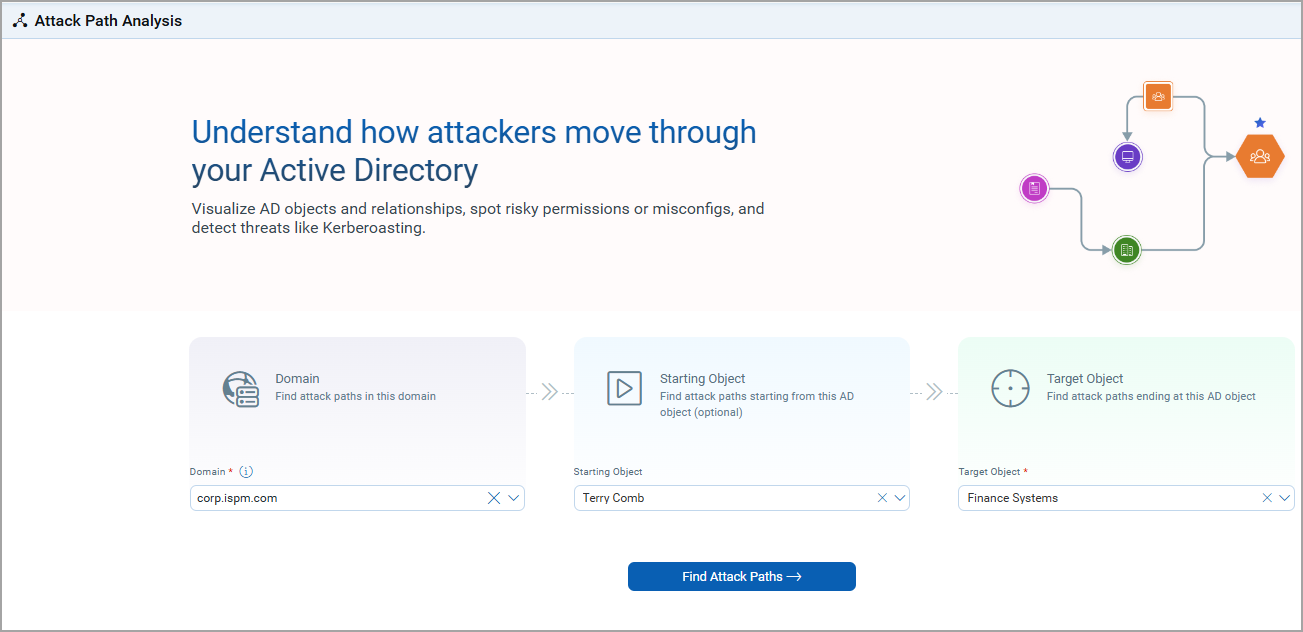
For visualizing the Attack Path, follow the given steps:
- Go to ETM Identity> Risk Management tab > Attack Path Analysis tab.
- Use the drop-down to select the AD domain you want to analyze.
Example: corp.spm.com - (Optional) Enter Starting Object.
Enter a starting object to analyze a specific user or asset. If not provided, ETM Identity automatically considers all possible starting points.
Example: Terry comb (a low-privilege user) - Select the target object you want to secure or investigate.
Example: Finance System (a high-value system)To choose the root domain, select the domain name from the Target drop-down menu.
- To generate the visualization, click Find Attack Paths.
Understanding the Attack Path Graph
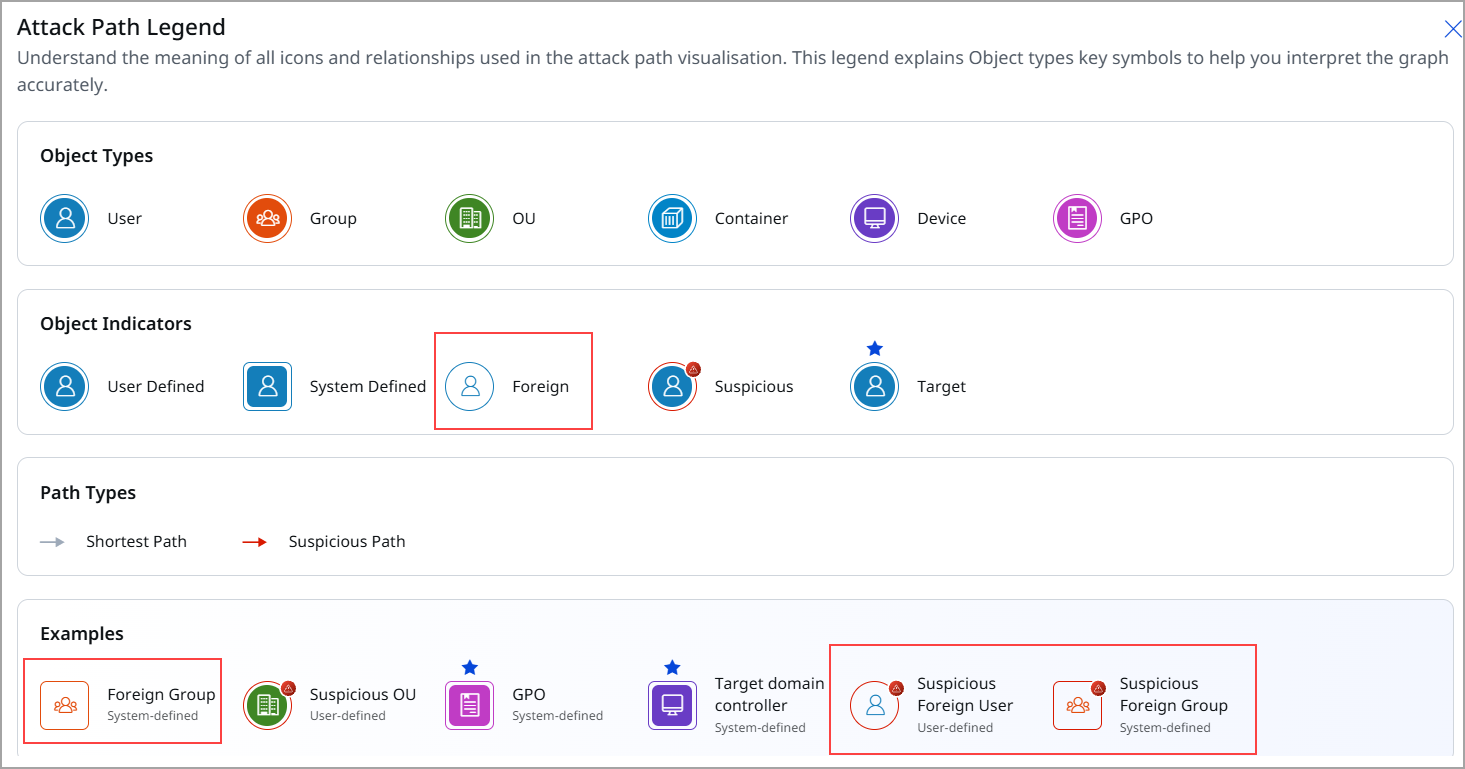
The resulting graph shows possible paths between the starting and target objects. For demonstration purposes, we have included a screenshot of the Attack Path Legend too.
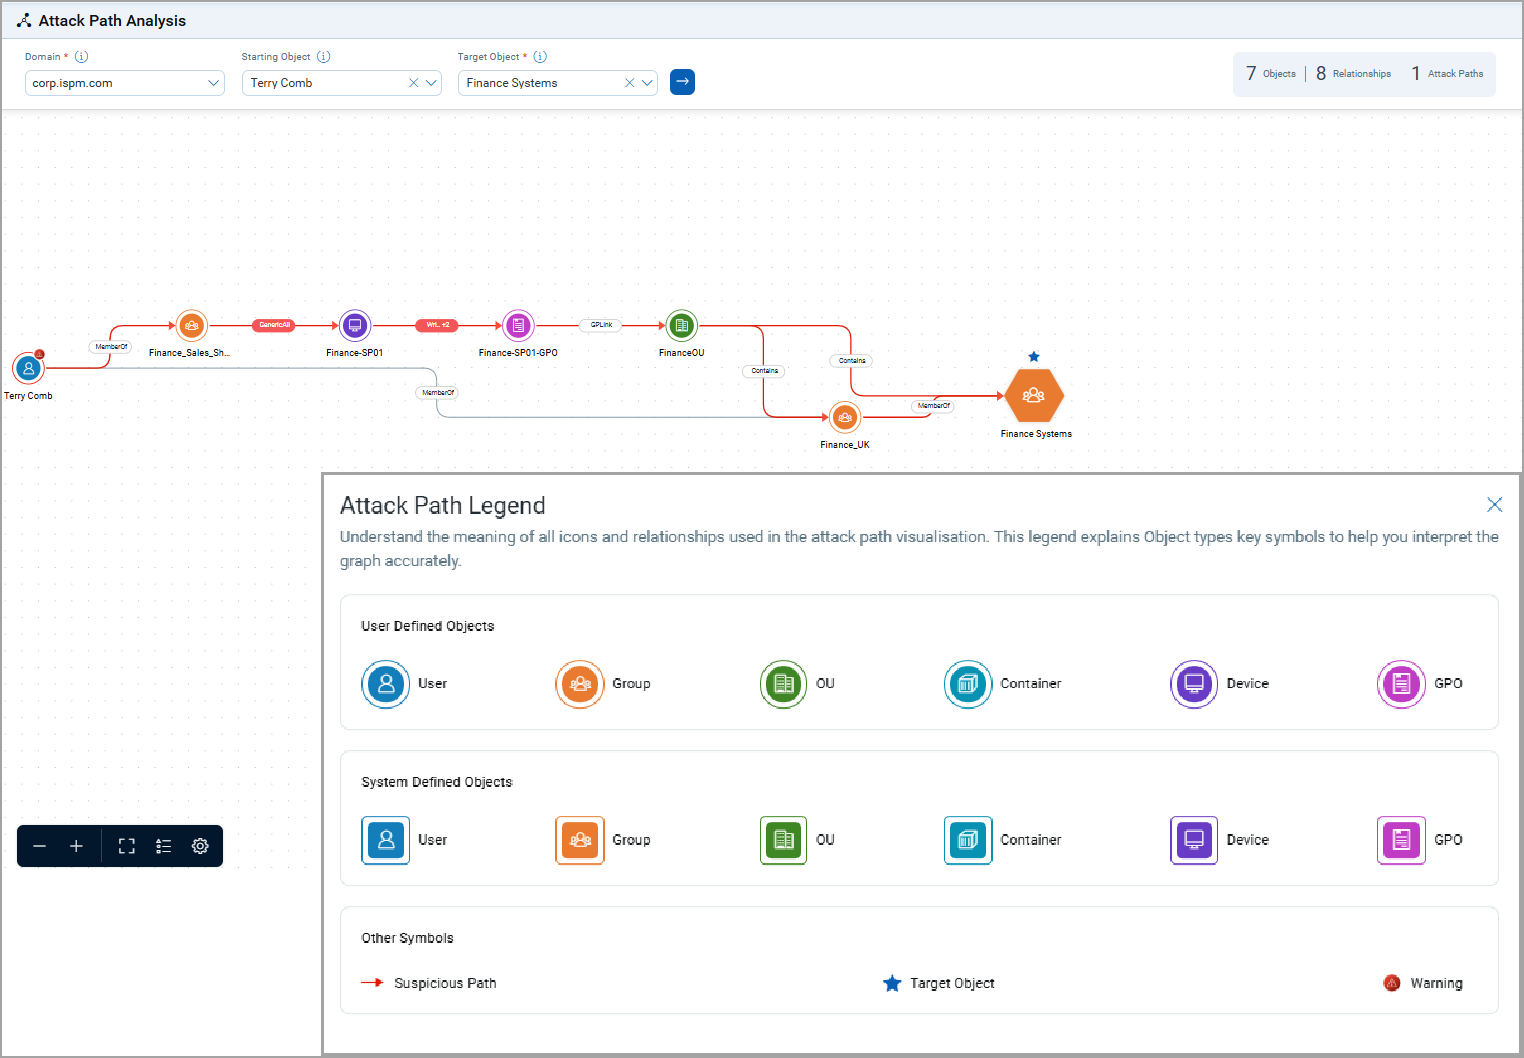
Path (Color Indicated)
- Red: Suspicious attack path (potential security risk)
- Grey: Non-suspicious or safe path
Various Symbols
- User-defined objects
These are custom objects configured by the administrator
- System-defined objects
These are default AD objects.
- Target object
These are highlighted destinations.
- Suspicious paths
These are marked in red with a warning icon.
- Warnings
Indicate risky permissions or misconfigurations.
Graph Options
Graph options include functionalities for zooming in and out, as well as a full-screen view for enhanced data visualization.
- Zoom In / Zoom Out
Allows users to magnify or reduce the view of the graph for detailed or broader analysis.
- Full-Screen View
Expands the graph to utilize the entire screen, providing an unobstructed view for better focus on the data.
Foreign Security Principal Support
ETM Identity identifies and processes Foreign Security Principal (FSP) within Active Directory environments. FSPs are accounts that exist in another forest but have rights in the AD forest.
Prerequisite: Availability of the Foreign Security Principal feature is dependent on the Qualys Cloud Agent version 6.6.0+
Managing Forest Security Principals (FSPs) provides the following benefits:
- Cross-Forest Permissions
Assigns local access rights to users from trusted forests. - Security & Auditing
Serves as placeholders in Access Control Lists (ACLs) for traceable permissions on external access. - Universal Group Membership
Allows centralized resource access in multi-domain environments. - Broken Trust Identification
Orphaned FSPs are easily identifiable if the trust relationship with an external forest is lost.
Currently, we provide FSP support for Users, Groups, and Computers.
When are FSPs Created?
- FSPs are created automatically by the system when:
- A user/group from a trusted external forest/domain is added to a domain local group in the local domain.
- A special identity (e.g., Authenticated Users) is added to a group.
- Permissions are granted to a foreign principal on a local resource.
Key Features of FSP
Key features include:
- Cross-Domain Identity Visibility
- Improved handling of forest trust relationships between domains.
- Enables identification of users and groups from trusted external domains.
- Foreign Security Principal (FSP) Identification
The system locates the domain as the administrator object and links edges to the corresponding foreign security principal, enabling accurate graph traversal across trust boundaries.- External users and groups are now clearly identified as Foreign Security Principals (FSPs).
- Helps distinguish between:
- Local domain users
- Foreign (external) users
- Suspicious identities
- Enhanced Security and Auditing Insights
- Provides better insights into:
- Cross-domain access
- Group memberships involving external entities
- Supports auditing of foreign user/group activity across trusted domains.
- Provides better insights into:
- Suspicious Identity Highlighting
- Improved detection of:
- Suspicious users
- Suspicious group relationships
- Helps identify unexpected or risky cross-domain associations.
- Improved detection of:
The following screenshot displays the attack path analysis for the user showing the FSP account.
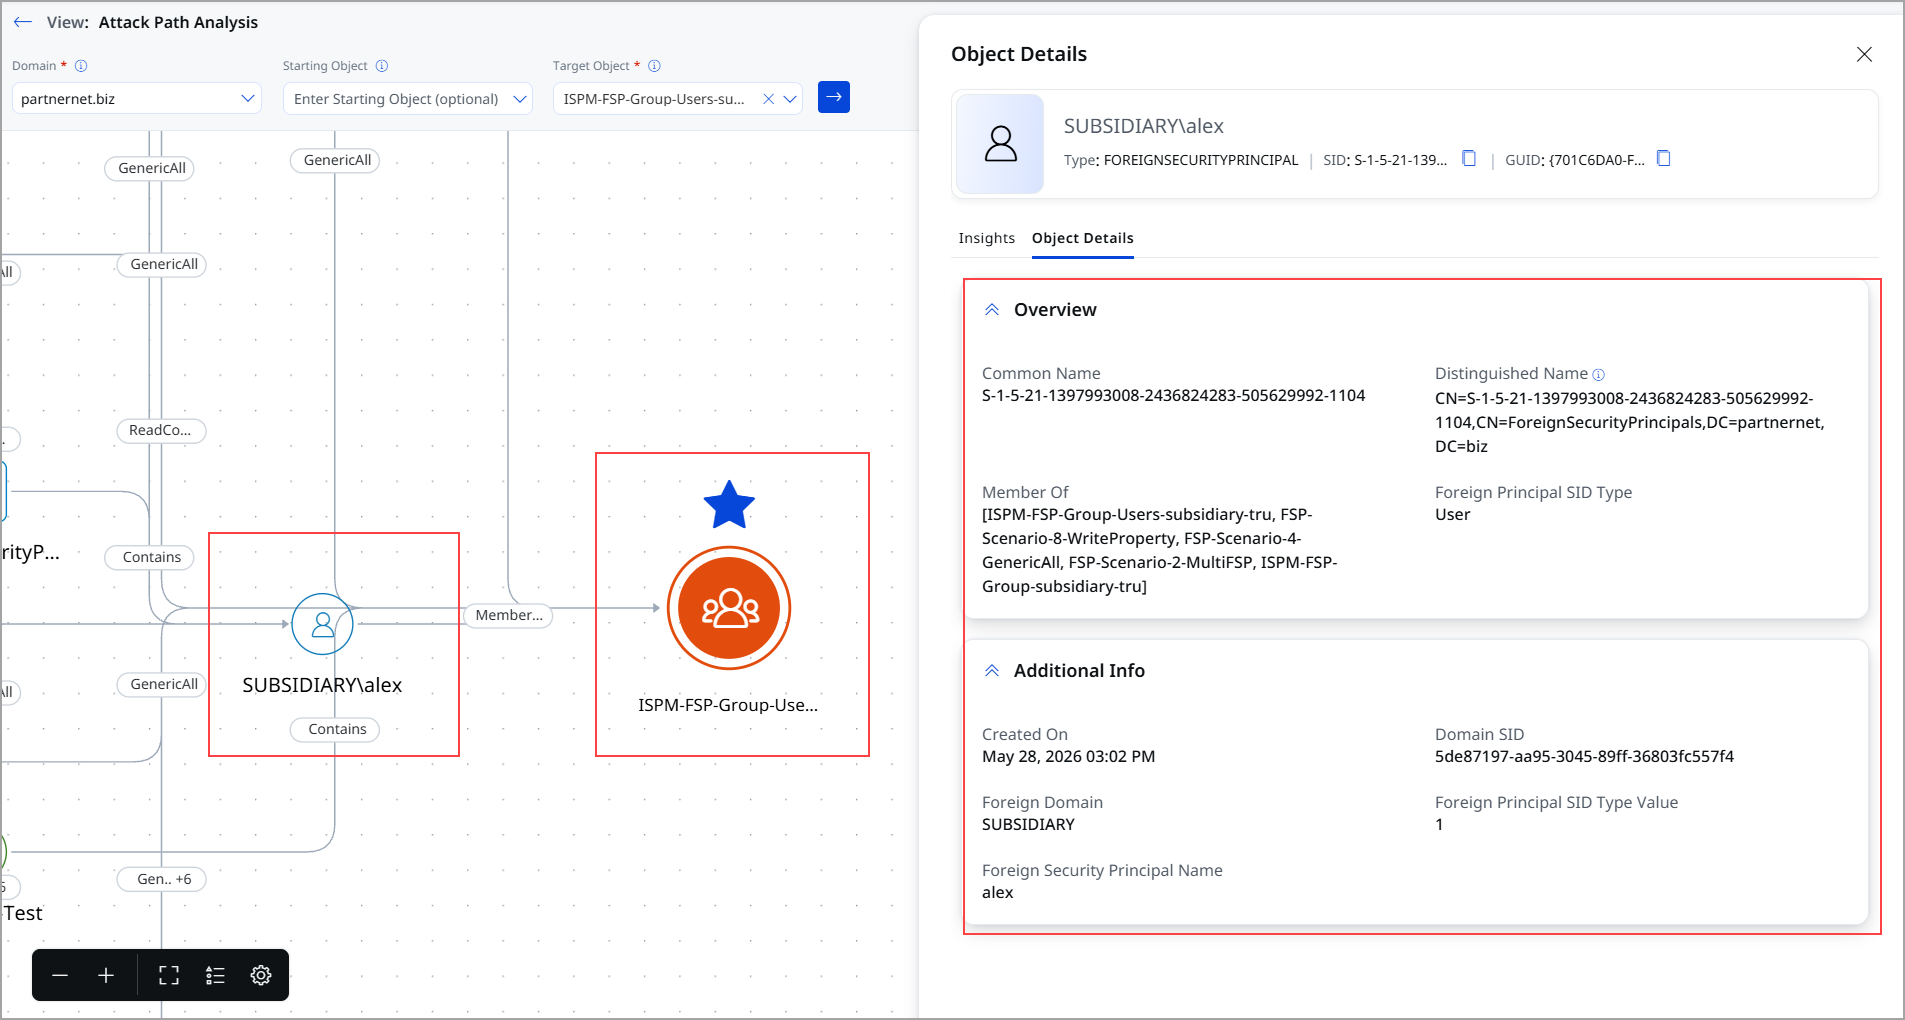
The following screenshot displays the attack path analysis for the group, showing the FSP account.
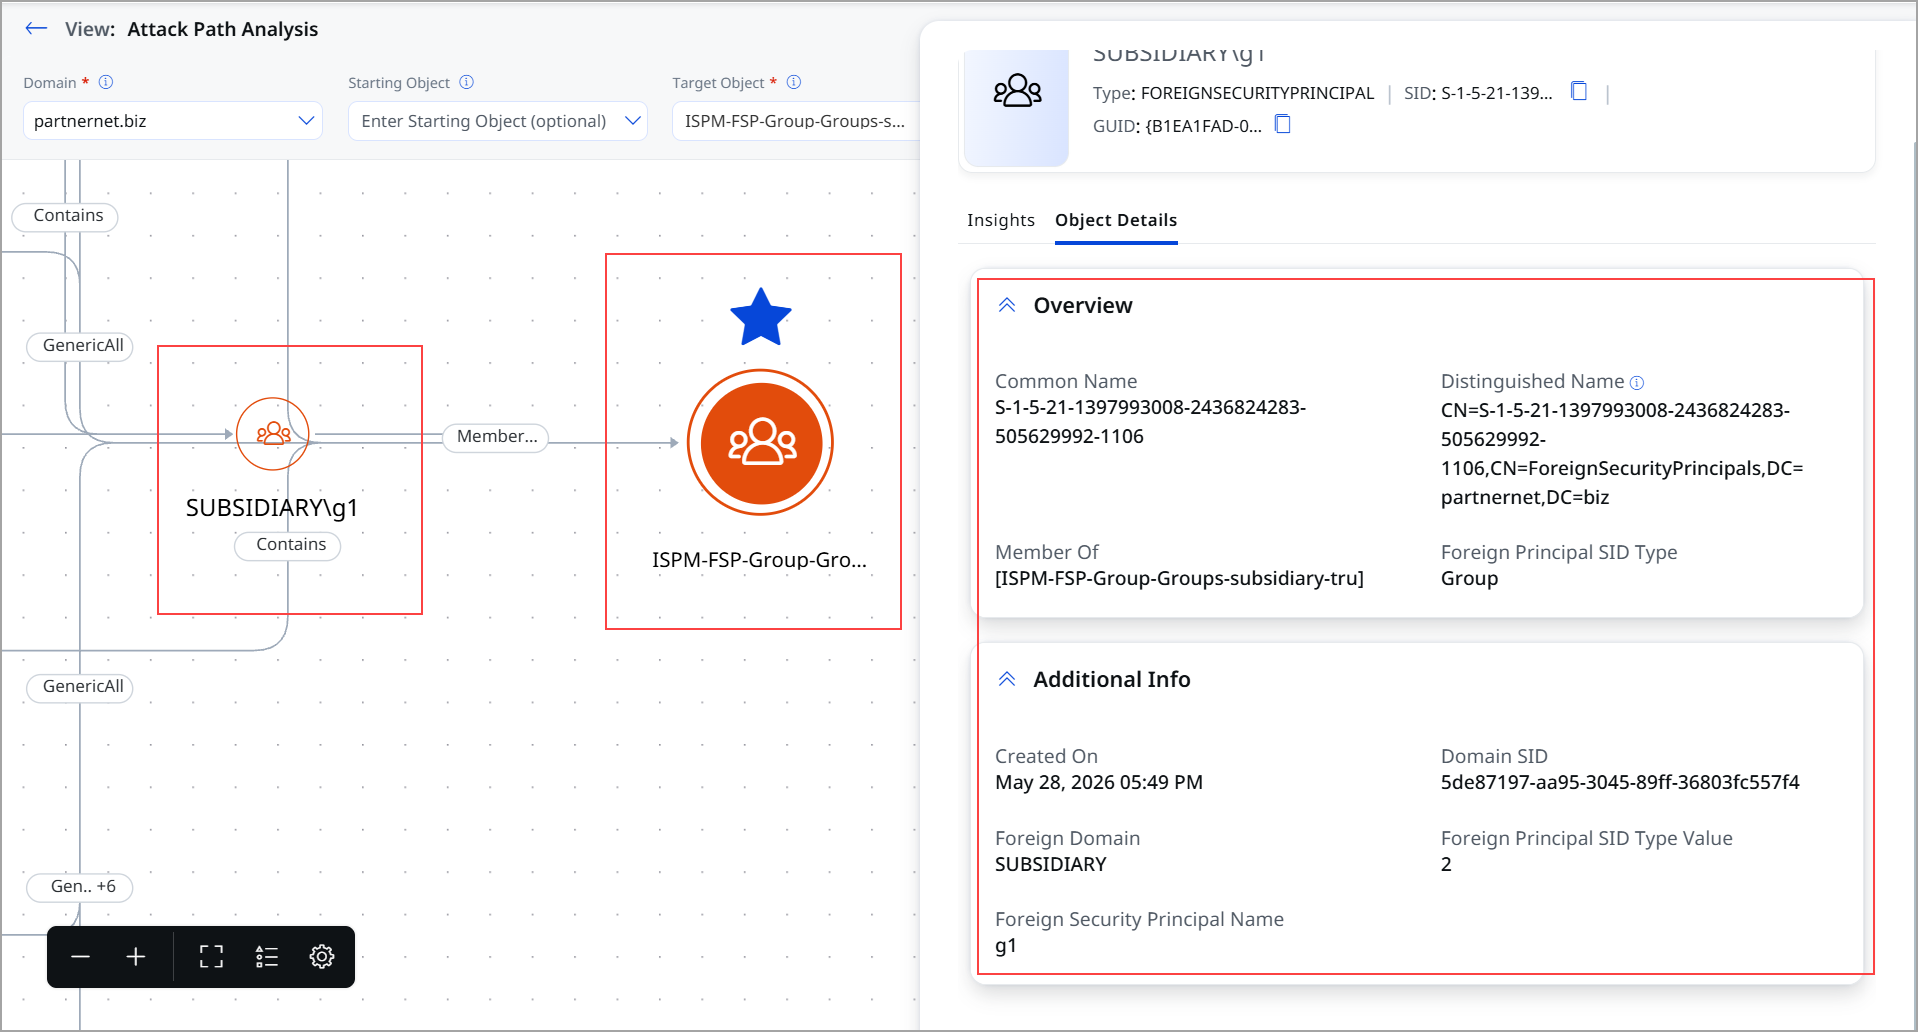
The following screenshot displays the Attack Path Legends, such as Foreign Users and Foreign groups.
Use Case
The following scenario demonstrates how a low-privilege user account (Terry Comb) in the domain corp.spm.com can be exploited to gain access to a high-value target (Finance System) due to misconfigurations in access permissions.
Attack Path Overview
Let us take an example to view the Attack Path, where we select
- Domain: corp.spm.com
- Starting Object: Terry Comb (low-privilege user)
- Target Object: Finance System (high-value target)
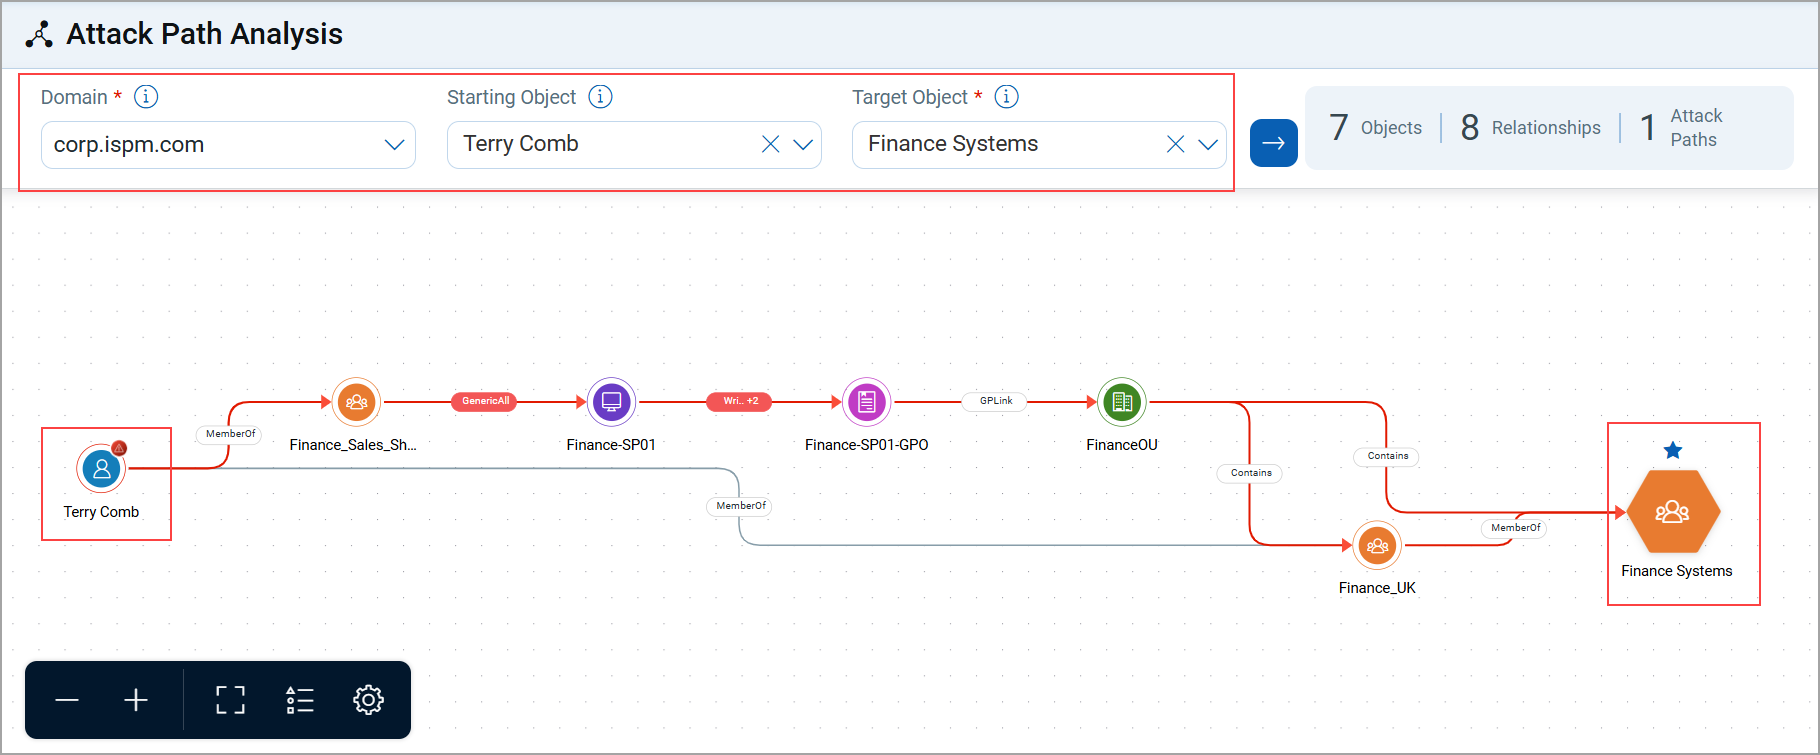
Observation of Attack Path
- The Terry Comb user is part of the SharePoint Access Group.
- Misconfiguration
This group has write DACL permissions over the finance.sp1 computer.
Attack Path Analysis
- If an attacker compromises the Terry Comb account, they can control the access list of the Finance-SPOI computer.
- The Finance-SPOI computer also has permissions to modify the Finance-SPOI-GPO.
- By modifying this GPO, an attacker can affect all systems under the FinanceOU, including the Finance System Group.
Impact
A compromised low-privilege account (Terry Comb) could be leveraged to gain control over high-value finance systems.
This path is therefore marked suspicious in red.
Taking Remediation Actions
If a suspicious attack path is detected, you can view recommended remediation steps directly from the graph:
- Click the suspicious object (for example, Terry Comb in the above case)
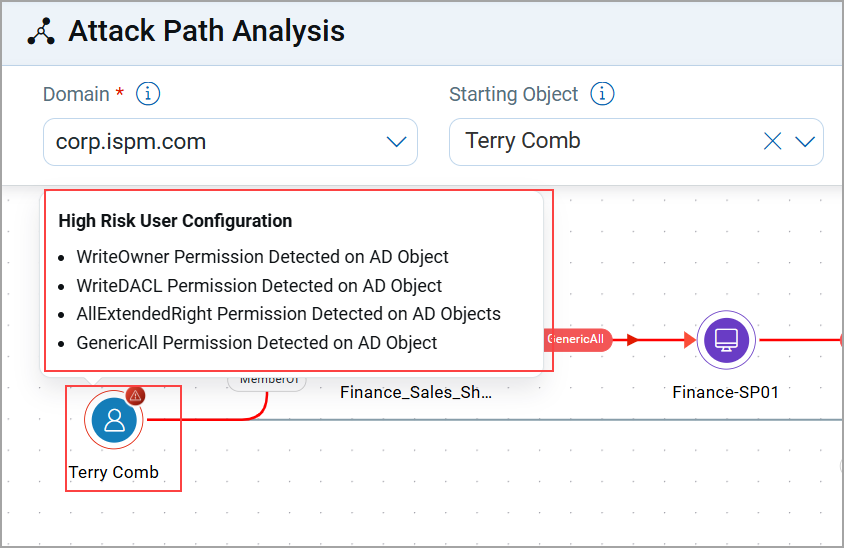
- Check the Remediation Recommendations panel on the right.
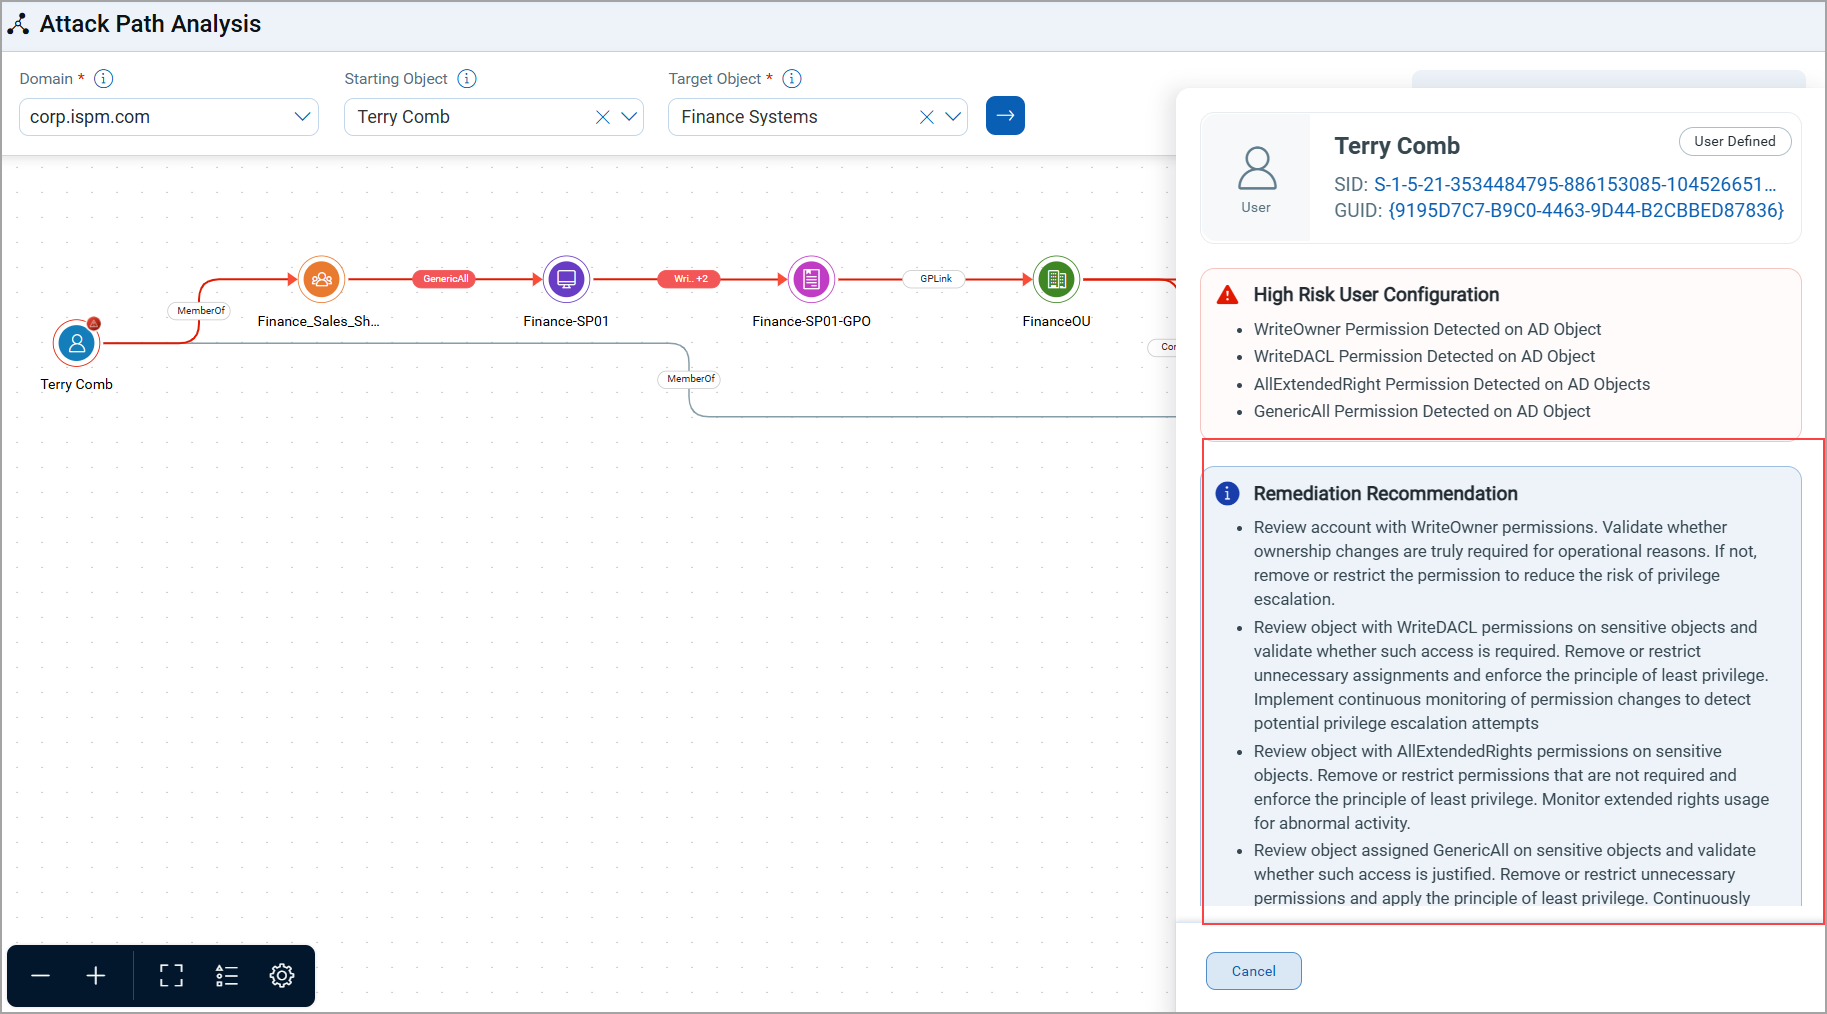
- Suggested actions may include:
- Removing excessive permissions
- Reviewing group memberships
- Securing GPO configurations
- Deactivating unused accounts
- Additionally, GID object details are displayed to help troubleshoot potential misconfigurations.
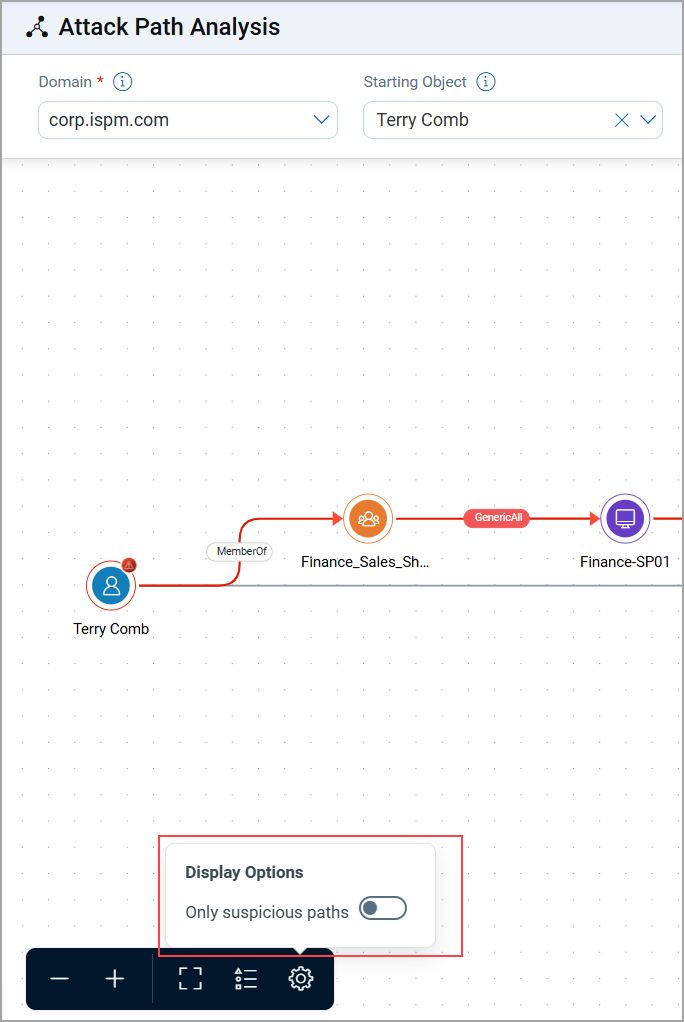
Filtering Suspicious Paths
In environments with complex graphs, you can toggle between viewing all attack paths or only suspicious paths:
- Show All Paths: Displays every possible route between objects
- Show Suspicious Paths Only: Highlights only risky routes for quicker analysis.