Managing a User
After user creation, the user is listed on the User Management dashboard. You can perform the various actions on the user from the Quick Actions menu.
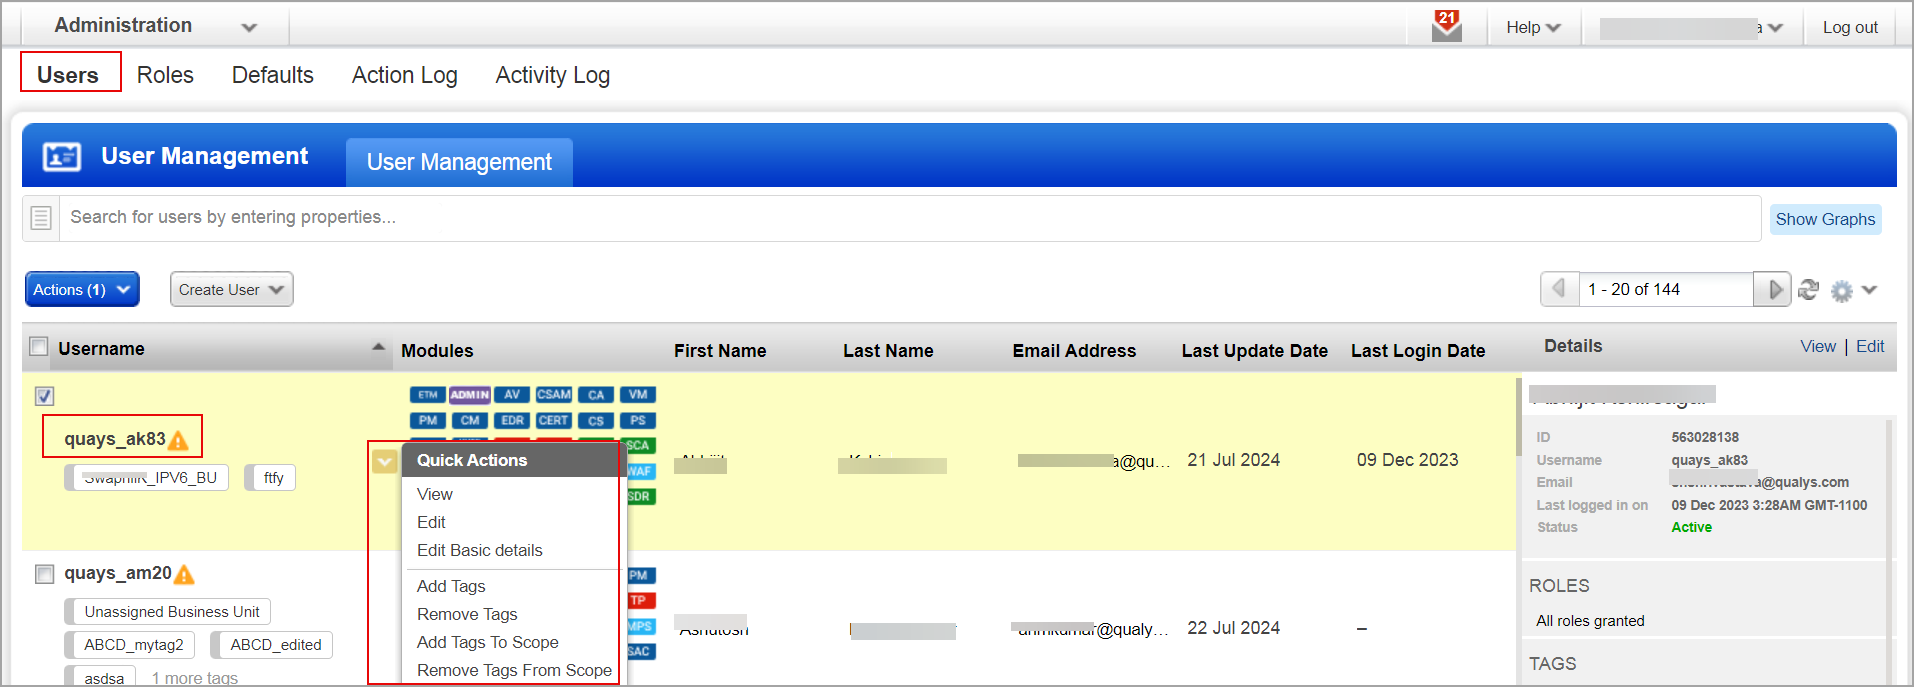
Quick Actions on a User
Select the required user, and from the Quick Actions menu, perform the following.
Viewing a User | Editing a User | Editing Basic Details of a User | Adding Tags | Removing Tags | Adding Tags to a Scope | Removing Tags from a Scope
Viewing a User
After selecting the user, from the Quick Actions menu, you can view the user details, profile settings, roles and scopes, action log, and account activity of the user.
You can edit the user details using the Edit option on the User View: "username" window or the Edit option from the Quick Actions menu.
Editing a User
With the Edit option from the Quick Actions menu of the user, you can edit the following details.
User Details | Profile Settings | Roles and Scopes | Action Log | Account Activity
User Details
- To tag the user, click Select. In the Add Tags to Include pop-up, click
 to browse the tags.
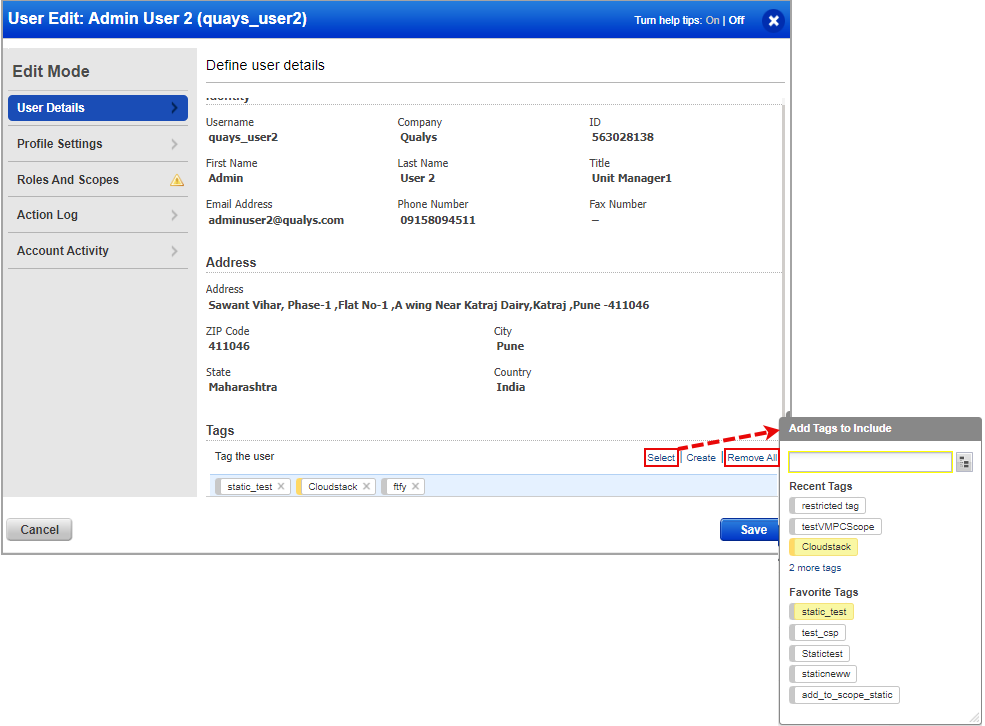
- Select the required tags and click outside the window to exit.
- To remove a particular tag assigned to the user, click
 on the tag. To remove all tags, click Remove All.
 - To create a new tag, click Create. The created tags is displayed in the list.
Profile Settings
Edit the time zone, CSV List separator, and the download format option as required.
Roles and Scopes
- Select the Allow user full permissions and scope checkbox to allow full access and permissions.
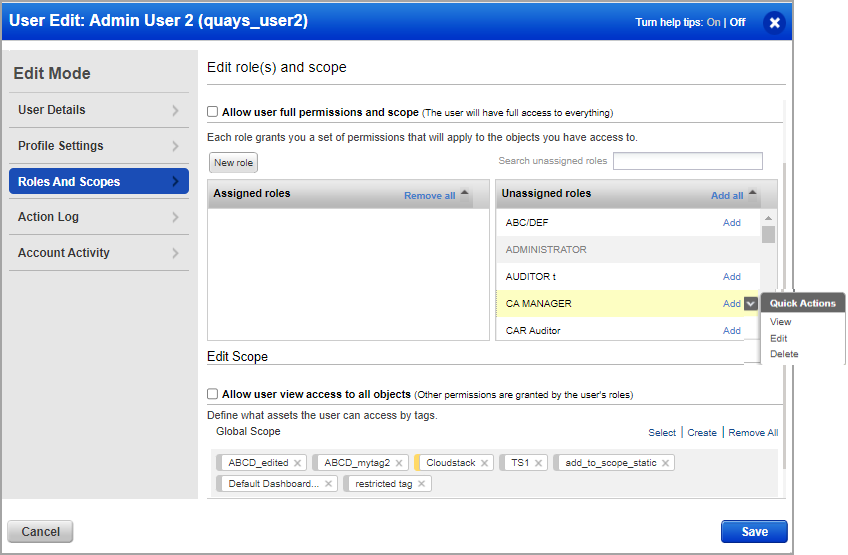
- To restrict the full permissions,clear the Allow user full permissions and scope checkbox. Once cleared, following options are enabled to edit.
- To add a new role, click New Role. For more information, refer to Managing Roles and Permissions.
- Click the Quick Actions menu for the role to view, edit, or delete the role.
- To unassign a role, select the role from the Assigned roles pane and click Remove.
- Select the Allow user view access to all objects checkbox to grant view access to all objects.
- To restrict the view access, clear the Allow user view access to all objects checkbox.
- Select or Unselect the Exclude Agent assets from the IP Range Tags checkbox as required.
Action Log
On the Action Log tab, select the event, and from the Actions menu, click View Details. You ca view the details of the action such as the browser, operating system, IP address and event type.
Account Activity
This tab displays the past login details of the user such as the login time stamp, browser and IP address.
You can save the updates. A warning message is displayed asking the user to re-login for the permissions to take effect.
Editing Basic Details of a User
You can edit the General Information, User Role, Permissions, Options, and Security information of the user. You can activate or deactivate this user.
To edit the basic details of the user, from Quick Actions menu, select Edit Basic Details and perform the following:
- On the General Information tab, edit the required fields.
- On the Locale tab, edit the Language, Date Format, and Time Zone fields as required.
- On the User Role tab, perform the following:
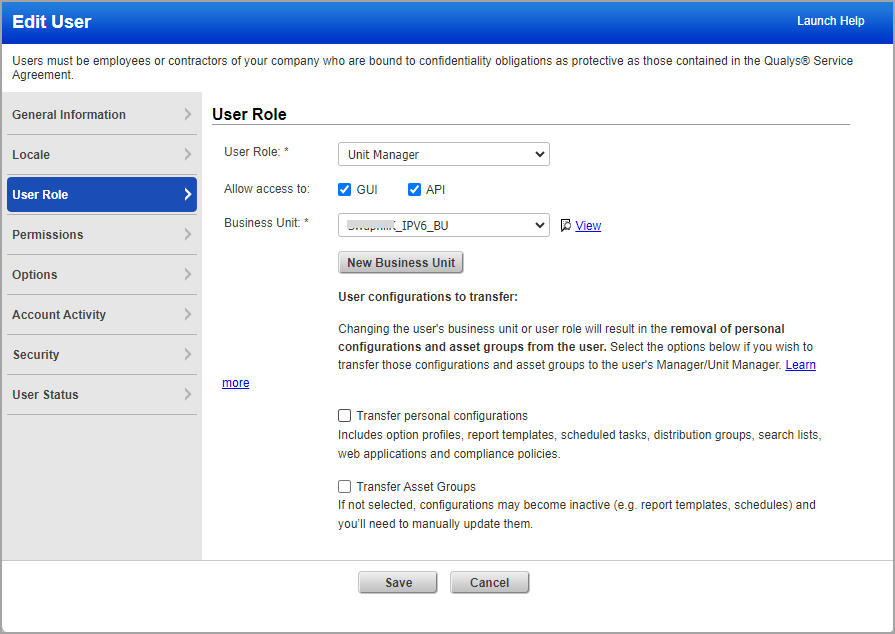
- To change the role on the User Role field, select the required role.
- Select the GUI and/or API checkboxes to grant access to the UI and API. If required, clear the checkboxes to prohibit access.
- In the Business Unit field, edit the user's Business Unit and select the Transfer personal configurations and transfer Asset Groups checkboxes if required.
- To create a new business unit, click New Business Unit.
- On the Asset Groups tab, in the Add asset groups field, select the required asset group. You can also remove an added asset group.
The Asset Groups option is available only for Scanner, Reader, Remediation User and Contact user only.
- On the Permissions tab, edit the required checkboxes for the relevant permissions.
- On the Options tab, edit the required notification options.
-
On the Security tab, edit the VIP two-factor authentication and Enable SAML SSO checkboxes if required. You can also edit the session timeout in minutes.
-
To deactivate the user account, select the Deactivate this user checkbox.
Adding Tags
To add a tag to the user, perform the following:
- On the Add Tags window, from the listed tags, select the tag to be added to the user account. You can expand the parent tag to view the child tags under it.
- (Optional) To remove an added tag, click on the tag.
- Click Save.
A success message about the addition of tag is displayed. You can view the added tag in the tags list.
Removing Tags
To remove a tag from a user, perform the following:
- On the Remove Tags window, select the tags to be removed from the user account.
- (Optional) To cancel a tag to be removed, click X.
- Click Save.
A success message about the removal of tag is displayed.
Adding Tags to a Scope
To add a tag to the user, perform the following:
- On the Add Tags To User Scope window, from the listed tags, select the tag to be added to the scope of the user account. You can expand the parent tag to view the child tags under it.
- (Optional) To remove an added tag from the scope, click on the tag.
- Click Save.
A success message about the addition of tags to the scope is displayed.
Removing Tags from a Scope
To remove a tag from the scope of the user, perform the following:
- On the Add Tags To User Scope window, from the listed tags, select the tag to be added to the scope of the user account. You can expand the parent tag to view the child tags under it.
: If the user has full access to all the objects or do not have any tags added to the scope, no tags are visible to be removed.
- (Optional) To remove an added tag, click on the tag.
- Click Save.
A success message about the removal of tag from the scope is displayed.