Configure Plugin for Build Pipelines Projects
You can use the Qualys ETM Finding Connector extension as a pre-deployment task in your project pipeline.
After installing the Qualys ETM Finding Connector, you can see this plugin as a task in your pipeline.
Before adding the plugin, you need to create the Classic Build Pipeline. For more details, refer to How to Create Classic Build Pipeline.
How to Create Classic Build Pipeline
To create a Classic Build Pipeline, perform the following steps:
Step 1: Enable the Classic Build Pipeline Option
By default, YAML pipelines are favoured, and the Classic editor may be disabled.
To enable the classic editor:
-
Go to Organization Settings in Azure DevOps.
-
Navigate to Pipelines > Settings.
-
Ensure the Disable creation of classic build pipeline option is turned off (that means classic pipelines are not disabled)
The Use the classic editor option is displayed when creating a new pipeline.
Step 2: Create a Classic Build Pipeline
Once the feature is enabled, follow these steps:
-
In your project, go to Pipelines and select New Pipeline.
-
Choose Use the classic editor to create a pipeline without YAML.
-
Select your source (for example, Azure Repos Git), repository, and branch.
-
Choose a template or start with an Empty job.
Add Plugin
To add a plugin, perform the following steps:
- Under your agent job in the Tasks tab, click
 Add, and search for Qualys ETM Finding Connector.
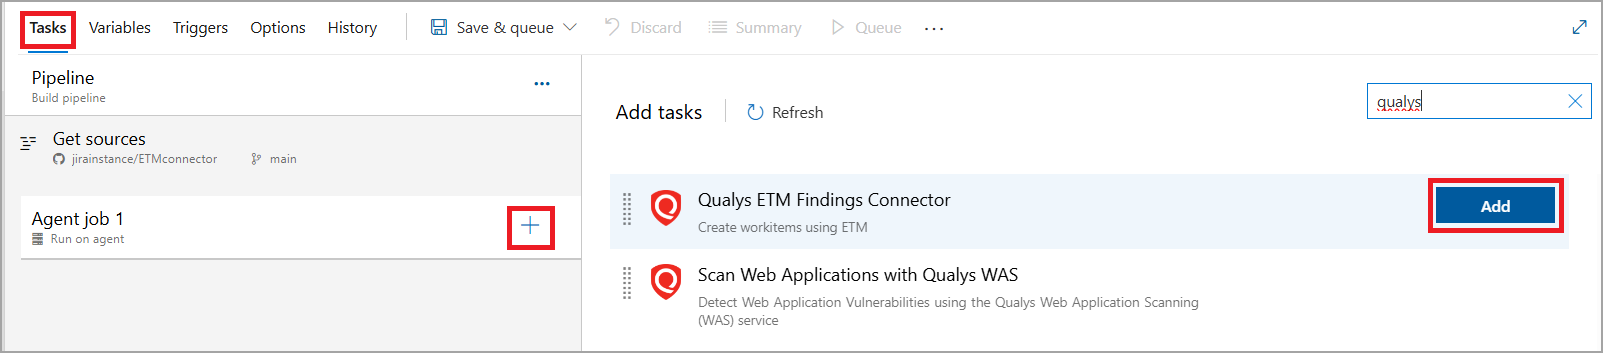
- To add the plugin as a task in the build pipeline, click Add.
After you click Add, the task gets added below the Agent Job.
Configure Plugin
To configure the plugin, perform the following steps:
- Below the Agent Job, click the task that you want to configure.
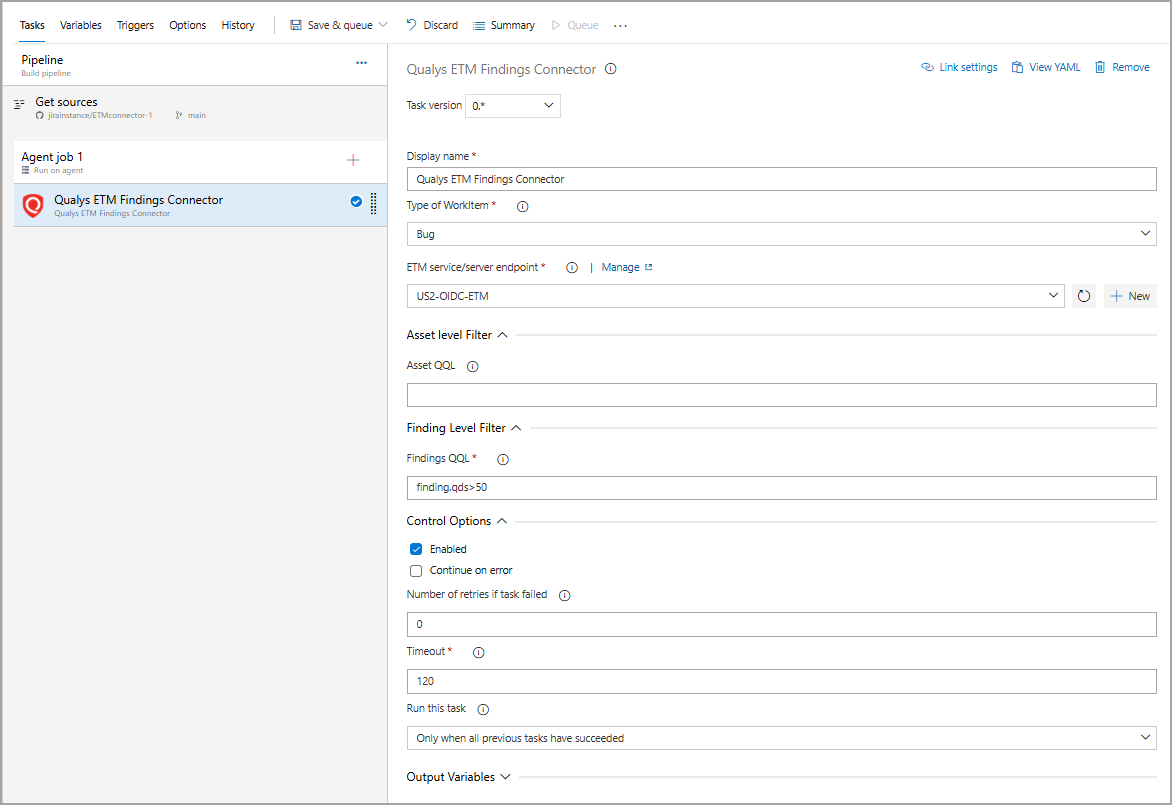
-
Enter the Display name.
-
From the Type of Work Item dropdown, choose Bug or Task as required.
-
Then, configure the ETM service endpoint.
To connect with ETM APIs, you need to configure the service endpoint using a Qualys account and, if necessary, a proxy on your Azure DevOps instance for the organization where the Qualys ETM Finding Connector is installed.
To create work items through the API, you will need a Personal Access Token (PAT) to securely authenticate your access to Azure DevOps.
To configure service endpoints, perform the following steps:
- Go to the ETM service/server endpoint field and click New.

-
In the New service connection window, enter the Qualys Gateway URL where your Qualys ETM account resides. For more information, refer to Qualys Platform Identification page.
-
Enter your account credentials for authenticating to the ETM API server.
-
Provide Azure DevOps Personal Access Token (PAT) with the required permissions of Read, Write, and Manage work items.
-
Provide a Service connection name to the new connection.
-
You can use this service connection to all pipelines in the same project by selecting the Security checkbox.
-
Click Save.
Once added, the ETM service endpoint is listed in the ETM service/server endpoint' drop-down field.
If your Azure DevOps instance does not have direct Internet access and requires a proxy, click Use Proxy Settings check box, and enter the proxy server information.
- Go to the ETM service/server endpoint field and click New.
-
Configure Asset Level Filter - You can configure the asset-level query here; multiple assets can be configured using a comma-separated list (for example: asset.assetID=12345,34563). If the query is not configured, it will pull detections for all assets.
-
Configure Finding Level Filter - finding QQL is a required field. At least one QQL must be configured to detect findings.

-
Timeout Setting
The ETM connector may take 45 to 60 minutes to fetch the report. After the report is retrieved, the pipeline starts creating tickets based on the report data.
However, the pipeline execution is currently timing out after 60 minutes due to the default timeout limit on Microsoft-hosted Azure DevOps agents.To avoid this issue, please take one of the following actions on your end:
- Increase the pipeline or job timeout configuration to match the required execution time.
- Use a self-hosted Azure DevOps agent, which does not have the 60-minute execution limit.
- Purchase additional Azure DevOps hosted agent capacity if a longer execution time is required on Microsoft-hosted agents.
-
Click Save and queue.