Configure Plugin for Build Pipelines Projects
You can use the Qualys TotalAppSec Findings Connector extension as a pre-deployment task in your project pipeline.
After installing the Qualys TotalAppSec Finding Connector, you can see this plugin as a task in your pipeline.
Before adding the plugin, you need to create the Classic Build Pipeline. For more details, refer to How to Create Classic Build Pipeline.
How to Create Classic Build Pipeline
To create a Classic Build Pipeline, perform the following steps:
Step 1: Enable the Classic Build Pipeline Option
By default, YAML pipelines are favoured, and the Classic editor may be disabled.
To enable the classic editor:
-
Go to Organization Settings in Azure DevOps.
-
Navigate to Pipelines > Settings.
-
Ensure the Disable creation of classic build pipeline option is turned off (that means classic pipelines are not disabled)
The Use the classic editor option is displayed when creating a new pipeline.
Step 2: Create a Classic Build Pipeline
Once the feature is enabled, follow these steps:
-
In your project, go to Pipelines and select New Pipeline.
-
Choose Use the classic editor to create a pipeline without YAML.
-
Select your source (for example, Azure Repos Git), repository, and branch.
-
Choose a template or start with an Empty job.
Add Plugin
To add a plugin, perform the following steps:
- Under your agent job in the Tasks tab, click
 Add, and search for Qualys TotalAppSec Findings Connector.
 - To add the plugin as a task in the build pipeline, click Add.
After you click Add, the task gets added below the Agent Job.
Configure Plugin
To configure the plugin, perform the following steps:
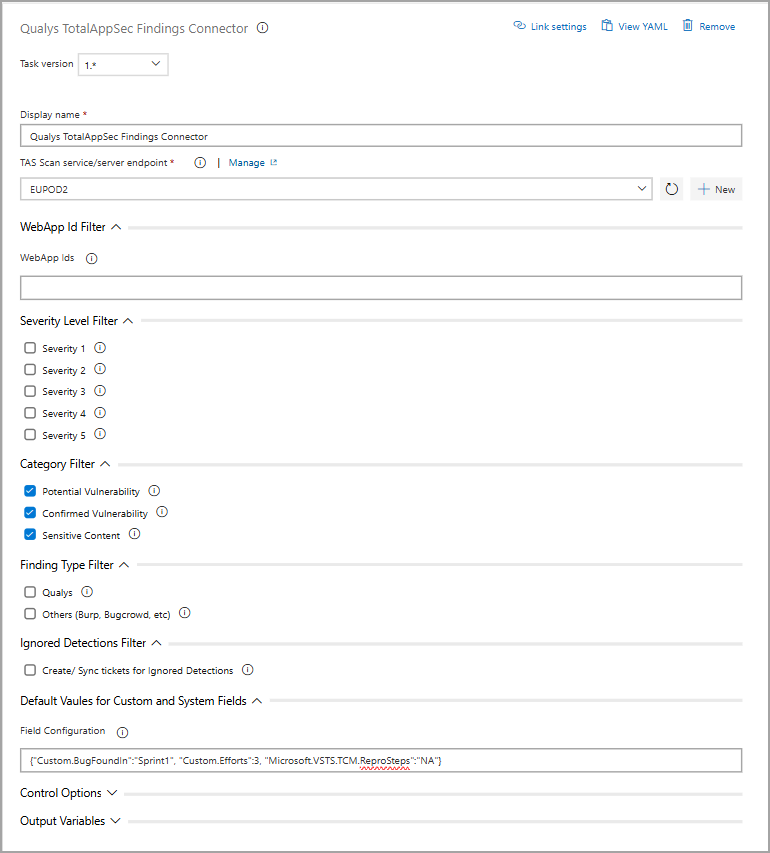
- Below the Agent Job, click the task that you want to configure.
-
Enter the Display name.
-
Then, configure the TAS service endpoint.
To connect with TAS APIs, you need to configure the service endpoint using a Qualys account and, if necessary, a proxy on your Azure DevOps instance for the organization where the Qualys Web App Scanning Connector is installed.
To create work items through the API, you will need a Personal Access Token (PAT) to securely authenticate your access to Azure DevOps.
To configure service endpoints, perform the following steps:
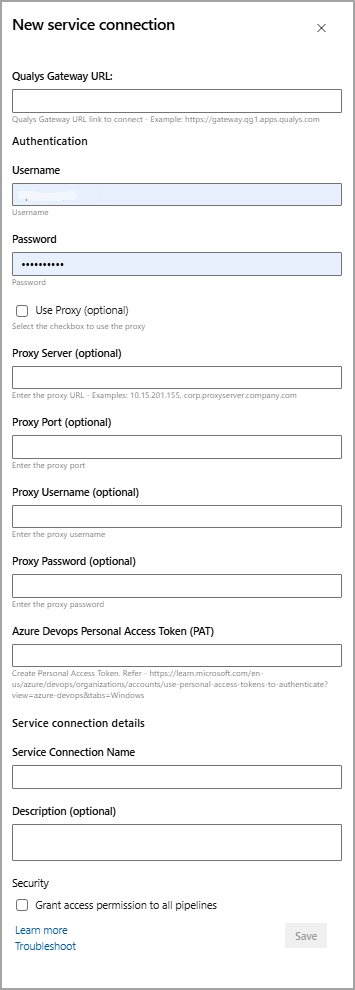
- Go to the TAS service/server endpoint field and click New.
-
In the New service connection window, enter the Qualys Gateway URL where your Qualys TAS account resides. For more information, refer to Qualys Platform Identification page.
-
Enter your account credentials for authenticating to the TAS API server.
-
Provide Azure DevOps Personal Access Token (PAT) with the required permissions of Read, Write, and Manage work items.
-
Provide a Service connection name to the new connection.
-
You can use this service connection to all pipelines in the same project by selecting the Security checkbox.
-
Click Save.
Once added, the TAS service endpoint is listed in the TAS service/server endpoint' drop-down field.
If your Azure DevOps instance does not have direct Internet access and requires a proxy, click Use Proxy Settings check box, and enter the proxy server information.
- Go to the TAS service/server endpoint field and click New.
-
Configure the required filters:
-
If you want to create work items only for specific application findings, you can configure the Application IDs as a comma-separated list. If no Application ID is configured, work items will be created for all application findings.
Azure DevOps does not allow duplicate work items for the same finding within the same organization.
-
If you want to create work items for specific severity levels, you can select the desired levels. If you do not select a severity level, work items are created for all detected severity levels.
-
If you want to create work items for specific vulnerability categories, you can select the desired categories. If you do not select any category, work items are created for all detected vulnerabilities.
-
If you want to create work items for a specific source, you select a finding type. If you select Qualys, you create work items only for Qualys findings. If you select 'Other', you can include findings from other sources, such as Burp or Bugcrowd. If you do not select a finding type, the system creates work items for all finding types.
-
If you select the Create/Sync tickets for ignored Detections checkbox, then work items are created for all findings. If you do not select it, work items are created only for findings that are not marked as ignored.
-
-
Configure Default Values for Custom and System Fields.
If you have any required fields in your Azure DevOps instance, you can add them using JSON. Field mapping requires the Azure DevOps field reference name as the JSON key and the desired value as the input.Example JSON configuration
{ "Custom.BugFoundIn": "Sprint1", "custom.Efforts": 3, "Microsoft.VSTS.TCM.ReproSteps": "NA" }- You can configure a custom field using its reference names, as shown in the example below:
{"Custom.BugFoundIn":"Sprint1"} - To configure system fields, you must use the correct field reference name. You can retrieve the reference names for system fields by running the following API call:
API Call
GET https://dev.azure.com/{Organization}/{Project}/_apis/wit/workitemtypes/Bug/fields?api-version=7.1Ex. "Microsoft.VSTS.TCM.ReproSteps":"NA"
- You can configure a custom field using its reference names, as shown in the example below:
-
Click Save and queue.