Upgrade Application
This section outlines upgrade procedures for your application across successive versions.
- Application Upgrade to v3.0.1 from v3.0.0
- Application Upgrade to v3.0.0 from v2.0.1
- Application Upgrade to v2.0.1 from v2.0.0
- Application Upgrade to v2.0.0 from v1.1.0
- Application Upgrade to v1.1.0 from v1.0.0
Application Upgrade to v3.0.1 from v3.0.0
To upgrade from v3.0.0 to v3.0.1, perform the following steps:
- Navigate to the Configuration record.
- Set the Start Time field to slightly earlier than the dashboard’s last_run_evaluations timestamp shown in the dashboard. The time shown is in UTC.
- Click Update Filters to fetch the relevant evaluations, evaluated resources, and enriched resources.
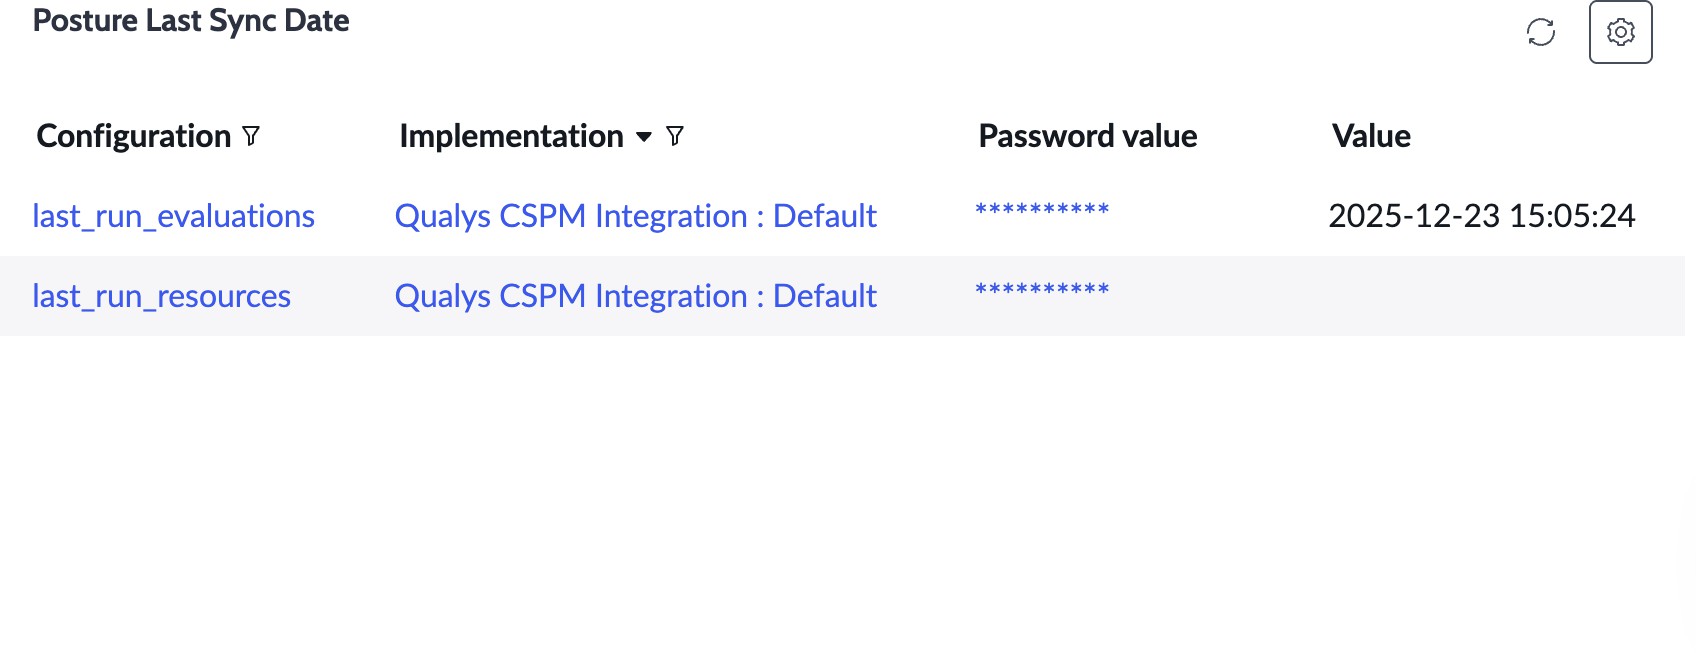
-
After configuring the Start Time field and clicking on Update Filters.
-
The user should execute the integration in the order specified here.
Application Upgrade to v3.0.0 from v2.0.1
To upgrade from v2.0.1 to v3.0.0, perform the following steps:
- Navigate to the Configuration record.
- Set the Start Time field to slightly earlier than the dashboard’s last_run_evaluations timestamp shown in the dashboard. The time shown is in UTC.
- Click Update Filters to fetch the relevant evaluations, evaluated resources, and enriched resources.
-
After configuring the Start Time field and clicking on Update Filters.
-
The user should execute the integration in the order specified here.
Application Upgrade to v2.0.1 from v2.0.0
Resolved an issue that caused empty records to be unintentionally created in the Test Results table.
Application Upgrade to v2.0.0 from v1.1.0
To upgrade from v1.1.1 to v2.0.0, perform the following steps:
-
Navigate to the Configuration record.
-
Set the Start Time field to slightly earlier than the dashboard’s last_run_evaluations timestamp shown in the dashboard. The time shown is in UTC.
-
Click Update Filters to fetch the relevant evaluations, evaluated resources, and enriched resources.
-
After configuring the Start Time field and clicking on Update Filters.
-
The user should execute the integration in the order specified here.
Application Upgrade to v1.1.0 from v1.0.0
After upgrading to Qualys CSPM v1.1.0, you can see the Authentication Type in the configuration record.
To upgrade from v1.0.0 to v1.1.0, perform the following steps:
-
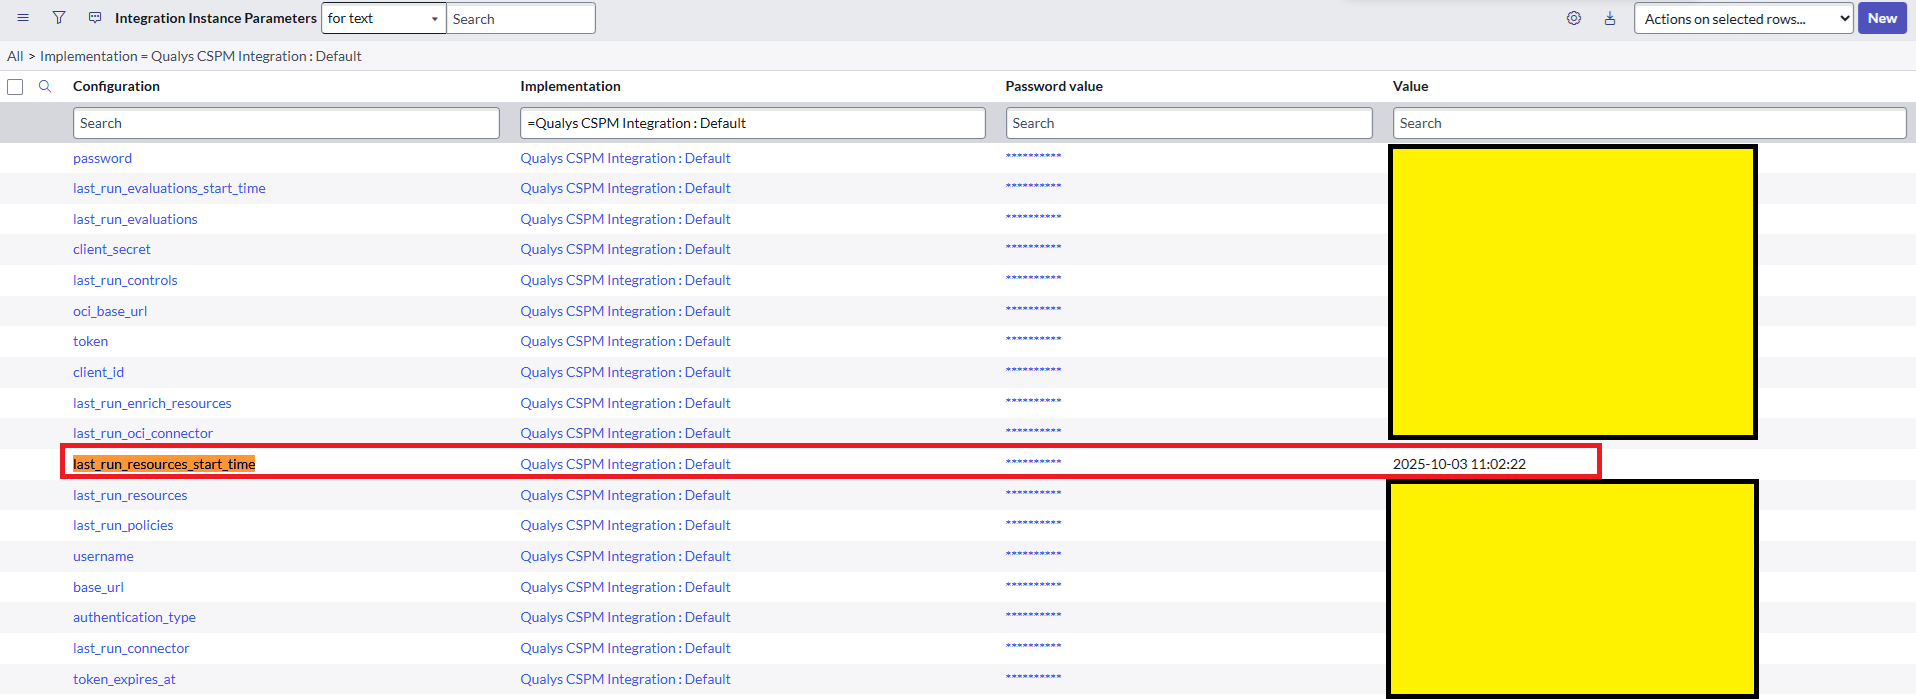
Navigate to the Integration Instance Parameters (sn_sec_int_impl_config) table.
-
Filter the records by the Implementation column using the implementation record you configured. You can find it under the Configuration record.
-
Set the value of last_run_resources_start_time to an older date, for example, 1970-01-01 00:00:00, or the earliest time when a resource was evaluated on your Qualys TotalCloud subscription.
-
Save the record.
-
Run the Evaluated Resources Integration integration for the implementation you have configured.
This would add additional details for the Discovered Items from the Qualys CSPM v1.1.0 integration.
After the upgrade, an additional Authentication Type Field, OIDC Authentication, is available.
- If you switch to OIDC Authentication, the OCI Connectors Integration may fail with a 500 error (as shown in the screenshot).

-
To ensure smooth schedule execution, it is recommended to unlink the OCI Connectors Integration from the Connectors Integration.
-
Follow the steps outlined in Qualys CSPM Integration - Installation and Configuration Guide v1.1.0.docx, and ensure the integration execution order is Policy integration > Controls integration > Connectors integration > Evaluations Integration > Evaluated Resources Integration.
-
After the unlink process, deactivate the ‘OCI Connectors integration’ if data collection is working with OIDC Authentication.
-
Additionally, when switching from OIDC Authentication to Basic Authentication, you need to relink the integration and ensure the execution order is: Policy integration > Controls integration > Connectors integration > OCI Connectors integration > Evaluations Integration > Evaluated Resources Integration.