Debugging and Troubleshooting
Why do I see this error while executing docker-compose up command?
"yaml: line 6: did not find expected key"Why do I see this error while executing docker-compose up command?
"yaml: line 6: did not find expected key"
Cause: Issue with syntax of the docker-compose.yml file.
Solution: Correct the docker-compose.yml file. The easiest way would be to copy and paste the yml content from Jira connector Github as is. Alternatively, use the syntax validators yamllint on your linux machine or the online yaml syntax validator to correct the yaml syntax.
Why do I see this error when I execute docker-compose up command with valid YAML file?
“Error response from daemon: manifest for <image-name:tag> not found: manifest unknown: manifest unknown"Why do I see this error when I execute docker-compose up command with valid YAML file?
“Error response from daemon: manifest for <image-name:tag> not found: manifest unknown: manifest unknown"
Cause: Image mentioned in the docker-compose.yml file is not present on docker hub.
Solution: Verify if the image names used in your local docker-compose.yml file and Jira connector's Github docker-compose.yml file have same image names.
If both of them are correct, check if your host needs proxy to connect with docker hub which could be blocking docker pull operation.
Why do I see the error while fetching custom fields?
"An exception occurred while trying to resolve custom field Id for module VMDR and fields [Custom Field Name]". ERROR- "Cannot proceed further until conflict is resolved."Why do I see the error while fetching custom fields?
"An exception occurred while trying to resolve custom field Id for module VMDR and fields [Custom Field Name]". ERROR- "Cannot proceed further until conflict is resolved."
Error in Jira Instance:

Cause:
The presence of two Custom fields with the same name and different field type in your Jira instance leads to this error scenario.
In such a case, you need to configure the Custom Field ID in Ticketing Scheme template for the custom field which has correct field type.
Solution:
Configure Custom field Id for that custom Field in Ticketing Scheme Template as per below Example.
"Impact": {
"value":"${vuln.impact}",
"customFieldId": "customfield_10009"
}
You can read more about this in depth at Configurations.
Jira Client logs error as “Field cannot be set. It is not on the appropriate screen, or unknown”Jira Client logs error as “Field cannot be set. It is not on the appropriate screen, or unknown”
Cause:
- The error in Jira connector's Jira client service refers to the default screen scheme.
- If any of the custom fields or default fields (eg. description) are not part of this 'Default screen scheme' then, while creating a ticket, the Jira API used to create issue can not find this field and throws the error mentioned above.
Solution
Check the fields for which error is being thrown in the logs.
The Jira Connector throws an error response from the Jira API which contains only field custom field ID.
To identify the corresponding field name, use the following curl call.
Curl call to fetch all the fields in Jira instance
curl --request GET --url '<jira-instance-url>/rest/api/latest/field' --user '[email protected]:<API-token>' --header 'Accept: application/json' > output.json
- output.json created in above curl call contains all the fields in your Jira instance
- You can search using custom field ids on this JSON file to find out the field which is in error.
Now, that you have list of your fields ready with you, Go to jira instance (needs admin login here)
- Navigate to Project setting > Screens.
- On this screen click on 'Edit' option infront of 'Default Screen Scheme'. refer below image
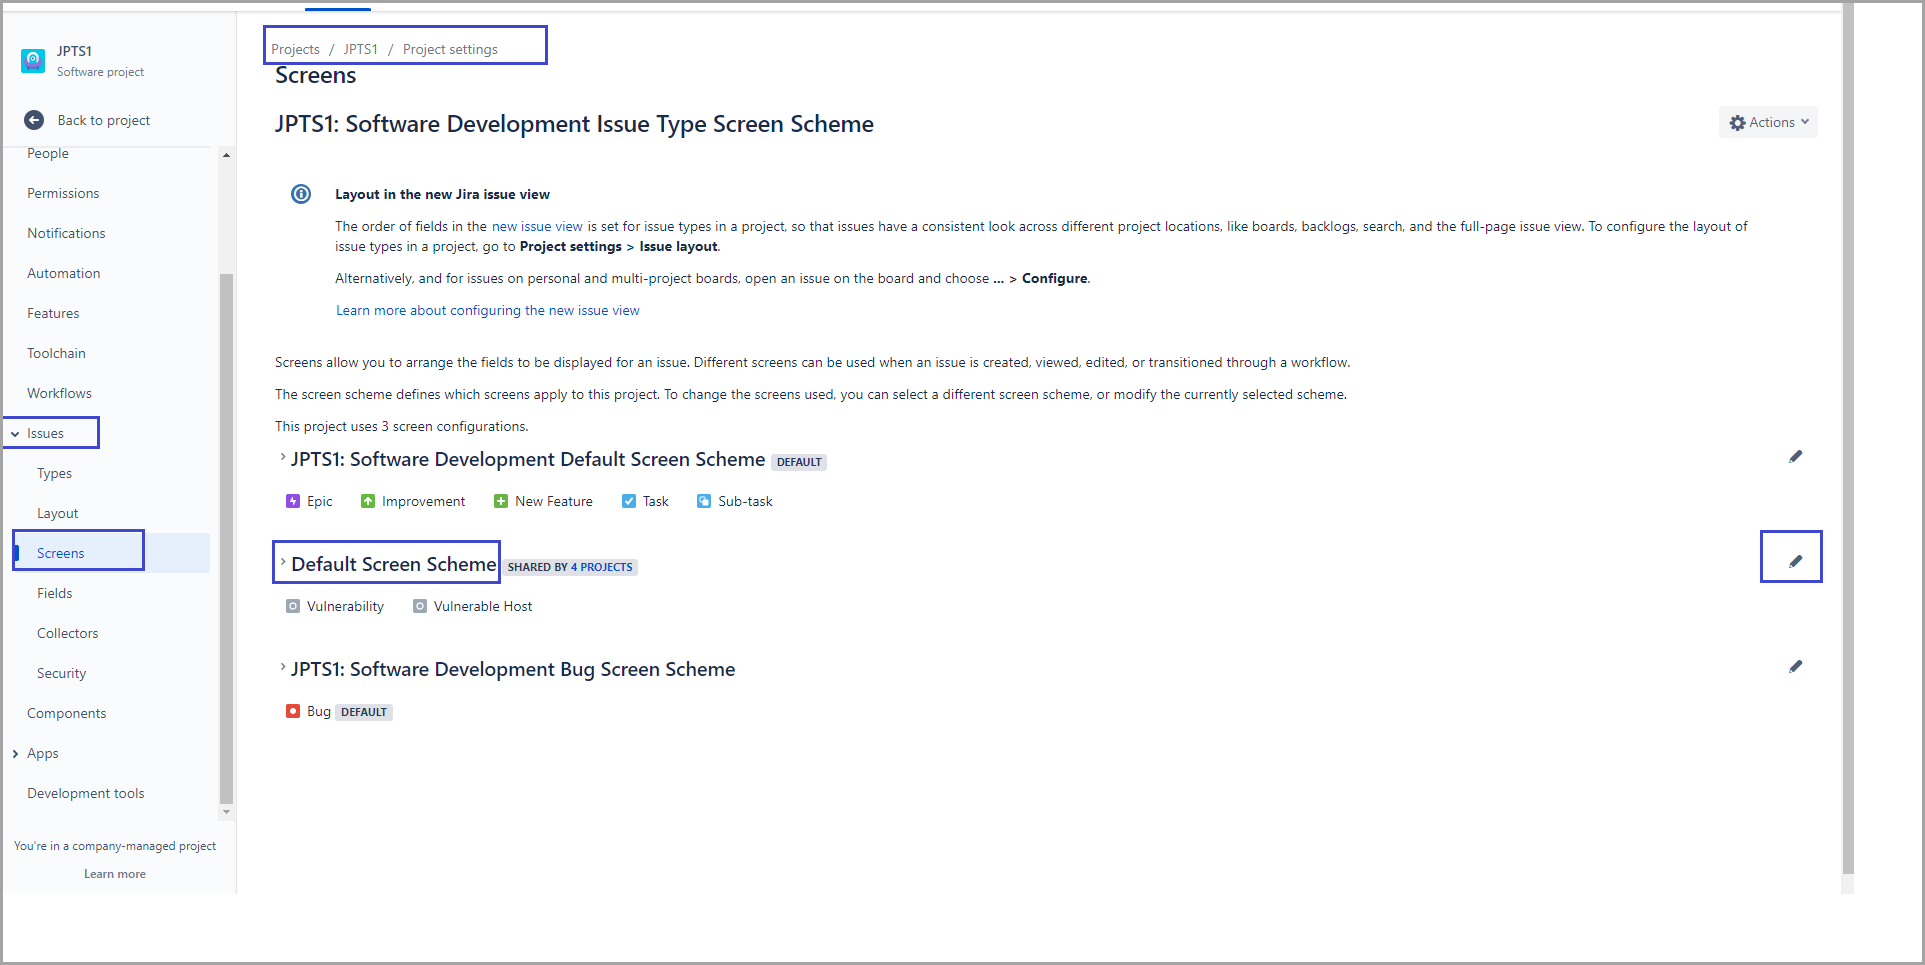
- On 'Configure Screen Scheme — Default Screen Scheme', click Default Screen.

- Configure Screen' page appears.
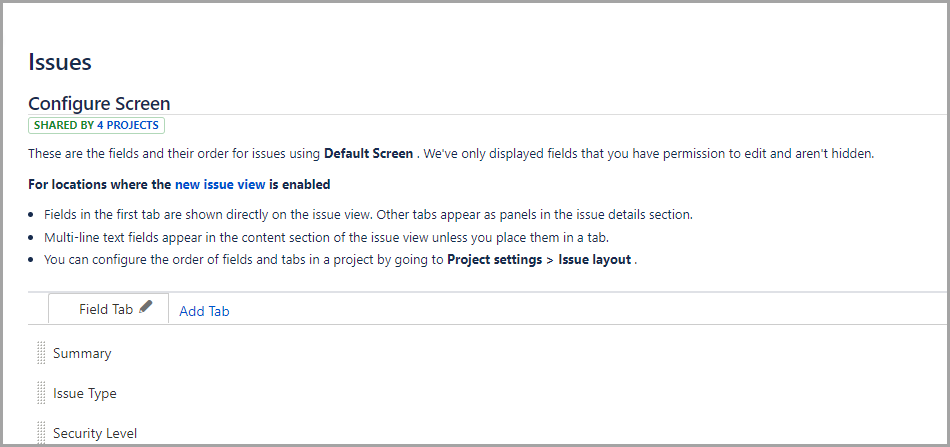
The page lists all the field on this screen. We need to add the fields for errors being thrown to this list. To do so, move down to bottom of the page, you can find an option to add field.
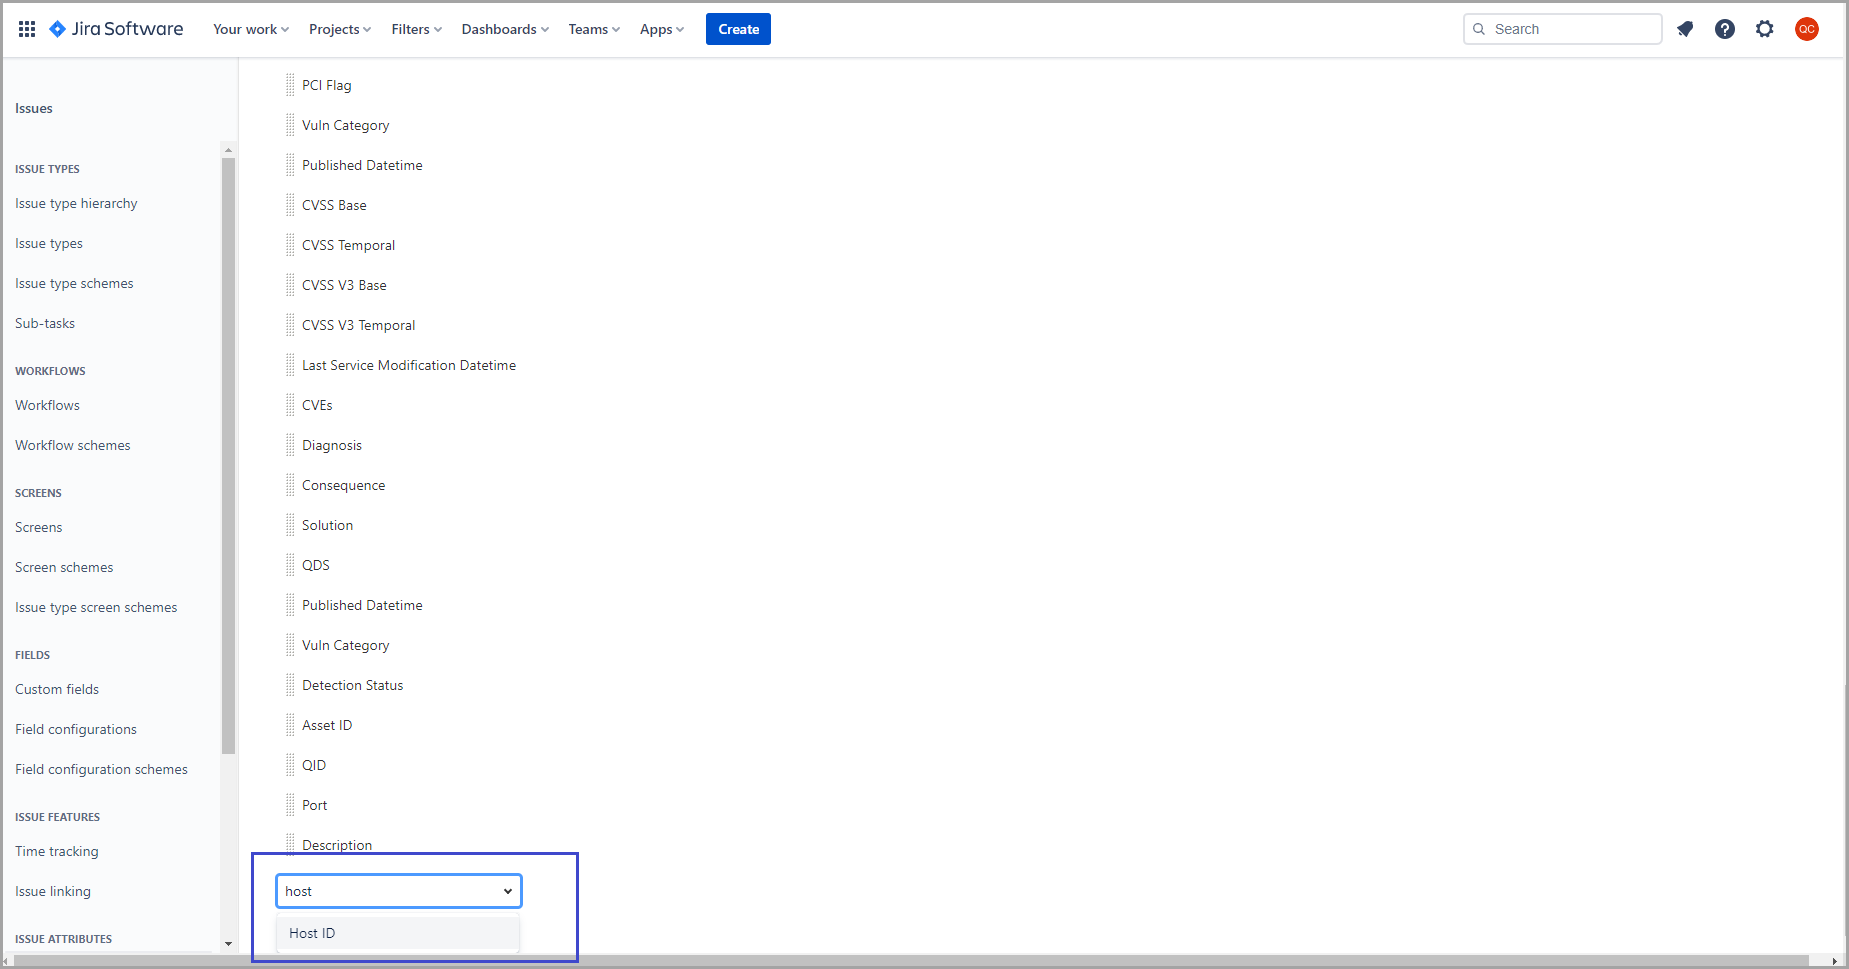
- Type the field name in it, it should populate the respective field, select the same. refer below image.
Once, all the fields are added to this list. from this point onwords, Jira client should not face the screen related error.
After uploading config.json, I observed ‘config.json (Permission denied)’ error in Qualys client Service LogsAfter uploading config.json, I observed ‘config.json (Permission denied)’ error in Qualys client Service Logs
Cause:
As of Jira connector v1.0.1, passwords provided in config.json are encrypted by Qualys client service. After encryption, the service replaces actual passwords in config.json with a static string saying, "Password has been encrypted".
Default owner of the config.json file is 'app' (Jira connector App user - 555) with permissions rw-r--r-- (644). When the file is uploaded to the docker-volume-path/_date/config/, its owner changes from 'app' (Jira connector App user - 555) to root.
Hence, when Qualys client service tries to replace the 'password' in config.json with static string post encrypting your password, it runs into Insufficient permissions to write into config.json file
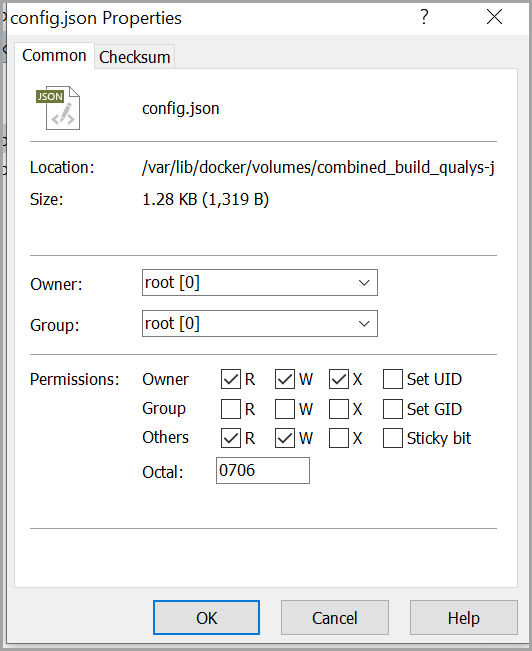
Solution:Provide required permissions to the config.json file at 'docker-volume-path/_date/config/'
dir
Minimum set of permissions required are 706, which you can provide from the Linux terminal
by using the command 'chmod 706 config.json'
On winscp, your permissions matrix for file should look like as follows
Qualys Client Error | java.io.IOException: No space left on deviceQualys Client Error | java.io.IOException: No space left on device
Cause:
The host running JIra Connector has insufficient disk space.
Use the command df -h to check for availalbe disk space. We recommend a minimum 30GB free space to run the Jira Connector application smoothly. To clear space, delete old log files from the 'logs' directory at regular intervals.
KnowledgeBaseService getFirstQid(). Caused by : Could not get a resource from the pool redis.clients.jedis.exceptions.JedisConnectionException: Could not get a resource from the poolKnowledgeBaseService getFirstQid(). Caused by : Could not get a resource from the pool redis.clients.jedis.exceptions.JedisConnectionException: Could not get a resource from the pool
Cause:
The redis host information is not correctly configured in docker-compose.yml.
The 'SPRING_REDIS_HOST' field under 'environment' should be configured with the host IP where redis is running (the host on which Jira connector containers are spinning).
Correct the redis host configuration in docker-compose.yml as highlighted in below sample.
Sample - docker-compose.yml
version: "3.7"
services:
    qualys-client-service:
        image: qualys/qualys-client-for-jira-integration:1.1.0
        networks:
            - qualys-jira-connector
        volumes:
            - qualys-jira-volume:/opt/qualys/common/jiraconnector/
        environment:
            - SPRING_REDIS_HOST=10.10.10.10
            - SPRING_REDIS_PORT=6379
            - SPRING_REDIS_USER=default
            - SPRING_REDIS_PASSWORD=JiraConnectorRedisDB

    redis-client-service:
        image: qualys/redis-test:1.1.0
        networks:
            - qualys-jira-connector
        ports:
          - 6379:6379
        volumes:
          - qualys-jira-volume:/opt/qualys/common/jiraconnector/db

    jira-client-service:
        image: qualys/jira-client-for-jira-integration:1.1.0
        networks:
            - qualys-jira-connector
        volumes:
            - qualys-jira-volume:/opt/qualys/common/jiraconnector/
        depends_on:
            - qualys-client-service
networks:
    qualys-jira-connector:

volumes:
  qualys-jira-volume:
Qualys Client Error | starting userland proxy: listen tcp 0.0.0.0:6379: bind: address already in useQualys Client Error | starting userland proxy: listen tcp 0.0.0.0:6379: bind: address already in use
Cause:
The application and port configured in docker-compose.yml for redis service is already in use.
Solution:In your docker-compose.yml, change the port mapping configuration in docker-compose.yml file.
Refer the highlighted part in following sample.
Sample
version: "3.7"
services:
    qualys-client-service:
        image: qualys/qualys-client-for-jira-integration:1.1.0
        networks:
            - qualys-jira-connector
        volumes:
            - qualys-jira-volume:/opt/qualys/common/jiraconnector/
       environment:
            - SPRING_REDIS_HOST=10.10.10.10
            - SPRING_REDIS_PORT=6379
            - SPRING_REDIS_USER=default
            - SPRING_REDIS_PASSWORD=JiraConnectorRedisDB
    redis-client-service:
        image: qualys/redis-test:.1.1.0
        networks:
            - qualys-jira-connector
        ports:
          - 6379:6379
        volumes:
          - qualys-jira-volume:/opt/qualys/common/jiraconnector/db
    jira-client-service:
        image: qualys/jira-client-for-jira-integration:1.1.0
        networks:
            - qualys-jira-connector
        volumes:
            - qualys-jira-volume:/opt/qualys/common/jiraconnector/
        depends_on:
            - qualys-client-service
networks:
    qualys-jira-connector:
volumes:
  qualys-jira-volume:
Why do I see the below error while processing Output file?
[VMDR] An error occurred while processing detection data. Error: Cannot invoke "com.qualys.jiraclient.model.TicketData.CustomFieldTemplate.getValue()" because the return value of "java.util.Map.get(Object)" is nulljava.lang.NullPointerException: Cannot invoke "com.qualys.jiraclient.model.TicketData.CustomFieldTemplate.getValue()" because the return value of "java.util.Map.get(Object)" is nullWhy do I see the below error while processing Output file?
[VMDR] An error occurred while processing detection data. Error: Cannot invoke "com.qualys.jiraclient.model.TicketData.CustomFieldTemplate.getValue()" because the return value of "java.util.Map.get(Object)" is nulljava.lang.NullPointerException: Cannot invoke "com.qualys.jiraclient.model.TicketData.CustomFieldTemplate.getValue()" because the return value of "java.util.Map.get(Object)" is null
Error in Jira Client Service:
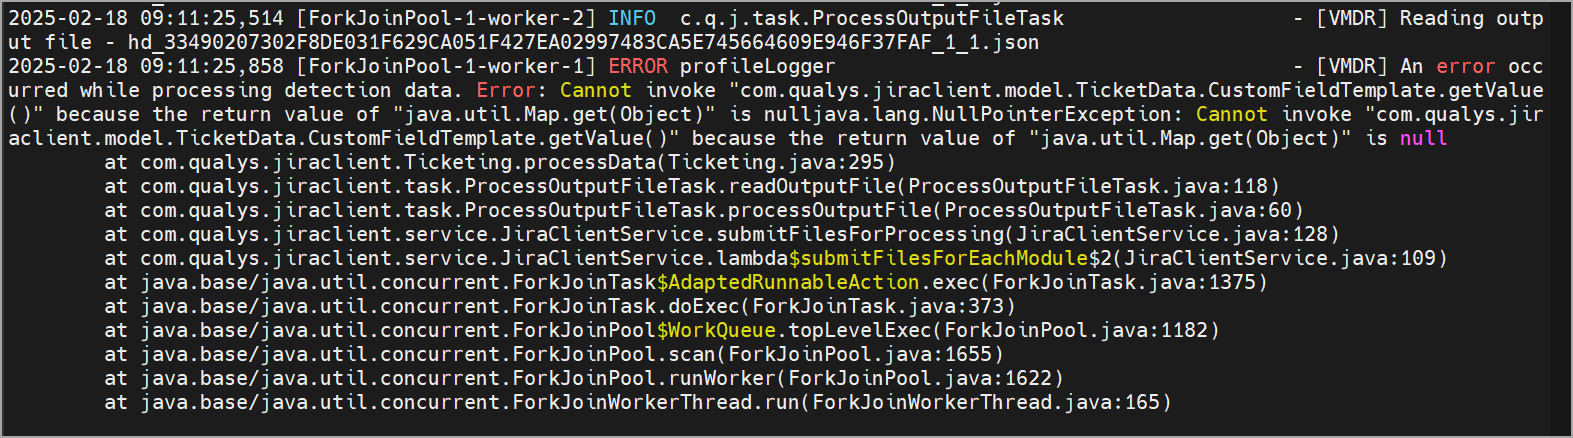
Cause:
The Jira Connector creates tickets based on the Primary Key. By default, the Primary Key custom field is present in all Ticketing Scheme Template. If Primary Key is manually removed from the Ticketing Scheme Template then Jira Client shows this error when processing output files.
Solution:Update the Primary Key Custom field again in ticketing Template in both Parent and Child Ticket payload as per the default Ticketing template.
Example:
If customer is using Ticketing Scheme 1
Parent Ticket-  "Primary Key": {

                 "value": "Host ID:${ID}",

                 "customFieldId": ""

                    },

  Related Ticket- "Primary Key": {

       "value": "QID:${QID}-Port:${PORT}",

       "customFieldId": ""

           },
- Shut down Jira Connector.
- Clear all the files from Output directory, and profileque directory.
- Update the Primary Key Custom field again in the ticketing Template.
- Save Ticketing template file.
- Restart Jira Connector.
Why do I see this error while fetching custom field "Invalid Primary Key type found. Primary Key type should be Text Field (read only)."Why do I see this error while fetching custom field "Invalid Primary Key type found. Primary Key type should be Text Field (read only)."
Error in Jira Client Service:

Cause:
The Primary key custom field is created with field type 'Text Field (read only)' in Jira instance.
If we create Primary key custom field with other field type in Jira Instance, then Jira Client service shows the above Error.
You can either delete the previous Primary key custom field with another field type from Jira Instance and create new 'Primary key' custom field with Text Field (read only) in Jira Instance. Or,
you can create a new 'Primary key' custom field with 'Text Field (read only)' type in Jira instance. The custom field ID of this new custom field needs to be configured in Ticketing template.
"Primary Key": {
      "value": "Host ID:${ID}",

      "customFieldId": "customfield_10045"
},
To obtain this custom field ID, follow the below steps:
- Navigate to project Settings > Fields >Actions > Edit Field> Custom Fields > search for a Custom Field
- Click Edit Details on the custom field.
- The URL above shows the custom field ID. For example, id=10045.

To resolve the issue, please follow below steps:
- Shut down Jira Connector.
- Make the changes in ticketing template as mentioned above.
- Restart Jira Connector.
Why do I see the Warning message in Jira c'lient service-""customfield_10226": "Field 'customfield_10226' cannot be set. It is not on the appropriate screen, or unknown."Why do I see the Warning message in Jira c'lient service-""customfield_10226": "Field 'customfield_10226' cannot be set. It is not on the appropriate screen, or unknown."
Error in Jira Client Service:

Cause:
This error occurs if the fields are not set on the appropriate screen and the appropriate issue type is not selected as per the ticketing scheme selection.
Solution:
You must set the field on the appropriate screen and select the appropriate issue type based on the ticketing scheme selection.
To find the custom field name, use the custom field ID in the jirasetting.json file. Navigate to the following path: Jira connector volume path > _data > jiraconnectorconfig > jiraSettings.json.
To resolve the issue, please follow below steps:
- Navigate to Project Settings > Issues > Fields > Actions> Edit Fields > Custom fields.
- Search the custom field that you want to modify.
- Click on Screen > add or remove associated screen.
- Select the appropriate screen you want to use and then Update.
- Again, search the custom field and click on context > create, edit, or delete context
- Click on Edit Context and then select appropriate issue type as per the ticketing scheme selection. For example, for ticketing scheme 1, you must select 'Vulnerable Host' issue type for the 'Host ID' field.
- Choose applicable context to apply issues in selected project.
- Click Modify.
Why do I see the error for priority field-"priority": "Specify the Priority (name) in the string format" Why do I see the error for priority field-"priority": "Specify the Priority (name) in the string format"
Error in Jira Client Service:

Cause:
Jira Connector uses default priority mapping levels "Highest," "High," "Medium," and "Low," in ticketing template. You can change the default levels as per the priority configuration in your Jira Instance.
If the severity levels in Ticketing template and your Jira Instance are different then, Jira Client shows the Error-"priority": "Specify the Priority (name) in the string format"
For example, if priority mapping levels in ticketing template are "Highest" ,"High", "Medium," and "Low, but the Jira instance has priority mapping levels "Blocker", "Higher", "Medium", "Low" then Jira Client will throw the above error.
Solution:
For example, if your Jira instance has “Blocker”, ”High”, ”Medium”, ”Low” Severity levels, then you must configure same Severity levels in your ticketing template for both Parent Ticket and Related Ticket as shown below.
"priorityMapping": {

        "parent":{

          "matchWith": "${TRURISK_SCORE}",

          "criteria": {

            "Blocker": "850-1000",

            "High":"700-849",

            "Medium": "500-699",

            "Low":"0-499"

          }

        },

        "relatedTicket": {

          "matchWith": "${QDS.content}",

          "criteria": {

            "Blocker":"90-100",

            "High": "70-89",

            "Medium": "40-69",

            "Low": "1-39"

          }
To resolve the issue, please follow below steps:
- Shut down Jira Connector.
- Clear all the files from Output Directory.
- Clear profileque file from Profileque directory.
- Make changes to your Ticketing Template as mentioned above.
- Save the Ticketing template.
- Restart Jira Connector.
Why do I see the error while processing detection-"An error occurred while processing detection data. Error: Index 1 out of bounds for length 1java.lang.ArrayIndexOutOfBoundsException: Index 1 out of bounds for length 1"Why do I see the error while processing detection-"An error occurred while processing detection data. Error: Index 1 out of bounds for length 1java.lang.ArrayIndexOutOfBoundsException: Index 1 out of bounds for length 1"
Error in Jira Client Service:
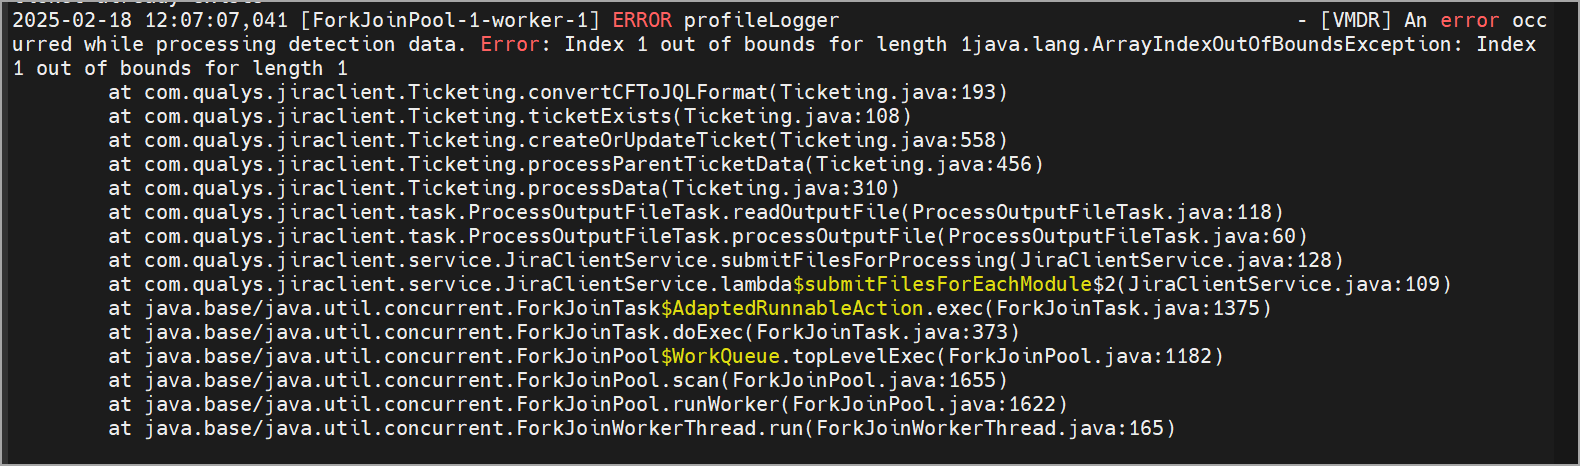
Cause:
Jira Client shows this error when you configure custom field ID for Primary key field in the ticketing template with the wrong format.
Example:
"Primary Key": {

       "value": "QID:${QID}-Port:${PORT}",

       "customFieldId": "10834"

               }
Solution:
You need to configure the primary Key custom field ID in ticketing template with correct format.
Example:
"Primary Key": {

      "value":"QID:${QID}-Port:${PORT}",

      "customFieldId": "customfield_10834"

               }
To resolve the issue, please follow below steps:
- Shut down Jira Connector.
- Clear all the files from Output Directory.
- Clear profileque file from Profileque directory.
- Make changes to your Ticketing Template as mentioned above.
- Save the Ticketing template.
- Restart Jira Connector.
Why do I see the Warning message in Jira client service-"Custom fields [Custom field names Ex. CVSS V3 Temporal] were not found on Jira instance but are added in template"Why do I see the Warning message in Jira client service-"Custom fields [Custom field names Ex. CVSS V3 Temporal] were not found on Jira instance but are added in template"
Error in Jira Client Service:

Cause:
The Jira Client cannot fetch those fields because there are spelling differences between the fields in the ticketing template and the fields in the Jira instance, such as extra white spaces, capitalization, or case differences. All custom fields are case-sensitive.
As a result, those fields will not be saved in the jiraSettings.json file, and you will not be able to see their data in the ticket.
To locate the jiraSettings.json file, navigate to: Docker volume path > _Data > jiraconnectorconfig > jiraSettings.json.
Solution:
If the field is not present in Jira Instance, then you need to create that custom field in Jira Instance.
If the field is present in Jira Instance but Jira client service still shows the error, then you need to modify the field to match the exact spelling of the field name in the ticketing template.
To resolve the issue, please follow below steps:
- Search the custom field in Jira Instance and Edit the details.
- Copy the custom field name from ticketing template and paste it in Jira Instance custom field details.
- Update the Field.
- Follow the steps for all custom fields for which Jira client shows the above WARN message or fields which are not present in jiraSettings.json file.
- Restart Jira Connector.
The Tickets created before the modification of those custom fields will not show the data for those fields. However, after the custom field is modified, newly created and updated tickets will display the data for that field.
Why do I see the error for field-"labels": "Field cannot be set. It is not on the appropriate screen, or unknown."Why do I see the error for field-"labels": "Field cannot be set. It is not on the appropriate screen, or unknown."
Error in Jira Client Service:
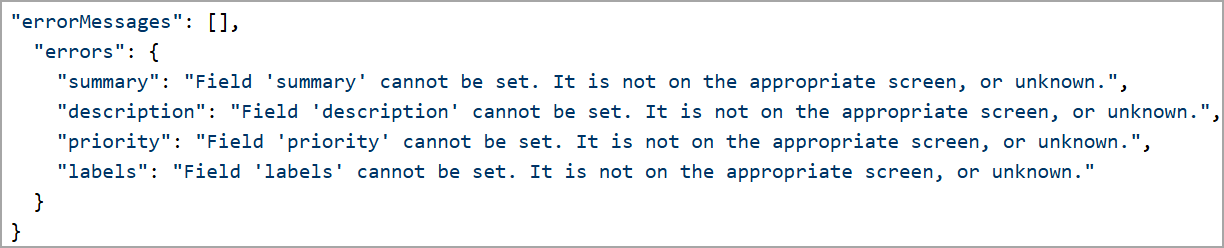
Cause:
Jira connectors refer to the default screen scheme for creating tickets in the Jira instance. When we use the default screen, those fields are already added to the screen, but when we use a different screen, those fields are not part of this screen. Hence, Jira API cannot find this field while creating a ticket and throws the above mentioned error.
Solution:
You need to add those fields to the screen that you use in Jira Instance.
To resolve the issue, please follow below steps:
- Go to the Project > Project Setting > Issues > Screen > Action > Edit Screen.
- Click Screen scheme, then click the screen you are using. You will see the fields that are currently available on it.
- Click Select Field and add those fields labels, description, priority, summary.