Configure Plugin for Pipeline Projects
Perform the following steps to configure the plugin for pipeline projects.
- Open your application’s pipeline project and click 'Pipeline Syntax' to enter the Snippet Generator.
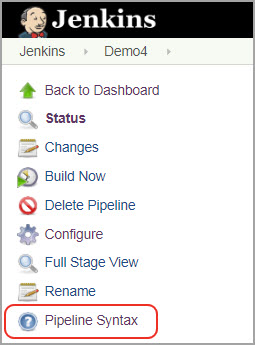
- Select 'qualysPolicyComplianceScanner:Scan Host/Instances with Qualys PC' from the Sample Steps drop-down menu.

Configure API Login
Now, you are ready to configure the plugin. The first step is to confirm that Jenkins can communicate to the Qualys Cloud Platform via the Qualys Policy Compliance (PC) API.
You need valid account credentials for an active Qualys PC subscription. The account must have API access enabled and a role assigned with all necessary permissions. Qualys recommends using a service account restricted to API access only (no UI access) and having the least privileges possible.
Perform the following steps to configure API login:
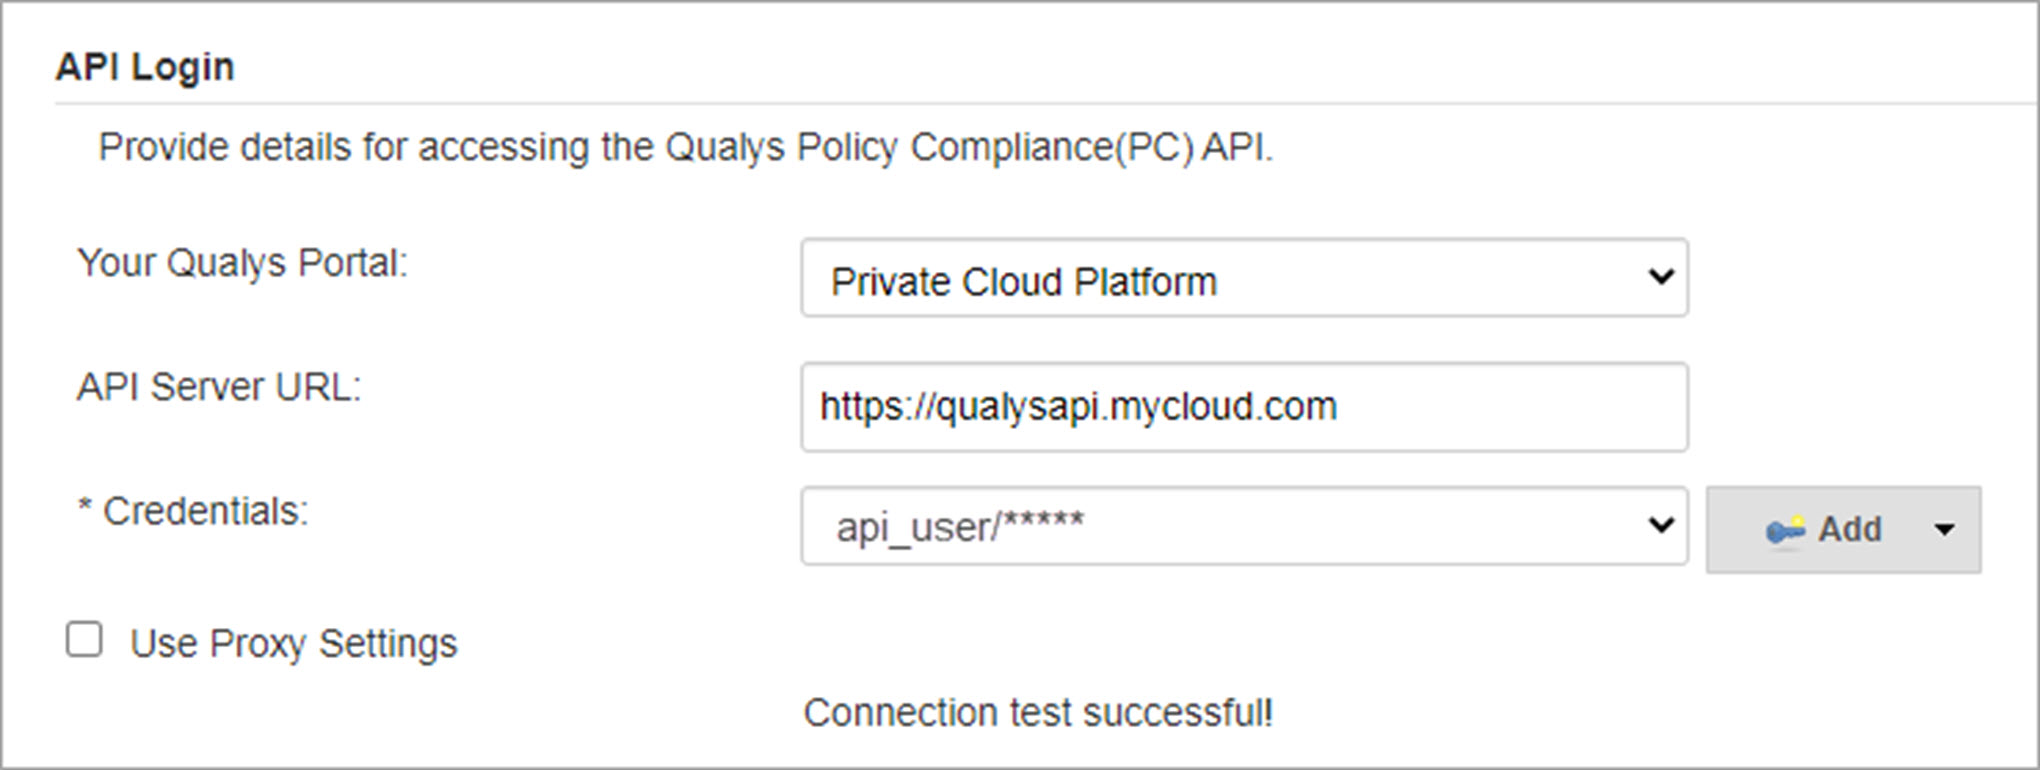
Qualys Enterprise TruRisk™ Platform- Select the Qualys platform where your Qualys account resides and your account credentials to authenticate to the PC API server.
- Click Add to add the new user's account credentials to the Jenkins store. Once added, the credentials are listed in the Credentials drop-down.
What you select here depends on the Qualys platform your organization is using. Learn more.
If your Jenkins instance does not have direct Internet access and requires a proxy, click Use Proxy Settings checkbox and enter the required information.

-
Click Test Connection.
If you have entered the correct API server URL for your subscription and the valid credentials, you can see the message Connection test successful!If your Qualys account resides on a private cloud platform, select Private Cloud Platform as your Qualys cloud platform, and specify the API server URL and your account credentials to access the API.
Configure Scan Options
Next, either enter the host IP in your Qualys PC account or AWS EC2 Cloud Instance information that you wish to scan. You can also specify an environment variable for the Host IP and EC2 ID.
We currently support scanning only a single IP or EC2 instance.
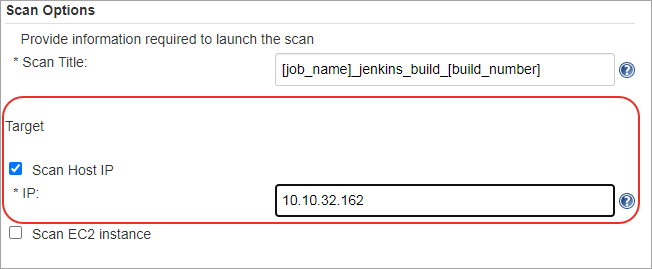
By default, the PC scan name is:
[job_name]_jenkins_build_[build_number] + timestamp
You can edit the scan name, but a timestamp is appended regardless.
Optionally, to scan your assets residing on an EC2 cloud instance:
- Provide the ID of Amazon EC2 Instance on which you want to launch the PC scan.
- Select the connector name for the instance.
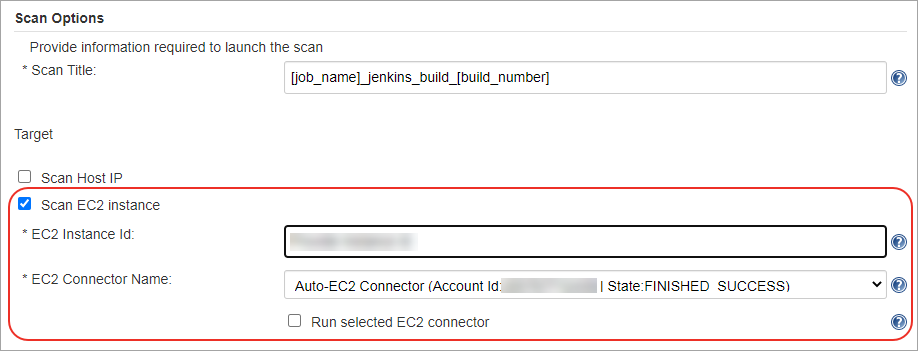
When you select the Run selected EC2 connector check box, we run the EC2 connector to get updated information about the instance only if the configured EC2 instance ID state is returned as 'Unknown' by Qualys host asset APIs. After running the connector, a scan launch attempt will be made only if the EC2 instance state is known.
We call the hostasset API with the Id and accountId of the ec2 instance to get the region/endpoint details.
The Create Authentication Record step is optional. If you already have an authentication record for the host in your account, we use that authentication record to authenticate to the host.
If the authentication record for the host in your account is not present, select Create Authentication Record and then select Windows or Unix platform. Click the Add button to add your host credentials, then select them from the Credentials drop-down field.
When the plugin runs, it creates an authentication record with the name Jenkins_windows_[Job Name] for Windows or Jenkins_unix_[Job Name] for Unix based on the platform selection.
New authentication record creation from the plugin will fail if an authentication record for the target host already exists in your account. You need to delete the host authentication record from your account to create a new authentication record from the plugin.

Next, configure scan parameters.
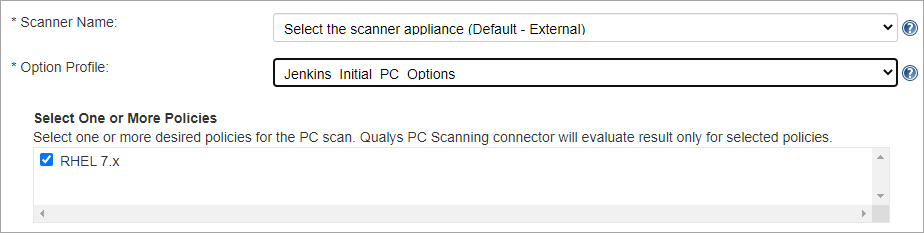
Scanner Name – Select the scanner appliance name from the drop-down that the PC will use to scan your host assets on your network or on an EC2 instance to check the compliance of your systems against your policies. The default value is the External scanner if you do not select a scanner from the Scanner drop-down.
Selecting the Host IP option shows you all the scanners, including those configured for scanning EC2 instances. When you select the Cloud Instance (AWS EC2) option, we show you only those scanners configured to scan EC2 instances. Select the appropriate scanner configured to scan your EC2 instance.
Option Profile – The option profile contains the settings used for a compliance scan. Select the option profile and one or more policies for the PC scan. We show only the policies for the selected option profile. The plugin will evaluate the results for selected policies only.
The option profiles and scanners may take a bit longer to populate after connection to the API server is successful.
Configure Scan Pass and Fail Criteria
Configure the pass and fail criteria for a build using the following step
You can set any or all of the three conditions to fail the build. The three conditions are:
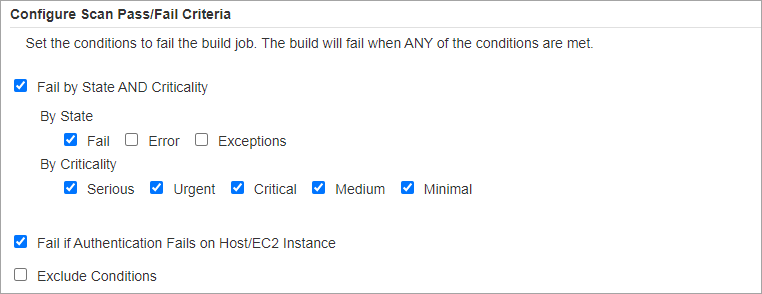
- Fail by State AND Criticality – This criterion lets you choose the states and the corresponding criticality to fail a build. The build fails if both the state and the criticality conditions are fulfilled. The build can fail for all or any of these states for the controls you are evaluating: Fail, Error, and Exceptions, and any or all of these criticalities: Serious, Urgent, Critical, Medium, and Minimal.
- Fail if Authentication Fails on Host/EC2 Instance – This criteria, if selected, fails the build if the plugin fails to authenticate to the host IP or EC2 Instance using the authentication record. If this option is not selected and the authentication fails, we pass the build, but no reports are generated.
- Exclude Condition - You can use the Exclude Conditions option to ignore specified CIDs or Control IDs while evaluating the policy for failure conditions. For example, it does not fail a build if an excluded CID is detected for a policy in the scan even if that CID meets the specified failure condition. We evaluate the Exclude conditions first and remove the CIDs that match the exclude conditions before evaluating the Failure Conditions.
Timeout Settings
Scan status polling frequency and timeout duration for the scan.
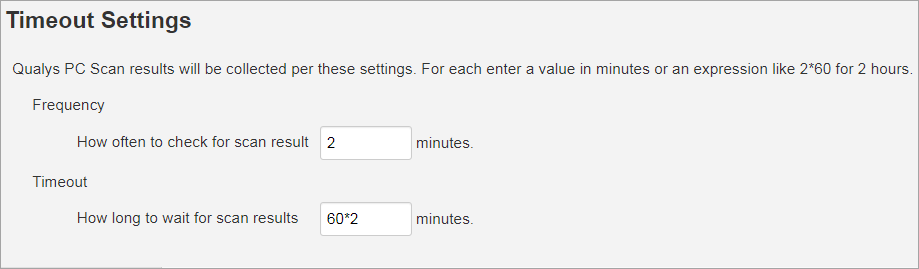
In the Timeout settings, specify the polling frequency in minutes for collecting the PC scan status data and the timeout duration for a running Jenkins build. The default value for polling frequency is 2 minutes, and the default timeout duration is 120 minutes.
Next, click Generate Pipeline Script. This is your pipeline snippet for launching a PC scan.

The pipeline snippet is now ready to be plugged into your pipeline script.