Deploy Cloud Agent for Windows VMs via Azure Deployment Policy
Using the Microsoft Azure deployment policy, you can configure the auto-deployment of Qualys Cloud Agent extensions on the Windows virtual machines (VMs) for which these extensions are not available.
Assignment Policy Creation
The following are the steps to create the deployment policy:
- Copy the following custom policy script and save it on your local machine (For example, c:\temp\qagent-windows-qualys.json).
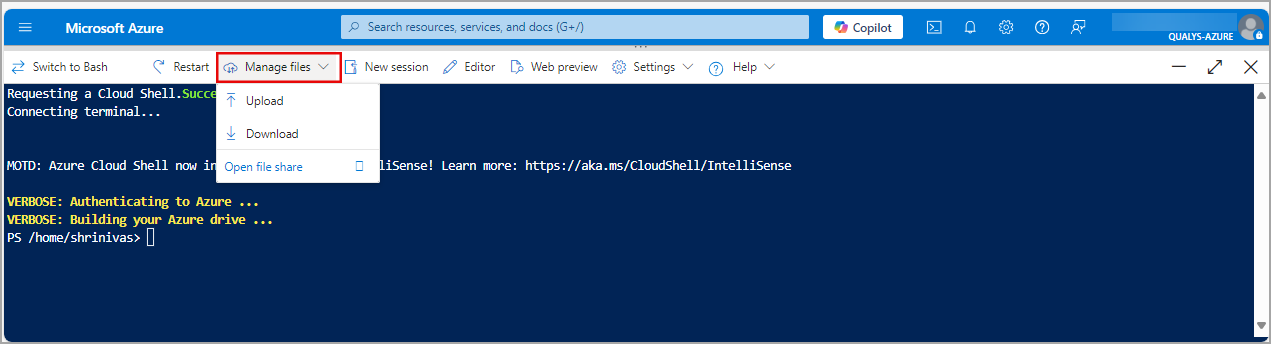
{ "policyType": "Custom", "mode": "All", "displayName": "Autodeploy Qualys Agent Extension for Windows VMs", "parameters": { "effect": { "type": "String", "metadata": { "displayName": "Effect", "description": "Deploy, Audit, Disabled", "portalReview": "true" }, "allowedValues": [ "DeployIfNotExists", "AuditIfNotExists", "Disabled" ], "defaultValue": "DeployIfNotExists" }, "licensecode": { "type": "String", "metadata": { "displayName": "LicenseCode", "description": "Qualys Licensecode", "portalReview": "true" } }, "excludetagname": { "type": "String", "metadata": { "displayname": "Exclusion tag name", "description": "Tag name to exclude from Qualys rollout", "portalReview": "true" }, "defaultValue": "noqualysagent" }, "excludetagvalue": { "type": "String", "metadata": { "displayname": "Exclusion tag value", "description": "Tag value to exclude from Qualys rollout", "portalReview": "true" }, "defaultValue": "true" } }, "policyRule": { "if": { "allOf": [ { "field": "type", "equals": "Microsoft.Compute/virtualMachines" }, { "anyOf": [ { "field": "Microsoft.Compute/virtualMachines/osProfile.windowsConfiguration", "exists": "true" }, { "field": "Microsoft.Compute/virtualMachines/storageProfile.osDisk.osType", "like": "Windows*" } ] }, { "anyOf": [ { "field": "[concat('tags[', parameters('excludetagname'), ']')]", "exists": false }, { "field": "[concat('tags[', parameters('excludetagname'), ']')]", "notEquals": "[parameters('excludetagvalue')]" } ] } ] }, "then": { "effect": "[parameters('effect')]", "details": { "type": "Microsoft.Compute/virtualMachines/extensions", "name": "QualysAgent", "roleDefinitionIds": [ "/providers/microsoft.authorization/roleDefinitions/9980e02c-c2be-4d73-94e8-173b1dc7cf3c" ], "evaluationDelay": "AfterProvisioning", "existenceCondition": { "allOf": [ { "field": "Microsoft.Compute/virtualMachines/extensions/type", "equals": "QualysAgent" }, { "field": "Microsoft.Compute/virtualMachines/extensions/publisher", "equals": "Qualys" }, { "field": "Microsoft.Compute/virtualMachines/extensions/provisioningState", "equals": "Succeeded" } ] }, "deployment": { "properties": { "mode": "incremental", "parameters": { "vmName": { "value": "[field('name')]" }, "location": { "value": "[field('location')]" }, "licensecode": { "value": "[parameters('licensecode')]" } }, "template": { "$schema": "https://schema.management.azure.com/schemas/2015-01-01/deploymentTemplate.json#", "contentVersion": "1.0.0.0", "parameters": { "vmName": { "type": "string" }, "location": { "type": "string" }, "licensecode": { "type": "string" } }, "resources": [ { "apiVersion": "2019-07-01", "name": "[concat(parameters('vmName'), '/QualysAgent')]", "type": "Microsoft.Compute/virtualMachines/extensions", "location": "[parameters('location')]", "properties": { "publisher": "Qualys", "type": "QualysAgent", "autoUpgradeMinorVersion": true, "typeHandlerVersion": "1.6", "settings": { "LicenseCode": "[parameters('licensecode')]" } } } ] } } } } } } }{ "policyType": "Custom", "mode": "All", "displayName": "Autodeploy Qualys Agent Extension for Windows VMs", "parameters": { "effect": { "type": "String", "metadata": { "displayName": "Effect", "description": "Deploy, Audit, Disabled", "portalReview": "true" }, "allowedValues": [ "DeployIfNotExists", "AuditIfNotExists", "Disabled" ], "defaultValue": "DeployIfNotExists" }, "licensecode": { "type": "String", "metadata": { "displayName": "LicenseCode", "description": "Qualys Licensecode", "portalReview": "true" } }, "excludetagname": { "type": "String", "metadata": { "displayname": "Exclusion tag name", "description": "Tag name to exclude from Qualys rollout", "portalReview": "true" }, "defaultValue": "noqualysagent" }, "excludetagvalue": { "type": "String", "metadata": { "displayname": "Exclusion tag value", "description": "Tag value to exclude from Qualys rollout", "portalReview": "true" }, "defaultValue": "true" } }, "policyRule": { "if": { "allOf": [ { "field": "type", "equals": "Microsoft.Compute/virtualMachines" }, { "anyOf": [ { "field": "Microsoft.Compute/virtualMachines/osProfile.windowsConfiguration", "exists": "true" }, { "field": "Microsoft.Compute/virtualMachines/storageProfile.osDisk.osType", "like": "Windows*" } ] }, { "anyOf": [ { "field": "[concat('tags[', parameters('excludetagname'), ']')]", "exists": false }, { "field": "[concat('tags[', parameters('excludetagname'), ']')]", "notEquals": "[parameters('excludetagvalue')]" } ] } ] }, "then": { "effect": "[parameters('effect')]", "details": { "type": "Microsoft.Compute/virtualMachines/extensions", "name": "QualysAgent", "roleDefinitionIds": [ "/providers/microsoft.authorization/roleDefinitions/9980e02c-c2be-4d73-94e8-173b1dc7cf3c" ], "evaluationDelay": "AfterProvisioning", "existenceCondition": { "allOf": [ { "field": "Microsoft.Compute/virtualMachines/extensions/type", "equals": "QualysAgent" }, { "field": "Microsoft.Compute/virtualMachines/extensions/publisher", "equals": "Qualys" }, { "field": "Microsoft.Compute/virtualMachines/extensions/provisioningState", "equals": "Succeeded" } ] }, "deployment": { "properties": { "mode": "incremental", "parameters": { "vmName": { "value": "[field('name')]" }, "location": { "value": "[field('location')]" }, "licensecode": { "value": "[parameters('licensecode')]" } }, "template": { "$schema": "https://schema.management.azure.com/schemas/2015-01-01/deploymentTemplate.json#", "contentVersion": "1.0.0.0", "parameters": { "vmName": { "type": "string" }, "location": { "type": "string" }, "licensecode": { "type": "string" } }, "resources": [ { "apiVersion": "2019-07-01", "name": "[concat(parameters('vmName'), '/QualysAgent')]", "type": "Microsoft.Compute/virtualMachines/extensions", "location": "[parameters('location')]", "properties": { "publisher": "Qualys", "type": "QualysAgent", "autoUpgradeMinorVersion": true, "typeHandlerVersion": "1.6", "settings": { "LicenseCode": "[parameters('licensecode')]" }, "protectedSettings": { "ProxySettings": { "Servers": [ { "Type": "NoAuth", "Url": "http://ProxyServerIP:Port" } ] } } } } ] } } } } } } }{ "policyType": "Custom", "mode": "All", "displayName": "Autodeploy Qualys Agent Extension for Windows VMs", "parameters": { "effect": { "type": "String", "metadata": { "displayName": "Effect", "description": "Deploy, Audit, Disabled", "portalReview": "true" }, "allowedValues": [ "DeployIfNotExists", "AuditIfNotExists", "Disabled" ], "defaultValue": "DeployIfNotExists" }, "licensecode": { "type": "String", "metadata": { "displayName": "LicenseCode", "description": "Qualys Licensecode", "portalReview": "true" } }, "excludetagname": { "type": "String", "metadata": { "displayname": "Exclusion tag name", "description": "Tag name to exclude from Qualys rollout", "portalReview": "true" }, "defaultValue": "noqualysagent" }, "excludetagvalue": { "type": "String", "metadata": { "displayname": "Exclusion tag value", "description": "Tag value to exclude from Qualys rollout", "portalReview": "true" }, "defaultValue": "true" } }, "policyRule": { "if": { "allOf": [ { "field": "type", "equals": "Microsoft.Compute/virtualMachines" }, { "anyOf": [ { "field": "Microsoft.Compute/virtualMachines/osProfile.windowsConfiguration", "exists": "true" }, { "field": "Microsoft.Compute/virtualMachines/storageProfile.osDisk.osType", "like": "Windows*" } ] }, { "anyOf": [ { "field": "[concat('tags[', parameters('excludetagname'), ']')]", "exists": false }, { "field": "[concat('tags[', parameters('excludetagname'), ']')]", "notEquals": "[parameters('excludetagvalue')]" } ] } ] }, "then": { "effect": "[parameters('effect')]", "details": { "type": "Microsoft.Compute/virtualMachines/extensions", "name": "QualysAgent", "roleDefinitionIds": [ "/providers/microsoft.authorization/roleDefinitions/9980e02c-c2be-4d73-94e8-173b1dc7cf3c" ], "evaluationDelay": "AfterProvisioning", "existenceCondition": { "allOf": [ { "field": "Microsoft.Compute/virtualMachines/extensions/type", "equals": "QualysAgent" }, { "field": "Microsoft.Compute/virtualMachines/extensions/publisher", "equals": "Qualys" }, { "field": "Microsoft.Compute/virtualMachines/extensions/provisioningState", "equals": "Succeeded" } ] }, "deployment": { "properties": { "mode": "incremental", "parameters": { "vmName": { "value": "[field('name')]" }, "location": { "value": "[field('location')]" }, "licensecode": { "value": "[parameters('licensecode')]" } }, "template": { "$schema": "https://schema.management.azure.com/schemas/2015-01-01/deploymentTemplate.json#", "contentVersion": "1.0.0.0", "parameters": { "vmName": { "type": "string" }, "location": { "type": "string" }, "licensecode": { "type": "string" } }, "resources": [ { "apiVersion": "2019-07-01", "name": "[concat(parameters('vmName'), '/QualysAgent')]", "type": "Microsoft.Compute/virtualMachines/extensions", "location": "[parameters('location')]", "properties": { "publisher": "Qualys", "type": "QualysAgent", "autoUpgradeMinorVersion": true, "typeHandlerVersion": "1.6", "settings": { "LicenseCode": "[parameters('licensecode')]" }, "protectedSettings": { "ProxySettings": { "Servers": [ { "Type": "RegularAuth", "Url": "http://username:password@ProxyServerIP:Port" } ] } } } } ] } } } } } } } - In the Azure Cloudshell user interface, click Manage files > Upload to upload the custom policy script you had saved earlier. A confirm message is displayed on successful upload of custom policy script.
- Enter the following command in the Azure Cloudshell to configure your custom policy script.
New-AzPolicyDefinition -Name 'Policyname' -DisplayName 'Autodeploy Qualys Agent Extension for Windows VMs' -Policy './qagent-windows-qualys.json'
A confirmation message is displayed in Azure Cloudshell.
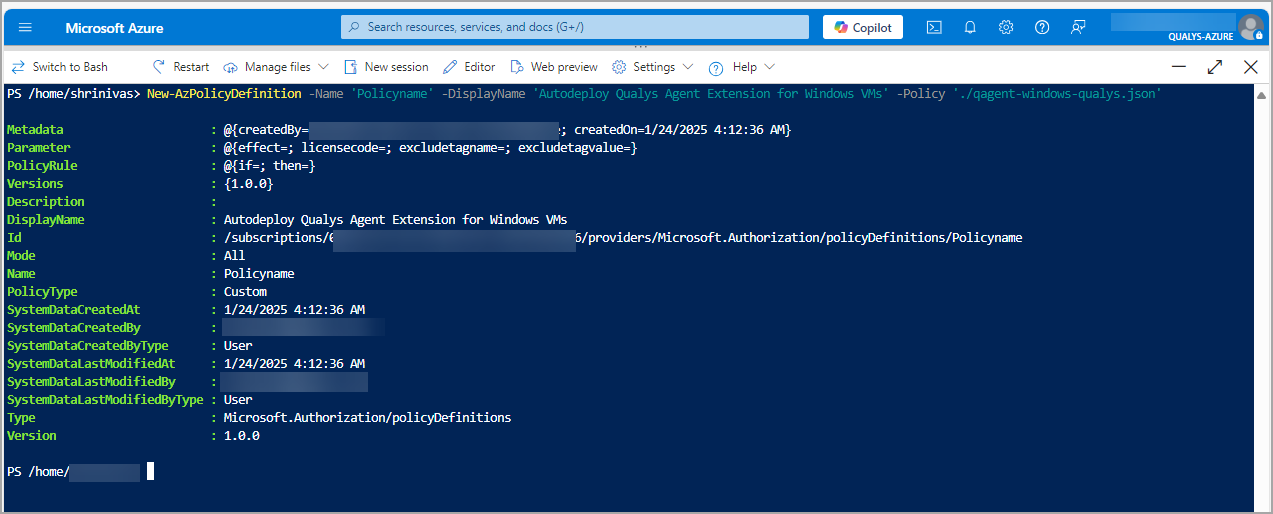
The above command contains the sample values. Replace the values as per your requirements.
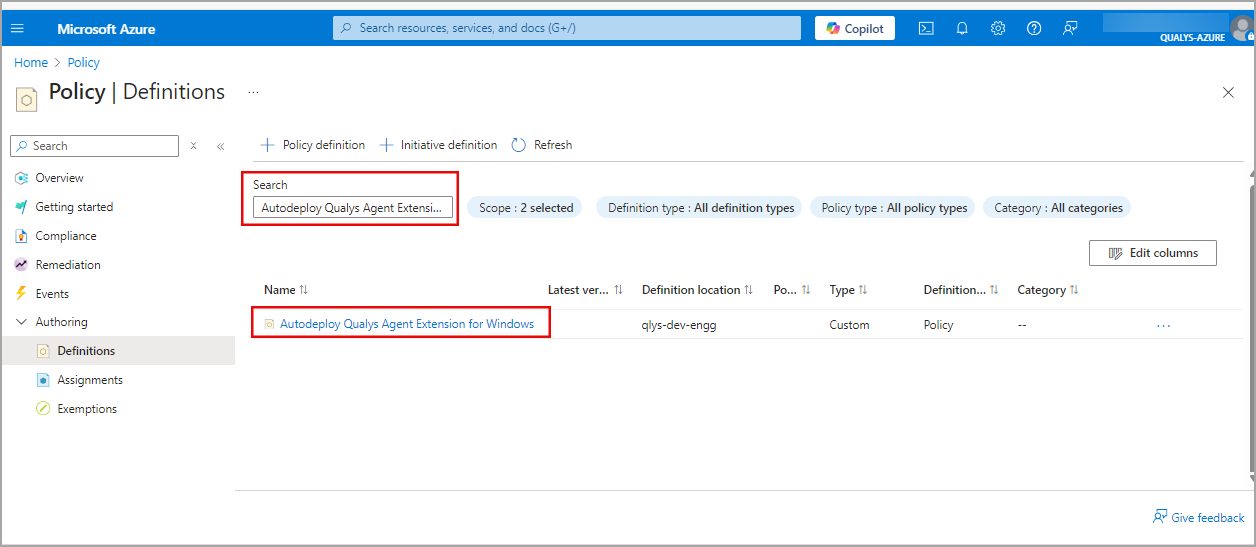
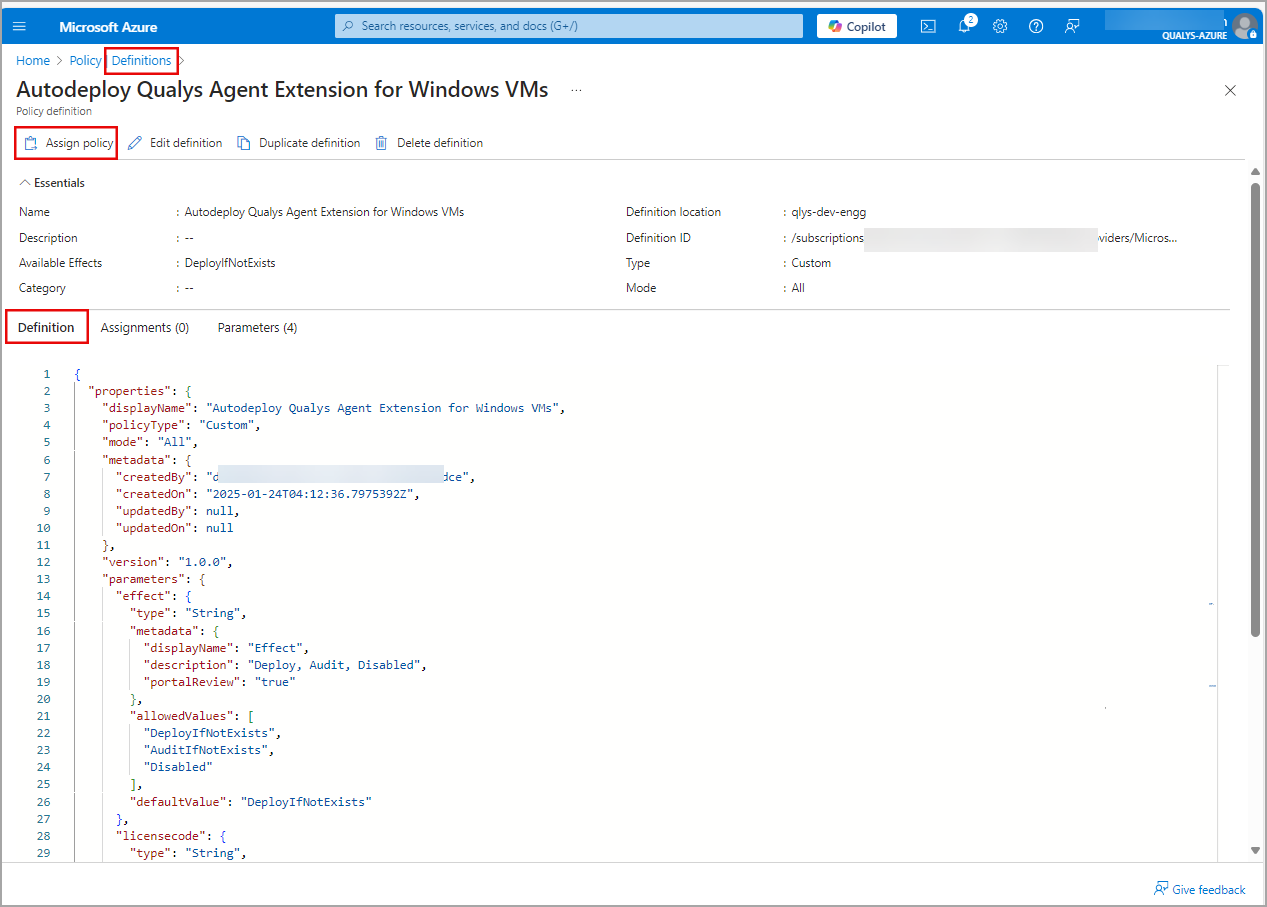
- In the Microsoft Azure user interface, navigate to Policy > Authoring > Definitions to search for a newly created policy.
- Click the newly created custom policy to open the policy details page.
- In policy details page, click Assign policy. The Assign policy page opens.
- Enter the following details in the Basics tab of Assign policy page.

Scope: Specify the scope for your deployment policy. By default, the policy will be applied at subscription level.
Exclusions: If you want to exclude any resource group from the deployment scope, specify it here.
Policy definition: Enter the definition for your policy.
Overrides: You can change the effects or referenced versions of definitions for all or a subset of resources evaluated by this assignment.
Assignment name: Enter the name for this assignment.
Assignment ID: The assignment ID is auto-generated for this assignment policy.
Description: Enter the brief description about your policy.
Policy enforcement: Switch the Enabled toggle to ON to enforce the custom policy to selected resource groups. - Click Next. The Parameters tab opens.
- Enter the following details in the Parameters tab.
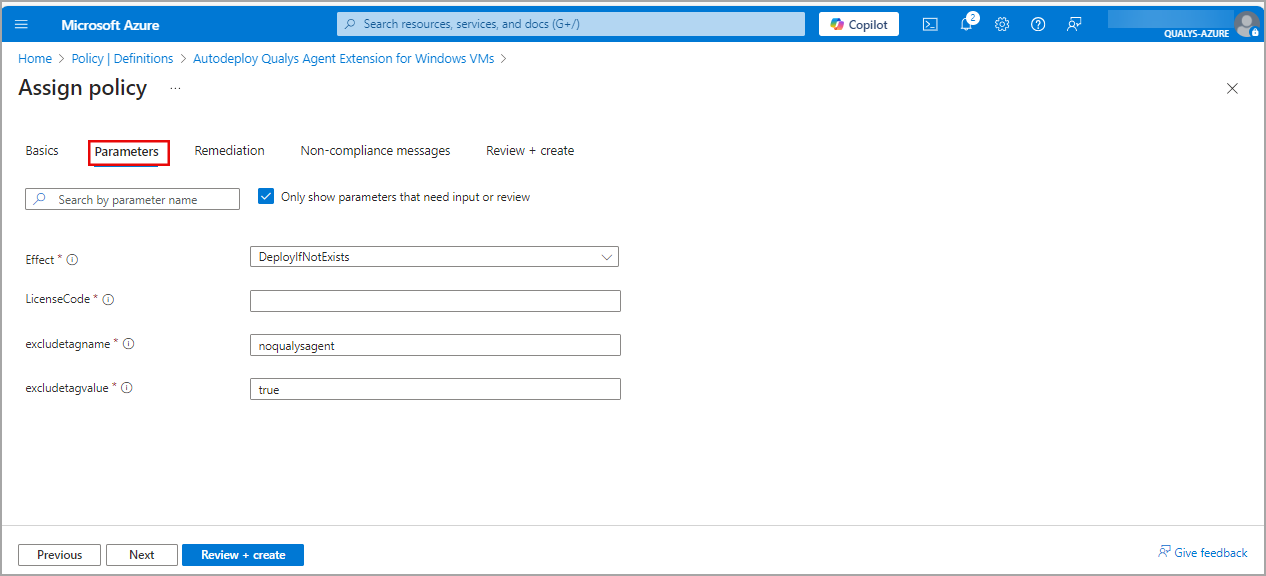
Only the parameter that need input or review checkbox: Select this checkbox to see only those parameters which are mandatory for policy assignment.
Effect: Select an available option from the drop-down menu as per your requirements. For policy deployment select deployifNotExists.
LicenseCode: Enter the Qualys Azure Extension's license code retrieved from your Qualys subscription. To learn more about retrieving License code, refer to Download Cloud Agent Installer.
excludetagname: Add the tags for the assets that you want to exclude from this assignment.
excludetagvalue: Enter the tag value for the excluded tags. - Click Next. The Remediation tab opens.
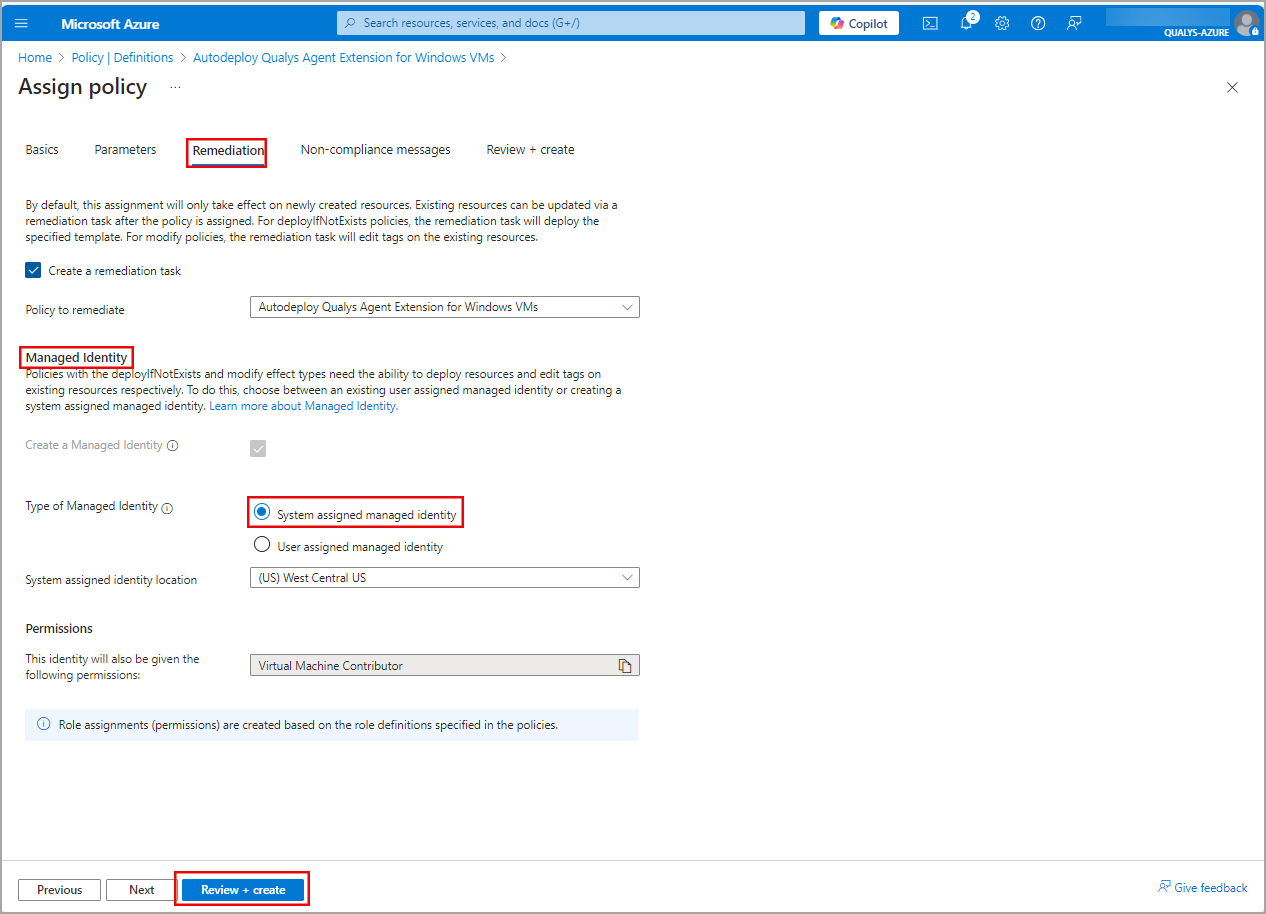
Create a remediation task: Select this checkbox if you want to update the existing assets without Qualys extension to get updated.
Managed Identity: Ensure that you have created a managed identity as the policies with DeployifNotExists and modify policies options need it for policy deployment. - Click Review + create. The Review + create tab opens.
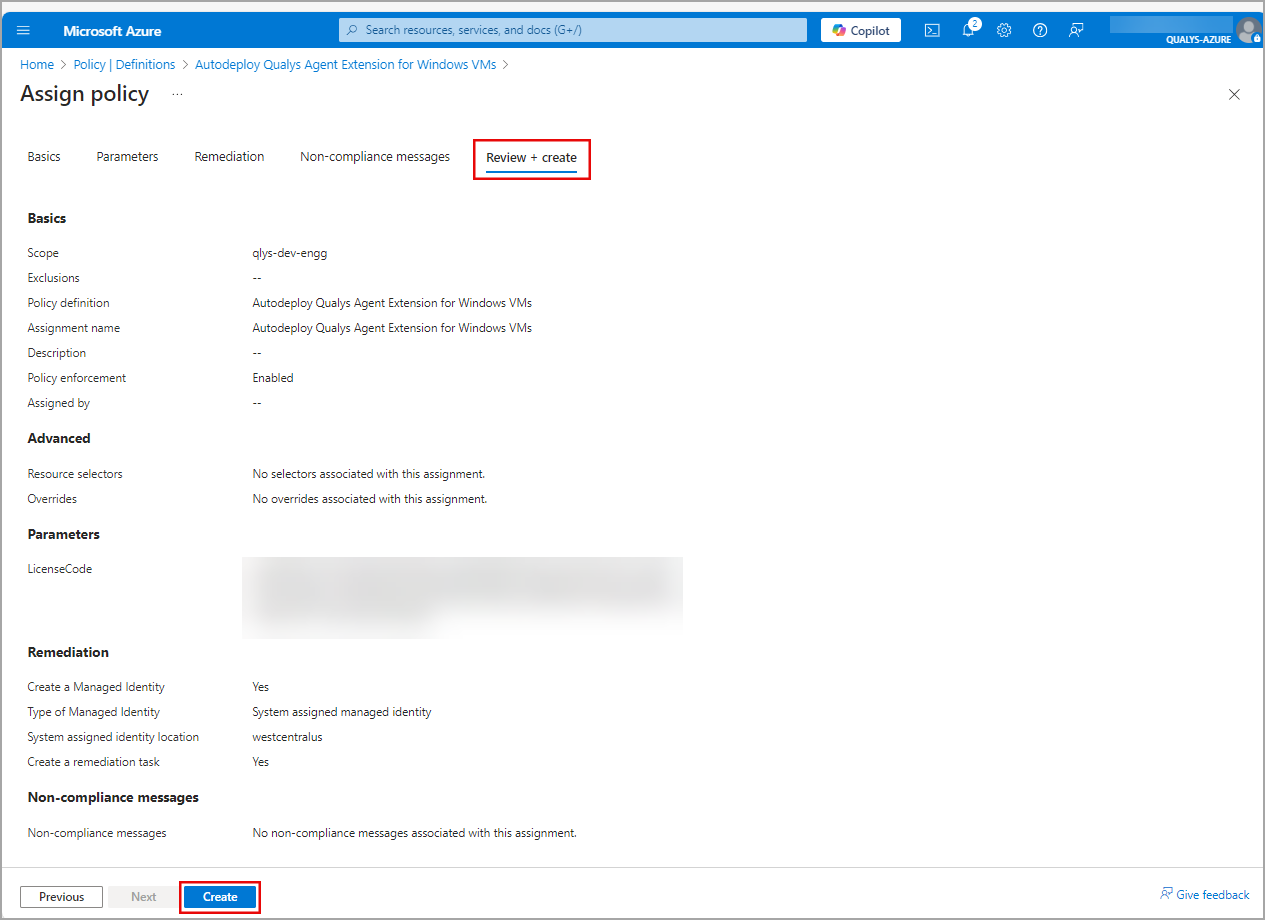
- Review the Assign policy summary and click Create to set the assignment. Upon successful creation of the assignment policy, the Notifications tab displays the newly created policy.
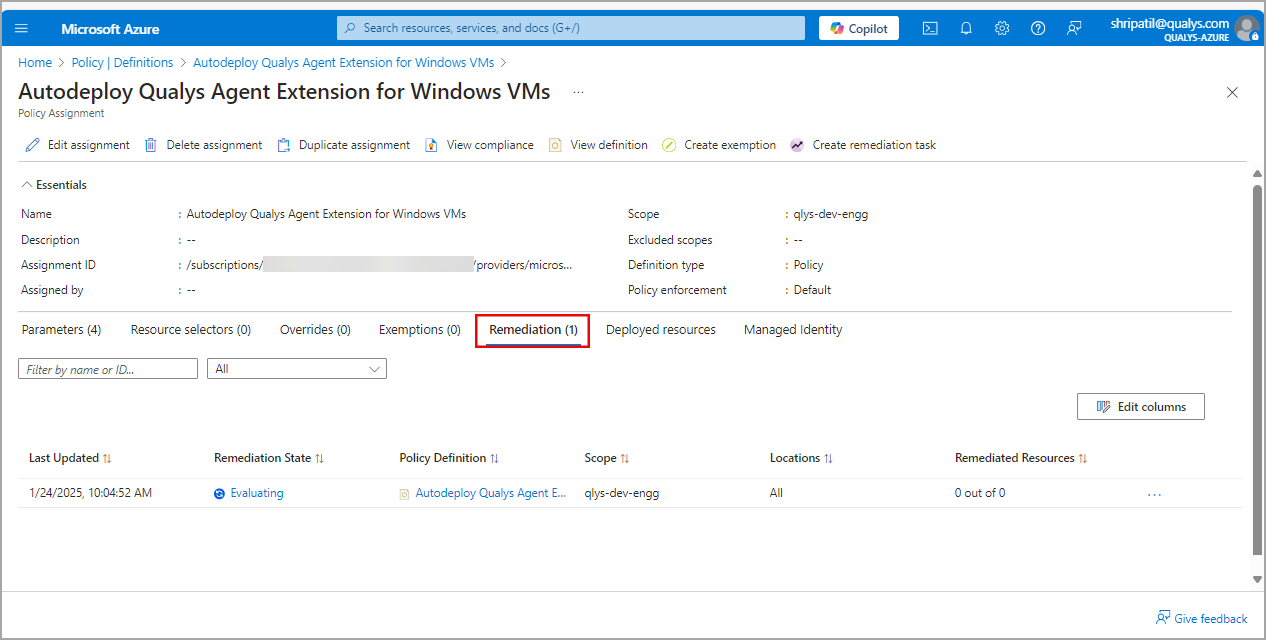
Check Assignment Policy State
The following are the steps to check the assignment policy state:
- In the Microsoft Azure user interface, navigate to the Policy > Authoring > Definitions.
- Click the newly created policy.
- On the Definition page, under the Assignments section, click the newly created assignment name to see its details.

- On the policy details page, under the Remediation section, you can view the Remediation State for your policy.