KnowledgeBase Settings
Configure Knowledge Base settings to fetch Solution, Consequence, and Diagnosis information in the KB data and enable or disable indexing KnowledgeBase (KB) data in Splunk.
- Choose Log additional fields (SOLUTION, CONSEQUENCE, DIAGNOSIS) to fetch Solution, Consequence, and Diagnosis information in the KB data.
By default, this checkbox is disabled. - Choose Enable multi-threading to download Knowledgebase data to pull knowledgebase data in lesser time.
We fetch QIDs with knowledgebase API then make the chunks as per page size configured and also fetch the QIDs details with knowledgebase API.
By default, this checkbox is disabled. - Enter Number of threads to pull Knowledgebase data.
You can select the number form 2 to 10. -
Enter Page Size to specify the number of records to be fetched in single API call.
Default: 1000 records, maximum: No limitPage Size feature is applicable only in case of multithreading.
- Select Enable Full Pull for Knowledgebase to retrieve data from the configured start time during each run.
- Choose Enable to preserve Knowledgebase ids API response to preserve the KB ids in case of multithreading.
By default, this checkbox is disabled.Enable to preserve Knowledgebase ids API response is applicable only in case of multithreading.
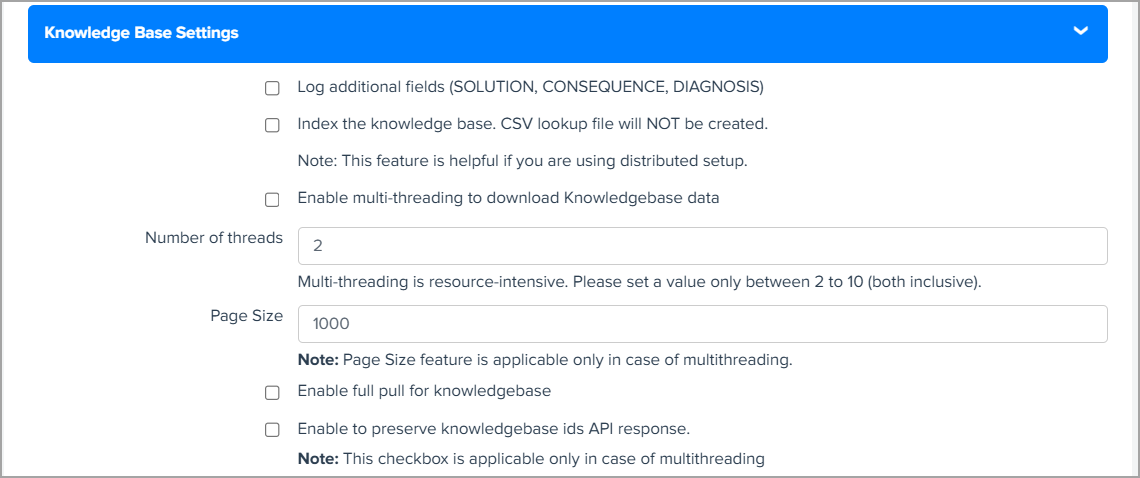
- Choose Index the KnowledgeBase to fetch the KB data and index the data into splunk or write the data into a CSV file.
By default, this checkbox is disabled
When you select the check box and click Save, TA fetches the KB data and then indexes this data into Splunk. If you are on the distributed setup environment, we recommend you to select this option so that you can get the updated KnowledgeBase data on the Search Head and generate the KB CSV file from the Search Head.
If the check box is not selected, TA does not index the KB data and creates a KB CSV file. The CSV file have KB data from 1999-01-01 till the current date. By default, this option is disabled.
After you enable the index KB data option, the KB data is indexed in Splunk. Next, you need to generate the KB CSV lookup on the Search Head using the Splunk's scheduled saved searches feature. To generate KB CSV look up on the Search Head, you need to create a schedule save searches on the Search Head, and then create the KB CSV lookup definition. Creating 'scheduled saved searches' and 'KB CSV Lookup Definition' on the Search Head' are one-time activities that you need to perform when you enable KB indexing first time.
We recommend these steps if you are using distributed Splunk setup & have enabled the index KB data option on the TA setup page.
If you disable the KB indexing option later, then disable the scheduled save searches and lookup definitions created for KB indexing. If you enable the KB indexing option after disabling it, just enable the scheduled saved searches and lookup definitions created for KB indexing instead of creating them again.
Create Scheduled Saved Searches on Search Head
- Go to Settings > Searches, Reports, and Alerts.
- From the Searches, Reports, and Alerts page, click New Report.
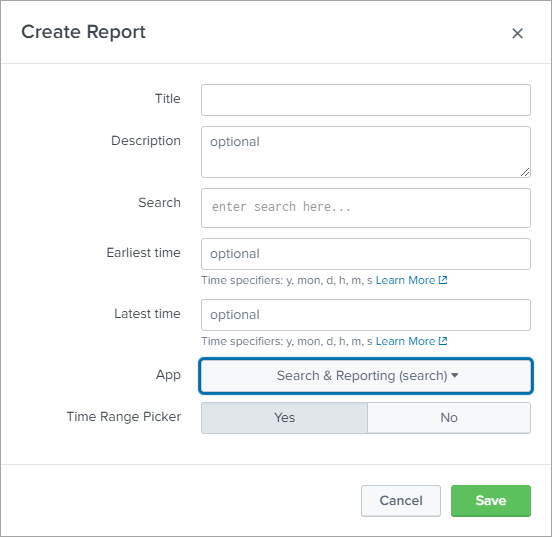
- From the Create Report screen, enter a title & description for the new report. For example, you can have a title: Generate KB CSV Lookup and a description: Generate KB CSV Lookup.
-
In the Search field, copy and paste this SPL and replace the {INDEX_NAME} with the actual index name that you have set for KnowledgeBase data input. The SPL reads the KB data for the specified fields using the selected index that has the Qualys KnowledgeBase source type and then write this data in the KB CSV output file.
index= {INDEX_NAME} sourcetype="qualys:knowledgebase" | table QID, SEVERITY, VULN_TYPE, PATCHABLE, PCI_FLAG, TITLE, CATEGORY, PUBLISHED_DATETIME, CVSS_BASE, CVSS_TEMPORAL, CVSS_VECTOR_STRING, CVSS_V3_BASE, CVSS_V3_TEMPORAL, CVSS_V3_VECTOR_STRING, CVE, VENDOR_REFERENCE, THREAT_INTEL_IDS, THREAT_INTEL_VALUES, BUGTRAQ_IDS | outputlookup qualys_kb.csvFrom TA v1.10.5 onwards, add the following SPL:
index= {INDEX_NAME} sourcetype="qualys:knowledgebase" | table QID,SEVERITY,VULN_TYPE,PATCHABLE,PCI_FLAG,TITLE,CATEGORY,PUBLISHED_DATETIME,LAST_SERVICE_MODIFICATION_DATETIME,AUTHENTICATION,DISCOVERY_REMOTE,SUPPORTED_MODULES,CVSS_BASE,CVSS_TEMPORAL,CVSS_VECTOR_STRING,CVSS_V3_BASE,CVSS_V3_TEMPORAL,CVSS_V3_VECTOR_STRING,CVE,VENDOR_REFERENCE,THREAT_INTEL_IDS,THREAT_INTEL_VALUES,BUGTRAQ_IDS | outputlookup qualys_kb.csvIf you have selected the 'Log additional fields (SOLUTION, CONSEQUENCE, DIAGNOSIS)' in the Knowledge Base settings, then you must specify these fields in the SPL provided above.
-
In the App field, select the Search & Reporting (search) to generate the KB CSV file under the directory SPLUNK_HOME/etc/apps/search/lookups/.
-
Click Save to create the report.
When you click Save, the Searches, Reports, and Alerts page is displayed. -
From the Searches, Reports, and Alerts page, select Search & Reporting (search) from the app drop-down field.
-
Navigate to the report title you created, then click Edit to schedule the report.
-
Click Edit and select the Edit Schedule option.
-
From the Edit Schedule screen, select the Schedule Report check box.
-
From the Schedule drop-down field, select Run on Cron Schedule.
-
In the Cron Expression input field, enter the cron format to specify the cron schedule for running the report.
A validation is added for a minimum 4hrs cron interval in Knowledgebase data input settings.
-
In the Time Range field, select the All time option to pull all the index data.
-
Click Save.
KnowledgeBase Settings FAQs
Refer to the following frequently asked questions for details on KnowledgeBase settings,
How to create KB CSV lookup definition on search head?
These steps let you access the KB CSV file data using the lookup.
- Go to Settings > Lookups and on the Lookups page, click Add New in the Lookup definitions row to create lookup for KB CSV file.
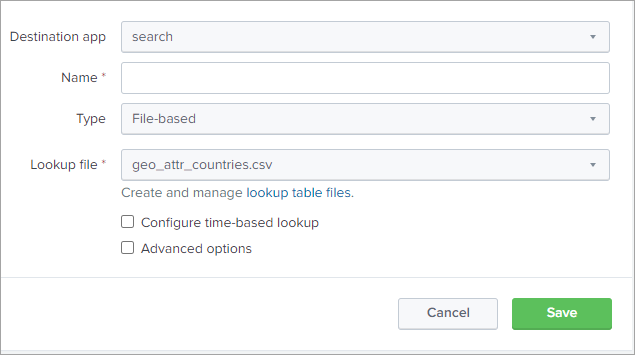
- From the Destination app field, select the search option to select the destination app to be used for the lookup.
- In the Name field, enter a name as qualys_kb_lookup.
- From the Type field, select the File-based option.
- From the Lookup file field, select the qualys_kb.csv option.
- Click Save to create the KB CSV lookup.
What happens if you disable KB indexing after enabling it initially?
The KB CSV lookup file is generated in SPLUNK_HOME/etc/apps/TA-QualysCloudPlatform/lookups/directory. So, the KB CSV file which is generated previously in SPLUNK_HOME/etc/apps/search/lookups/directory, is also present. It is possible that the user may not receive updated data or may see a blank dashboard. To view updated data on the dashboard, remove the KB CSV file and disable scheduled saved searches from Splunk UI. To view the updated data on dashboard, follow these steps:
- Remove the KB CSV file.
- Go to Settings > Lookups > Lookup table files and find
/opt/splunk/etc/apps/search/lookups/qualys_kb.csvpath. - Click Delete from Actions.
- Go to Settings > Lookups > Lookup table files and find
- Disable the scheduled saved searches.
- Go to Settings > Searches, Reports, and Alerts.
- Select the Search & Reporting (search) App and go to the scheduled saved search which you have created.
- Click Edit and Disable the scheduled saved search.
What happens when you enable the index KnowledgeBase data?
When you enable indexing, TA determines if the KB data is getting indexed for the first time into Splunk or KB data has been indexed before. If TA determines that the KB data is indexed the first time, then the entire KB data from 1999-01-01 is pulled. TA pulls the entire data so that the KB data which you could see before upgrading TA is available to you in the new version. On the other hand, if KB data has been indexed before, then TA uses the KB checkpoint date of the last run to pull the KB data.
How does TA determine if the KB data is getting indexed for the first time?
When you upgrade Splunk TA to 1.8.4 or later and choose to index the KB data into Splunk, TA determines if the KB indexing option is enabled for the first time. TA does this by checking if the KB checkpoint file is empty and if the KB CSV file exists. Note that TA creates a KB CSV file when you upgrade Splunk TA to 1.8.4 or later. If TA finds these 2 conditions true, then TA fetches the KB data from 1999-01-01, updates the KB checkpoint file with the latest date time, and removes the KB CSV file from the lookup folder if it exists.
If you remove or clear the data from the KB checkpoint file, verify that the KB checkpoint file is empty and the KB CSV file is missing before starting the indexing process. If both conditions are met, TA concludes that this is not the first time the KB indexing option has been enabled. Under these circumstances, TA uses the start date specified on the KB input data form to retrieve the KB data from your Qualys account. It then updates the KB checkpoint file with the most recent date and time.
If the index KB check box is not selected, TA generates the KB CSV file but TA does not update the KB checkpoint file.