Configure the Plugin
Using the following steps, configure the plugin.
- Go to your project in TeamCity.
- Click the Add Build step.
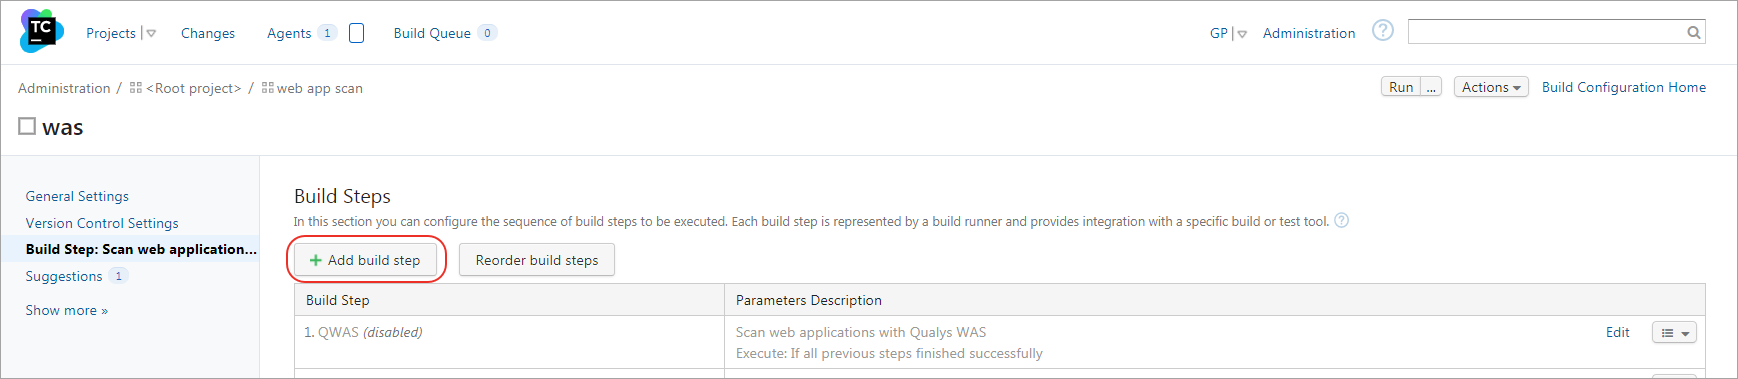
-
Select Scan web applications with Qualys WAS from the drop-down menu.
Now, you are ready to configure the plugin.
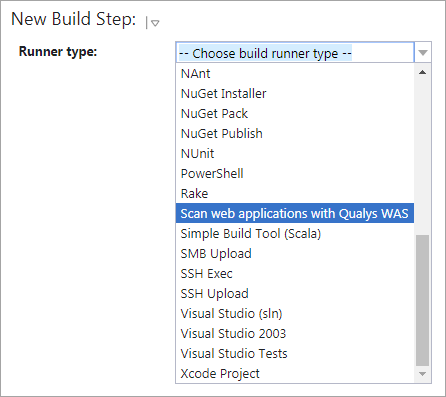
-
Provide a name for the build step, then go to the Qualys API Credentials section.
This step confirms that TeamCity can communicate to the Qualys Enterprise TruRisk™ Platform via the WAS API.
You need valid account credentials for an active Qualys WAS subscription. The account must have API access enabled and a role assigned with all necessary permissions. Qualys recommends using a service account restricted to API access only (no UI access) and having the least privileges possible.
- Select the Qualys platform or portal where your Qualys account resides. When you select the platform, it shows you the API server URL.
-
Enter your account credentials: API username and password to authenticate the WAS API server.
Here, selections depend on the Qualys platform your organization uses. Learn more.
- If your TeamCity instance does not have direct Internet access and requires a proxy, click the Use Proxy Settings checkbox and enter the required information.
-
Click the Test Connection button. Assuming you have selected the correct platform for your subscription and the valid credentials, you can see the message Connection test successful!.
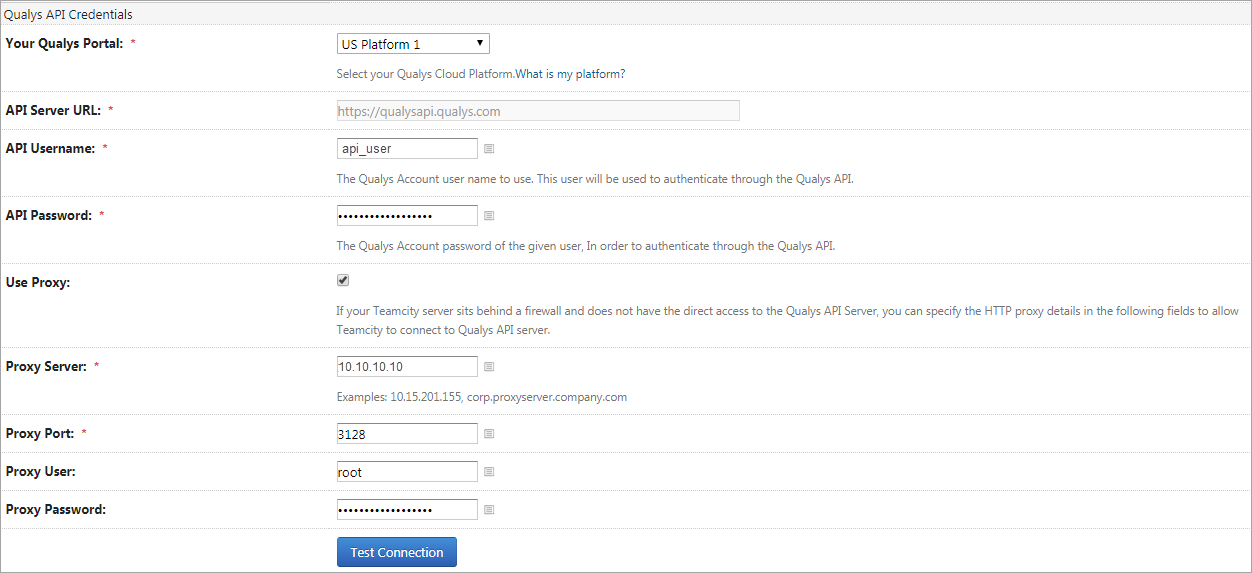
If your Qualys account resides on a private cloud platform, select Private Cloud Platform as your Qualys cloud platform, and specify the API server URL and your account credentials to access the API.
-
Select the web application that you wish to scan in Qualys WAS.

-
By default, the WAS scan name is:
[job_name]_teamcity_build_[build_number] + timestamp
- You can edit the scan name, but a timestamp is automatically be appended regardless.
- You can choose to run a Discovery scan or a Vulnerability scan. The default is a Vulnerability scan.
- Configure optional scan parameters.
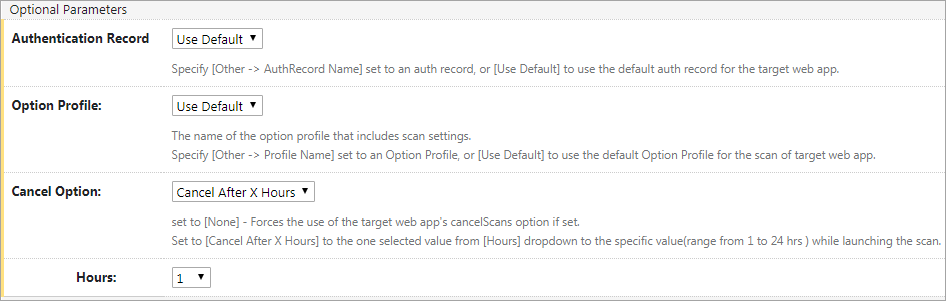
Authentication Record
You can run the scan without authentication (the default), but keep in mind the scanner is not be able to log into the web application and test the authenticated surface area of the application. You may instead want to select Use Default, in which case the default authentication record for the web app in WAS (if any) is used. Optionally, you can also select the Other option and choose a specific authentication record ID if desired.
Option Profile
The option profile contains the various scan settings, such as the vulnerability types that should be tested (detection scope), scan intensity, error thresholds, and many more. Selecting Use Default uses the default option profile for the web app in WAS. This is the recommended setting; however, you can also select the Other option and choose a specific option profile ID if desired.
Cancel Options
The default is not to cancel the scan, in which case the scan runs to completion. However, you can cancel the scan after a set number of hours.
You may not get any results if the scan is canceled before finishing.
- Configure the pass or fail criteria for a build.
You can set conditions to fail a build by
You may also choose to fail the build in case the Plugin initiates the scan, but the WAS module could not complete this scan due to some issues, such as scanners not being found and so on.
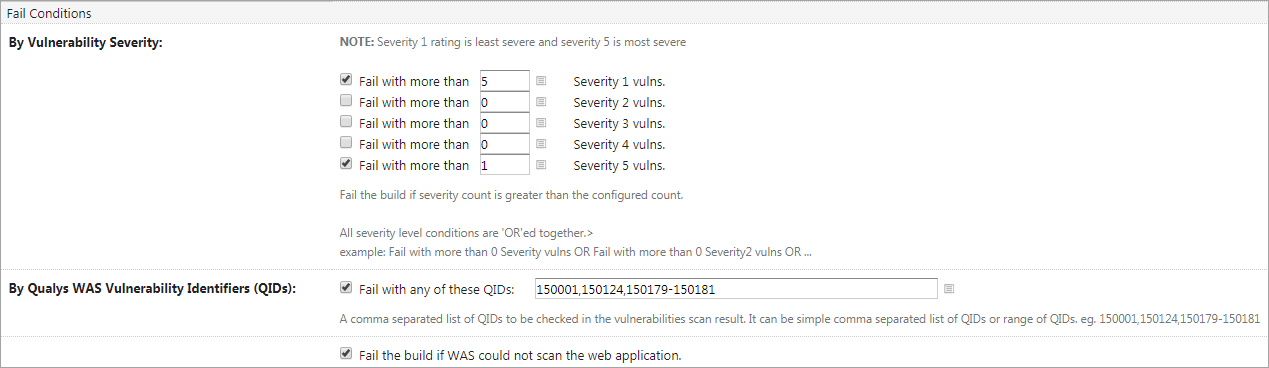
- Vulnerability Severity
- Qualys WAS Vulnerability Identifiers (QIDs)
To fail the build by vulnerability severity, specify the count of vulnerabilities for one or more severity types. A build can fail if, in scan results, the number of detections exceeds the number specified for one or more severity types. For example, to fail a build if the severity 5 vulnerabilities count is more than 2, select the Fail with more than severity 5 option and specify 2.
Qualys severity '5' rating is the most dangerous vulnerability while severity '1' is the least.
Similarly, to fail a build by QIDs, select Fail with any of these QIDs check box and specify one or more QIDs
-
Configure scan status polling frequency and timeout duration for the scan.

In the Timeout settings, specify the polling frequency in minutes for collecting the WAS scan status data and the timeout duration for a running scan.
-
Click Save to save the Web application scanning configurations.