PCI Compliance SAML Integration with Azure Active Directory
This section explains the procedure for integrating Azure Active Directory (Azure AD) with Qualys PCI Compliance using SAML 2.0 IdP-Initiated SSO.
Integrating Qualys PCI Compliance with Azure AD provides you with the following benefits:
- Control who has access to Qualys PCI Compliance from Azure AD.
- Enable users to automatically log in to PCI Compliance with their Azure AD credentials.
- Manage your PCI Compliance accounts from the Azure portal.
Prerequisites
The following are the prerequisite conditions your system must meet to integrate Azure Active Directory (Azure AD) with Qualys PCI Compliance.
- Qualys Cloud Platform and Qualys PCI Compliance subscription.
- SAML SSO must be enabled for your subscription for Merchant or Bank as per your requirements.
Onboarding with SAML SSO
Perform the following steps to configure SAML with your Identity Provider (IdP).
- Provide the following details to Qualys Support:
- Entity ID string from IdP (SAML Identity Provider)
- Public key certificate for the IdP (your organization’s IdP base64 certificate)
- Organization’s SAML IdP SSO URL
- Qualys PCI Merchant/Bank login details
- Custom exit URL for PCI (optional)
- Qualys Support will help you configure the trust relationship between your Identity Provider (IdP) and Qualys SAML 2.0.
- Qualys Support provides you with an Identifier URL and Reply URL. You need these URLs to configure Azure AD in the Azure Portal.
Configure Azure Directory
Complete the following steps in Azure Portal to configure Azure Active Directory (Azure AD).
Add New Application (Non-Gallery Application)
Perform the following steps to create a new application.
- In the Azure portal navigate to Azure Active Directory > Enterprise applications.
- Select All applications > New application.
- Search "Qualys" in the Browse Azure AD Gallery window. It shows all the available Qualys applications. Select the first application with a Federated SSO tag. The application creation window appears in the right pane.
- In the application creation window enter the application name and click Create.
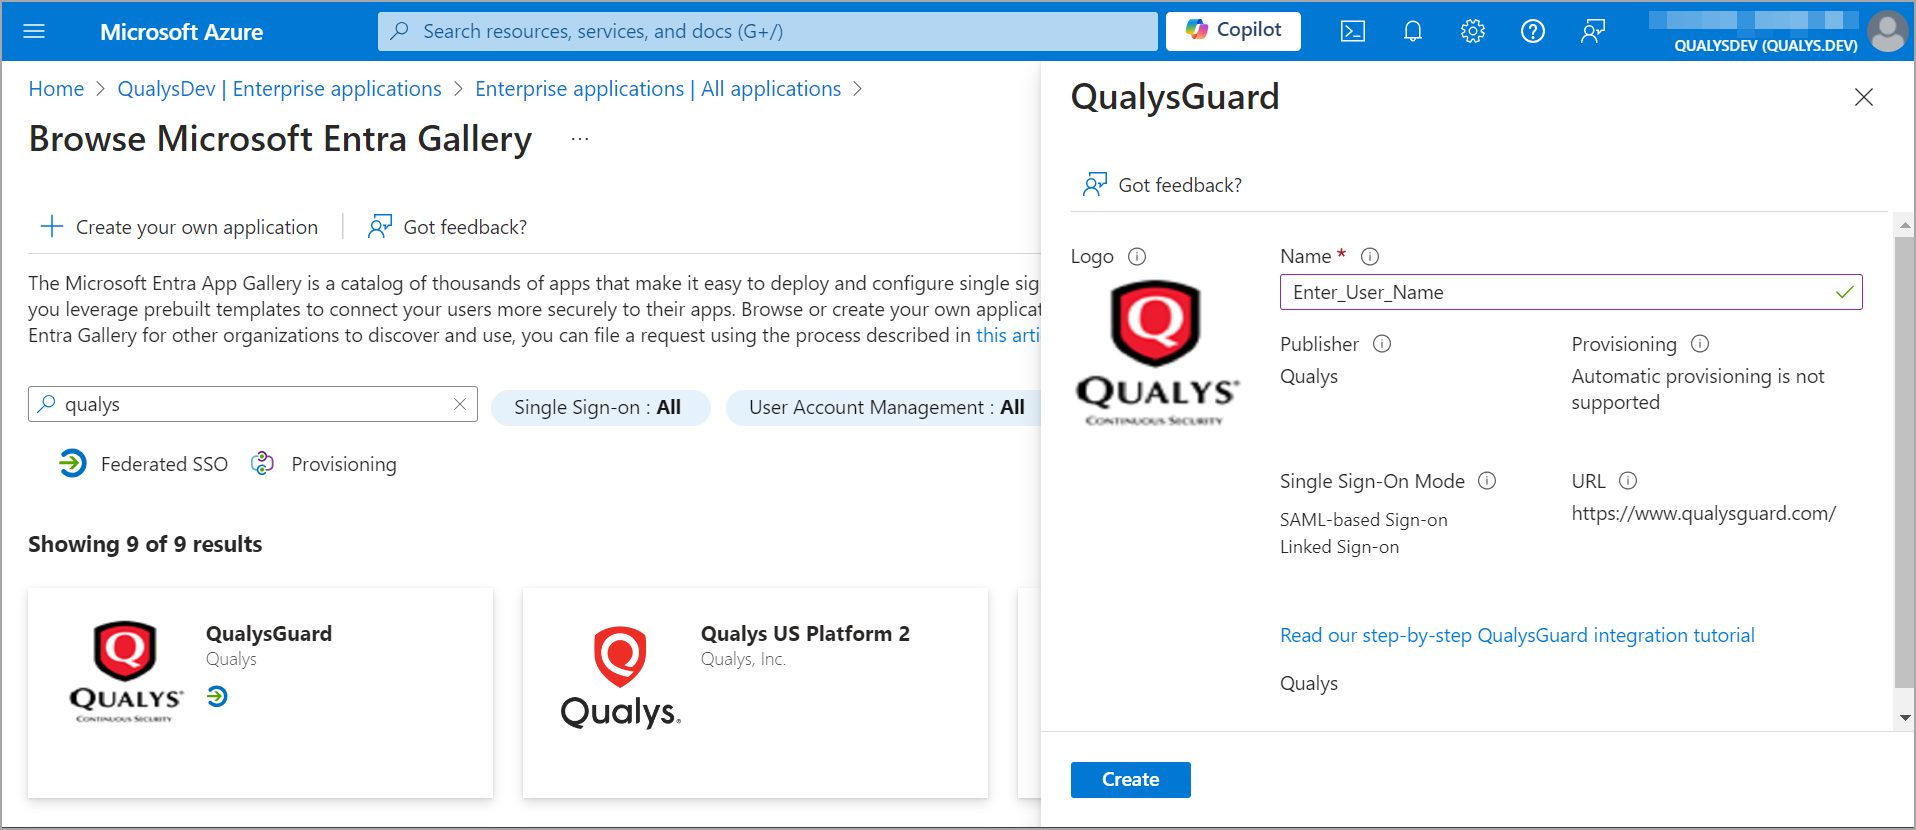
- The new application is added to your Azure portal. Check the following section to configure your newly created application to use SAML SSO.
Configure the Application to use SAML SSO
- In the newly created Qualys application page, select Single sign-on and click SAML for the sign-on method.
- Share the following details with Qualys Support to continue with the configuration.
- Certificate for your application. You can download the certificate file from SAML configuration window. Refer SAML Certificates for more details.
- Login URL and Logout URL
- User log in details
- External ID
- Once you provide these details, Qualys Supports generates the IdM UUID for your subscription. Use this IdM UUID for the SAML configuration.
Provide SAML configuration details in the following sections:
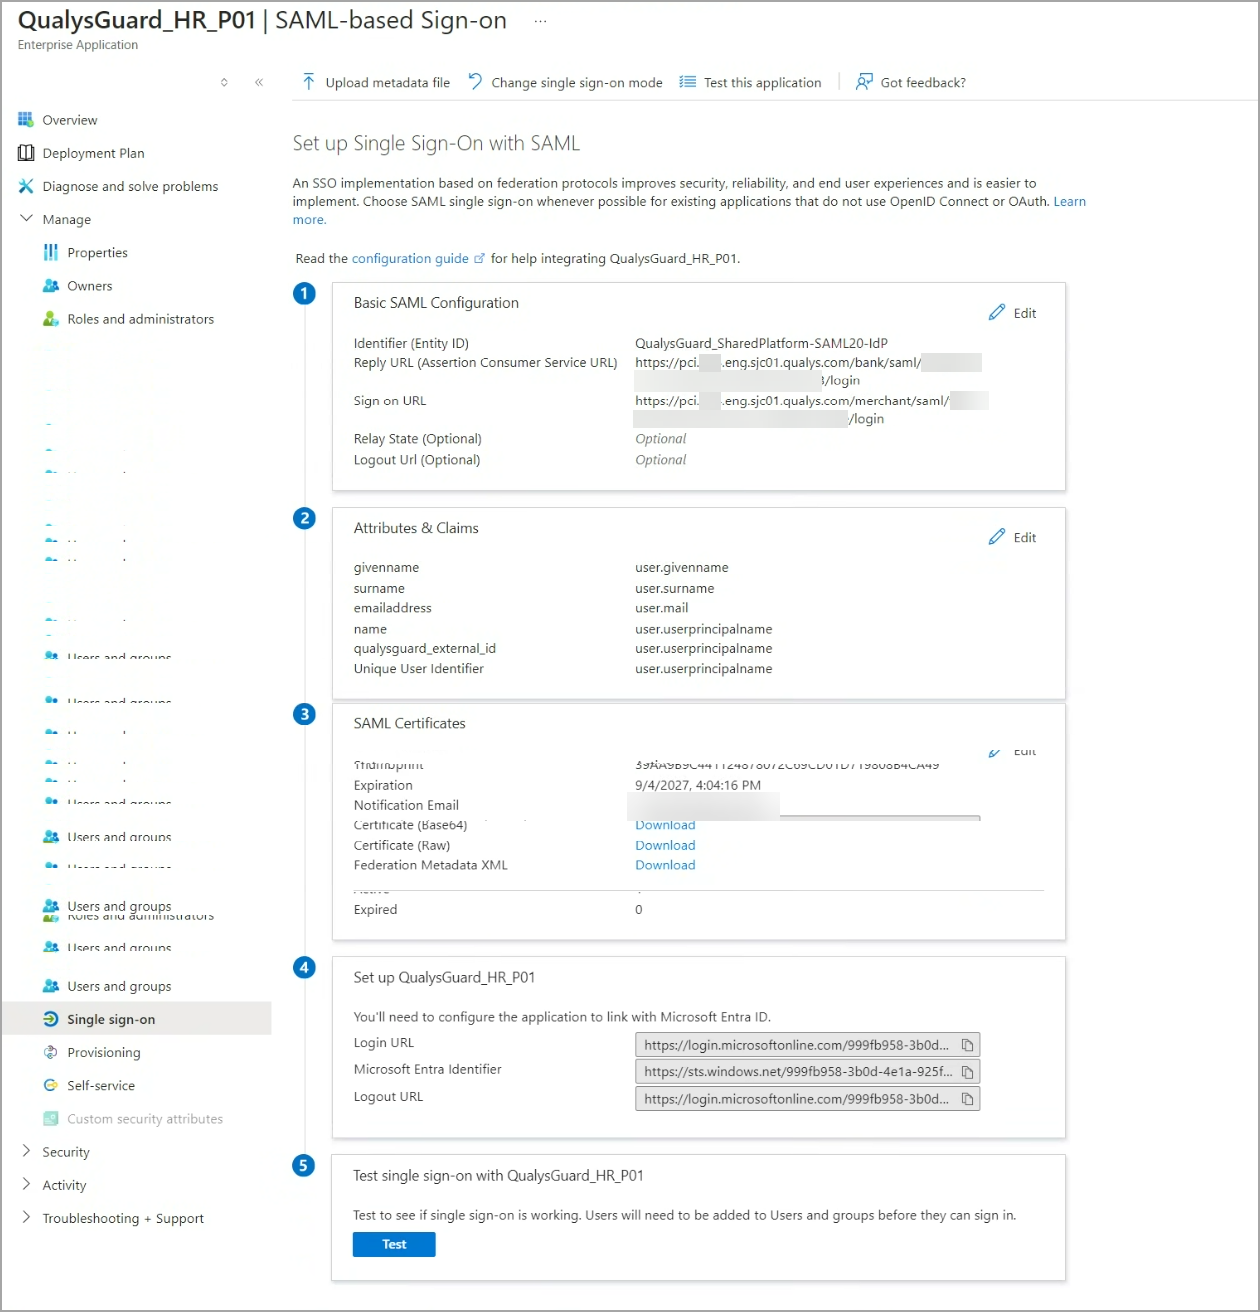
Basic SAML Configuration
- Click the Edit icon to provide the required SAML configuration settings.
- Enter the Identifier ID, Reply URL, and Sign on URL provided to you by Qualys. Other values are not required.
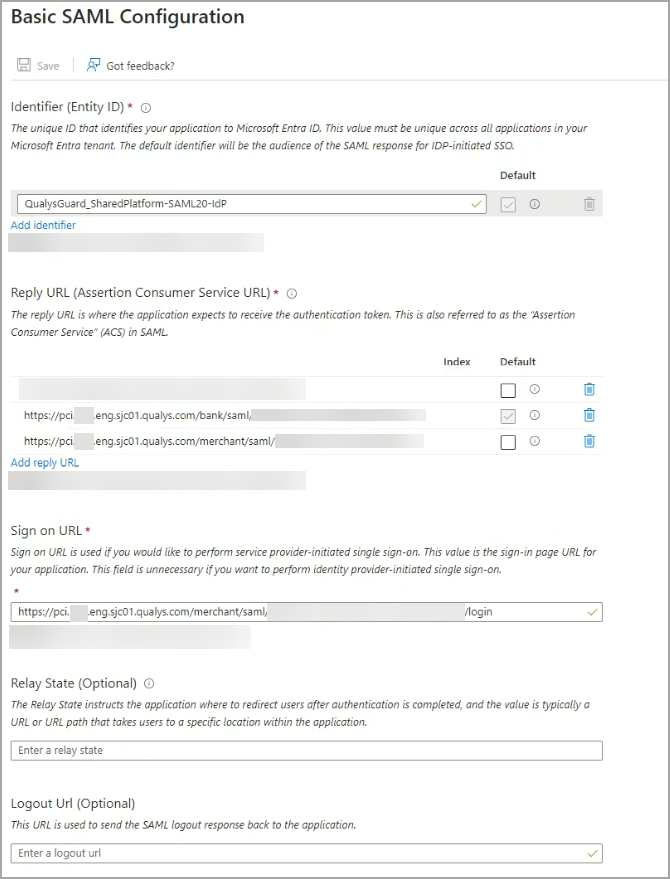
For example,
Identifier: https://QualysGuard_SharedPlatform-SAML20-IdP
Reply URL (based on the Qualys Cloud Platform for your subscription):- https://pci.p01.eng.sjc01.qualys.com/IdM/saml2/
- https://pci.p01.eng.sjc01.qualys.com/bank/saml/<IdM_UUID>/login
- https://pci.p01.eng.sjc01.qualys.com/merchant/saml/<IdM_UUID>/login
- https://pci.BASE_URL/IdM/saml2/ (for Private Cloud Platform)
Attributes & Claims
When a user authenticates to an application through Azure AD using the SAML 2.0 protocol, Azure AD sends a token to the application as part of the SAML Auth Response (via an HTTP POST). Then, the application validates and uses the token to log the user in instead of prompting for a username and password. These SAML tokens contain pieces of information about the user known as "claims."
Change the name identifier (optional)
You’ll notice that the Unique User Identifier is mapped to the value of the Azure user’s username (user.userprincipalname). Click the Edit icon to change the name identifier to a different source attribute like user.employeeid.
Add claim for external ID (required)
By default, Qualys Cloud Platform is configured to parse the value of external_id that is issued with the SAML token. You’ll need to add this claim to the list.
Click Add new claim, and provide these settings:
- Name: external_id
- Namespace: leave blank
- Source attribute: user.mail (recommended)
When you set the source attribute as user.mail, you can enter the user’s email address in the External ID field in the user’s Qualys account to validate the claim. You can choose to set the source attribute to another value. If you do, be sure to set the External ID value to match.
SAML Certificates
The Federation Metadata XML file is used by Qualys to create the IDP and IDM profile for your subscription. It contains useful information like IDP Entity ID, SSO Re-Direct URL, and the Base64 encoded Token Signing certificate.
Click Download next to Federation Metadata XML to save the metadata file to your computer. Send this file to Qualys Support.
Set up Qualys
The Federation Metadata XML file downloaded in the previous step has the info that Qualys needs. You can skip this step unless you want to customize the logout URL.
By default, the logout URL is set to https://www.qualys.com. You can add a custom logout URL to section 2 of the SAML 2.0 Integration Request Form.
Assign the Azure AD user to the Qualys Application
To proceed with integration, assign users or groups to the Qualys application. Azure AD does not allow a user to sign into the Qualys application unless Azure AD has granted the user access.
- Select a Qualys application from your list of applications.
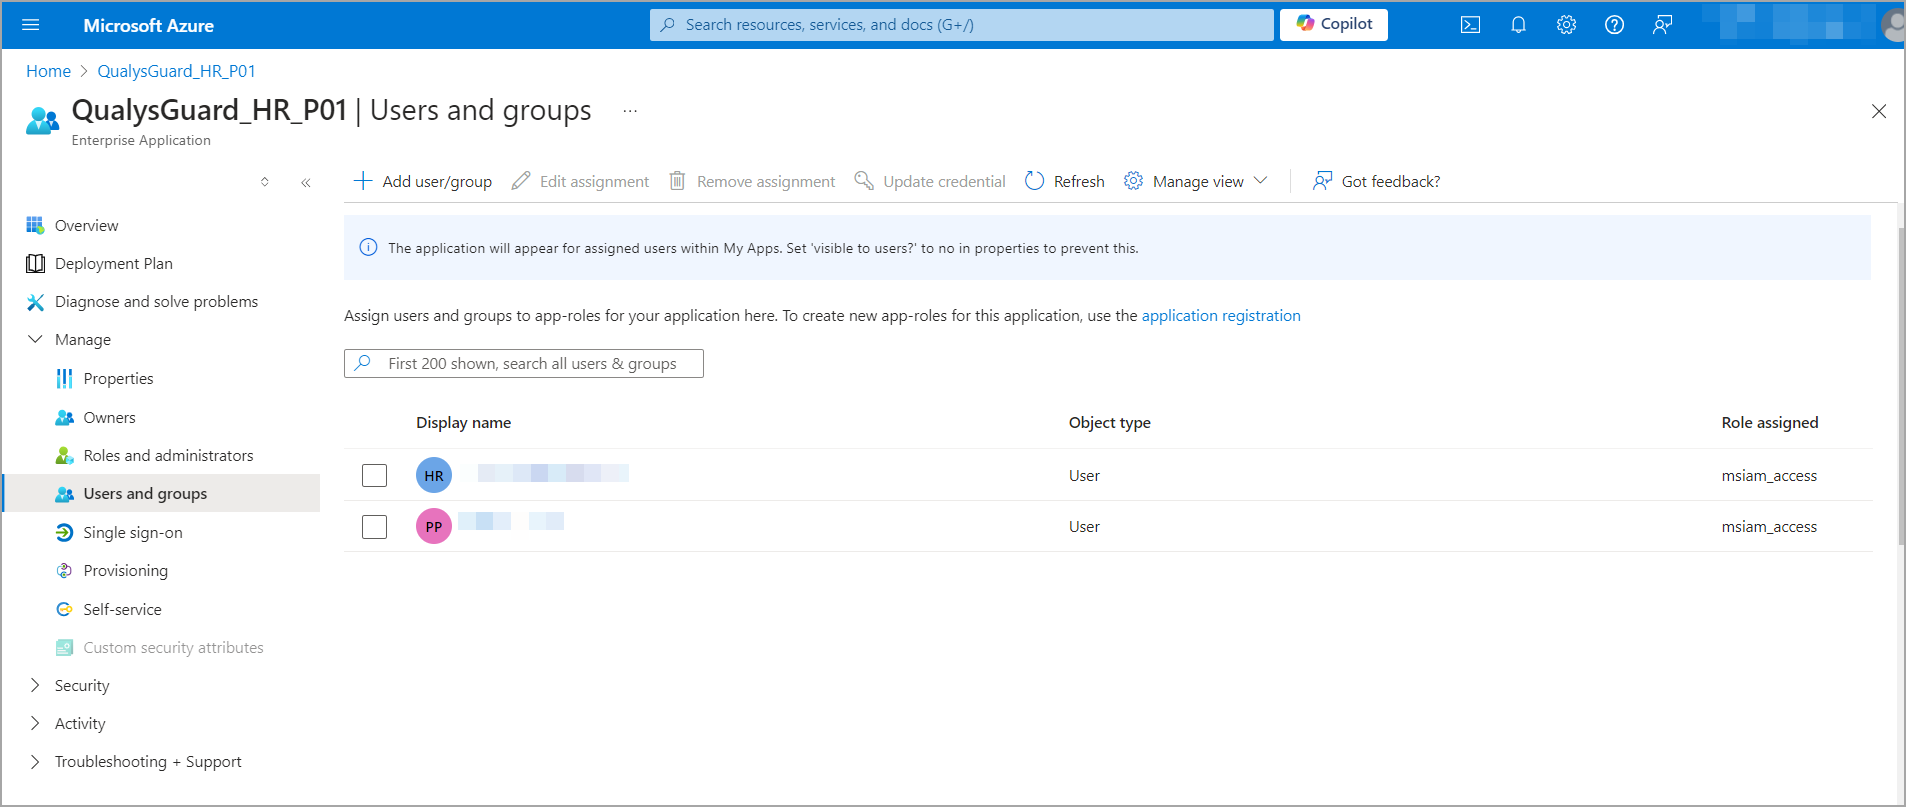
- Click Users and groups.
- Click the Add user button.
- In the Add Assignment window, select Users and groups.
- Select the checkbox for one or more users in the list to select them and click Select.
- Click Assign. The selected users are now assigned to the Qualys application.
Enable SAML SSO for Qualys User
Complete the following steps to enable SAML SSO for Qualys Users.
Enable SAML SSO in user account
- Go to the Users section in the Qualys user interface.
- Create a new user or edit an existing one.
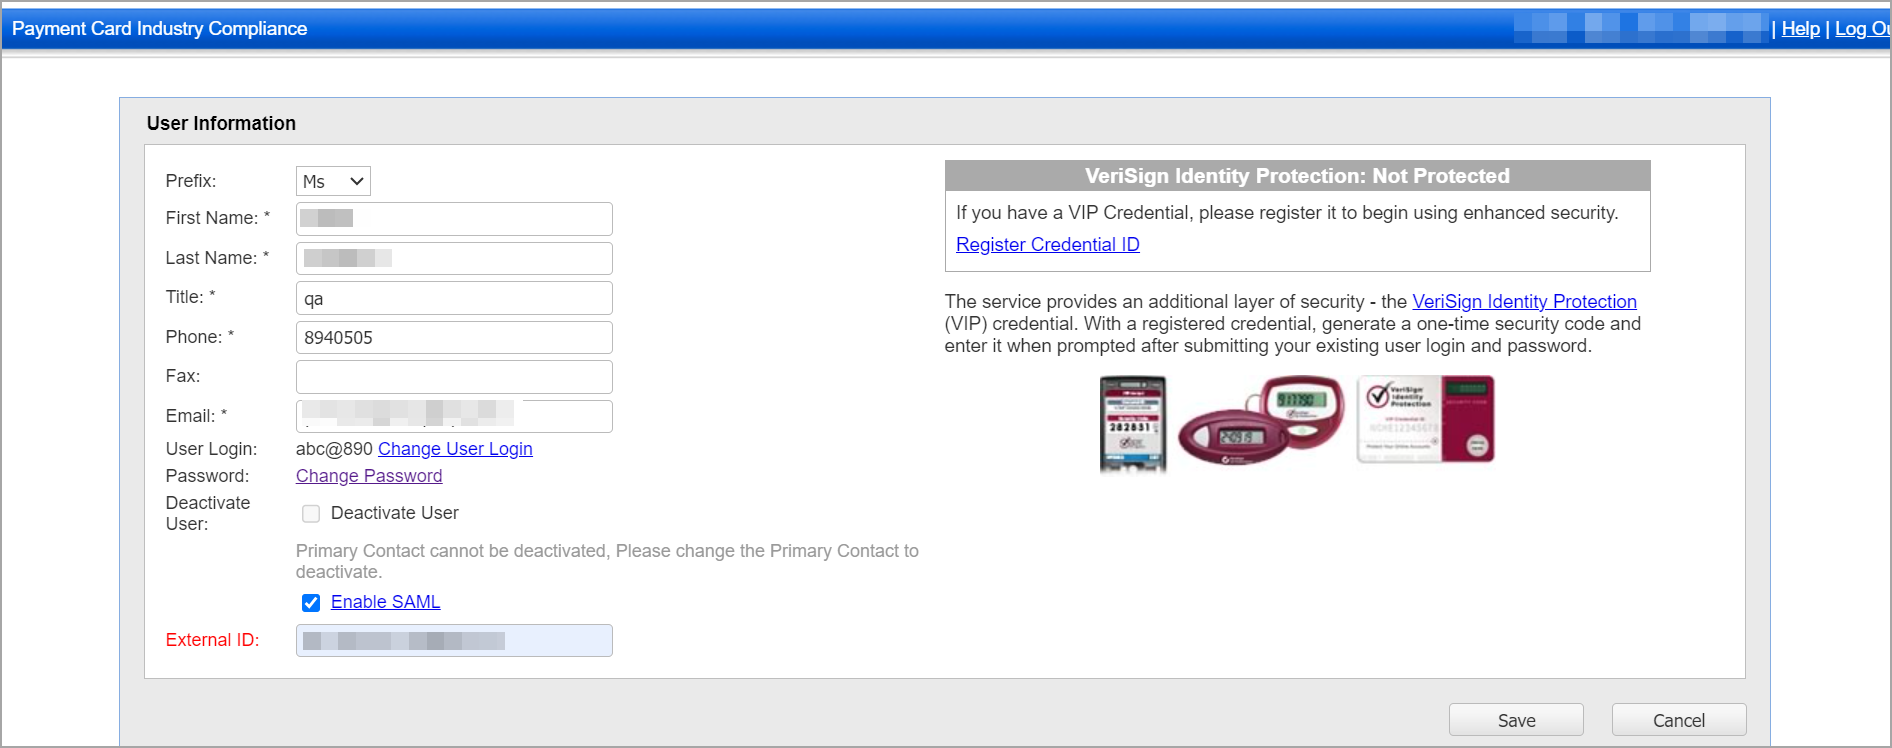
- In the user account settings navigate to Security and select the Enable SAML checkbox.
Set the external ID
Set the external ID for the user. The external ID value corresponds to the external_id claim that you have defined in your Azure SAML configuration. We recommend that you use the user’s email address as the external ID. You can change this to another attribute present in the SAML Auth Response.
Good to Know
The external ID can be set to any string, but the string must be unique for each user in the subscription, and the same value should be passed in the claim.
By default, the external ID validation is case-sensitive. If you need it to be case-insensitive, we can configure it that way. Please contact Qualys Support to customize your IDM settings.
Initially, only the Manager Primary Contact has permission to edit a user's external ID. Other managers may be granted this permission.
Test Qualys login using SAML SSO
- Use a web browser and open the unique Login URL.
- The web browser should redirect you to the SAML SSO page.
- Enter your Azure Active Directory login and password.
- Upon successful authentication, the web browser should be redirected to Qualys and a valid session should be opened with the expected user identity.
- When logging out of Qualys, the web browser should be redirected to https://pci.qualys.com/ or a custom logout URL provided by the customer.