About Auto Remediation
Auto-remediation is a feature of the Policy Compliance application that allows remediation of failed controls in order to fix misconfigurations on assets at a larger scale. Failed controls correspond to settings that are not configured as per security guidelines, which may lead to data breaches. When you evaluate your assets against policies and your compliance report shows the status as Failed, you must fix the failed controls to pass the assessment and strengthen your compliance posture.
This is achieved through the use of Custom Assessment and Remediation (CAR) scripts. The auto remediate feature lets you leverage Qualys CAR (Custom Assessment and Remediation) scripts to set control values according to security guidelines for passing controls in subsequent scans.
When a remediation job is executed, the values in the failed controls are changed to the expected value, making sure that the controls pass in the subsequent evaluation. Note that you can only remediate failed controls using the PC Auto Remediation feature. Errors in controls cannot be remediated. Additionally, only assets with a Cloud Agent installed are eligible for remediation jobs.
Benefits:
-
Enables you to fix misconfigurations on your assets at scale.
-
Reduces cyber security risks that misconfigured assets expose you to.
-
Lets you leverage Qualys CAR (Custom Assessment and Remediation) scripts to set control values based on security guidelines for passing controls in subsequent scans.
Pre-requisites:
In order to use the auto-remediation feature, here are some prerequisites that need to be met:
-
Access to the enhanced Policy Compliance is required.
-
Qualys Cloud Agent installed on your asset.
-
Manager or Unit Manager role assigned to your user account. Only these roles have the ‘View Remediation’ permission.
-
For the first time users, the Remediation tab displays the Activate Remediation button to enable auto-remediation

Creating a Remediation Job Workflow
Identifying Failed Controls
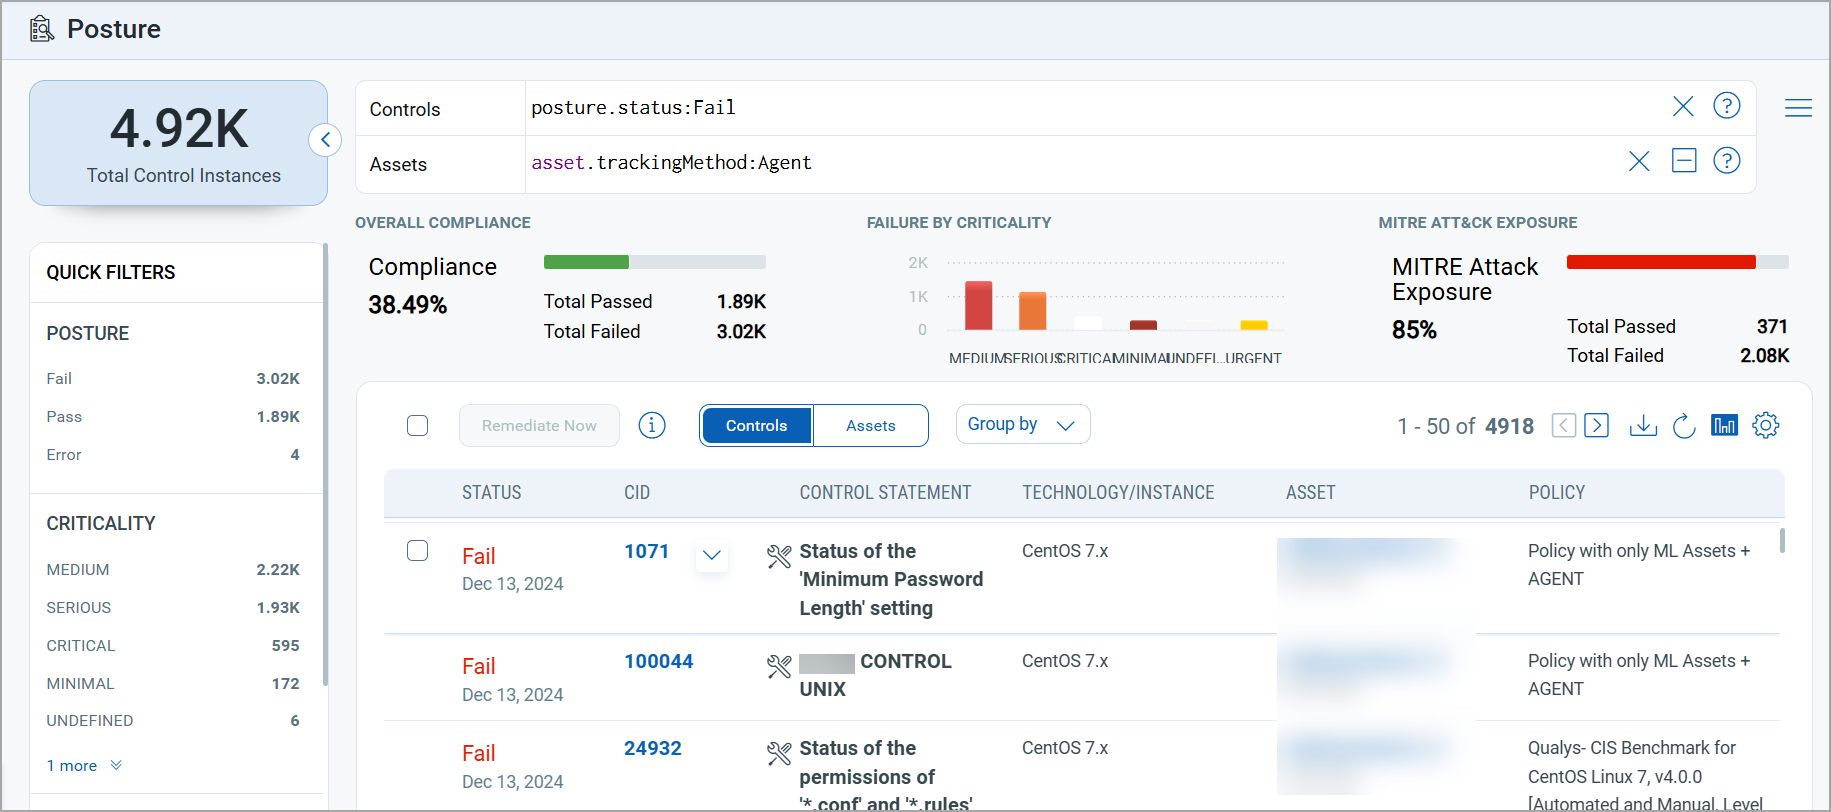
You can see a new icon  in the Posture tab. This new icon indicates the controls that are failed and remediable using the PC auto remediation feature. You can only remediate controls that failed on assets with a Qualys Cloud Agent installed.
On the left pane, click the quick filter, Remediable, to display a list of remediable controls. The system uses the following QQLs to find remediable controls:
Creating a Remediation Job
You can create a remediation job either from the Posture tab or from the Remediation tab. On the Remediation tab, click Create Job > Using Controls. You are redirected to the Posture tab. Either way, continue with the steps outlined as follows:
-
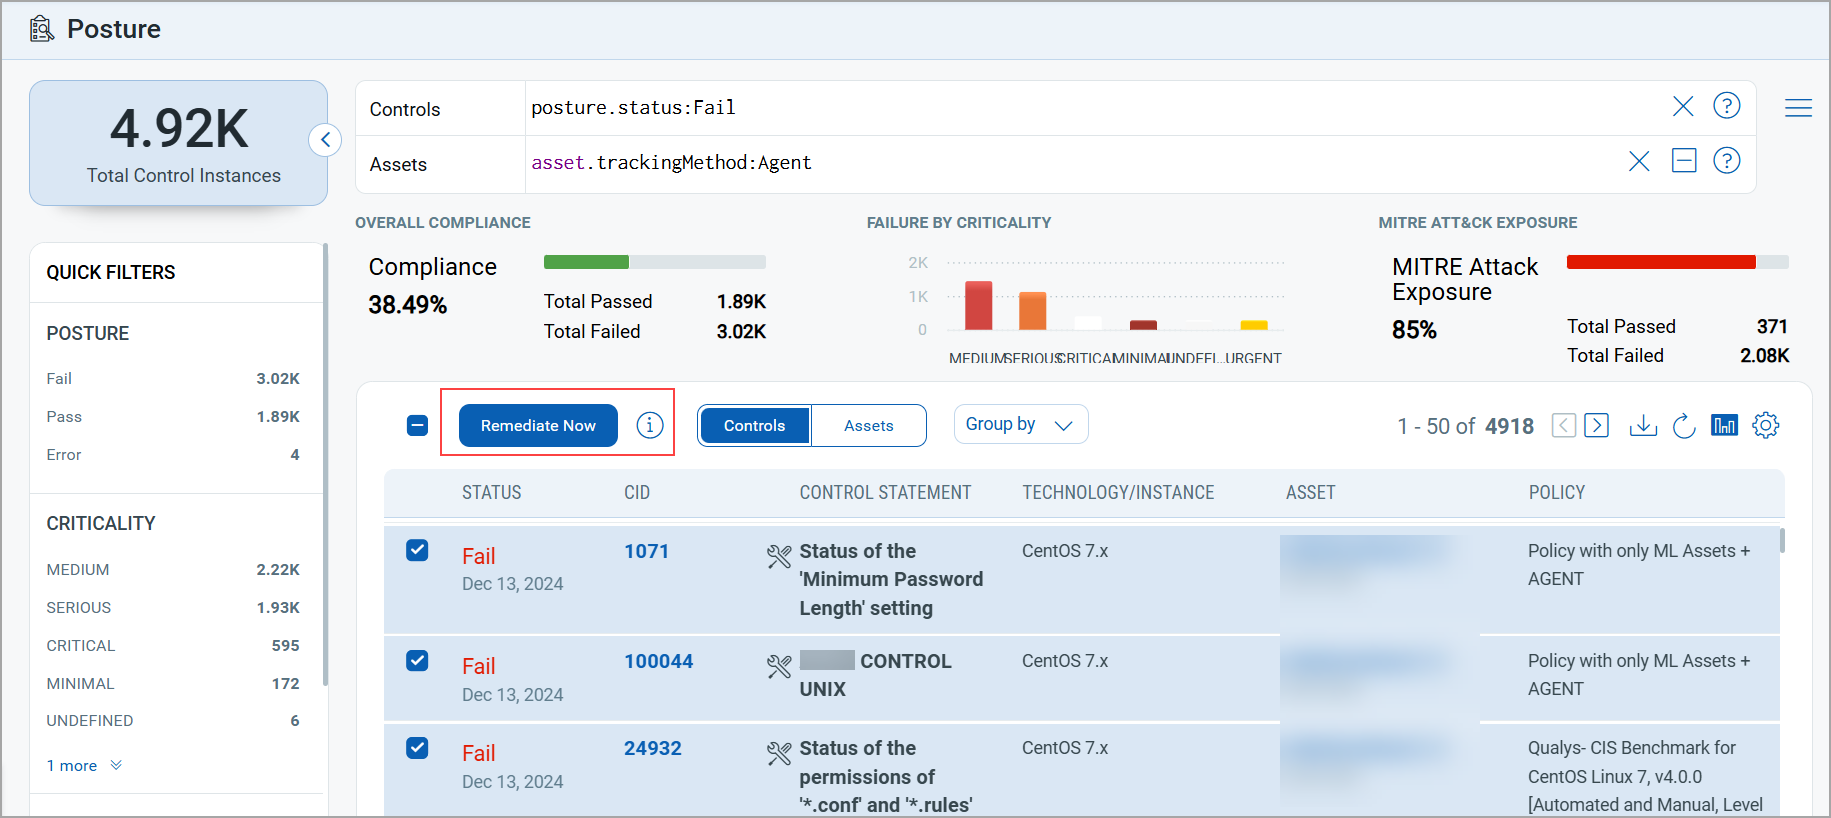
Once you have identified the failed controls, select one or more failed controls that you want to remediate.
-
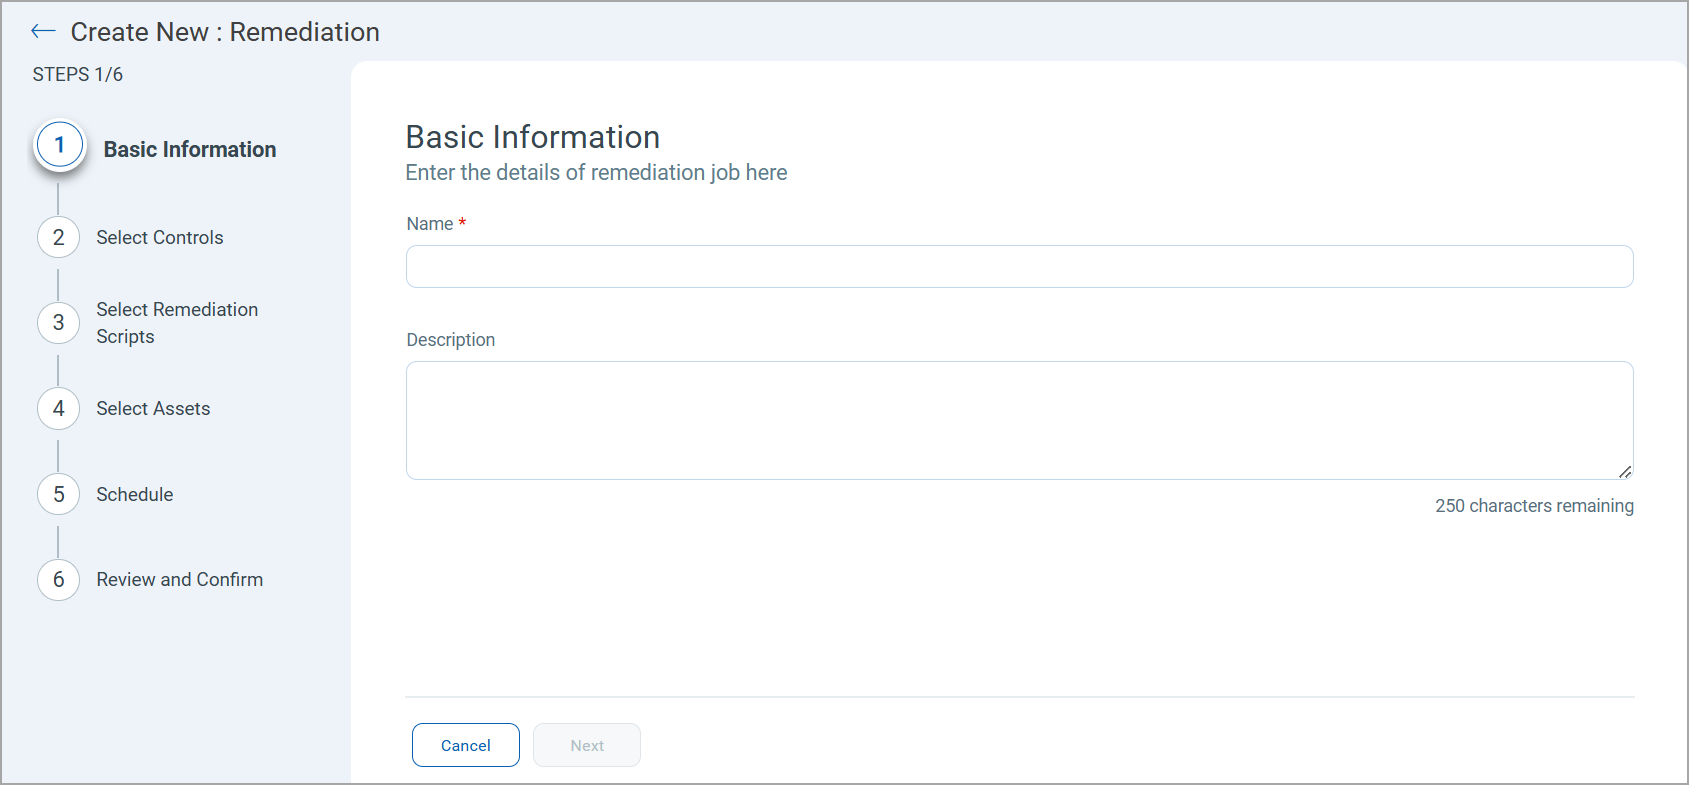
Click the Remediate Now button from the top. The Create New-Remediation wizard appears as shown in the following image. This wizard is comprised of steps that are accessible through the left navigation. Step 3 below provides detailed explanations for each step.
-
Complete the following series of steps in the Create New-Remediation wizard to create a new remediation job. Once these steps are completed the newly created remediation job appears in the Jobs list on the Jobs tab.

On the Basic Infomation page, enter the name and description for the remediation job and click Next.

-
The Select Controls page displays the list of control technology instances based on the failed controls you selected in the Posture tab in step 1. If you wish to add more remediable controls, then:
-
Click Add controls  icon. The system re-directs to the Posture tab, displaying the list of remediable controls.

-
Select the controls and then click Add. Perform this action again if you want to choose and include additional controls by navigating to the other pages in the Posture tab.

-
After completing the control selection, click the Close icon located at the top right corner to return and proceed with the create remediation job workflow.
Note: There is a limit of 100 unique controls to add to the remediation job. However, there is no limit on the number of postures (technologies) that you can add to fix. You can remediate a control associated with multiple technologies and policies. For example, let's consider that control 1071 has failed on three technologies - Windows 7, Windows 8.1, and Windows Server 2012 R2. In the Control, Technology, Instances, and Policy section, control 1071 gets listed multiple times as it has failed against multiple postures (technologies). However, the count of unique controls is considered as one.
-
Review the controls listed and add/remove controls depending on your business requirements.
Note: To remove remediable controls, select the desired controls and click either Remove Selected or the Remove control icon next to each control.

-
Click Next.

1. On the Select Remediation Scripts page, select the desired remediation scripts and click Next.
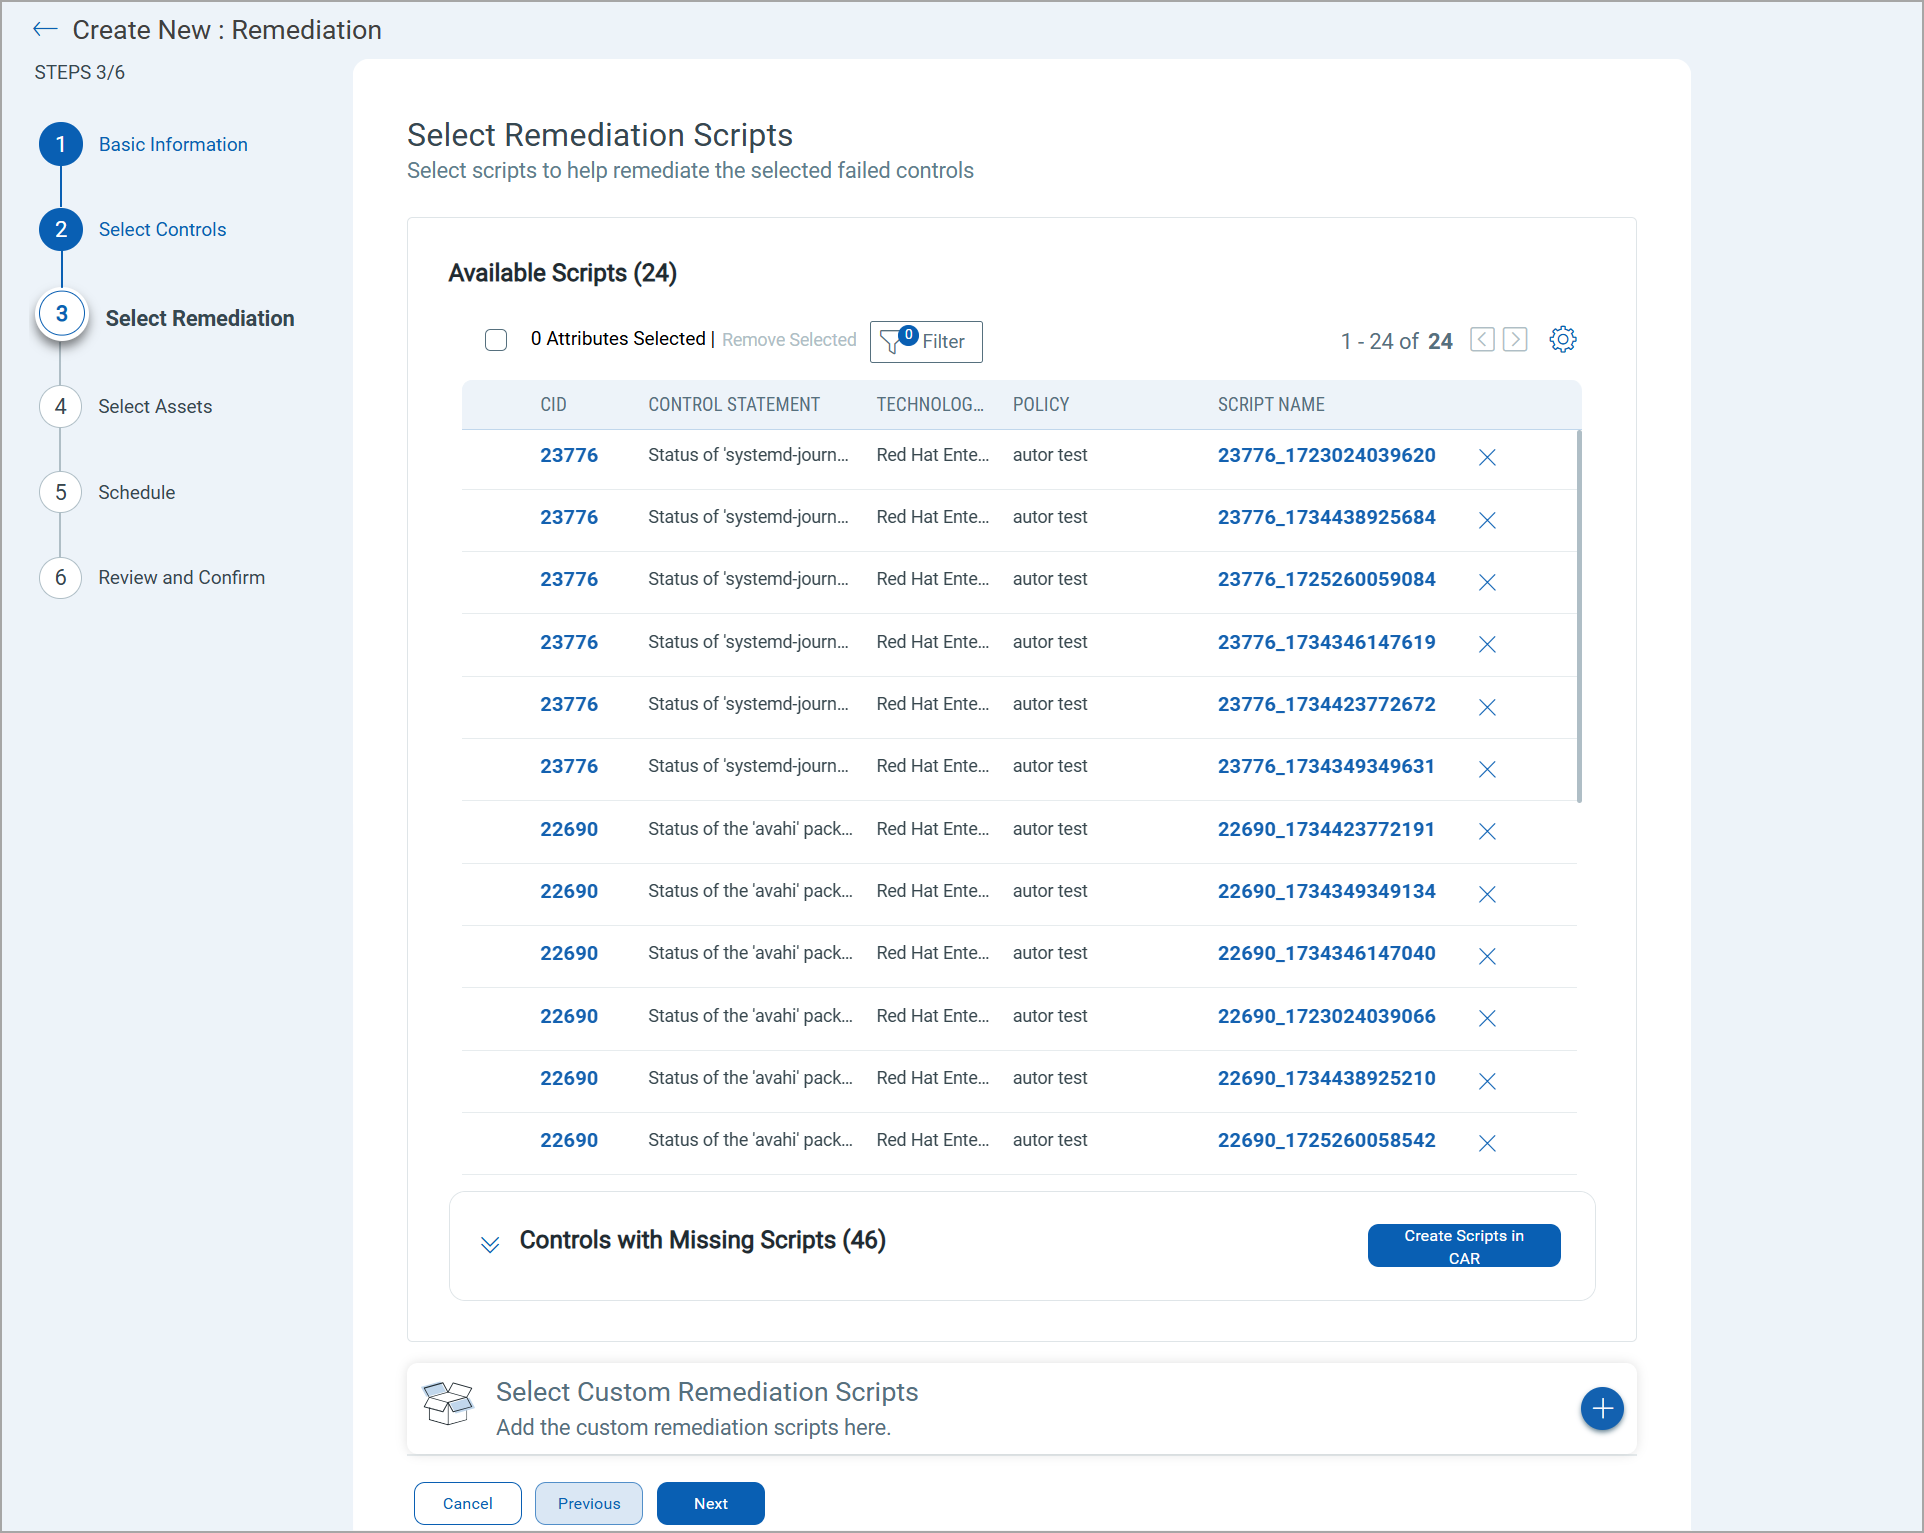
The following two types of scripts can be used for the remediation job:
-
Available Scripts: This section displays the Out-of-the-Box Scripts. The scripts from the CAR library. Each out-of-the-box script in the CAR library is associated with specific controls, policies, and technologies. If the Out-of-the-Box scripts match with the controls, control technologies, and policies you selected for remediation in the previous step, then only they are displayed here for you to choose from.
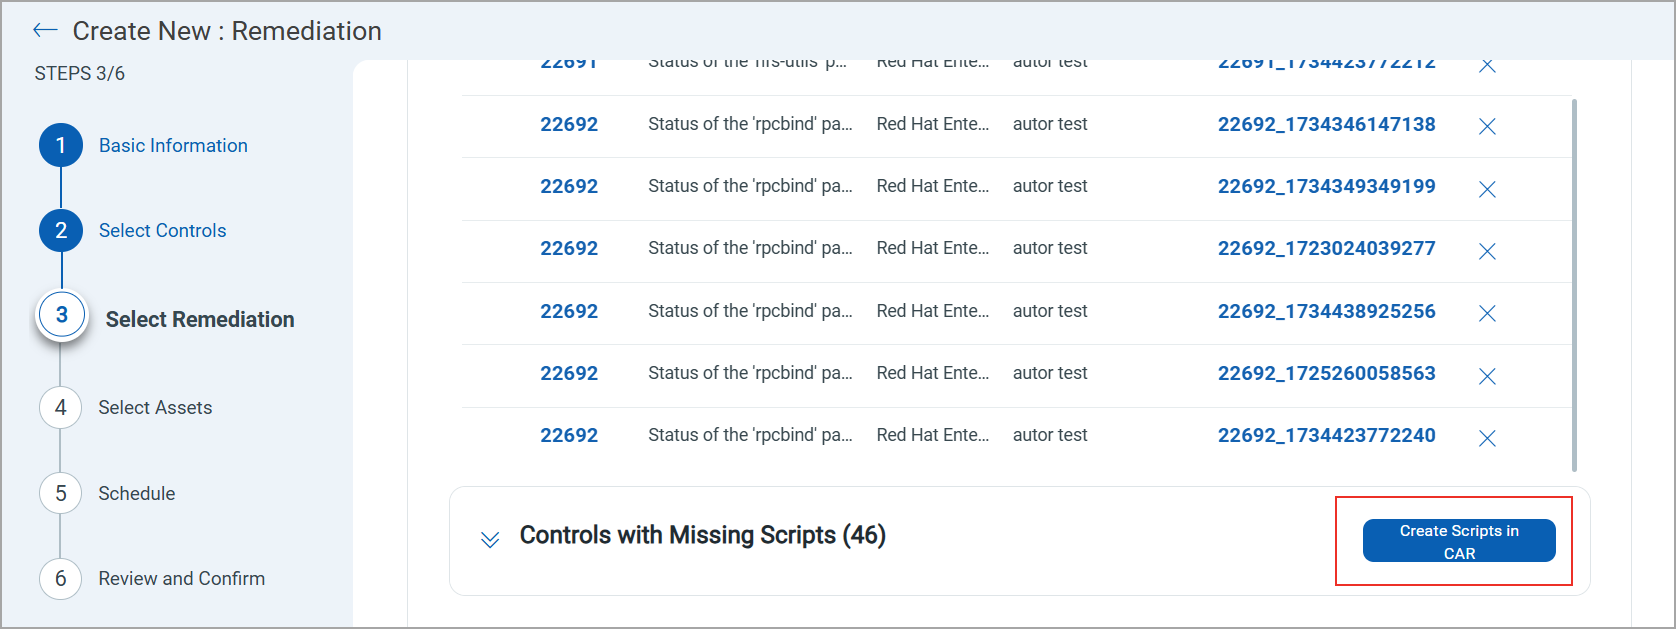
If there are no Out-Of-The-Box scripts associated with the controls you selected earlier, then click Create Scripts in CAR. On clicking this button, you are redirected to the Create New Script wizard in the CAR application. To learn more about creating custom scripts, refer to the Creating Scripts topic from CAR online help.
-
Select Custom Remediation Scripts: This section displays the custom scripts created by you. Only full/trial CAR license subscribers have this option to utilize custom remediation scripts.
Click to select the scripts you want to use for the remediation job and then click Apply. The selected scripts appear in the Selected Custom Script pane.

2. Click Next.

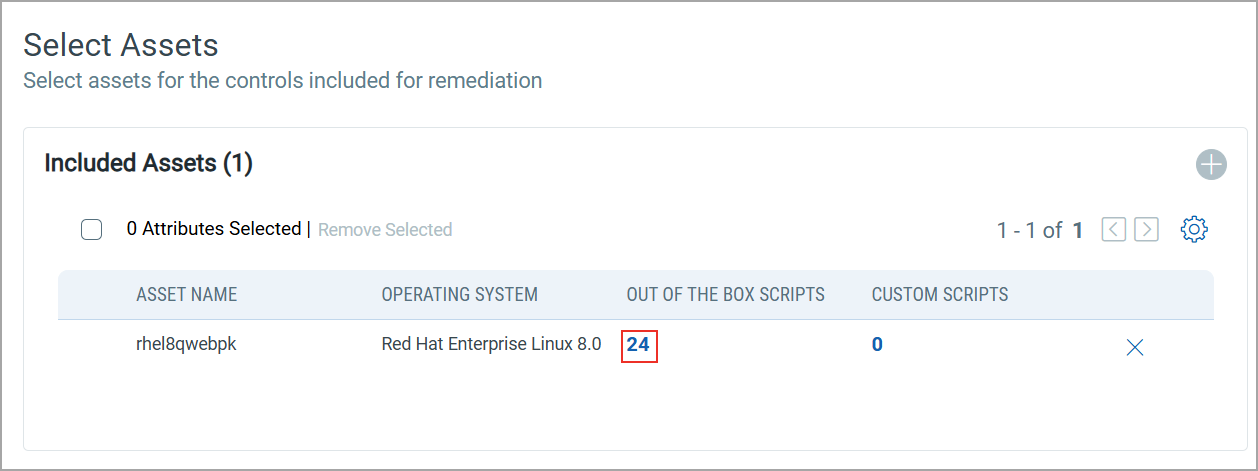
1. Review the asset list to include/exclude assets and add/remove corresponding remediation scripts applied to assets. The Select Assets page displays the list of assets associated with the failed controls that you previously selected to remediate. This list displays the assets and the corresponding remediation scripts for each asset.
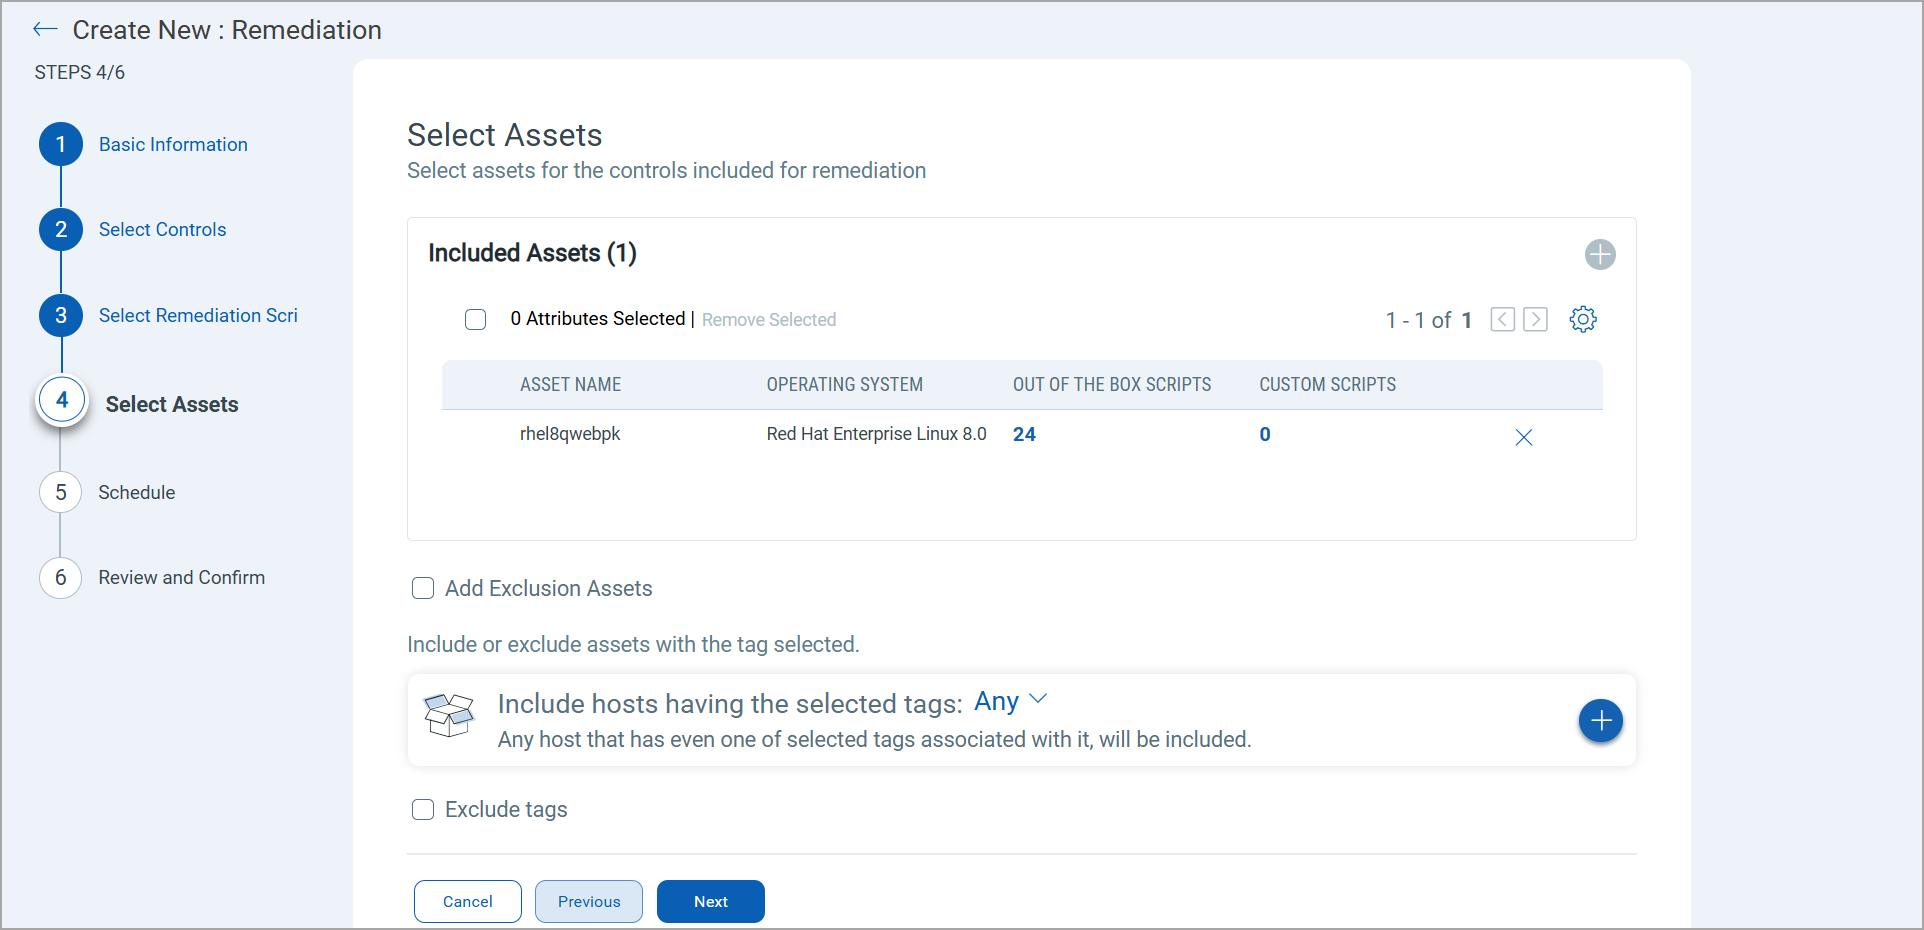
-
Include/add assets or asset tags
-
To include/add the asset, select the desired asset to include in the remediation job
-
To include/add an asset tag:
-
Go to Include hosts having the selected tags.
-
Select either Any or All for Include hosts having the selected tags Select Any to include assets that have any of the selected tags. Select All to include only those assets in the remediation job that have ALL the selected tags.
-
Click adjacent to Include hosts having the selected tags.

-
On the Select Tags page, select the desired asset tags and then click Add Tag.

-
Exclude/remove assets or asset tags
-
Select the Exclude tags check box.
-
Select either Any or All for Exclude hosts having the selected tags. Select Any to exclude assets that have any of the selected tags. Select All to exclude only those assets in the remediation job that have ALL the selected tags.
-
Click adjacent to Exclude hosts having the selected tags.

-
On the Select Tags page, select the desired asset tags that you want to exclude and then click Add Tag. The excluded tags appear under the Excluded Tags section.
-
Add exclusion assets
Use this feature to specify certain assets that should be ignored from the included assets/asset tags. For example, if you have included Windows tags in the remediation job, you can then add exclusion to prevent including certain assets associated with this tag in the remediation job.
To add exclusion:
-
Select the Add Exclusion Assets checkbox.

-
Click adjacent to Exclude the following assets.
-
On the Select Assets page, select the desired assets that you want to exclude and click Add. The excluded asset appears under the Excluded Assets section.


2. Click Next

1. On the Schedule page, click to select any one of the following job scheduling options:
Run Now: Choose this option to execute the job immediately. When you choose this option, the remediation job is executed as soon as you confirm the remediation job in the next step.
Single Occurrence: Choose this option to execute the job only once at the specified date and time.
Recurring: Choose this option to create a recurring job to repeat the job execution daily, weekly, or monthly at a specified date and time.
2. Click Next.

1. On the Review and Confirm page, review the control and technology instances, assets, and scripts you selected for the remediation job.
2. Click Save. You have created the remediation job successfully.
When a remediation job is successfully executed, the misconfigured settings in your assets are fixed as per security guidelines by leveraging the selected CAR script. This ensures that the failed controls are passed in the next agent scan. The auto-remediation feature, thus, enables you to adopt a streamlined workflow to address the compliance gaps in your organization, adhere to security guidelines, and achieve 100% compliance.You can view the compliance posture from the Posture tab.