Understand Cache Mode and Patch Mode
Cache Mode is an optional feature used to optimize the download network bandwidth used by Cloud Agents whereby the QGS appliance caches downloaded Cloud Agent artifacts (installers for platform-initiated upgrades and manifest files).
Files downloaded by the first-connecting agent is cached on the QGS appliance to be served to any subsequent configured agents requesting the same content. This saves Internet download bandwidth from the Qualys cloud platform to the on-premise network as only one copy of unique files is downloaded. For environments with large number of Cloud Agents deployed, this can save a significant amount of download bandwidth.
|
File Type |
Interval |
Number of Agents |
Bandwidth without Caching |
Bandwidth with Caching |
|---|---|---|---|---|
|
VM Manifest |
Daily |
1,000 |
2 GB |
2 MB |
|
VM Manifest |
Daily |
5,000 |
10 GB |
2 MB |
|
VM Manifest |
Daily |
10,000 |
20 GB |
2 MB |
|
VM Manifest |
Daily |
25,000 |
50 GB |
2 MB |
Patch Mode extends the caching capability to cache patch files for Cloud Agents activated with the Qualys Patch Management application. Similar to Cache Mode where the gateway appliance caches the downloaded Cloud Agent artifacts, Patch Mode caches the patch files downloaded by the first requesting Cloud Agent in order to serve patch files locally to subsequent download request. Patch Mode uses the same port and connection as Cache Mode.
When Patch Mode is enabled, the default Connection Security that only allows outbound connections from the gateway appliance to Qualys platform domains is disabled. Cloud Agents with Patch Management application need to download patch files from the software vendor’s website thus the gateway appliance allows for connections to any Internet resource. When allowing QGS to communicate with third-party vendor patch repositories, these connections must be allowed through customer firewalls. For more details, refer to the “URLs to be added to the Allowlist for Patch Download” section of the Patch Management Getting Started Guide.
In Patch Mode, Connection Security is configured to only allow client connections from Cloud Agent clients as an additional protection method.
Cache Mode and Patch Mode are not enabled by default. Additional configuration is required to enable caching and patch file caching, both on the gateway appliance itself (using the QGS module UI) and on the host the runs the Cloud Agent.
QGS Appliance Cache and Patch Mode Configuration
To enable Cache Mode or Patch Cache Mode on an existing QGS appliance:
- For a specific appliance, use the Quick Action menu to select Configuration (hover over the appliance name in the appliance list until the Quick Action menu appears)
- Click Next through the menu until Caching Modes
- To enable Cache Mode, toggle the On/Off slider to On
- The default cache port is 8080. You may accept or change the cache port to an allowable port number.
Valid Port values are 1 – 65535 (integers only), excluding 22, 23, 2379, 2380, 4001,5514, 7001, 48081, 48082, 48083, 48084, 48085, 48086.
- To enable Allowed Domains, toggle the On/Off slider to On
Allowed Domains: This option allows traffic to external domains while operating in cache mode. By default, only Qualys domain URLs are accessible. However, with this feature, you can manually add domain names to allow QGS to reach the required external domains.
This toggle allows accessing external domain resources but does not involve artifact caching.
Default Domains Allowed: qualys.eu, qualys.ca, qualys.com, qualys.in
While adding domains in the allowed domain section you should not add a prefix like http(s)://www. For instance, if you want to allow traffic to Microsoft then you should enter only microsoft.com and not https://www.microsoft.com
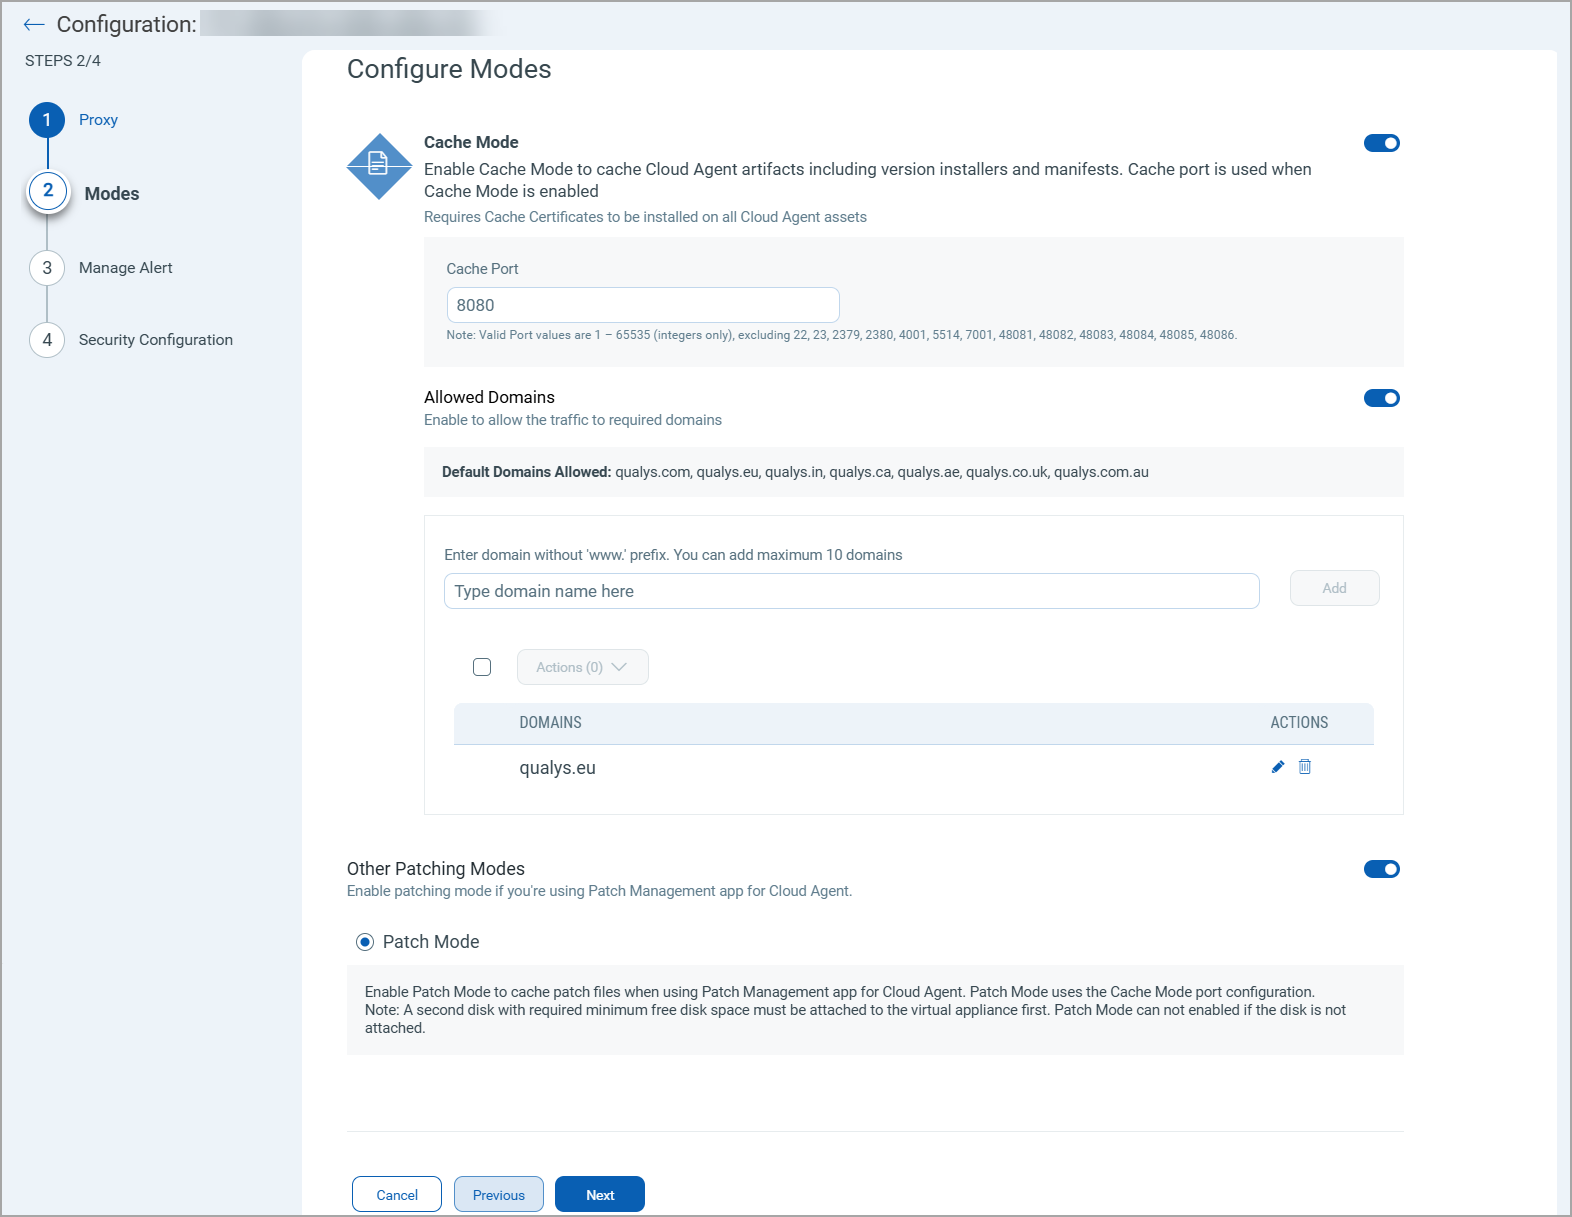
To enable Patch Mode, toggle the On/Off slider to On.
A second disk with required minimum free disk space must be attached to the virtual appliance first. Patch Mode can not enabled if the disk is not attached.
The third hard disk is not supported and would not be recognized on the CAMS/QGS appliance to use the patch mode. We recommend using only one extra hard disk of 150GB or more to use the patch mode.
Linux Patch Caching via QGS
Unlike Windows and macOS, where patches are downloaded directly from the Internet and can therefore be transparently cached by QGS, Linux systems retrieve patches from the configured package repositories. As a result, QGS caching does not work for Linux in the traditional sense.
To enable patch caching on Linux, you must configure your package repositories to point to QGS as a proxy. Only then are the patches cached. Qualys provides a CAR (Custom Assessment and Remediation) script that you can leverage to add the proxy configuration to your repositories. You must also add the required repository domains to the QGS Custom Domains list.
Once this is configured, package managers such as yum, dnf, apt, and zypper download packages through QGS, and the downloaded packages are cached on the appliance. This reduces internet bandwidth usage and speeds up patching across your environment, since each package is downloaded from the internet only once and then served locally to all other hosts.
How It Works
In Patch Mode, the appliance allows the traffic to the third-party domains when the client sends the QAgent User-Agent header. The package managers cannot send this header, so their requests are blocked, and their artifacts can neither be fetched nor cached.
The Custom Domains list addresses this. The domains that you add to the list are allowed regardless of the QAgent header, and the caching of their artifacts is governed by Patch Mode.
| Patch Mode | Custom Domains | Behavior for the listed repository domains |
|---|---|---|
| On | On | Traffic is allowed and the artifacts are cached, regardless of the QAgent header. |
| Off | On | Traffic is allowed but is not cached (pass-through only), regardless of the QAgent header. |
| Any | Off | Unchanged. The third-party domains still require the QAgent header. |
Prerequisites
- A QGS appliance with Cache Mode enabled.
- Patch Mode enabled. Patch Mode is required to cache downloaded packages.
- A second disk with the required minimum free disk space is attached to the virtual appliance. Patch Mode cannot be enabled if the disk is not attached. We recommend using only one extra hard disk of 150 GB or more to use the patch mode. The third hard disk is not supported and is not recognized on the CAMS/QGS appliance to use the patch mode.
- The QGS Root CA certificate is trusted by the client operating system (see Step 3).
- The connections to the third-party vendor patch repositories are allowed through your firewalls. For more details, refer to the URLs to be added to the Allowlist for Patch Download section of the Patch Management Getting Started Guide.
When Patch Mode is enabled, the default Connection Security, which only allows outbound connections from the gateway appliance to Qualys platform domains, is disabled so the appliance can reach third-party repositories. In Patch Mode, Connection Security is configured to allow only client connections from Cloud Agent clients as an additional protection measure.
Step 1 - Add the Repository Domains and Enable Patch Mode (QGS Appliance)
Perform these steps in the QGS UI.
- For a specific appliance, use the Quick Action menu to select Configuration (hover over the appliance name in the appliance list until the Quick Action menu is displayed).
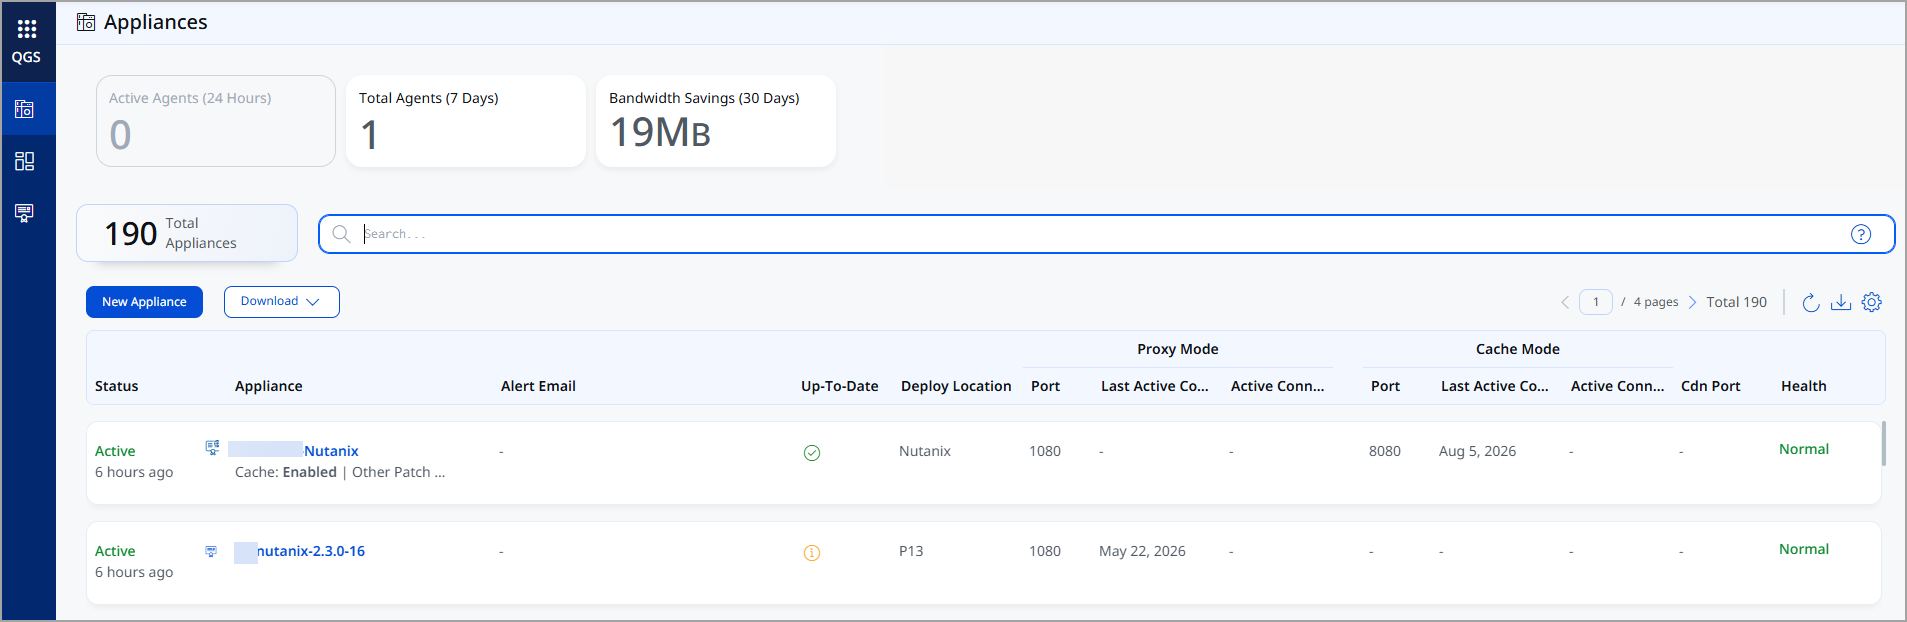
The Appliances list shows each appliance's status, Proxy Mode, and Cache Mode ports, and health. In the preceding example, the Nutanix appliance shows Cache: Enabled and the cache port 8080. - Click Next through the menu until Caching Modes.
- To enable Cache Mode, toggle the On/Off slider to On.
- The default cache port is 8080. You may accept or change the cache port to an allowable port number.
- To enable Custom Domains, toggle the On/Off slider to On, and add the package repository domains that your hosts use. For example:
yum.oracle.comrepo.oracle.comdownload.docker.comarchive.ubuntu.comsecurity.ubuntu.comdl.fedoraproject.org- Any other repository or mirror domains that are in use in your environment.
- To enable Patch Mode, toggle the On/Off slider to On.
- While adding domains in the custom domain section, you should not add a prefix like http(s)://www. For instance, if you want to allow traffic to Microsoft, you should enter only microsoft.com, not https://www.microsoft.com.
- You can add a maximum of 10 domains to the allowlist, add only the repositories that you actually use.
Step 2 - Configure the Package Repositories to Use QGS as a Proxy (Linux Host)
The patches are downloaded by the package managers from the configured repositories, therefore the repositories must point to the QGS appliance as their proxy. Until this is configured, the patches are not cached.
QGS also uses its own certificate to securely deliver the cached content over HTTPS. In most Linux distributions, the package managers, such as yum, dnf, apt, and zypper, use the system's trusted CA store to validate TLS certificates. If the QGS Root CA is not present in the system trust store, or in another CA bundle explicitly configured for the package manager, package downloads fail with SSL errors, such as unable to get local issuer certificate. The proxy configuration and the certificate are therefore both required on the host.
Use the cache port of the appliance for this configuration. QGS provides two proxy ports:
| QGS proxy | Port | Used for |
|---|---|---|
| Scan proxy | 1080 | Communication of the Cloud Agent with the Qualys Cloud Platform. |
| Cache or patch proxy | 8080 | Cached content, which includes the patches. |
You can complete this step in two ways: run the Qualys CAR library script, which applies the proxy configuration and installs the certificate (Option 1), or configure the repositories and install the certificate manually (Option 2).
Option 1 - Use the Qualys CAR Library Script (Recommended)
Qualys provides a CAR (Custom Assessment and Remediation) script that you can leverage to add the proxy configuration to your repositories and install the certificate, instead of configuring each host manually. Using library scripts can help you automate your proxy configuration workflows.
The script is Set Package Manager Repository Proxy and Cert. It sets the HTTP proxy used by the system package manager and its subscription/registration client across RHEL-family, Debian-family, and SUSE-family Linux hosts, so that repository refresh and patching work from networks without direct internet access, and it installs the certificate.
| Script detail | Value |
|---|---|
| Script Id | 2139925835 |
| Platform | LINUX |
| Scripting Language | Shell |
| Type | Custom Script |
| Sub Type | Response |
| Module | CAR |
- In the CAR application, navigate to the Library > Library window.
- Locate the Set Package Manager Repository Proxy and Cert script in the script library

- Click the script title to open View Details. The Summary page displays the script details, the disclaimer, and the script itself.

- Click Import Script. In the Import Script window, provide the required information, such as Name, Category, Type of Script, and Subtype, and select the Import script in approved state checkbox.
- Click Import. The imported script is displayed in the script list.
- In the Quick Actions menu, click View Imported Scripts to view the imported scripts.
- In the Scripts > Scripts window, select the imported script.
- In the Quick Actions menu, click Edit. The Edit Script window opens. Set the proxy to the QGS appliance address and its cache port.
- Run the edited script to apply the proxy configuration to the repositories.
For the general procedure for using CAR library scripts, see Proxy Configuration using Custom CAR Scripts in the Cloud Agent for Linux Installation Guide.
Option 2 - Configure the Repositories and Deploy the Certificate Manually
Use this option to perform the same configuration manually on the host.
Configure the Repository Proxy
Replace <qgs-ip> and <port> with the appliance address and cache port, respectively.
yum or dnf (RHEL, Oracle Linux, CentOS, Fedora)
Edit /etc/yum.conf or /etc/dnf/dnf.conf:
Proxy Configuration for yum or dnf
proxy=http://<qgs-ip>:8080
Alternatively, configure the proxy for an individual repository in /etc/yum.repos.d/<repo>.repo:
Proxy Configuration for an Individual Repository
[ol8_baseos_latest]
...
proxy=http://<qgs-ip>:<port>
apt (Ubuntu, Debian)
Create /etc/apt/apt.conf.d/95proxy:
Proxy Configuration for apt
Acquire::http::Proxy "http://<qgs-ip>:<port>";
Acquire::https::Proxy "http://<qgs-ip>:<port>";
zypper (SUSE)
Edit /etc/sysconfig/proxy:
Proxy Configuration for zypper
PROXY_ENABLED="yes"
HTTP_PROXY="http://<qgs-ip>:<port>"
HTTPS_PROXY="http://<qgs-ip>:<port>"
Install the QGS Root CA in the OS Trust Store
Install the certificate in the operating system trust store, because the package managers use the system trust store.
Commands to Install the QGS Root CA on RHEL, Oracle Linux, CentOS, and Fedora
cp qgs-root-ca.crt /etc/pki/ca-trust/source/anchors/ update-ca-trust extract
Commands to Install the QGS Root CA on Ubuntu and Debian
cp qgs-root-ca.crt /usr/local/share/ca-certificates/qgs-root-ca.crt update-ca-certificates
Commands to Install the QGS Root CA on SUSE
cp qgs-root-ca.crt /etc/pki/trust/anchors/ update-ca-certificates
If you prefer not to install the certificate system-wide, you can instead configure the package manager to use a certificate bundle that includes the QGS Root CA, for example, sslcacert= in yum.conf, or Acquire::https::CAInfo for apt.
Configure the Proxy for the Cloud Agent
The preceding configuration covers the package managers. If you also want the Cloud Agent's own communication to go through QGS, configure the proxy for the agent as follows.
- Create the file
/etc/sysconfig/qualys-cloud-agenton RPM-based systems, or/etc/default/qualys-cloud-agenton DEB-based systems, if it is not present. - Add the proxy URL to the file:
Proxy URL for the Cloud Agent Configuration File
https_proxy=https://[<username>:<password>@]<host>[:<port>]The <host> is either an IPv4 address or an FQDN, and the <port> is the proxy port number. The https_proxy variable applies to all the Cloud Agent commands, whereas qualys_https_proxy affects only the communication of the agent with the Qualys Cloud Platform. If authentication is required, supply the credentials. The special characters, such as @, :, or $, need URL encoding. You can also encrypt the credentials by using the Proxy Encryption Utility.
- Set the ownership and the permissions of the file. For RPM-based systems:
Command to Set Ownership and Permissions on RPM-Based Systems
Command to Set Ownership and Permissions on DEB-Based Systems
chown <cloud_agent_user> /etc/default/qualys-cloud-agent
chmod 600 /etc/default/qualys-cloud-agent
- Restart the service.
Command to Restart the Cloud Agent Service
service qualys-cloud-agent restart
For the complete procedure, see Configure Proxy in the Cloud Agent for Linux Installation Guide.
Configure the Certificate for the Cloud Agent Only
This method trusts the certificate at the application level, for the Qualys Cloud Agent only. It is sufficient for the agent's own outbound connections, but not for the package managers.
- Copy the certificate to the host.
- If you want to use any other location, ensure that the directory path is added in the
/etc/Qualys/cloud-agent/agent.configfile in the following manner:
Certificate Path in the agent.config File
 {
   "os": "Suse",
    "cafile": "<CustomizedPath>"
   }
Once this is added, the agent starts consuming only this certificate.
Because the package managers continue to use the system trust store, this method alone does not enable Linux patch caching. Install the certificate in the OS trust store as well.
Packaged Certificates
For Cloud Agent for Linux Intel version 7.4 and later, you can use the packaged certificates instead. The packaged Global Certificate provides platform access when the Qualys Gateway Service is used in patching and cache mode. To enable this feature, configure the parameter AddCertsToStore=1 through the Cloud Agent configuration tool (qualys-cloud-agent.sh). By default, this feature is disabled.
This support applies only to Cloud Agents running on the shared Qualys Platforms.
For more information, see Support for Packaged Certificates in the Cloud Agent for Linux Installation Guide.
Verification
- From a client host, run a package operation through the proxy. For example:
Command to Refresh the Package Cache on RPM-Based Systems
yum clean all && yum makecache
Command to Update the Package Index on DEB-Based Systems
apt-get update
- Confirm that the operation completes without SSL or access errors.
- Run the same download from a second host. It should complete noticeably faster, as the content is now served from the QGS cache.
Troubleshooting
| Issue | Resolution |
|---|---|
| Access denied errors | Verify that the repository domain is present in the Custom Domains list and that both Patch Mode and Custom Domains are enabled on the appliance. Ensure that the domain is added without a prefix like http(s)://www. |
SSL errors, such as unable to get local issuer certificate |
The QGS Root CA is not trusted by the operating system or the package manager. See Step 3. |
| Patches are not cached | The repositories are not configured to use QGS as their proxy (see Step 2), or Patch Mode is off. When Patch Mode is off, the repository traffic is allowed but is not cached. |
| Patch Mode cannot be enabled | A second disk with the required minimum free disk space must be attached to the virtual appliance first. Patch Mode cannot be enabled if the disk is not attached. |