Split Network Configuration
Split network configuration is supported only in IPv4+v6 mode (the default). It is not supported in IPv6-only mode.
The Qualys Scanner Appliance provides two network traffic configurations: Standard and Split. The Standard configuration is enabled by default. You can choose to enable the Split network configuration. For a physical appliance, you can do this using menu options on the SETUP NETWORK menu.
In the Standard network configuration, the LAN RJ45 Ethernet connector services both scanning traffic and management traffic to the Qualys Enterprise TruRisk™ Platform over the Internet.
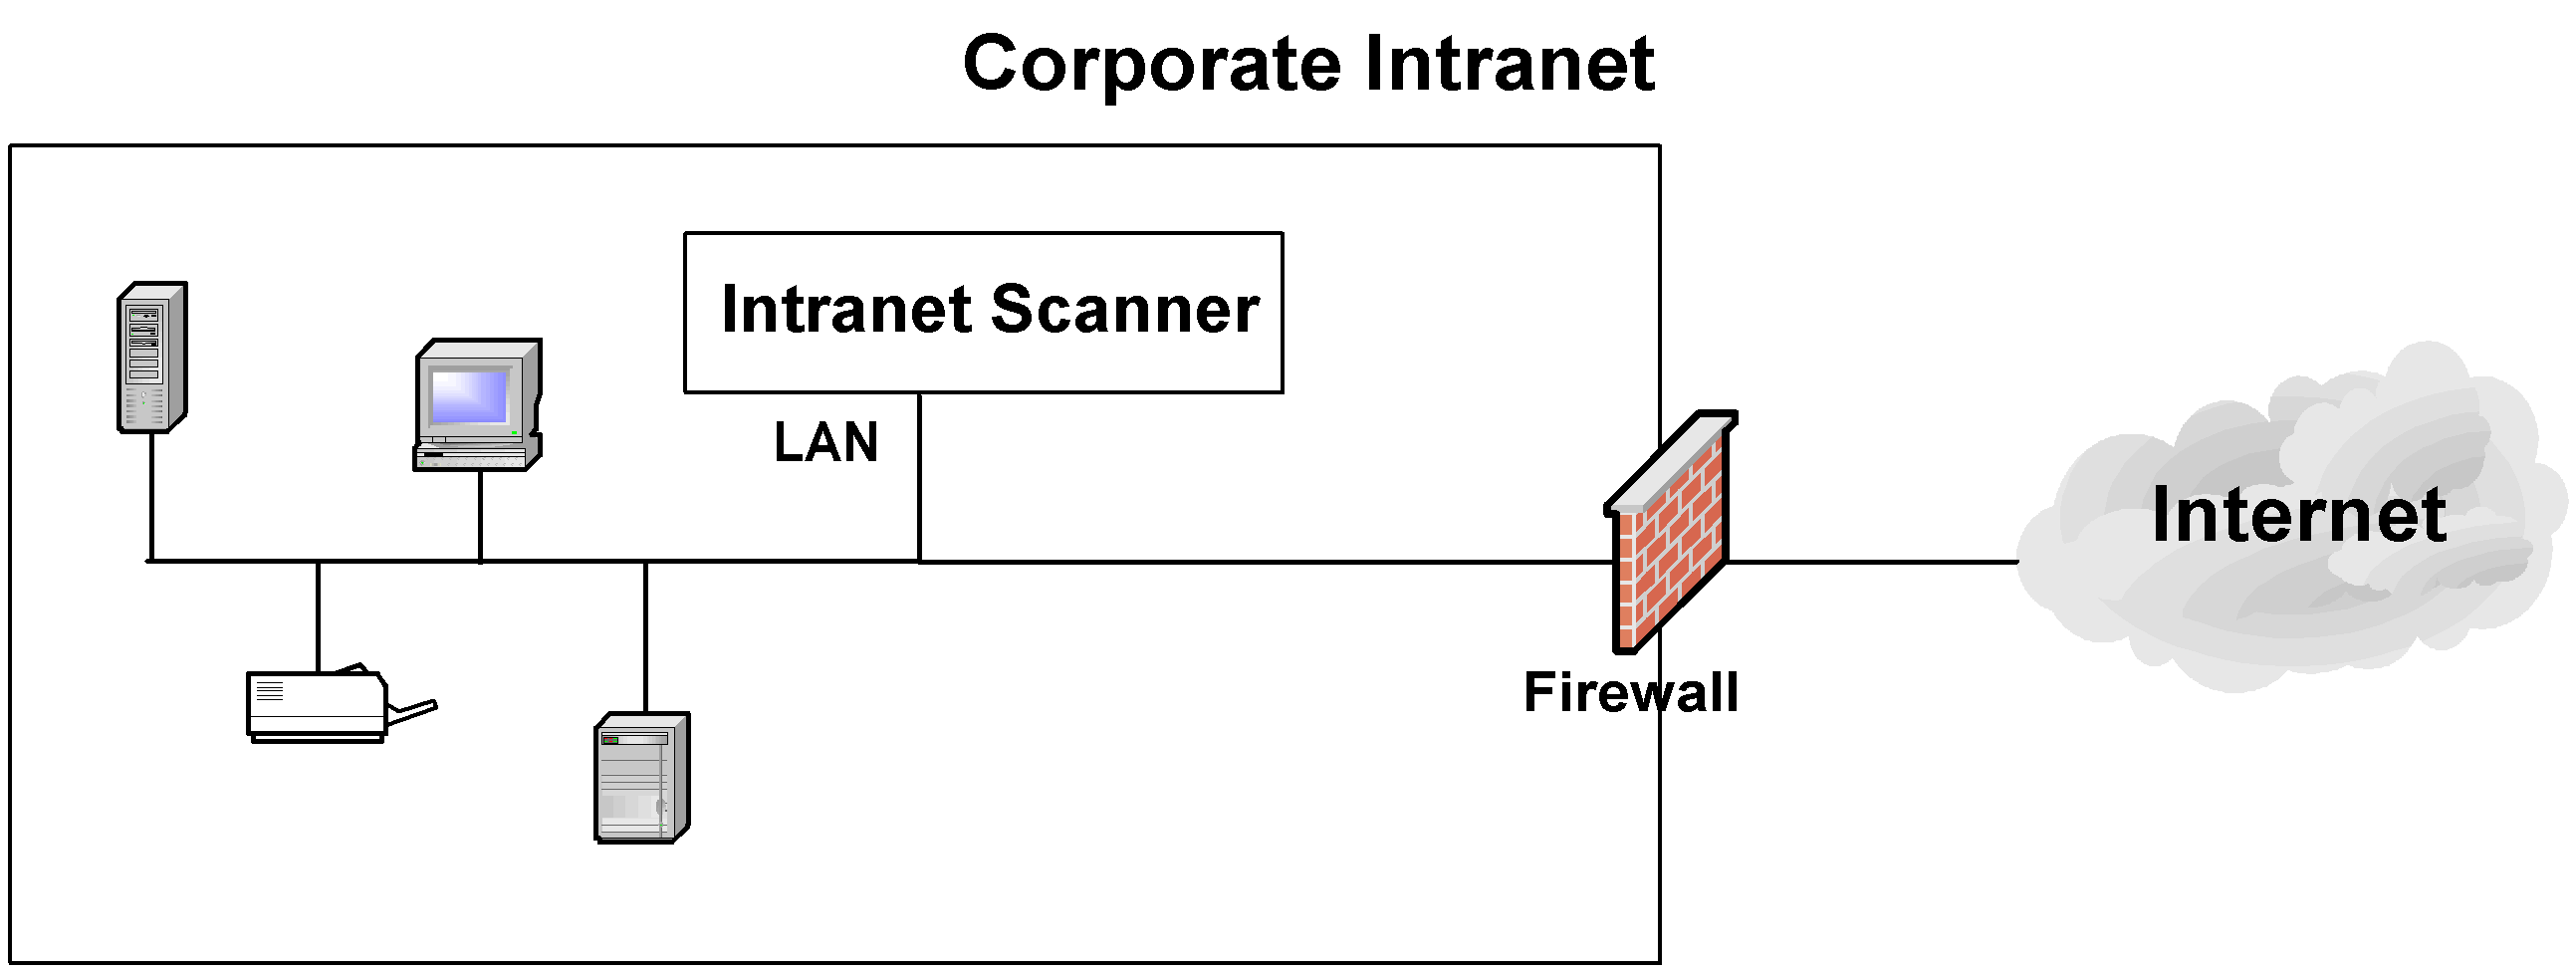
In the Split network configuration all Scanner Appliance management traffic, which includes scan/map job pickup, scan/map data upload, software updates and health checks are routed through the WAN port, whereas scan traffic uses the LAN port. This configuration enables the use of Scanner Appliances in networks that do not have direct Internet access.
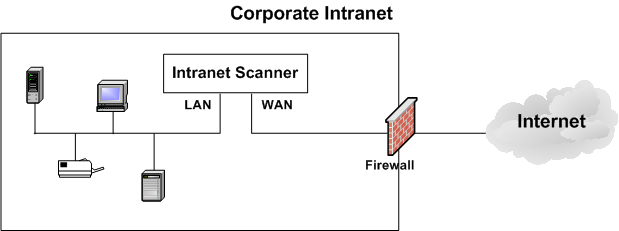
No internal traffic is routed or bridged to the WAN port and no management traffic is routed or bridged to the LAN port.
The Scanner Appliance implements logical separation of scanning traffic and
management traffic regardless of whether you configure the Standard or Split option.
A Few Things to Consider
Please review these tips and best practices before you configure Split network configuration.
- Check to be sure that network connections to both the LAN and WAN ports on the Scanner Appliance have been set up properly.
- The Scanner Appliance must be configured with DHCP or a static IP address on the LAN interface first.
- Using the LAN interface now? If your Scanner Appliance is powered on and
connected to the LAN port only, power down the Scanner Appliance before you
connect the second Ethernet cable to the WAN port. - Do not configure the LAN and WAN interfaces on the same subnet. This type of configuration is not supported.
Enable DHCP on the WAN Interface
To configure the WAN interface with DHCP, perform the following steps:
- Select SETUP NETWORK, press the Down arrow until the ENABLE WAN INTERFACE menu displays. Then press ENTER to continue.
- Go to ENABLE DHCP ON WAN menu and press ENTER to continue.
- When the REALLY ENABLE DHCP ON WAN? prompt displays, press ENTER to continue. Or press the Up arrow two times to quit this procedure and return to the SETUP NETWORK menu option.
- Review the confirmation message. When the SCANNER APPLIANCE NAME–IP ADDRESS displays you are ready to start scanning. If another message displays you need to complete the Quick Start or resolve the error indicated.
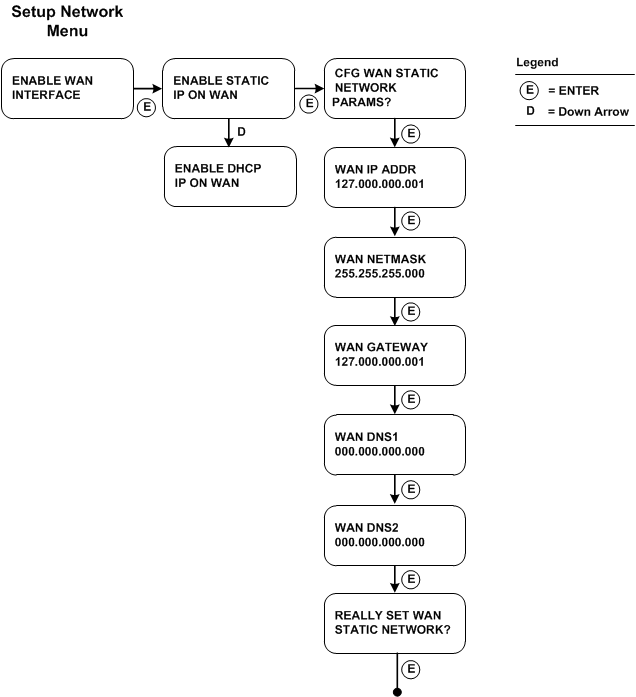
Enable Static IP on the WAN Interface
To configure the WAN interface with a static IP address, perform the following steps:
- Select SETUP NETWORK, press the Down arrow until the ENABLE WAN INTERFACE menu displays. Then press ENTER to continue.
- Go to ENABLE STATIC IP ON WAN menu option and press ENTER to continue.
- When the CFG WAN STATIC NETWORK PARAMS? prompt displays, press ENTER to continue. Or press the Up arrow to quit this procedure and return to the SETUP NETWORK menu.
- When the WAN IP ADDR prompt displays, enter the static IP address, and then press ENTER to continue.
- When the WAN NETMASK prompt displays, use the Up and Down arrows to scroll to the desired netmask value. After selecting a netmask value, press ENTER to continue.
- When the WAN GATEWAY prompt displays, enter the gateway IP address. Then press ENTER to continue.
- When the WAN DNS1 prompt appears, enter the IP address for the primary DNS. Then press ENTER to continue.
- When the WAN DNS2 prompt displays, enter the IP address for the secondary DNS. This entry is optional. Press ENTER to continue.
- When the REALLY SET WAN STATIC NETWORK? prompt displays, press ENTER to continue. Or press the Up arrow to quit this procedure and return to the SETUP NETWORK menu.
- Review the confirmation message. When the SCANNER APPLIANCE NAME–IP ADDRESS message displays, you are ready to start scanning. If another message displays you need to complete the Quick Start or resolve the error indicated.
Interface - Enable Static IP on WAN
We update menu once you configure settings. Once you configure ENABLE STATIC IP ON WAN the option changes to CHANGE STATIC IP ON WAN. Once you configure ENABLE DHCP ON WAN the option displays as RENEW DHCP ON WAN.