Navigate Appliance UI
This section helps you to understand Scanner Appliance UI.
Main Menu
To access the Scanner Appliance main menu, press ENTER when the Scanner Appliance name and IP address are displayed. The first menu option displayed is SETUP NETWORK.
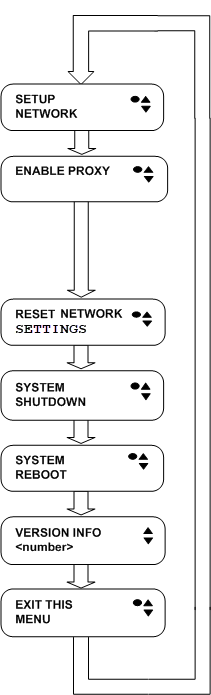
To move up through the menu options, press the Up arrow. To move down through the menu options, press the Down arrow. To select an option, press ENTER. To exit the main menu, press the down arrow button until the EXIT THIS MENU option displays, and then press ENTER.
Navigation Indicators
Each Scanner Appliance screen displays one or more indicators in the top right corner, indicating the navigation options available from the current screen.
The following are the important guidelines for using buttons:
- Press one button at a time.
- Do not hold down an arrow button (except as noted in the guideline instead, press the arrow multiple times.)
- When entering the username or password, you can hold down the Up and Down arrow buttons to scroll through characters quickly.
Enter Information
The Scanner Appliance user interface (LCD and Remote Console) allows users to enter information in the fields provided using arrow keys. The Left and Right arrows move the cursor to the left and right and the Up and Down arrows are used to scroll through characters. Some fields allow certain characters to be entered.
The character restrictions are described below.
Up and Down Arrows
Using the LCD user interface, press the Up and Down arrows to enter characters in a field. Using the Remote Console interface you have the option to use the Up and Down arrows or to use your keyboard to enter characters.
In numeric entry fields, you press the Up and Down arrows to select a value between 0 and 9. When a numeric entry field is first displayed, a default value is displayed.
In text entry fields where you enter a username and password, you press the Up and Down arrows to select a character (numeric, alphabetic, space, underscore or special character). In these fields, you can hold the Up arrow or the Down arrow to scroll through the available characters. When a text entry field is first displayed, the text entry field is blank (filled with spaces).
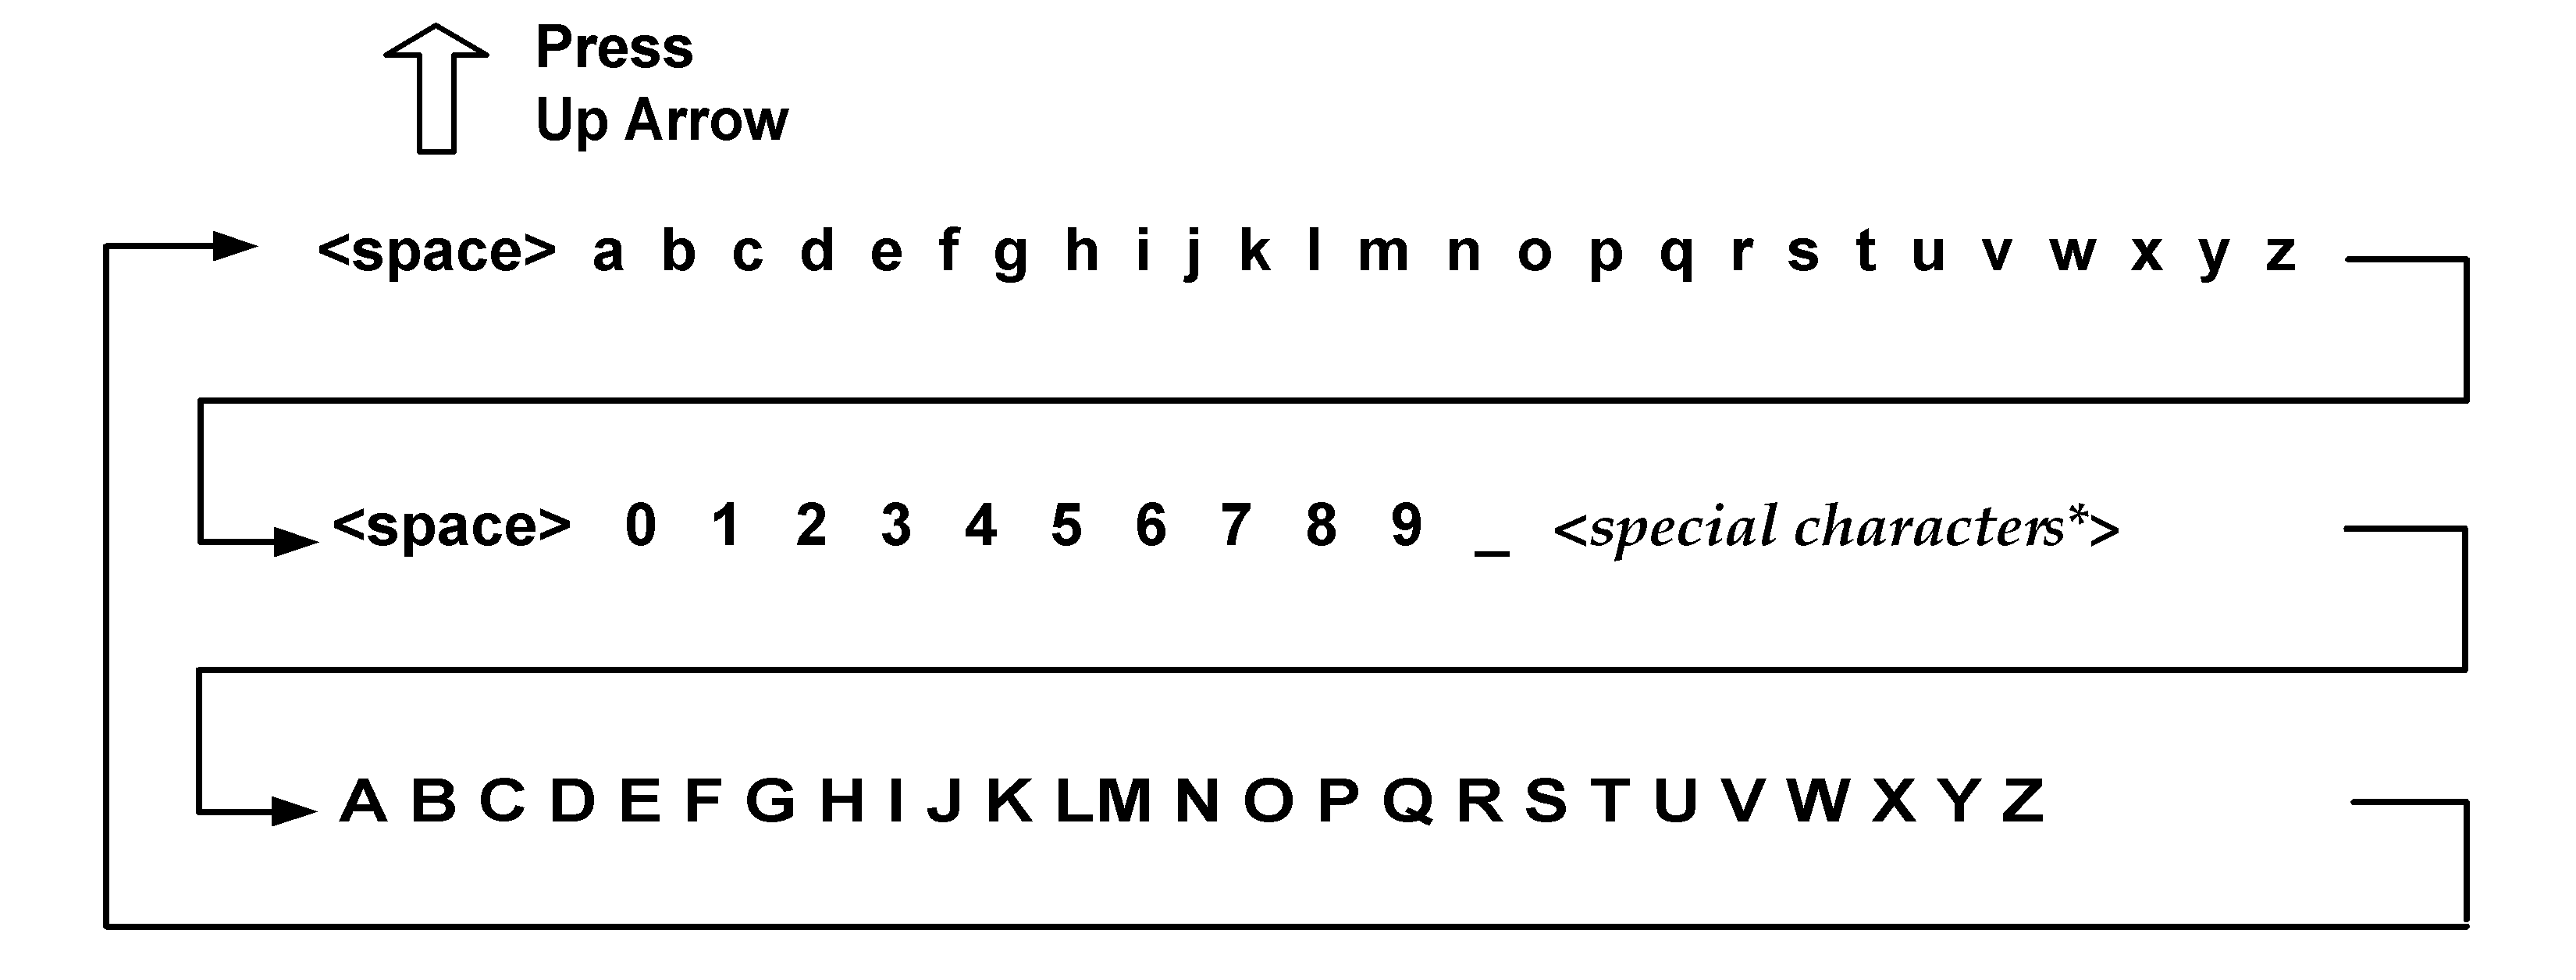
Scroll through Characters
Some fields allow you to select characters. Press the Up arrow to scroll through characters in ascending order. Starting from the space character, the characters appear in this order: lowercase letters (a to z), space, numbers (0 to 9), underscore, special characters (for Proxy username and password only), uppercase letters (A to Z).
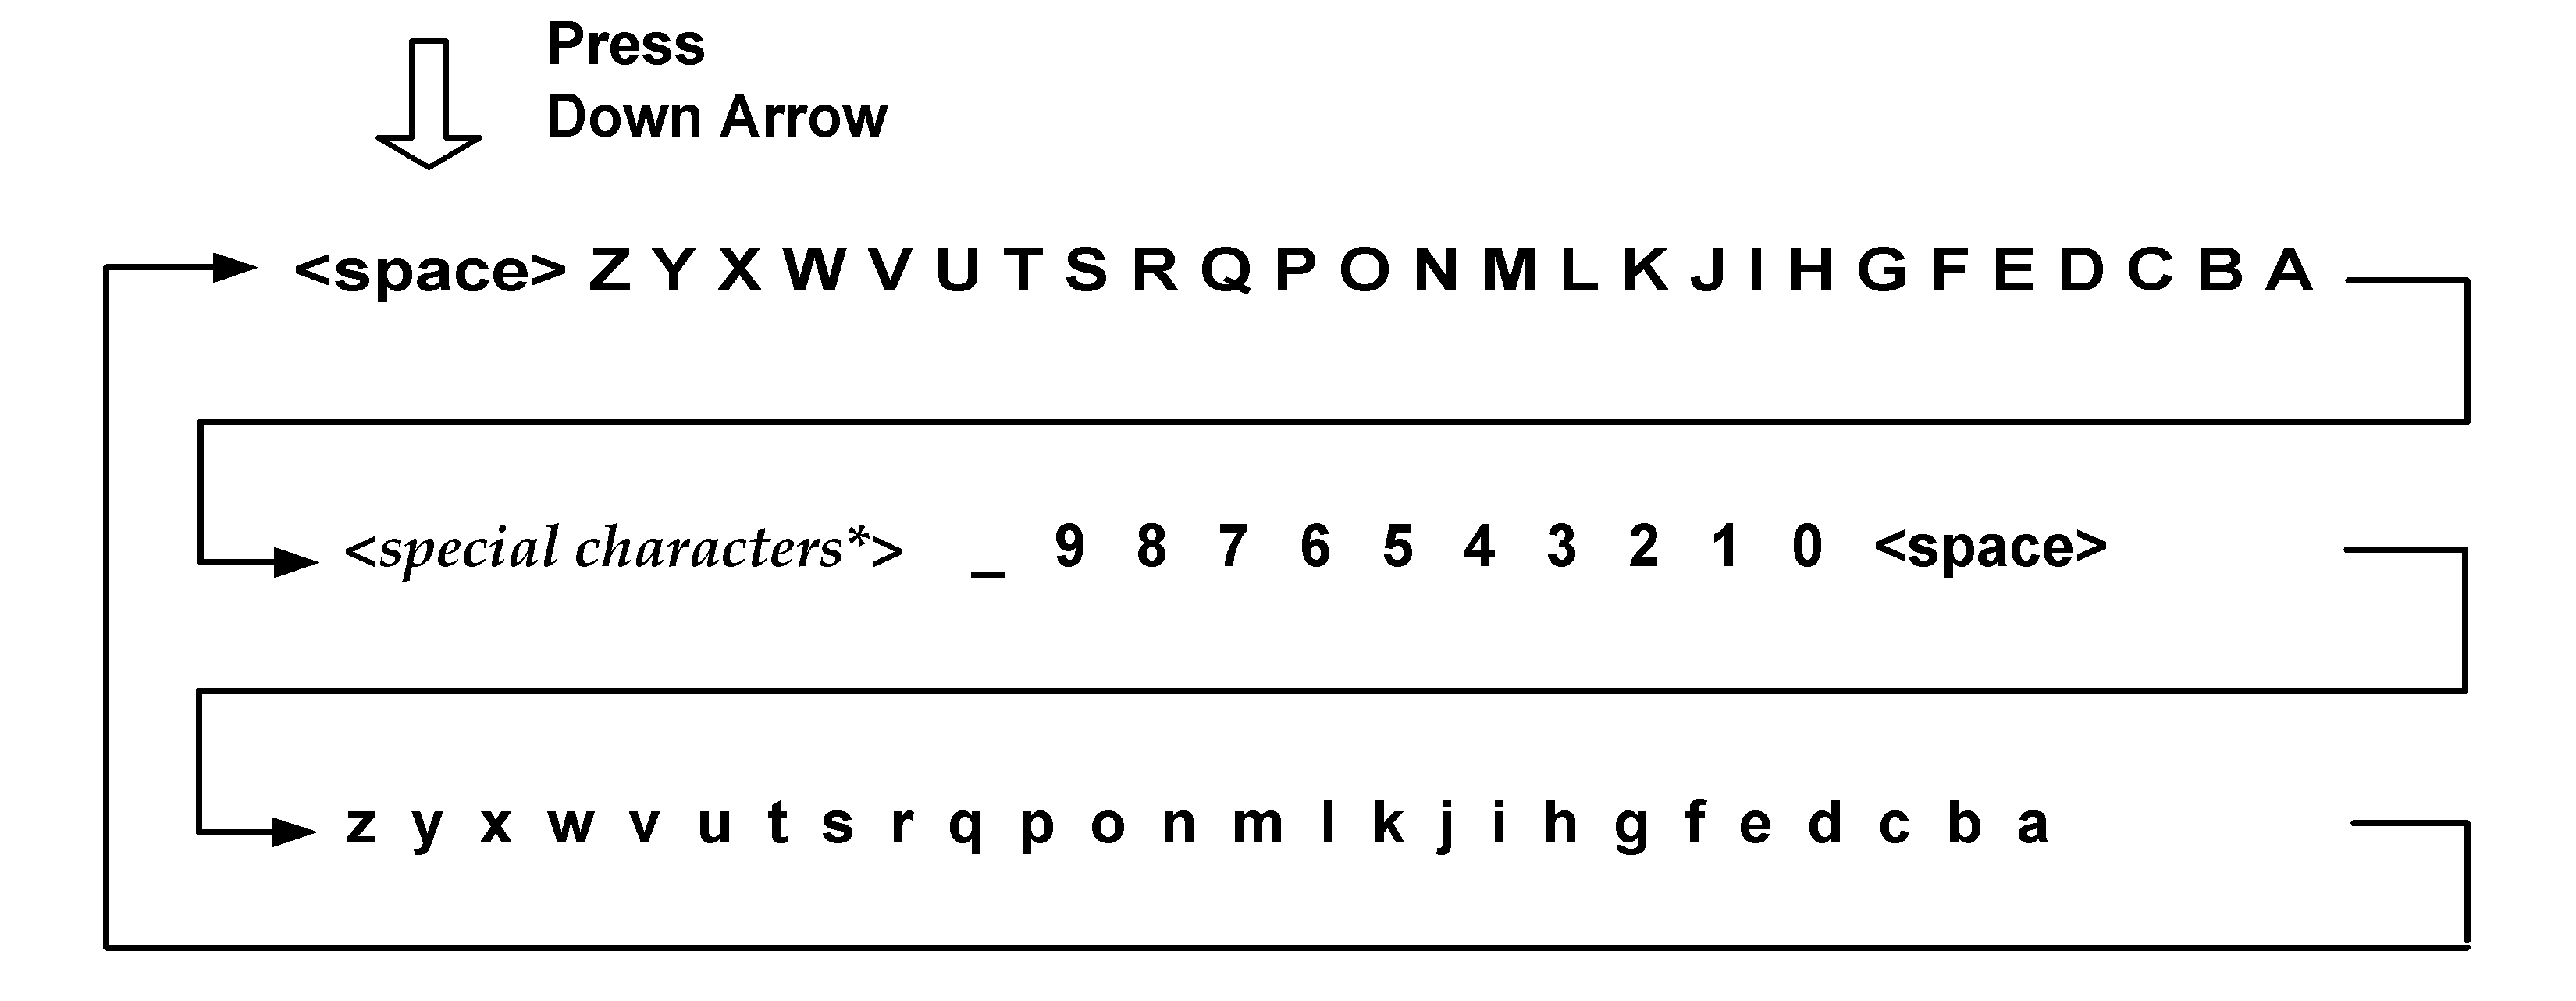
Press the Down arrow to scroll through characters in descending order. Starting from the space character, the characters appear in this order: uppercase letters (Z to A), special characters (for Proxy username and password only), underscore, numbers (9 to 0), space, lowercase letters (z to a).
Insert and Delete Characters
Some fields allow you to insert and delete characters. This is supported for PROXY HOST and WINS DOMAIN, and is especially useful when updating long FQDN values or IPv6 addresses (when in IPv6-only mode). Go to the field you need to modify and press the Down arrow to activate insert/delete mode. Press the Down arrow again to navigate through the menu options.
- When Delete Previous? displays, scroll through the characters and press Enter to delete the character in the previous position. This option does not appear for the first character in the field.
- When Insert Character? displays, press Enter and then type or scroll through the characters to insert a character at the current position.
- When Done editing? displays, press Enter to confirm. Or press the Up arrow to continue with edits to the field value.
Space Character
When a text field entry contains fewer characters than the character's positions on the interface screen, you must select the space character for the unused positions, before or after the field entry. Only the characters associated with the field entry and space characters may be included in a text field entry.
Embedded spaces are not permitted in text field entries.
The space character may be used to remove characters when editing text fields, except for the Proxy password. To remove a character in an entry field using the LCD user interface, move the cursor on the character (using the Left and Right arrows), select the space character (using the Up and Down arrows) and then press ENTER. Any space characters entered appear in the interface screen until the next time you revisit the screen.
IPv4 Addresses
Entry fields for IP addresses are pre-filled with values in this format: nnn.nnn.nnn.nnn
The IP address format displays values for each character position in all octets. When entering an IP address, you replace the three “n” digits for each octet as appropriate. If an octet has less than three digits, then the octet must include leading zeros. For example, to specify the IP address “194.55.176.2”, you input the IP address as “194.055.176.002”.
IPv6 Addresses
When using IPv6-only mode, you need to enter IPv6 addresses for certain network configurations. The Scanner Appliance supports IPv6 addresses in expanded and compressed formats. For example, enter an IPv6 address in expanded format like 2001:470:8418:ffe:250:56ff:feb3:b89 or in compressed format like 2001:db8:3c4d:15:0:d234:3eee::
Windows Domain Name
The WINS DOMAIN field in the static IP address configuration allows you to enter the domain name (for example, mydomain.com). The domain name entry can have a maximum length of 32 characters. These characters are allowed: uppercase letters, numbers, underscore(_), and period (.).

The screen displays 16 characters of the WINS DOMAIN field entry, and it scrolls left. For example, the first character of the domain name is hidden when the 17th character is entered. As each additional character is entered, the domain name scrolls to the left.
The space character may be used to remove characters when editing the domain name entry. There is a shortcut for clearing a domain name entry. Just press the Left arrow and Right arrow at the same time.
Proxy Username
For the Proxy username in the PROXY USER field, you may enter a maximum of 32 characters including lower case letters, upper case letters, numbers, and underscores. These special characters can be used: underscore (_), dash (-), backslash (\), period (.), at sign (@).

The screen displays 16 characters of the PROXY USER field entry, and it scrolls left. For example, the first character of the Proxy username is hidden when the 17th character is entered. As each additional character is entered, the Proxy username scrolls left. The space character may be used to remove characters.
The format of a Proxy user entry is: “domain\user”. If there is a backslash in the middle of the entry, the Appliance interprets the string before the backslash as the domain name. No double backslashes (\\) are needed in front of the “domain\user” format.
Proxy Password
The PROXY PASSW allows you to enter a maximum of 16 characters including lower case letters, upper case letters, numbers, and underscore. Many special characters are allowed. These characters are shown in ascending order in the table below. Using the LCD interface, to scroll through characters 1 to 30, press the Up arrow. To scroll through characters in descending order, press the Down arrow.
Special Characters in the PROXY PASSW Field
The following table shows special characters in the Proxy Password field:
|
Order (ascending) |
Character |
Name |
|---|---|---|
|
1 |
_ |
underscore |
|
2 |
- |
hyphen |
|
3 |
\ |
backslash |
|
4 |
/ |
slash |
|
5 |
| |
bar |
|
6 |
~ |
tilda |
|
7 |
! |
exclamation |
|
8 |
? |
question |
|
9 |
@ |
at sign |
|
10 |
# |
number sign |
|
11 |
$ |
dollar |
|
12 |
% |
percent |
|
13 |
^ |
asciicircum |
|
14 |
& |
ampersand |
|
15 |
* |
asterisk |
|
16 |
+ |
plus |
|
17 |
= |
equal |
|
18 |
( |
parenthesis left |
|
19 |
) |
parenthesis right |
|
20 |
{ |
brace left |
|
21 |
} |
brace right |
|
22 |
[ |
bracket left |
|
23 |
] |
bracket right |
|
24 |
< |
less |
|
25 |
> |
greater |
|
26 |
; |
semicolon |
|
27 |
“ |
double quote |
|
28 |
` |
grave |
|
29 |
, |
comma |
|
30 |
. |
period |