Proxy Configuration
Proxy configuration is supported in IPv4+v6 mode (the default) and IPv6-only mode.
If the Scanner Appliance is behind a Proxy server, you need to enable a Proxy configuration using the ENABLE PROXY menu option. Authentication (Basic or NTLM) of the Scanner Appliance connection to your Proxy server can be enabled by configuring the Proxy user and password fields.
The Scanner Appliance uses Secure Sockets Layer (SSL) protocol (HTTPS) to secure its connection to the Qualys web application, in a similar way that a web browser does to a secure web server. If the Qualys connection must pass through a Proxy server, then you must enable the Proxy option on the Scanner Appliance. This configuration redirects Qualys outbound connections through the Proxy server.
Your Proxy server must be configured to tunnel or pass through the SSL session to the Qualys web application. This ensures a secure end-to-end connection. SSL bridging or tunnel termination must not be configured in your Proxy server when supporting the Scanner Appliance.
To configure the Scanner Appliance with Proxy support, perform the following steps:
- Go to SETUP NETWORK menu.
- Press the Down arrow until the ENABLE PROXY menu displays. Then press ENTER to continue.
- When the CONFIG PROXY PARAMETERS prompt displays, press ENTER to continue. Or press the Up arrow two times to quit this procedure and return to the SETUP NETWORK menu option.
Enter parameters
Enter Proxy parameters using the Up and Down arrows to scroll through characters.
- When the PROXY HOST prompt displays, enter the Proxy server’s FQDN/IP address. The gateway IP address displays on the screen by default. Use the Scanner Appliance interface to enter an FQDN/IP address, and then press ENTER to continue.
IPv4+v6 mode: IPv4 addresses are allowed in dotted decimal format, for example, 176.34.20.5
IPv6-only mode: IPv6 addresses are allowed in expanded and collapsed formats.Supported characters for FQDN: Upper case letters, numbers, dot (.) and hyphen (-)
- When the PROXY PORT: prompt displays, enter the port number assigned to the Proxy server. Port '0443' displays on the screen by default. Confirm that the port number shown is correct or enter a different one, if necessary. When the correct port number displays, press ENTER to continue.
Supported Characters: numbers only
-
When the PROXY USER: prompt appears, enter the username for Proxy authentication. If authentication is not enabled at the Proxy level, leave the entry field blank. Press ENTER to continue.
Supported Characters: Lower case letters, upper case letters, numbers, and these special characters: _-\@. (including dot).
-
When the PROXY PASSW prompt displays, enter the password for Proxy authentication. If authentication is not enabled at the Proxy level, leave the entry field blank. Press ENTER to continue.
Supported Characters: Lower case letters, upper case letters, numbers, and these special characters: _-\/|~!?@#$%^&*+=(){}[]<>:;"`,. (including dot).
-
When the REALLY ENABLE PROXY? prompt displays, press ENTER to continue. Or press the Up arrow two times to quit this procedure and return to the SETUP NETWORK menu option.
-
Review the confirmation messages. The ENABLING PROXY SUPPORT message displays followed by other messages while the Scanner Appliance attempts to make a connection to the Qualys Enterprise TruRisk™ Platform using the new configuration.
-
Upon success the SCANNER APPLIANCE NAME–IP ADDRESS message displays and the configured proxy is now confirmed working and being used.
Interface - Enable Proxy
The Scanner Appliance user interface to enable Proxy support is shown below.

Update Proxy Setting
Once a Proxy configuration is enabled, the Proxy settings are stored on the Scanner Appliance. You can change or disable these settings at any time.
To change Proxy parameters, perform the following steps:
- Go to SETUP NETWORK menu option.
- Press the Down arrow until the CHANGE PROXY PARAMS menu option displays. Then press ENTER to continue.
- Follow the prompts and messages in the Scanner Appliance interface to change the existing Proxy parameters. Existing parameters are displayed in each screen. Change and confirm each parameter. If a parameter has not changed, press ENTER to view the next parameter.
- When the REALLY ENABLE PROXY? prompt displays, press ENTER to continue. Or press the Up arrow two times to quit this procedure and return to the SETUP NETWORK menu option.
- Review the confirmation messages. The ENABLING PROXY SUPPORT message displays followed by others.
Disable Proxy Parameter
To disable Proxy parameters, perform the following steps:
- Go to SETUP NETWORK menu option.
- Press the Down arrow until the DISABLE PROXY menu option displays. Then press ENTER to continue.
- When the REALLY DISABLE PROXY? prompt displays, press ENTER to continue. Or press the Up arrow two times to quit this procedure and return to the SETUP NETWORK menu option.
- Review the confirmation messages.
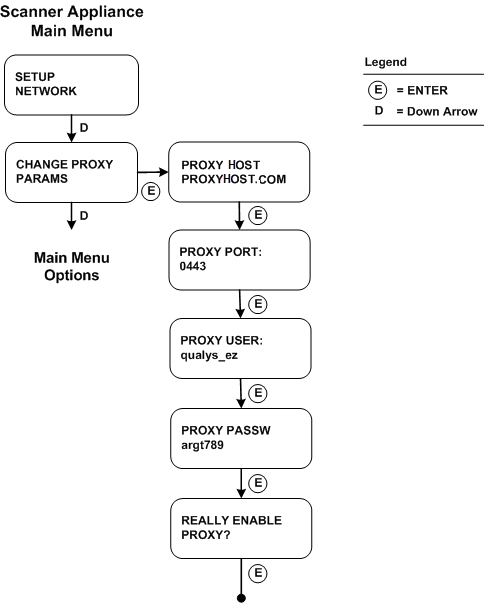
Interface - Change Proxy Parameters
Confirm the Configuration
When you see SCANNER APPLIANCE NAME–IP ADDRESS this means you are ready to start scanning. This message displays if the Scanner Appliance made a successful connection to the Qualys Enterprise TruRisk™ Platform using the new configuration.
The activation code displays on the screen if the Appliance has not been activated. Refer to Step 3 in the Quick Start and follow the instructions to activate the Scanner Appliance.
An appliance configuration error displays if the Scanner Appliance failed to make a connection to the Qualys Enterprise TruRisk™ Platform. An error may occur because the Proxy parameters you entered are incorrect, or they do not match the Proxy configuration on your network. Refer to Troubleshooting for help with resolving this issue.