Deploy Scanner Instance using Command-line virt-install
You can deploy a Scanner Instance using the command line virt-install.
Deploying Scanner in Single Network Mode Using Command-line virt-install
Log into your KVM server and run the following commands to launch a scanner instance using the qCOW2 disk image:
virt - install --name < INSTANCE NAME > --memory < MEMORY > --vcpus < NO. OF CPU > --network < Network> --disk < LOCATION OF IMAGE FILE > --check disk_size=off –import
Example:
virt-install --name qualys_scanner --memory 2048 --vcpus 1 --network bridge=bridge0,model=virtio --disk qVSA-X.X.XX-X.qcow2 --check disk_size=off –import
Once you run the command, an instance is created and the Scanner console is displayed where you need to enter the Personalization Code received in Step 1: Add your Virtual Scanner.
To view the console to see the progress of the launched instance, run:
virt-viewer < Instance Name >
To view the console to see the progress of the launched instance, run the following.
Login to KVM server console and run
virt - viewer < Instance Name >
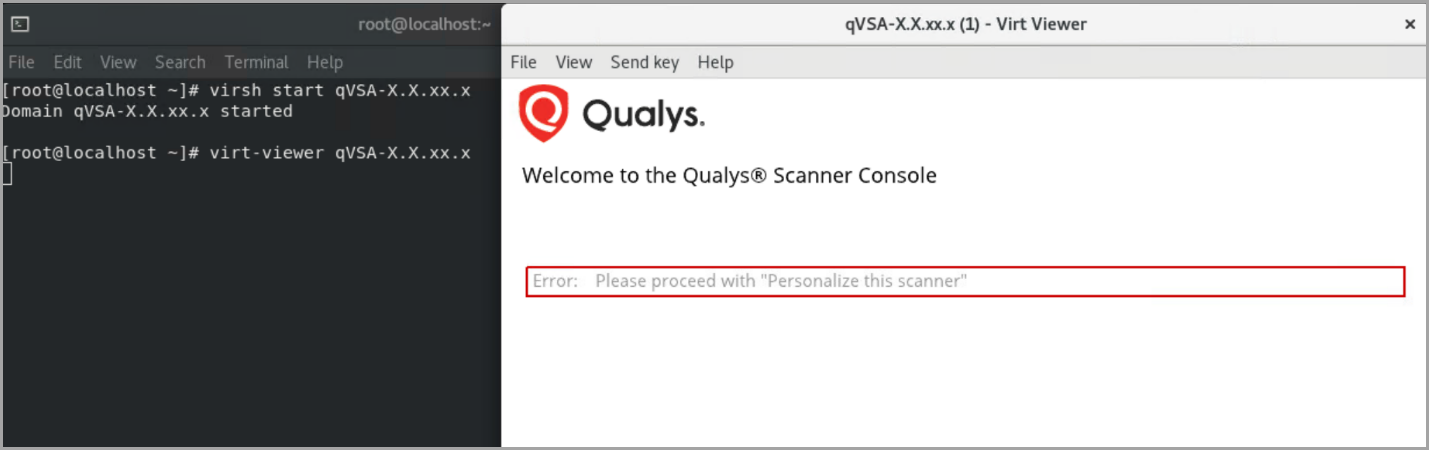
After the initial boot-up messages, the Scanner console is displayed where you need to enter the Personalization Code received in Step 1: Add your Virtual Scanner.
Personalize the Scanner Using Custom User Data
You can personalize the scanner using following methods:
Method 1
Scanner VM XML template can be used to inject custom user data. The user data includes a Personalization code. Optionally, Proxy details can also be included in user data.
The custom user data needs to be in base64 encoded format.
Follow these steps to inject custom user data into the Scanner VM XML template:
- Deploy KVM scanner VM.
Do not power on the Scanner VM before completing all the steps.
- Create base64 encoded user data.
- On the Linux machine, run this command to encode user data:
<<<$'PERSCODE=xxxxxxxxxx' gzip -c | openssl base64 -AThis will generate base64 encoded data.
Optional:
With Proxy details included:
<<<$'PERSCODE=xxxxxxxxxx\nPROXY_URL=user:pwd@proxyip:port' gzip -c | openssl base64 -A)Login to KVM host terminal and run - virsh edit <vm name> to edit the XML template.
In XML template, you can view this section:
<os>

	<type arch='x86_64' machine='pc-i440fx-rhel7.6.0'>hvm</type>

	<boot dev='hd'/>

	</os>
Edit this section with the following:
After<boot dev='hd'/>,add:
<smbios mode='sysinfo'/>

	Add new section after </os>:

	<sysinfo type='smbios'>

	<system>

	<entry name='serial'>CONFIG:<base64 encoded data></entry>

	</system>

	</sysinfo>
For element entry name='serial', add the encoded user-data generated in here.
The updated XML is:
<os>

	 <type arch='x86_64' machine='pc-i440fx-rhel7.6.0'>hvm</type>

	 <boot dev='hd'/>

	 <smbios mode='sysinfo'/>

	</os>
<sysinfo type='smbios'>
<system>
<entry name='serial'>CONFIG:<base64 encoded data></entry>
</system>
</sysinfo> -
Power on the Scanner VM.
Method 2
You can inject user data into a KVM virtual machine by using cloud-init with the NoCloud datasource. The user data is usually provided through an ISO image or a configuration drive. When the virtual machine starts for the first time, cloud-init reads this data and automatically applies the configuration to the guest operating system.
To inject user-data, perform the following steps:
- Prepare User-Data:
Create a user-data file containing the desired scanner’s configuration.
Example:
cat user-data:
PERSONALIZATION_CODE=1234567890123

	PROXY_URL=proxy_user:[email protected]:3128
Create an ISO Image (or Configuration Drive):.
Use a tool like genisoimage to create an ISO image containing the user-data file. The volume label of this ISO image must be named "CIDATA.iso" for cloud-init to recognize it as a NoCloud datasource.
Example:
genisoimage -output cidata.iso -volid cidata -joliet -rock user-data -
Attach the ISO to the scanner VM:
When creating or editing the KVM virtual machine, attach the CIDATA.iso to the VM scanner by using virsh-install command.
virt-install --name qualys-scanner \

	  --memory 4096 \

	  --vcpus 2 \

	  --network bridge=bridge0,model=virtio \ # VM with LAN interface only

	  --disk qVSA.x86_64-4.1.82-1.qcow2 \

	  --disk CIDATA.iso \

	  --graphics vnc \

	  --check disk_size=off \

	  --import
Deploy Scanner in Split Network Mode Using Command-line virt-install
In Split Network mode, the Qualys Scanner Appliance operates with two network interfaces:
- LAN (used explicitly for scanning )
- WAN (used for connecting the scanner to the Qualys TrueRisk Platform)
By default, the scanner is configured to start with only the LAN interface enabled using DHCP. When deploying via the KVM Cockpit Web Console, users can only attach a single network interface during VM creation. There is no option in Cockpit UI to add a second network interface (Scanner’s WAN) at creation time. As a workaround, you can deploy a scanner in a Split network with the virsh-install command.
Perform the following steps:
- Use virsh-install command to create a KVM VM with 2 interfaces.
Example:
virt-install --name qualys-scanner-in-split-network-mode \

	  --memory 4096 \

	  --vcpus 2 \

	  --network bridge=bridge0,model=virtio \    # LAN

	  --network bridge=bridge1,model=virtio \    # WAN

	  --disk qVSA.x86_64-4.1.82-1.qcow2 \

	  --graphics vnc \

	  --check disk_size=off \

--import -
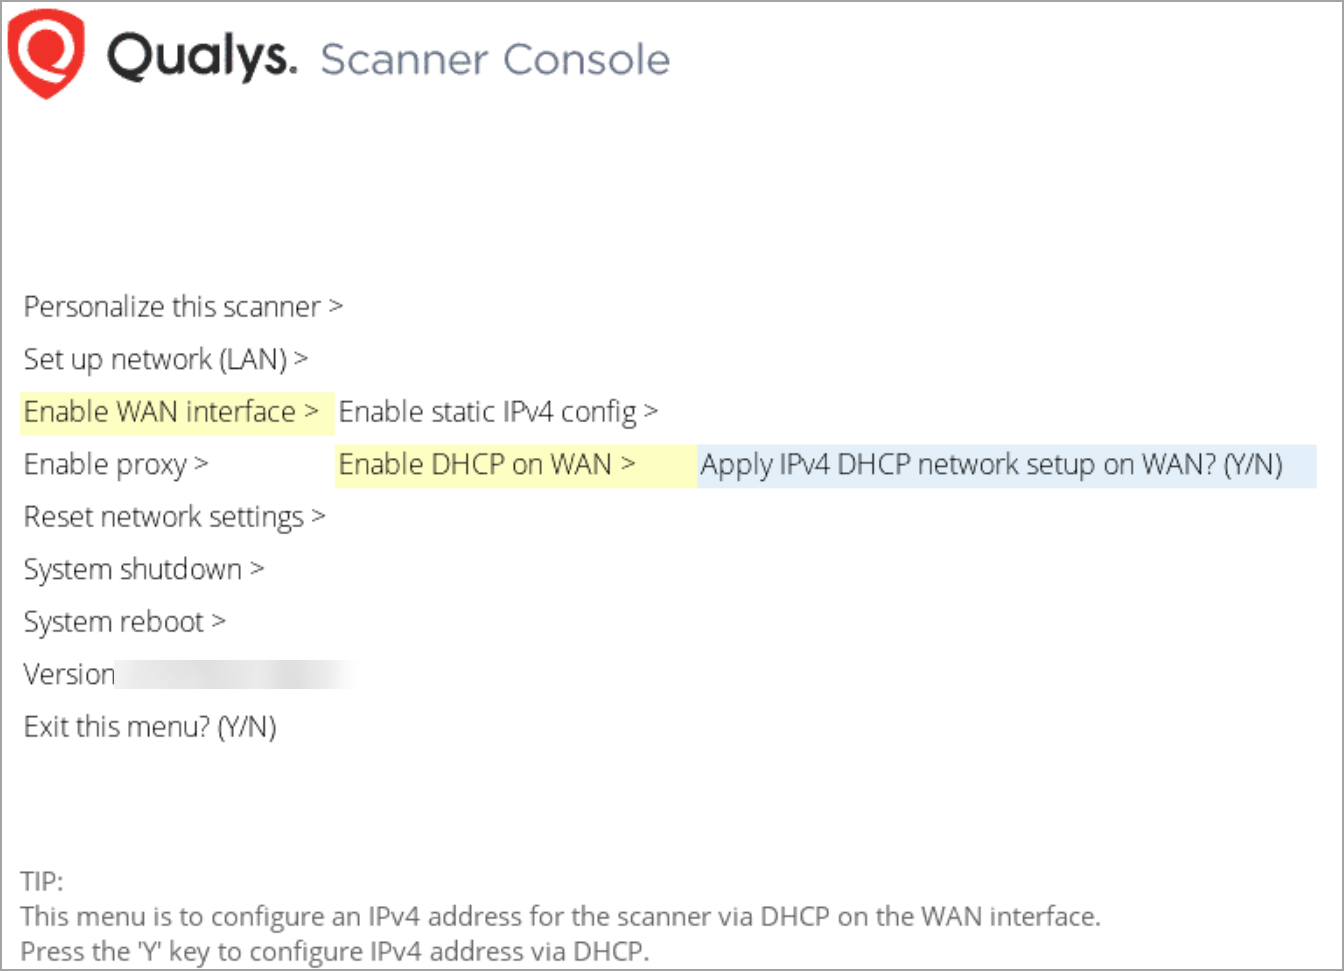
Once the scanner is deployed, access the scanner console and enable the WAN interface as shown in the screenshot below.
Ensure that both the LAN and WAN interfaces are assigned IP addresses and are connected to different network subnets. -
After verifying the network configuration, proceed with the Personalize this scanner option from the Scanner Console menu.